Transcription
DEFEWAYQuick User Guide for DVR Camera SystemVersion: xm v1.0
DEFEWAYContentHow to Get Customer Support . 1Installation Guide for DVR Camera System. 2Quick User Guide for DVR Camera System . 4Network Configuration . 4View on Mobile(iPhone/ Android) . 7View on PC via IE (Internet Explorer) . 10View on PC via CMS PC Client Software . 17FAQ . 26FAQ1 - Have a black screen when connect a monitor to the DVR? . 26FAQ2- How to set recording? . 27FAQ3- How to playback? . 30FAQ4-If cannot connect internet . 32How to Get Customer SupportDear Valued Customer,Thanks for your business! You should have received your security item; does it meet your expectation?Our customer service are always here and ready to assist you on any issue about product setup, operation, quality or RMA,please contact us directly to get customer support; we will reply you within 1 business day!For ebay customer: If you purchased item from our ebay store, please contact our customer support directly through eBaymessage and they will reply you within in 1 business day.For Amazon customer: If you purchased item from our Amazon store, please contact our customer support directlythrough Amazon message and they will reply you within in 1 business day.For Aliexpress Customer: If you purchased item from our AliExpress store, please contact our customer support directlythrough AliExpress online TradeManager and they will reply you within in 1 business day.Thanks for your patience!Best regards,SupportStatement:This quick user guide may have inaccurate content due to hardware or software upgrade. It is subject to change withoutnotice.1
DEFEWAYInstallation Guide for DVR Camera SystemBefore Installation1.2.3.4.5.6.7.This security camera kit requires cabling. It is strongly suggested to test all parts and setup network remoteaccess before installation and cabling.DVR should be placed in a cool, dust-free environment;Do not install or remove the hard drive when the DVR is powered on;Powering off DVR during playback or recording will damage the hard disk;In order to prolong the life of wire, do waterproof, sunscreen and windproof protection;To prevent electromagnetic interference, try to avoid high-voltage, high-power line wiring together;In order to deliver better image quality, beware of back lighting problems when installing cameras.Physical Connection Diagram(take 8 CH DVR for example)2
DEFEWAYSteps to Install Cameras (Note: Please test the product and setup remote access before installation.)1. In order to fix the cameras base easily, please release the fastening counterclockwise until it can be rotated;2. Please fix the camera base to the wall using 3 screws via a Phillips screwdriver.3. You can adjust camera monitoring angle,then tightening the fastening;3
DEFEWAYQuick User Guide for DVR Camera SystemBefore Setup Remote AccessMake sure you have done: Hook cameras to the DVR using cables included in the package; power on your DVR and cameras; Connect your DVR to a monitor (please make sure it supports resolution: 1280*1024). Use an Ethernet cable to connect your DVR to your router and high-speed Internet access; Refer to the connection diagram as below:Network Configuration1. Right-click mouse on your monitor and click 【Guide】, you can see the picture as below:4
DEFEWAY2. Follow the guide till you see【Network Test】status as below. Now you can check whether your deviceshave connectedto the network properly.a) If connect successfully, it will show a picture as below.b)If failed, it will show a picture as below. Click【Network】to set the gateway and IP Correctly. Then click【Retry】to testnetwork again.5
DEFEWAYIf your DVR still failed to connect to network, please refer to “FAQ 4- Cannot connect to internet?“to setup networkmanually.3. When your device have connected to the network properly, click【Next】, now you are able to setup remote access onmobile now, please make sure do not close the window like below. We are going to setup remote access via smartphone right now.6
DEFEWAYView on Mobile(iPhone/ Android)1. Connect you Smart phone to your Wifi router which your DVR has been connected to, and then scan iPhone orAndroid QR Code to download mobile app and then finish installation step by step.2. When you download and installed XMeye on your mobile, click 【Next】to get your device SN (Serial Number) QRCode. Please do not close the window on the DVR, you will need it soon.3. Open mobile app, tap【Register】to register an account for the app. If you don't want to register, just tap 【local login】.7
DEFEWAY4. Type user name and password,tap【cloud login】to login in. Then tap【 】 button at the top right to add device.5. Tap on QR Code icon -as below to scan QR Code shows on the DVR monitor.8
DEFEWAY6. Once access your device information successfully, it will show Serial Number and user name as below, then type aname for your device and tap【OK】. Device Name: Name your device Serial Number: Scan QR Code to get it automatically User name: admin Password: default password is null,please left it blanks, do not type anything Port: please left it blank, do not type anythingYou also have the right to set a new username and password for your device according to your need.7. Now you will see your device in the Device List, tap it to show all channels. Then you can choose any CAM to open itslive video.9
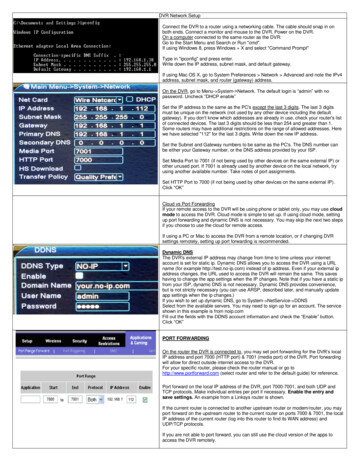
DEFEWAYView on PC via IE (Internet Explorer)When your PC is in the same LAN with the DVR (normally means they are connected to the same router)Please make sure get your DVR’s IP Address first!1)Right click mouse on your monitor, enter【Main Menu】--- System --- Network --- 2)Now you will see your DVR’s IP Address as picture below shows.Please make sure do not use the IP Address shows on the picture below, this is the sample.10
DEFEWAY1. Enter DVR IP address to 32-bite IE browser Bar2. Click “download” to download and follow the instructions to install IE ActiveX【Netsurveillance.exe】for the first time. Ifyou do not install, you will be failed to access your camera video.3. After ActiveX installed, input the same name and password that you use to login in DVR. If you have not changed theuser name and password, use the default information; the default user name is admin; for the default password,please does not type anything, just left it blank.4. Login, then click【OK】to watch the video.The main stream refers to 720P HD (If you purchased a 1080P HD DVR system,the main stream refers to 1080P HD) good for local view; while the extra stream refers to lower video quality, which ismore proper for remote view.11
DEFEWAYWhen your PC is not in same LAN with the DVR (For example: view your home cameras from your officePC)1. Open the website at http://www.xmeye.net with 32-bite IE browser.2. Click “Install ActiveX” and follow up the instructions to install and run ActiveX on your PC for the first time. If you donot install, you will be failed to access your cameravideo.12
DEFEWAY13
DEFEWAY3. After ActiveX installed, login in to access your cameras. There are two options to login:Option 1: By User(1)Please register an account for login.14
DEFEWAY(2) For the first login, please click【Device Manage】to add device.(3) Click【Add】to pop up a window like below, and input device information and click【OK】to save. Please login in yourmobile app and you will see Device List, you will get 【SerialNO】and【user name】as picture as below. The default username is【admin】and no need to type password, just left it blank. If you have changed, input the new user name andpassword.15
DEFEWAYOption 2: By DevicePlease login in your mobile app and you will see Device List, you will get【SerialNO】and【user name】as picture as below.The default user name is【admin】and no need to type password, just left it blank.4. Click【OK】to watch the video.The main stream refers to 720P HD (If you purchased a 1080P HD DVR system, the mainstream refers to 1080P HD) good for local PC view; while the extra stream refers to lower video quality, which is moreproper for remote PC view.16
DEFEWAYView on PC via CMS PC Client Software1. Download the CMS software at link below; download it to your PC and follow the instructions to install it.http://www.defeway.com/admin/download.php?rec edit&id 1217
DEFEWAY2. Please run General CMS client software and login. The default user is super; for the password, please just left it blankand do not type anything.》》》》》》》3. Login, the interface will pop up a window like below, click on【System】in the right bottom of the CMS interface.18
DEFEWAY4. Then click on the Device Manager icon to pop up a new window.19
DEFEWAY5. Click on 【ADD AREA】and name a zone name according to your monitoring area.6. Click on 【ADD DEVICE】to pop up a new window like below.When your PC is in the same LAN with the DVR (normally means they are connected to the same router)1. And click on【IP Search】to find out your device.2. Click on the device information like below and access your device information automatically.20
DEFEWAY21
DEFEWAY3. Please use the user name and password that you login DVR; The default user is admin; for the password, please justleft it blank and do not type anything; if you have changed user name and password, input the one created by yourself.Then click on 【OK】.4. Then click on 【OK】.22
DEFEWAY5. Right click on the device IP Address and select “Connect all video (Main Stream)”, now you are able toview live video.When your PC is not in same LAN with the DVR (For example: view your home cameras from your officePC)1. Please select 【Cloud】to add device, type Serial ID, user name and password, then click on【OK】.Serial ID: Please login in your mobile app and you will see Device List, you will get【SerialNO】at �version” ,as picture below.23
DEFEWAYuser name& Password: Please use the same username and password that you login DVR; The default user is admin; for thepassword, please just left it blank and do not type anything; if you have changed username and password, input the onecreated by yourself.2. Click【OK】to save, then you will see the interface below.24
DEFEWAY2. Double click device name to connect to your device, it will show the connect status at the bottom of the interface.25
DEFEWAY3. When status shows “Connect successful”, right click the device name and select “Connect all video(Main Stream)” toview live video.FAQFAQ1 - Have a black screen when connect a monitor to the DVR?When you hook a monitor up to your DVR and get a colorful screen, then change to black screen after seconds, theproblem should be the monitor does not support the default output resolution (1280*1024) of your DVR. Adjust the DVRoutput resolution (1024x768,1280x720,1280x1024, 1440x900,1920x1080optional)can help you solve the problem.1. Please connect a higher resolution monitor to your DVR to display the DVR interface.2. Right click your mouse on the monitor to go to 【Main Menu】26
DEFEWAY3. Click【System】4. Click【DISPLAY】5. 【resolution】the default resolution will be1280*1024; 1024x768, 1280x720, 1280x1024, 1440x900, 1920x1080areoptional, then select one that compatible with the resolution of your monitor. The almost new generation monitorsare able to adjust resolution by themselves automatically.6. Click “OK” to save, then the DVR will reboot and complete the output resolution adjustment.FAQ2- How to set recording?1) Check the hard driveRight click the mouse and go to “Main Menu”----choose “advanced”---- “storage”You can see the picture blow whether the DVR has installed a hard drive or not.(Note: Not all system we have on sale includes a hard drive, please check the package includes description on yourpurchased listing carefully before you buy; without a hard drive, and you can only view but cannot record video footage).27
DEFEWAY2) Set recording resolution and frame rateRight click the mouse and go to “Main Menu”----choose “system”----- “encode”Mainstream (on the left)You can change the resolution and frame rate of the video and choose to record audio or not.Sub stream (on the right)Resolution setting; Frame rate setting; Audio setting; Network transmissionIf you choose 720P as mainstream and CIF as sub stream, then the DVR will record 720P video. But when you remote viewthe video you can choose main stream or sub stream. If you choose 720P as the main stream, it may affect the networktransmission. If you choose CIF as the sub stream, it will be good for network transmission.Attention!The resolution of Main stream:If you use AHD 720P/960P cameras,it will automatically record 720P video,you cannotchange the resolution to other status;If you use analog cameras,The resolution of the recording video will automaticallychange to 960H,you cannot choose other resolution.3) Set recording period and recording states.Right click the mouse and go to “Main Menu”----choose “record”----- “record conf.”28
DEFEWAY【manual】start or stop recording manually.【stop】stop recording.【schedule】time scheduled recording. (regular or motion detected recording).You can divide one day into 4 periods. It will record 24 hours per day if you set it as 00:00-24:00.【Regular】Recording as you schedule.【Detect】Recording when motion is detected;【Alarm】External alarm trigger recording,this DVR does not support this feature.Note: If you want to set motion detected recording only, please select【Detect】only (do not select “regular” at the sametime)4) When recording, there is a “coin” on the screen like blow:(Attention:if you choose motion detection recording,you cannot see the logo when motion is not detected)29
DEFEWAY5)Automatically covered:Main Menu----System---General---Sorage FULLFAQ3- How to playback?1. Right click the mouse and go to “Playback”2. Playback interface pops up as below.30
DEFEWAY(1) Select the date you need to playback.(2) If DVR support at most 4 channel playback once (random 4 ), default channels are 1,2,3,4.If you need to playback 5678, stop defaulted 1234 by clicking the stop buttonThen clicking the symbol “1””2””3””4” to end, Then click “5””6””7””8” to start.End defaulted”1””2””3””4”, youcan also select4 channels at random.(3) Play back the specific periodThe green bar from 00:00-18:00 means regular recording.Move the mouse cursor to the green bar, scroll the mouse wheel to zoom the time for accurate positioning:(4) After selecting time period, clickto play31
DEFEWAY1. Play/Pause8. Next frame (please click pause first)2. play backward9. Next file (there are several files if you search by file, you can select the next file)3. Stop playing10. Next file (there are several files if you search by file, you can select the next file)4. Slow down x1 , x1/2,x1/4,x1/811.Repeat playback5.Reverse fast12.Full scream6.Fast play x1 , x2,x4,x813. Cut video (reserved function, not available currently )7. Prev frame(please click pause first)14. Backup (reserved function, not available currently )FAQ4-If cannot connect internet1. Right-click on your DVR and click 【Main Menu】— 【system】— 【Network】, you can see the picture as below:2. ” “ 【DHCP】 and click 【OK】to save.Please login in and check your router setting to make sure your router hasenabled【DHCP】also.32
DEFEWAY3. Click 【Main Menu】— 【info】 — 【version】, and check whether it states connected after 5 minutes.If states” connected”, it means the DVR has been connected to internet.If states “Probing DNS”, it means the DVR has not been connected to internet.If it still shows “Probing DNS” after 5 minutes, please do as following:a. Reboot your router.b. Right click — 【Logout】— 【Reboot】to reboot DVR;c. Wait for 5 minutes and check whether it shows “Probing DNS”, if so we need to do network setting manually.d.As the picture above, please do not select ” “ 【DHCP】and type IP Address, subnet mask, gateway, primary DNS,spare DNS manually.33
DEFEWAYFor example, if your router IP is 192.168.1.1, the configuration should be as the below: 【IP Address】192.168.1. xx (xx should be changed to a number between 2-255(except for the ones you have set forother PC or network equipment) 【Subnet Mask】enter 255.255.255.0【Gateway】enter router IP【Primary DNS】enter your DNS server IP【Secondary DNS】enter 8.8.8.8 If you don’t know your router IP or DNS, you can use a computer at the same local network, press 【WIN】 【R】on thekeyboard, it will pop a window like below and enter【cmd】and click【OK】will pops up a window as below.Enter 【ipconfig/all】and press the enter key, then you will get information needed.34
DEFEWAY35
DEFEWAY 2 Installation Guide for DVR Camera System Before Installation 1. This security camera kit requires cabling. It is stro