Transcription
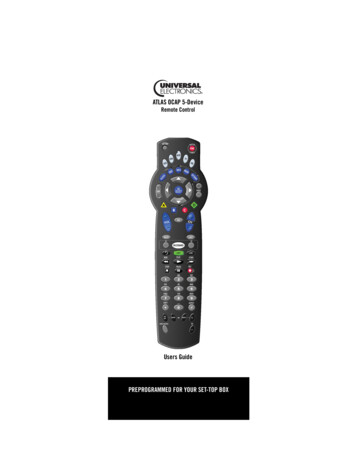
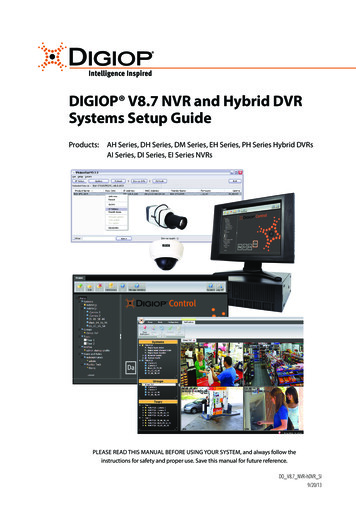
ATLAS DVR/PVR IR/UHFRemote ControlTélécommande ATLAS ENP IR/UHFUsers GuideGuide d'utilisation
TABLE OF CONTENTSIntroduction . . . . . . . . . . . . . . . . . . . . . . . . . . . . . . . . . . . . . . . . . . . . 3Features and Functions . . . . . . . . . . . . . . . . . . . . . . . . . . . . . . . . . . . 4Key Charts. . . . . . . . . . . . . . . . . . . . . . . . . . . . . . . . . . . . . . . . . 5Device Table . . . . . . . . . . . . . . . . . . . . . . . . . . . . . . . . . . . . . . . 7Installing Batteries . . . . . . . . . . . . . . . . . . . . . . . . . . . . . . . . . . . . . . . 8Programming Device Control . . . . . . . . . . . . . . . . . . . . . . . . . . . . . . . 9Programming TV/VCR Combo Control . . . . . . . . . . . . . . . . . . . . . . . 10Searching for Your Code . . . . . . . . . . . . . . . . . . . . . . . . . . . . . . . . . 11Checking the Codes . . . . . . . . . . . . . . . . . . . . . . . . . . . . . . . . . . . . . 12Using Learning . . . . . . . . . . . . . . . . . . . . . . . . . . . . . . . . . . . . . . . . . 12Learning Precautions . . . . . . . . . . . . . . . . . . . . . . . . . . . . . . . 12Programming a Learned Key . . . . . . . . . . . . . . . . . . . . . . . . . 13Deleting a Single Learning Key. . . . . . . . . . . . . . . . . . . . . . . . 14Deleting All Learned Keys in a Specific Mode . . . . . . . . . . . . 14Programming Channel Control Lock . . . . . . . . . . . . . . . . . . . . . . . . 15Unlocking Channel Control. . . . . . . . . . . . . . . . . . . . . . . . . . . 15Locking Channel Control to MTS . . . . . . . . . . . . . . . . . . . . . . 15Changing Volume Lock . . . . . . . . . . . . . . . . . . . . . . . . . . . . . . . . . . . 15Unlocking Volume Control for a Single Device (IndividualVolume Unlock) . . . . . . . . . . . . . . . . . . . . . . . . . . . . . . . . . 16Unlocking All Volume Control (Global Volume Unlock) . . . . . 16Locking Volume Control To One Mode (Global Volume Lock) 17Using the Master Power Key. . . . . . . . . . . . . . . . . . . . . . . . . . . . . . . 17Programming the Master Power Key . . . . . . . . . . . . . . . . . . . 17Using the Master Power Key. . . . . . . . . . . . . . . . . . . . . . . . . . 18Clearing the Master Power Key . . . . . . . . . . . . . . . . . . . . . . . 18Re-Assigning Device Keys. . . . . . . . . . . . . . . . . . . . . . . . . . . . . . . . . 18Clearing Custom Programming . . . . . . . . . . . . . . . . . . . . . . . . . . . . 22Checking Your Remote’s ID Code. . . . . . . . . . . . . . . . . . . . . . . . . . . 19Changing Your Remote’s ID Code. . . . . . . . . . . . . . . . . . . . . . . . . . . 20Using Your Remote’s RF Functionality . . . . . . . . . . . . . . . . . . . . . . . 20Troubleshooting . . . . . . . . . . . . . . . . . . . . . . . . . . . . . . . . . . . . . . . . 23FCC Notice . . . . . . . . . . . . . . . . . . . . . . . . . . . . . . . . . . . . . . . . . . . . 24Additional Information . . . . . . . . . . . . . . . . . . . . . . . . . . . . . . . . . . . 25Table Des Matières . . . . . . . . . . . . . . . . . . . . . . . . . . . . . . . . . . . . . . 26Manufacturer’s Codes (Codes Des Fabricants) . . . . . . . . . . . . . . . . 54Setup Codes for TVs . . . . . . . . . . . . . . . . . . . . . . . . . . . . . . . . 54Setup Codes for Audio Amplifiers. . . . . . . . . . . . . . . . . . . . . . 61Setup Codes for Audio Receivers. . . . . . . . . . . . . . . . . . . . . . 61Setup Codes for Audio Accessories . . . . . . . . . . . . . . . . . . . . 63Setup Codes for DVD Players . . . . . . . . . . . . . . . . . . . . . . . . . 64Setup Codes for TV/DVD Combos . . . . . . . . . . . . . . . . . . . . . . 68Setup Codes for TV/VCR Combos . . . . . . . . . . . . . . . . . . . . . . 69Setup Codes for VCRs . . . . . . . . . . . . . . . . . . . . . . . . . . . . . . . 69M215001/072
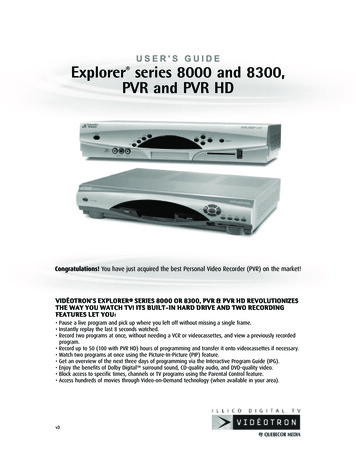
INTRODUCTIONThe Atlas DVR/PVR IR/UHF Remote by UniversalElectronics is our latest generation universal remotecontrol. Its sophisticated technology allows you toconsolidate up to five of your original homeentertainment remote controls into one easy-to-useproduct. Moreover, its packed with advanced featuressuch as: Preprogrammed control to operate the set-top boxprovided by MTS. Dedicated keys to control popular functions on yourDVR/PVR (Digital/Personal Video Recorder) Programmable Master Power key for master on/offcontrol of your home entertainment equipment witha single keystroke Channel Lock to lock channel selection only to theset-top box Volume Lock to lock volume controls to one mode orindividual modes Device Key Re-Assignment to remotely control asecond (duplicate) device Code Search to help program control of older ordiscontinued components Color-coded keys to quickly locate popularfunctions Code library for popular video and audio devices RF capability to allow you to control your deviceswithout being directly in front of them (for example,from another room).Before using the product, you need to install theenclosed batteries and also perform some programmingto operate the specific home entertainment devices youwish to control.Please follow the instructions detailed in this manual toset up the unit and then start enjoying your new remotecontrol and MTS TV service.3
FEATURES AND FUNCTIONSUse the illustration below to locate features on the AtlasDVR/PVR IR/UHF Remote and then study the KeyCharts (on the next three pages) to learn how theyfunction.To find out what type of devices can be controlled byeach device key after programming, see “Device Table”on page 7.4
Key ChartsKeyFunctionUse SETUP for all programmingsequences.Press PWR once to turn on or off a homeentertainment device. For MASTERPOWER control, see “Using the MasterPower Key” on page 17.Press MTS, TV, DVD, AUD, or AUX once toselect a home entertainment device tocontrol. Also see “Device Table” onpage 7.Each device key has an embedded LED(red light) that blinks upon selectionand indicates the remote control isworking and (after programming) issending signals.Use GUIDE to display the programguide.Press MENU/SETTINGS once to displayavailable interactive services.Use INFO to display the current channeland program information.Use DAY (or DAY-) to move a dayforward (or back) on your set-top box’sprogram guide.Use the Cursor keys to move the cursorin the program guide and menu screensand to navigate within the interactiveservice.Use OK/SELECT to choose options, PPVevents, and to tune programs from theprogram guide.Use PAGE (or PAGE-) to page up (orpage down) through menu screens andthe program guide.Use EXIT to exit out of your set-top box’smenu and guide.Use A, B, or C to access additional MTSfeatures (see your MTS manual).Use VOL (or VOL-) to raise (or lower)the audio volume.Use FAV to cycle through your favoritechannels stored in your set-top box.5
KeyFunctionUse CH (or CH-) to select the nexthigher (or lower) channel.For DVD players, use these keys to skipforward (or reverse) through chapters.For amplifiers/receivers, use these keysto select the next higher (or lower)preset station.Press MUTE once to turn the sound offor on.Press LAST once to recall the lastchannel.Press PPV to access the Pay Per Viewmenu and open the PPV programguide.Press HOME to access MTS TV OnDemand.Press VOD to launch Video on Demand.Press CALL ID to open your Caller IDscreen.Useto command your PVR toinstantly replay the last 7 seconds of aprogram you are watching.Press LIST once to display a list ofrecorded shows on your PVR.Press LIVE to return to watching live TV.In all modes except MTS, use REW, PLAY,FFWD, STOP, and PAUSE to control aVCR, DVD player, or a PVR (afterselecting a desired device). To record inthe VCR mode, press REC twice.In the MTS mode, use these keys tocontrol the DVR/PVR and VODfunctions of the set-top box.Use the keypad numbers (1-9, and 0) todirectly tune channels (e.g., 09).For amplifiers/receivers, use the keypadnumbers to select inputs 1 through 10.Press HD/ZOOM once to change the aspectratio of the show you are watching. (Notavailable on all set-top boxes).6
KeyFunctionUse PIP ON-OFF to switch the PictureIn-Picture feature on or off (if availableon your TV).Use PIP SWAP to switch images andsound between the main and windowpictures.Use PIP MOVE to move the window pictureto different positions in the main picture.Use PIP CH (or CH-) to select the nexthigher (or lower) PIP channel.In the MTS mode, use VIDEO SOURCE toview other video sources (A or B)instead of cable.In all other modes, use VIDEO SOURCEto watch TV or video programs on adesired device.For amplifiers/receivers, use VIDEOSOURCE to select an input source.Device TableNOTE:Please refer to the table below whenperforming the instructions in“Programming Device Control” on page 9 or“Programming TV/VCR Combo Control” onpage 10.After programming, theAtlas DVR/PVR IR/UHFRemote can control the following types of devices:Device KeyControls these types of devicesVCR, TV/VCR Combo, PVR (PersonalVideo Recorder), or extra DVD PlayerDVD PlayerAudio Amplifier, Tuner, or ReceiverTelevisionMTS Set-top Box7
INSTALLING BATTERIES❶❷❸1.2.3.4.NOTE:On the back of the remote control, push thetab and lift off the battery cover.Locate the two (2) enclosed AA batteries.Match the and - marks with those in thebattery case, then insert them.Align the covers keys with the cases holes andpress the cover back into place. The tab shouldclick when the cover is locked.Test the remote control by pressing any modekey (e.g., TV). If the batteries are insertedcorrectly, the LED (red light) blinks once.When batteries need replacement, the remotecontrol ceases to operate. Replace thebatteries and the unit is restored to its fullfunctionality, complete with your favoritesettings.8
PROGRAMMING DEVICE CONTROLThe Atlas DVR/PVR IR/UHF Remote is preprogrammedto operate the MTS set-top box, an RCA TV, a ToshibaDVD player, an RCA VCR (as an AUX device), and aPioneer audio receiver. To control devices other than thedefault brands, perform the following steps; otherwiseskip this section.NOTES: For TV/VCR Combo control, skip this sectionand perform the instructions on “Programming TV/VCR Combo Control” on page 10.Also refer to “Device Table” on page 7 to findout which devices can be programmed ontoeach device key.1.Turn on a device and, if applicable, insertvideo media, (e.g., cassette or disc).NOTE: Please read steps 2 through 4 completelybefore proceeding. Highlight or write downthe codes and device you wish to programbefore moving on to step 2.2.On the remote control, press a device key once(i.e., MTS, TV, DVD, AUD, or AUX); it blinksonce. Then press and hold SETUP until theselected mode key blinks twice.3.NOTE:4.NOTE:5.Use the “Manufacturer’s Codes (Codes DesFabricants)” starting on page 54) to locate thetype of device and brand name and then enterthe first four-digit code for your device. Ifperformed correctly, the selected mode keyblinks twice.If the selected mode key emits a long blink,the entry is invalid. Repeat steps 2 through 3and try entering the same code again.Aim the remote control at the device andpress PWR once. The device should turn off. Ifit does not, repeat steps 2 through 3, tryingeach code for your brand until you find onethat works. If it still does not respond, trysearching for the code (see “Searching forYour Code” on page 11).If the device does not have a PWR key, pressthe (Play) key.Repeat steps 1 through 4 for each device youwant the remote control to operate. For futurereference, write down each working devicecode in the boxes on the following page.AUX Code9
Device Type:DVD CodeDevice Type:AUD CodeDevice Type:MTS CodeDevice Type:TV CodeDevice Type:PROGRAMMING TV/VCR COMBO CONTROLIf you own a TV/VCR Combo, perform the followinginstructions to control this device:1.Turn on your TV/VCR Combo and insert avideo cassette.2.On the remote control, press AUX once; itblinks once. Then press and hold SETUP untilthe AUX key blinks twice.3.NOTE:Use the “Manufacturer’s Codes (Codes DesFabricants)” starting on page 54 to locate thebrand name and enter the first four-digit codefor your TV/VCR Combo. If you perform thisprocedure correctly, the AUX key blinks twice.If the AUX key did not blink twice after entering the codes last digit, repeat steps 2 through3 and try entering the same code again.If you’ve located a TV/VCR setup code thatworks for your TV/VCR Combo and a separateTV code is also listed, you’ll need to programthis code into the remote control to access volume control (see “Programming Device Control” starting on page 9).10
4.Aim the remote control at your TV/VCRCombo and press PWR once. The deviceshould turn off. If it does not respond, repeatsteps 2 through 3, trying each code listed foryour brand until you find one that works. If itstill does not respond, try searching for thecode (“Searching for Your Code” starting onpage 11).5.For future reference, write down each workingdevice code in the boxes below:TV/VCR CodeTV Code (if used)SEARCHING FOR YOUR CODEIf your home entertainment device does not respond totheAtlas DVR/PVR IR/UHF Remote after trying all ofthe codes listed for your brand, or if your brand is notlisted at all, try searching for your code.For example, to search for a code for your TV:1.Turn on your TV.2.On the remote control, press TV once; it blinksonce. Then press and hold SETUP until the TVkey blinks twice.3.Enter 9 9 1. The TV key blinks twice.4.Aim the remote control at the TV and pressPWR once.5.Press CH one or more times and stop whenthe TV turns off.NOTE:In the search mode, the remote control sendsIR codes from its library to the selecteddevice, starting with the most popular codefirst.Press SETUP once to lock in the code. The TVkey blinks twice.6.11
7.To search for the codes of your other devices,repeat steps 1 through 5, but substitute theappropriate key (e.g., AUX, DVD, AUD, or MTS)for the device you are searching for.CHECKING THE CODESIf you have set up the Atlas DVR/PVR IR/UHF Remoteby s
Key Charts Key Function Use SETUP for all programming sequences. Press PWR once to turn on or off a home entertainment device. For MASTER POWER control, see “Using the Master Power Key” on page 17. Press MTS, TV, DVD, AUD, or AUX once to select a home entertainment device to control. Also see “Device Table” on page 7.