Transcription
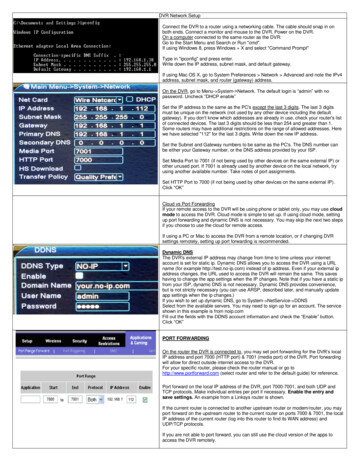
DVR Network SetupConnect the DVR to a router using a networking cable. The cable should snap in onboth ends. Connect a monitor and mouse to the DVR. Power on the DVR.On a computer connected to the same router as the DVR:Go to the Start Menu and Search or Run "cmd".If using Windows 8, press Windows X and select "Command Prompt"Type in "ipconfig" and press enter.Write down the IP address, subnet mask, and default gateway.If using Mac OS X, go to System Preferences Network Advanced and note the IPv4address, subnet mask, and router (gateway) address.On the DVR, go to Menu- System- Network. The default login is “admin” with nopassword. Uncheck “DHCP enable”Set the IP address to the same as the PC's except the last 3 digits. The last 3 digitsmust be unique on the network (not used by any other device including the defaultgateway). If you don't know which addresses are already in use, check your router's listof connected devices. The last 3 digits should be less than 254 and greater than 1.Some routers may have additional restrictions on the range of allowed addresses. Herewe have selected "112" for the last 3 digits. Write down the new IP address.Set the Subnet and Gateway numbers to be same as the PC's. The DNS number canbe either your Gateway number, or the DNS address provided by your ISP.Set Media Port to 7001 (if not being used by other devices on the same external IP) orother unused port. If 7001 is already used by another device on the local network, tryusing another available number. Take notes of port assignments.Set HTTP Port to 7000 (if not being used by other devices on the same external IP).Click “OK”Cloud vs Port ForwardingIf your remote access to the DVR will be using phone or tablet only, you may use cloudmode to access the DVR. Cloud mode is simple to set up. If using cloud mode, settingup port forwarding and dynamic DNS is not necessary. You may skip the next two stepsif you choose to use the cloud for remote access.If using a PC or Mac to access the DVR from a remote location, or if changing DVRsettings remotely, setting up port forwarding is recommended.Dynamic DNSThe DVR's external IP address may change from time to time unless your internetaccount is set for static ip. Dynamic DNS allows you to access the DVR using a URLname (for example http://test.no-ip.com) instead of ip address. Even if your external ipaddress changes, the URL used to access the DVR will remain the same. This saveshaving to change the app settings when the IP changes. Note that if you have a static ipfrom your ISP, dynamic DNS is not necessary. Dynamic DNS provides convenience,but is not strictly necessary (you can use ARSP, described later, and manually updateapp settings when the ip changes.)If you wish to set up dynamic DNS, go to System- NetService- DDNSSelect from the available servers. You may need to sign up for an account. The serviceshown in this example is from noip.comFill out the fields with the DDNS account information and check the “Enable” button.Click “OK”PORT FORWARDINGOn the router the DVR is connected to, you may set port forwarding for the DVR’s localIP address and port 7000 (HTTP port) & 7001 (media port) of the DVR. Port forwardingwill allow for direct outside internet access to the DVR.For your specific router, please check the router manual or go tohttp://www.portforward.com (select router and refer to the default guide) for reference.Port forward on the local IP address of the DVR, port 7000-7001, and both UDP andTCP protocols. Make individual entries per port if necessary. Enable the entry andsave settings. An example from a Linksys router is shown.If the current router is connected to another upstream router or modem/router, you mayport forward on the upstream router to the current router on ports 7000 & 7001, the localIP address of the current router (log into this router to find its WAN address) andUDP/TCP protocols.If you are not able to port forward, you can still use the cloud version of the apps toaccess the DVR remotely.
Local Internet AccessWe can test the DVR's local internet access by typing in the local IP address and portnumber in a web browser on a computer connected to the same router. Make sure toinclude “http://” at the beginning. Here, we typed in http://192.168.1.112:7000A login screen will appear. Do not log in yet.Internet Explorer usersWe need to change a couple of settings first.Go to Internet options Security Local intranet Sites Advanced AddClick Close OK Apply OKGo to Internet options Security Local intranet Custom levelSet “Download unsigned ActiveX controls” to “Prompt”.Log back into the DVR by typing its local ip into the url bar again.You will be prompted to install web.cab (or to allow an activeX control). Proceed withthis installation. It may take a couple of minutes. If you had a previous version of thedriver installed, then you may be prompted thru a series of ActiveX controls (this couldtake several minutes.)When you see the login button read “Login”, you may log in (use “admin” and blank)The main DVR screen should show. If there are any problems, restart the browser andlog in again. For further troubleshooting, please see the FAQ at end.All usersThe login is “admin” and no password (or “admin” as password.)This verifies that the DVR's network hardware is working, and that the local IP addressand HTTP port are correct. If you can't access the login prompt, see the troubleshootingsteps at the bottom.Now we are ready to test outside internet access to the DVR.Remote AccessWe now need the external IP address. Using a computer on the same router as theDVR, check http://ip-lookup.net for the “WAN” IP address.Using a web browser, type into the address bar “http://” and the external IP address ofthe DVR followed by “:7000” (see image on left). If you have a domain name for theDVR, you can append “:7000” to the domain name instead. Here, 362.223.13.45 is ourexternal ip. See the example shown here. If we had a dynamic DNS name, we coulduse http://pimfg.no-ip.com:7000 instead.This screen should come up. You may log in with “admin” and no password. If ActiveXis blocked, go to Internet Options Security Internet Custom level and set“Download unsigned ActiveX controls” to “Prompt”. If Internet Explorer does not showany video, see the troubleshooting steps at the end.If you do not get a login, there may be a problem with port forwarding. See thetroubleshooting steps at the bottom. Alternatively, you can still use the cloud version ofthe mobile apps for remote access.
Mobile AccessAfter setting up internet access using a computer, you can install the mobile app.For Android, use vMEyeSuper (non-cloud) or XMEye (cloud mode) from the play store.For iPhone, use vMEyeSuper (non-cloud) or XMEye (cloud mode) from the app store.For iPad, use vMEyeSuper (non-cloud) or XMEye (cloud mode).For Macbook, use vMEyeSuper (non-cloud).We will first describe the non-cloud version of the apps, followed by the cloud versions.Use the cloud version if you cannot port forward to the DVR.Non-cloud setup via vMEyeSuperFor cloud-based mobile apps, skip down to the cloud section. We will cover thenon-cloud, port-forward based mobile access first.Our example here is using vMEyeSuper for Android. The iPhone/iPad/Macbook versionwill be similar.Go to “Device List”Click the “ ” button to add a new connection.Enter the IP (external IP, if used remotely) address or hostname of the DVR.For “Port” or “TCP Port” enter port 7001 (or whatever is assigned the media port.) Donot use the mobile port.Type in the login information (admin and blank password are the default).Select the number of channels on the DVR.Click “OK”Non-cloud mobile setupExpand the DVR dropdown.Click on a channel. Here, we click on channel 1.Non-cloud mobile setupIt should say “Connecting” and show the video. It may take a few seconds. If it says“Successful Connection” without showing video, make sure the port number, ip, andlogin settings are correct, and restart the DVR or the camera.You can click on another quadrant and make another channel selection.After successful connection, you can verify that “Auto play” is selected under “Option”.This will automate the display of channels in the Live Preview mode.On Android, you may use the back button to exit the app and save settings. The onlyway to save settings is to use the app to exit.If you were not able to connect, make sure your mobile device is currently on wi-fi ordata. Make sure you typed in the correct port. If you are at a remote location make surethe ip address is current external ip address of the DVR.If the video lags on an IP camera during high motion, you can decrease the frameratefor the “Extra” stream in the System Encode settings of the camera. The app can alsobe used to connect directly to IP cameras if desired.Cloud mobile setupIf using port forwarding is not practical, you can use the cloud mode along with thecloud version of the mobile apps.Go to System NetService CloudCheck “Enable” and click “OK”, “OK”, and the close button.You can check the status of the cloud connection in System NetServiceIf it doesn't get to “Connected” status, try reconnecting the network cable.When configuring mobile cloud apps, you will need to enter the DVR serial number.The serial number can be found in Info Version SerialNo
XMEye for mobile accessFor cloud based access, you can use XMEye.Registration is optional; it is used for saving multiple DVR logins across devices.Go to “Local Login”In the device list, click “ ”You may name the device.Type in the serial number of the DVR.Login default is “admin” and blank password.Click “OK” when done.A list of devices will show. If camera channels are not listed, you can click on the deviceto show the listing.Select a camera to view.To view the DVR the next time the app is started, you can go to “Local Login” and selecta device to connect to.(OPTIONAL) ARSP Setup (some models)On occasion the DVR's external IP may change because of the internet serviceprovider. The ARSP option allows for remote browser login to the DVR to check for theDVR's current external address even if it changes. This would allow you to remotelylook up the DVR's current IP, and manually update it in the app settings. This can beuseful if you choose not to use dynamic DNS.Go to System Netservice ARSPCheck “Enable”Server IP is xmsecu.comPort, username, and password are default values and do not need to be modified.Click “OK”, “OK”, and close
(OPTIONAL) ARSP Setup (2)Go to Info VersionWrite down the MAC number.(OPTIONAL) ARSP Setup (3)Using a web browser, go tohttp://xmsecu.com:8080and login using the MAC number.If it fails to login, verify the MAC number, and try logging in again.Current information about the DVR will be shown.“True IP” is the current external IP address of the DVR.Troubleshooting Tips1. Can't log into the DVR from the internet.Cloud usersIf using the cloud, check to see if the DVR serial number typed in is correct. Check to see if the mobile device is connected to data. Try using wi-fi.On the DVR itself go to System Netservice and check the cloud status. It should say “Connected”. If not, check the network cable.Make sure the DVR can be accessed locally via computer. If you can only access the DVR locally, the cloud may be busy and you can try again. If local accessfails, see step 2.Close the mobile app and open it again. Test with another mobile device.Non-cloud users (port forwarded)Check the address bar to verify you are using the correct IP address and port number. Check every single digit because typos can be common. The addressshould start with “http://”, followed by the external IP address, followed by the colon symbol and the port (“:7000”). Try another web browser to see if you can geta login. Make sure that any software firewall or hardware firewall is not blocking ports 7000-7001. Check for any port restrictions imposed by the router on boththe DVR side and the remote computer side. Check all relevant settings including port filtering and application exception lists. Double check that the port andlocal IP addresses of the DVR are assigned for forwarding on the router. If you were previously able to access the DVR from the outside, make sure that theexternal IP address specified in the address bar is still valid (the router's external IP address may change from time to time.) If using Dynamic DNS, make sureyour account has not expired or test with the DVR's current external ip address instead of the host name. Double check the settings on the DVR. Make sure theDVR can be accessed locally (see below). If you can access DVR locally but not remotely, there is a problem with port forwarding. Review your router portforwarding settings. Review the router manual. If the router is attached to another router upstream, you will need to do port forwarding from the upstream routerto the current router (using the current router's local ip address on the upstream router, and ports 7000-7001). If you have changed routers, make sure the localstatic IP on the DVR is still valid for the router is it connected to.2. No local network access to the DVR.Make sure the computer is on the same router as the DVR. You can use the “ping” command from the command line (ie “ping 192.168.1.112”) to see if the DVRis accessible at all. Ping the local IP address that was assigned to the DVR. You should see response times from the DVR (no timeouts). If you get responsetimes, you can log in locally using a web browser. If you get a timeout, reconnect the DVR’s network cable on both ends, or test with another cable. Mostnetwork cables will snap in. You may also power cycle the DVR. Check network lights on the router and on the DVR network port. Try connecting to anotherphysical port on the router. Make sure the DVR is using a unique local IP address. Check the validity of the IP address assigned on the DVR. Some routers havea numeric restriction on the range of local addresses (you may need to reassign a static address to the DVR.) Make sure you log in with the correct local IPaddress and port. Check every single digit because typos can be common. Go in the DVR menu and verify the assigned address numbers. Recheck yourassigned web port and media port. Check firewall settings. Try adding the DVR local IP to the local zone (Internet Options Security Local intranet Sites Advanced Add Close Apply OK). Use another web browser. Access the DVR from another computer on the same router. Test the DVR with anotherrouter. If you have changed routers, make sure the local static IP on the DVR is still valid for the router is it connected to. See the first 2 steps of this guide.Reboot the DVR.3. Internet Explorer can log in but no video
Check Internet Explorer's security settings for ActiveX (set “Prompt” for “Download unsigned ActiveX controls”) Click refresh or restart the browser. Make sureyou port forwarded the media port. Double check for typos.Test IE access on the local network. Add the DVR to the local zone under Internet Options Security Local intranet Sites Advanced. If the browser seemsto take a long time or freeze, please allow a few minutes for the control to load.If using a laptop that was not used for setup, first set it up on the local network using the steps in this tutorial.If IE still doesn't work, you may use the CMS software that is on the CD (see below for setup.)CMS usageHere are the steps for using the CMS:1) Install the CMS software from the CD.2) Start up the software, and login with the default login ("Super" and blank.) You may check auto-login.3) In the CMS, go to “System” - "Device Manager". If you see preexisting devices and zones that you don't recognize, you may remove them.4) Go to "Add Area" and add a zone.5) Highlight the zone, then click "Add Device"a) Click "IP Search"b) Highlight the device corresponding to the DVR.c) Enter the username and password. Click "OK" and "OK"6) Highlight a quadrant.7) On the left, double-click on the new zone, wait for connection, and then double-click an active channel to display.4. IE ActiveX control crashes with NOD32 installedIn order to allow the ActiveX software to work, you will need to go to the Advanced Setup for NOD32. Expand “Web and E-mail” and click on “Protocol Filtering”.In “Protocol Filtering”, click on “Excluded Applications” and then make sure a check is on Internet Explorer and the DVR software.5. Android app loses settings.Remember to exit the app using the hardware “back” button.If autoplay does not play all channels, go to tools and select “Auto play” again.6. Mobile access from the outside doesn't work anymoreMake sure the external IP address of the DVR has not changed (if not using the cloud). Test local internet access locally (and see troubleshooting case 2.)If local IP access works, test at a remote location (and see troubleshooting case 1.)You may need to restart the mobile device. Test with WiFi instead of data. Test with another mobile device.7. Camera drops out / poor pictureMake sure you have the correct password and login for each IP camera. See if you can log directly into the IP camera. Restart the DVR.Make sure you are using a power adapter with the correct voltage and adequate amperage rating for the camera. Test with another power adapter if possible.Make sure you are using quality cables between the DVR and the camera. Make sure the hub or switch the DVR is connected to can handle the bandwidth ofmultiple network cameras. A gigabit switch or router will have higher bandwidth and is better suited for multi-channel HD video streaming. Test with anothercamera.IP cameras should have unique local ip addresses. Check to see if every camera has a unique local ip.8. Internet Explorer crashesTest this locally:You can add the DVR to the local zone under Internet Options Security Local Intranet Sites AdvancedIf it still crashes, you can try using the CMS software on the CD (see previous step for instructions.)9. Motion detection does not recordMake sure that the recording schedule includes “Detect” and is set to “Schedule”. If you don't want full time recording for a camera, then uncheck “Regular” inthe schedule for that camera. Make sure that a record channel is selected in Alarm Motion Detect, and that the channel is enabled. If using an IP camera,motion detection should also be set up in the camera itself. Try searching for and setting the camera as a NETIP camera instead of an ONVIF camera, and testagain.10. IP Camera does not show up
Make sure you are able to log directly into the camera using a computer on the same router as the DVR. Try power cycling the camera. Make sure thenetworking cable is snapped in. Each IP camera should have its own local IP address. Verify that all devices connected to the router have unique local ipaddresses. You may want to assign a unique static local IP for the camera.
For iPad, use vMEyeSuper (non-cloud) or XMEye (cloud mode). For Macbook, use vMEyeSuper (non-cloud). We will first describe the non-cloud version of the apps, followed by the cloud versions. Use the cloud version if you cannot port forward to the DVR. Non-cloud setup via vMEyeSuper For cloud-based mobi