Transcription
Moxi Whole Home HD DVRQUICK REFERENCE GUIDELet’s get started with learning more aboutwhat your Moxi System can do. This is a quickreference guide to get you up and running.Contents:Menu Quick Look1Icon Descriptions2Remote Control3Controlling Live TV5Recorded TV8Video On Demand11Parental Controls12
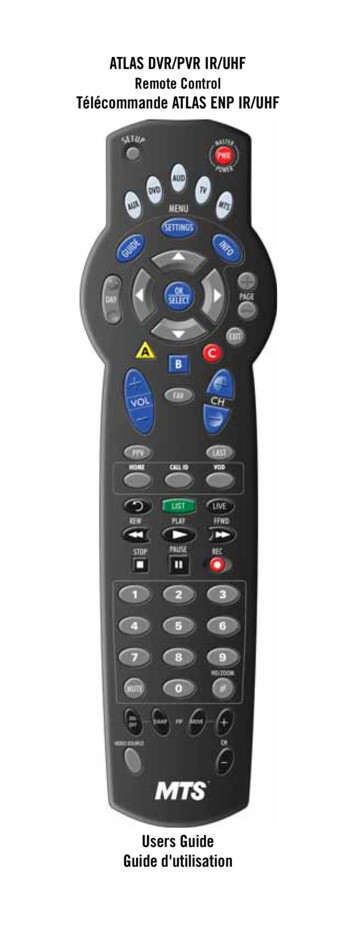
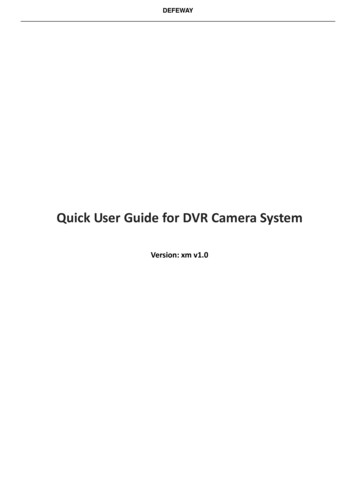
Menu Quick LookMENU SCREEN:1 TIME – With the current time, you’ll know when yourshow begins.2 CURRENT CHANNEL – Displays the channel that isplaying in Mini TV. If the program is recorded, an iconwill display the current status - i.e., play or pause.3 MINI TV – Lets you keep watching your program whileyou browse.4 FOCUS – The current selection is in the focus area of the menu.When cards are in focus, they appear raised and highlighted.5 VERTICAL LIST – Contains all of the items in the currenthorizontal category.6 INFO PANEL – Depending on the item in focus, this areaeither provides more information about that item or aselection of choices for that item.7 CARD – Items in vertical lists are called cards.When you press INFO on an item in focus, you’ll get a list of options for that item in an action menu. Use the up and down arrowbuttons to scroll through your action menu options. Action menushave a focus, just like the main menu. To select an option, bring itinto focus, and press OK.*Helpful Hint: There is also an optional Grid Guide view for people whoprefer to find programming in that layout. Launch the Grid Guide with theshortcut button at the top of the remote.1
Gateway IconsPresson your remote to access the main menu.You will see a horizontal band with the following icons:Channels – A vertical menu that lists all available channels.Recorded TV – A list of all of the programs you’ve recorded.Search – Options to search for programs by title, key-word,or by category.VOD – Contains the VOD library of all available titles.Home Network – An easy way to enjoy media stored on yourcomputer from the comfort of your TV.Settings – A category that allows you to customize your system.Messages – A place to receive messages about Comporiumservices and updates.Phone – A list of recent phone calls from your incoming lines.TV Music – A collection of TV music channels to match yourtaste and mood.News – A filter that displays all of the 24 hour news channelsand current news programming.Kids – Access all children’s programming in one consolidated list.Sports – A filter that displays all available sports content.Movies – A filter that displays all available movies, including liveand recorded TV.HD – A filter that displays all of the high-definition content.Favorites – A filter that lets you add your favorite TV, video,photo and music content to one convenient place. 2
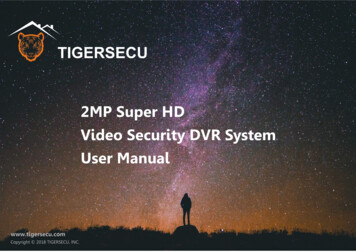
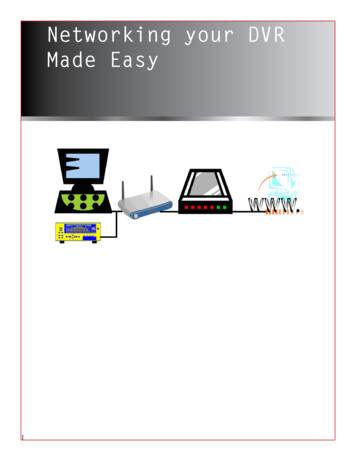
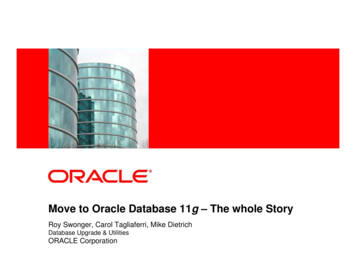
Remote ControlShortcut ButtonsArrowpadPlayer ControlsKeypad3
SHORTCUT BUTTONS:1 RECORDED TV – Goes to the Recorded TV category.2 VOD – Goes to the VOD category. Press twice to launch SuperTicker.3 GRID – Activates the traditional GridGuide view of TV programming.Press twice to go to your Favorites.4 LIVE TV – Goes to full-screen, live TV, regardless of what’scurrently in focus.ARROWPAD AND KEYPAD:1 ARROWS – Moves the horizontal or vertical bands one itembackward or one item forward. Holding them downactivates Turbo Mode and increases your browsing speed.2 OK – Begins playing the item in focus or executes anoption in an action menu.3 BACK – In the guide, takes you back on the Grid to theprevious half hour of programming. Also controls live andRecorded TV.4 NEXT – Takes you forward on the Grid guide to the next halfhour of programming. Also controls live and Recorded TV.5INFO – Brings up info as well as an action menu of optionsrelated to the item in focus.6 ZOOM – Alternates between full screen and the main menu.7 NUMBER KEYS – Entering numbers will take you directlyto the corresponding channel. CLEAR will back you outof any menu you are in. Will remove info boxes or can beused to delete Recorded TV.4
PLAYER CONTROLS:1 MENU – From wherever youare, MENU launches thehorizontal menu screen.2 PLAY – Begins playing the TVshow or media file in focus.Also allows you to view theshow at the point offast-forwarding or rewinding.3 SKIP – Skips forward in your program the number of secondsthat you predefine in settings. Also takes a vertical list ofprogramming forward 24 hours.4 REPLAY – Rewinds the program seven seconds, so you cancheck out what you missed.5 REWIND – Press up to three times (for three speeds) to rewindthe show. Use to control live or Recorded TV.6 FAST-FORWARD – Press up to three times (for three speeds)to fast-forward. Use to control live or Recorded TV.7RECORD – Press RECORD while watching a show or with ashow in focus to record.8 STOP – Exits out of a recorded show or stops a recording inprogress if you’re watching that show full screen.9PAUSE – Pauses the show you are watching.*Helpful Hint: Use the LAST button to jump back to the previously viewed channel. Controlling Live TV: Press PAUSE to alternate between pausing and resuming theshow you’re watching. Press REWIND up to three times (for three speeds) to rewindthe show. Press FORWARD up to three times (for three speeds) to fastforward the show up to the point of broadcast. Press BACK to skip back to the previous 15 minutes of programming on that channel.5
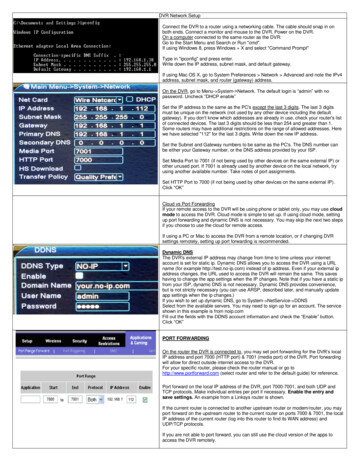
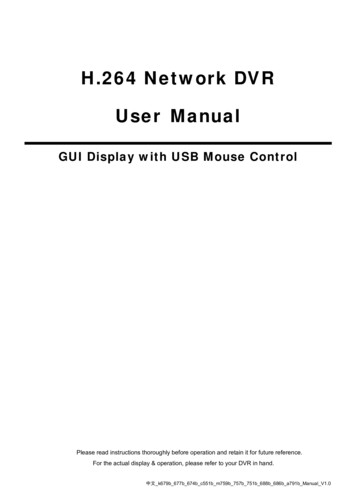
Press PLAY to stop fast-forwarding or rewinding or resumefrom a pause. Press LIVE TV to view the point of broadcast for the lastchannel you watched. Press REPLAY to view the previous 7 seconds of the show. Press SKIP to skip forward in the show up to the moment ofbroadcast. You can decide how many seconds to skip with thisbutton in the Settings menu. Press PAUSE and then FORWARD once to activate slow motion. Press PAUSE and then SKIP to advance forward one frame. Press RECORD to record the entire contents of the temporarymemory or buffer for the show you are watching.The BufferWhen you start watching a show, your system will start storing itin temporary memory, called a buffer. The amount of temporarymemory varies, but it is never less than 30 minutes for standarddefinition or 10 minutes for HDTV.Player BarWhenever you press one of the player control buttons, you’ll seethe Player Bar, which gives you status information about the program you’re currently watching. You’ll see a version of the playerbar no matter what type of media you’re enjoying, whether it’srecorded or live TV, photos, or music.PLAYER BAR SCREEN:1 CURRENT TIME –The current time orpoint in the currentprogram.2PROGRAM –The current live orrecorded programbeing played back.3 SHOW START TIME – The start time of the recorded or LiveTV program.4 STORED IN MEMORY – while watching live TV, this area(the buffer) displays the part of the show recorded intemporary memory. While watching recorded TV, it shows theentire contents of the show available for viewing.6
5 PLAYER BAR STATE – The current state of the programcontrols, such as play, pause, rewind, and fast-forward.6 SHOW END TIME – Displays the end time of the Live TVprogram or the duration of a recorded TV program.TV CHANNELS LAYOUT:1 TIME – With the current time, you’ll know when yourshow begins.2 CURRENT CHANNEL–Displays the channelthat is playing in MiniTV. If the program isrecorded, an icon willdisplay the currentstatus - i.e., play orpause.3 MINI TV – Even whenchannel surfing, MiniTV always keeps you inthe action.4 FOCUS PROGRAM – Pressing INFO on this item brings up anaction menu.5 AVAILABLE TV PROGRAMS – Displays all of the programsavailable in your TV lineup that are currently airing. Use thearrows to scroll.6 RECORDING ICON – Displays an icon if the show is recordingor scheduled to record.7 INFORMATION PANEL – Displays program information aboutthe show in focus.8 PROGRAM INFORMATION – Displays the next threeupcoming shows that will air on the channel in focus.*Helpful Hint: Holding down the up or down arrow button allows f or fastersurfing. Use the channel up or down to move in “blocks” o f channels. 7
Recorded TV FunctionalityIn the horizontal menu, you’ll find the Recorded TV category. Allof the recorded shows that are currently recording are listed inthe vertical band in alphabetical order. Episodes of a series aregrouped into folders; you’ll see the individual episodes in thepreview panel to the right. To watch a show, select it, and pressOK. And if you’ve already watched half of the show, you canchoose whether to resume where you left off or start over fromthe beginning.RECORDING ICONSYour system includes the following recording icons for status ata glance. The following icons appear on focus cards and verticalcards throughout the main menu:The show is recording right now.The show is scheduled to be recorded.The show is recorded and may be deleted when spaceis needed for newer shows.The show will not delete and can only be deleted manually.RECORDING OPTIONSIf you have record once or record series selected, you’ll see anarrow to the right that allows you to access recording options.You can also access recording options from the action menu of ashow that’s currently recording or scheduled to record.SCHEDULED TO RECORD - SINGLE EPISODESRecording options for a single episode scheduled to record: Keep - lets you decide when the show will be deleted. Get series - sets the entire series to record. Stop - allows you to set the recording to stop early or late. Start - allows you to set the recording to start early or late.SCHEDULED TO RECORD - SERIES Keep Episode limit - Determines how many episodes will be storedautomatically. Accept - Determines whether you’ll accept first-run only orrepeat episodes. Timeslots - Lets you record only episodes airing at a certaintimeslot. Priority - Sets the priority order of your series recordings. Cancel series - Cancels the scheduled recordings. Start Stop8
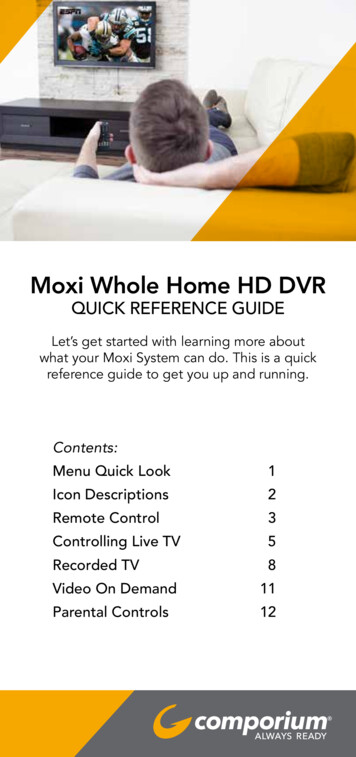
CONFLICT MANAGEMENTYour system comes with six tuners, which means that you canrecord up to six* shows at once unless someone is watching live TVat the same time. In the event that there is a tuner conflict, such aswhen you have six recordings scheduled and are watching anotherlive show, your Recorded TV will bring up an action menu thatoutlines your options and lets you make a choice.SPACE MANAGEMENTShows are automatically kept until more room is needed. You canprotect shows from deletion from the Recorded TV category; seethe following chapter for details.When you schedule a new show to record, your system will checkto make sure your hard drive has enough room.If your hard drive does not have enough room for the new recording, you’ll receive a message informing you that, when the newshow airs, some recordings may need to be deleted in order tomake room for the new show.If all of your current recordings are protected against deletion,you’ll get a message that your show may not be recorded.RECORDED TVSCREEN LAYOUT:121 CHANNEL LOGO –Displays the channel ofthe recorded show.2 RECORDED SHOWICONS – Let you knowif the show is in dangerof deletion or protectedagainst deletion.345673 FOCUS – Displays the channel number, logo and an indicationof whether a show is part of a series. Folders that containmultiple episodes in a series also display the number of episodes.4 SERIES FOLDER – Episodes of a series are held within a folderlisting the number of recorded episodes.5 EPISODES OR DURATION – If the item in focus is a foldercontaining episodes in a series, focus lists the number ofepisodes. If it’s an individual show, it lists the show’s duration.*Helpful Hint: To delete an entire series of recording, highlight the programand press Clear. Follow the on screen directions.9
6 INFORMATION – With a folder containing episodes in a seriesin focus, this area shows the current recording options for theseries. With a single recorded program in focus, this areashows a summary of the show information.7 SERIES – Individual episodes in a series are shown in thepreview panel. Press the right arrow button and select anepisode to see that episode’s action menu.*Helpful Hint: When watching a recorded show, use the ZOOM button to gofrom the menu back to the recorded program. Do not press “Live TV” as itwill take you out of the recorded show.RECORDED TV MANAGEMENTWhen you press INFO with a recorded program in focus, you’ll getthe following list of opations in the action menu: Resume – This option only appears if you’ve watched a portionof the program. Launches the program full screen from the pointyou left off. Start Over – Launches the program full screen from the beginning. Delete – Removes the program from Recorded TV. Recording Options – Lets you access the recording options menu. Keep Until – Your system will automatically delete the oldestshows in your Recorded TV folder as you need the room for newrecordings. Keep Until lets you set the program to be deleted atthe point of your choosing. See All Times – Displays all of the times that particular show airs. Lock – Prevents someone from watching the recorded programwithout a PIN. Record Series – you’ll get this option if you only have a singleepisode recorded.RECORDED TV OPTIONS he Options card appears in the Recorded TV category and letsTyou set your personal recording preferences. Select the Optionscard, and you’ll get access to:Canceled and Deleted – When you chose to record one showover another due to a conflict, (or someone in your householddoes) sometimes it’s hard to remember why that canceled showisn’t showing up in Recorded TV. Your system keeps a list of showsthat you have scheduled that will not record as well as shows thatdid not record. The shows above focus have not aired yet, whilethe shows below focus have already aired.Scheduled to Record – You can confirm that a show is set torecord using the Scheduled to Record category. In Scheduled toRecord, you can also cancel a recording and access your recordingoptions for each show. Just pick the show you want to manageand press INFO.10
Video On DemandVideo on Demand, or “VOD,” allows you towatch what you want, when you want.Choose from thousands of movies and shows,some free, and some available before Netflix or Redbox.Accessing VOD Tune directly to channel 700 Press the shortcut button on your remote Select the VOD icon from the horizontal menuExploring VODVOD items are organized intofolders including SD & HDmovies, free on demand (likeA&E, Nickelodeon and AMC),and free movies. Use theArrow Pad (see page 3) tonavigate. To enter a folder,press OK.Additional category foldersare located in each mainfolder. Use the right and leftarrow keys to surf throughthe various choices. Toexpand the category, press OK.Making AVOD PurchaseUpon selecting the desiredprogram, select “rent” bypressing OK. Confirmpurchase, as needed. Enjoyyour in home entertainmentall from the comfort of yourcouch!To restrict access to VOD, enable Parental Controls as describedon Page 12.11
Parental ControlsCREATING A PIN1. The first time you use Parental Controls the system asks you tocreate a PIN.2. In the Settings category, scroll to the Parental Controls cardand press OK.3. Press the numbers on the remote to enter a four digit PINand then enter the PIN again to confirm it.4. Choose close.CHANGING A PIN1. In the Settings category, scroll to the Parental Controls card,and press OK.2. Choose settings, use the left arrow to scroll left to the ChangePIN card, and then press OK.3. Enter the old PIN, enter the new PIN, and then enter the newPIN again to confirm it.LOCKING BY CHANNEL AND/OR RATING1. In the Settings category, scroll to the Parental Controls card,and press OK.2. Choose settings. You’ll be taken to the Parental Controlsmenu. Use the right arrow to choose either TV Ratings, MovieRatings or Lock By Channel.3. Each card contains a list of the rating systems or a list ofchannels. Scroll to the format or channel you want to control.Lock the rating or channel by choosing it, and then pressingOK on the remote. When you lock a rating, all ratings for morerestrictive content are also locked. For example, if you lock theTVPG rating, then the TV14 and TVMA ratings are also lockedautomatically, because these ratings are for more matureaudiences than TVPG. When unlocking, the reverse is also true.If the V-Chip in your TV is enabled, you may see a black screenafter tuning to a channel with blocked content. No menu, flip bar,sound effects, or any other audio or video are shown or heard.To correct this, change to an unblocked channel, or disable allV-Chip functions and use the parental control features provided bythe system to regulate viewing.4/1312
Moxi Whole Home HD DVR QUICK REFERENCE GUIDE Let’s get started with learning more about what your Moxi System can do. This is a quick reference guide to get you up and running. Contents: Menu Quick Look 1 Icon Descriptions 2 Remote Control 3 Controlling Live T