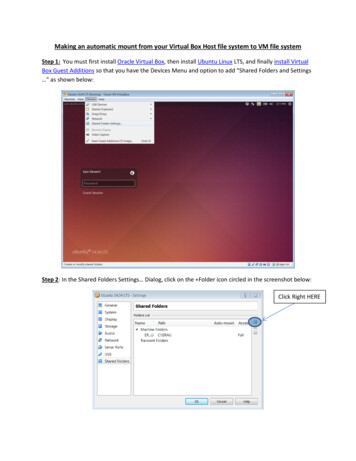
Transcription
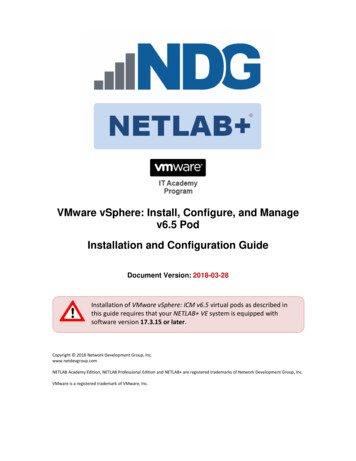
How to Install Virtual BoxMarcos ValdebenitoI- IntroductionThis How To will show the installation of the Virtual Box program thatcan be set up in Windows XP to run a second Operating System in a single computer.Additionally, Linux OpenSolaris, will be installed to demonstrate the use of the VirtualBox.II -What is VirtualBox?Virtual Box is an Open Source software, is freely available, and performs as aVirtual Machine. It can be installed in the most popular operating systems such asWindows XP and Vista, Macintosh and Linux hosts, while additionally supporting alarge number of guest operating systems such as Red Hut, Fedora, Obuntu,OpenSolaris, Open SUSE, Devian. You can even install Windows Vista or WindowsXP Guest in a Linux Host without a dual boot environment just one key willswitch from Host OS to Guest OS. This is a big advantage since you can have twooperating systems in the same screen at the same time without restarting yourmachine!III- How to install the VirtualBoxWe will go step by step in the process of installing VirtualBox in a computer thatruns Windows XP. Before proceeding with any installation I suggest to create a newpartition exclusively for VirtualBox. I have created a new partition with the letter E: \and have assigned 16 GB. I’m sure that you don’t need to create a special partition forthis installation but I feel more relieved doing it and remember VirtualBox is free!1- To download the VirtualBox application, go to www.virtualbox.org2- Select on the right side menu, Downloads3- From the list select VirtualBox 2.0.4 for Windows hosts x86 (for XP only)for other host operating systems select accordingly. Choose the destination whereyou will save it. (Fig. 1.1)Fig 1.1
4 - A window will indicate the download progress. The download will takeapproximately 3 minutes.5 - Once the download is completed, go to the location where you have saved thefile and double click on it. A welcome window will open. Hit next and accept theconditions. Click next.When you get to the Custom Set Up window you can chose in which locationyou would like to save the program. By default it goes to your Program Files inyou’re C:\ drive but you have the option of choosing another folder or partitionwhere the program will be stored (Fig. 1.2)Fig. 1.2
6 - Once you selected the place where you’re going to save the VirtualBox program, hitnext.7 - Next window will ask you to install the VirtualBox. Go ahead and hit Install8 - VirtualBox will be installed in your computer. This process will take a few minutes.9 - Once the installation is completed hit Finish and open the VirtualBox in yourcomputer.Go to Start All Programs Sun xVM VirtualBox VirtualBox. This will bring up theVirtualBox windows in your screen, as showed in Fig. 1.3. Notice that the first time youopen VirtualBox it is going to ask you to register the product. Do this just by typing yourname and email.Fig. 1.310- Our VirtualBox is already installed.IV- Installing a Guest operating systemNext step will be installing an operating system. I have chosen OpenSolarisdistribution, which is also free. There are 2 options to get OpenSolaris. One is todownload the .iso file from this site: http://opensolaris.org/os/downloads
The second option is to order a CD from this site: https://oscd.sun.com. It will ask you toregister and then enter your name and address and a copy of OpenSolaris will be sent toyour home for free. I chose the second option since I could use the CD as a live CD andplay with OpenSolaris first before installing it.11- Place the CD into the disc drive and open VirtualBox. Now hit New in the upper leftside of the window as showed in Fig 1.4Fig 1.412- A Wizard installation will show up and just follow the steps. We will be naming theOS to be installed, I chose the name “Orbitahead”. Also select OpenSolaris in the dropdown menu. Fig 1.5Fig 1.5
13- Now we will set the system memory. This means how much RAM the Guestoperating system will be using. OpenSolaris recommends a minimum of 512 MB. Iselected 1 GB or 1000MB (Fig 1.6)Fig 1.6
14- Now is the turn of the Hard Drive. You will be setting the size of hard drive that wecan use for this Guest Operating system (Fig 1.7). You will have 2 options; Fixed-sizeimage and dynamically expanding image. I would recommend selecting dynamicallyexpanding image because this means that initially, the image will take a small amount ofhard drive when installed (Fig 1.8).Fig 1.7
Fig 1.815- Fig 1.9 shows the size that you expect the Guest OS will use. I selected 16 GB.If you want to assign a different partition (other than C :\) where the Virtual Drive willbe, you can choose it here. I have created a special partition for the VirtualBox previouslyits installation. I suggest doing the same since you don’t want to delete any data youalready have in your Host operating system by accident.Fig 1.9
Browse to choose a different partition.Select the HD size for this guest operating system.16. Hit next and now you will have the confirmation of the settings. (Fig 2.0, and 2.1)If you want to change any of the settings, just hit back to do so.Once you have confirmed the system memory, the hard drive memory and its location, hitfinish.Fig 2.0
Fig 2.117- And that’s it! We have created a Virtual Machine for OpenSolaris in Virtual Box.You can see the VirtualBox and the new Virtual Machine on the left side of the screen.On the right side you can see the settings that you have created for the Guest OS. Fig 2.2Fig 2.2
18. Now that you have the Virtual Machine OpenSolaris, next will be installing theOpenSolaris operating system. Hit start (Fig 2.3) and select the CD where the OS willboot (Fig 2.4)Fig 2.3Fig 2.4
19- Now we have the OpenSolaris OS booting from the CD as showed in Fig 2.5Fig 2.520. Next screen will ask you to select the language and keyboard layout. I selectedEnglish for both.
21- After selecting the language, you are already working with the Live CD. To installthe OS, just double click in the Install OpenSolaris Icon placed on the desktop (Fig 2.6)Fig 2.623- Follow the installation process. Special attention must be taken when selecting thepartition where the Guest OS will be located (Fig 2.7). I selected the partition that I hadalready created for VirtualBox (see step 15).Fig 2.7
22- The next steps will ask you to set the time zone, country location, and user and rootpasswords. Choose a password that you will remember.23- Now the installation will start. This process will take about an hour or so. (Fig 2.8)Fig 2.8
24- Once completed, the screen will ask you to reboot the Guest OS. This will onlyreboot the Guest OS in the VirtualBox, not the Host OS.25- After the reboot is completed, open your Guest operating system (OpenSolaris) againin the VirtualBox. Log in entering the password you have chosen and you now have twooperating systems in your computer; Windows XP and OpenSolaris.Notes: - When clicking with the mouse in the VirtualBox screen, the Mouse will be“captured” inside the VirtualBox, allowing you to use it only in your Guest operatingsystem. If you want to go back to your Host Operating system, just hit the Right Alt keyin your keyboard. You can configure any other key to do this in the VirtualBox by goingto File Preference Input.- After installing OpenSolaris you might want to download the Guest additions to takefull advantage of your Guest operating system such as full frame and screen resolution.- Nevertheless to say, it is always recommended backing up all your data before installingthe VirtualBox.
4 - A window will indicate the download progress. The download will take approximately 3 minutes. 5 - Once the download is completed, go to the location where you have saved the file and double click on it. A welcome window will open. Hit next and accept the conditions. Click next. When you g