Transcription
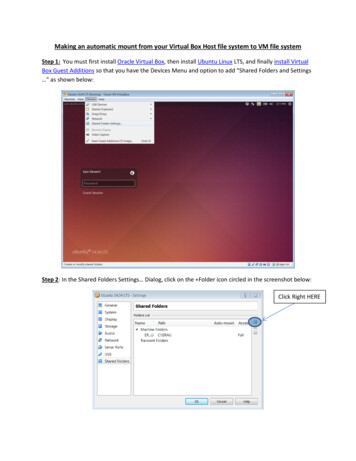
Making an automatic mount from your Virtual Box Host file system to VM file systemStep 1: You must first install Oracle Virtual Box, then install Ubuntu Linux LTS, and finally install VirtualBox Guest Additions so that you have the Devices Menu and option to add “Shared Folders and Settings ” as shown below:Step 2: In the Shared Folders Settings Dialog, click on the Folder icon circled in the screenshot below:Click Right HERE
Step 3: Make a folder on your Host Windows or Macintosh system (I use the name “ERAU” on my C:drive, but use what you will remember best). Now browse to it as your “Folder Path:” as shown below:Step 4: The Folder Name will take on the name of the folder from the path you browsed to and justmake sure to check the “Make Permanent” box as shown here and just complete with “OK”:
Step 5: Create a mounting point for the Host Shared Folder with “sudo mkdir /mnt/ERAU” or whatevername you want in place of “ERAU” (that’s just what I use). To verify, enter “df” and “ls /mnt” and youshould see something like this:Step 6: Test your Shared Folder as a mount on your Virtual Box Linux system by opening an terminal andentering the mount command “sudo mount –t vboxsf ERAU /mnt/ERAU” and aftwards enter “df” andyou should now see the Host Shared Folder mounted on your Linux VM installation:Step 7 (optional): If you just want this done AUTOMATICALLY every time you start up your VB-Linuxinstance, then you need to make an entry in a system file to specify this as well as telling Ubuntu to loadthe vboxsf (Virtual Box Extension Support) at boot time [this normally works, but if a mount fails forsome reason, you can normally just “Skip” the mount]. If you are new to “vi”, you may want to makesure you use an alternate editor such as “nano” or learn “vi” and use the cheat sheet of commands of vifound here, or here, or here. E.g. if you delete the host Shared Folder, this automatic mount will fail and
hang up your boot until you let the boot loader know that it’s OK to skip this automatic mount. This iswhy I list this step as optional. You can always just repeat Step #6 manually whenever you need to afterboot. But, it is horribly convenient to have an automatic mount – I do it so I can easily grade Linux C/C programming assignments. Here’s what you do. First, edit /etc/modules and add vboxsf as shown with“sudo vi /etc/modules”:Add “vboxsf”Save this and now edit a second file, /etc/fstab with “sudo vi /etc/fstab” and add the lineAdd mountdirective asshown with Tab betweenentries
Step 8 (optional): Verify your automatic mount by restarting your Linux installation VM and after itboots, just login and use “df” to verify that you in fact see the mount. If you fat-finger something (Imade my mount point path bad on purpose to demonstrate), you may see this when you reboot:Just enter S to skip and fix the error in /etc/fstab and try again. It’s also possible that your Kernelmodule “vboxsf” did not load for some reason and/or your VB extensions are not working. Verify bothmanually, look for errors in /etc/modules and /etc/fstab and you should be able to get the automaticgoing as long as you have no unresolvable manual mount issues.
the vboxsf (Virtual Box Extension Support) at boot time [this normally works, but if a mount fails for some reason, you can normally just “Skip” the mount]. If you are new to “vi”, you may want to make sure you use an alternate editor such as “nano” or learn “vi” and use the