Transcription
2012GETTING STARTED WITH CODE ON TIMEGot data? Generate modern web apps in minutes. Learn to create sophisticated web apps with Code On Timeapplication generator for ASP.NET, Azure, DotNetNuke, and SharePoint.
ContentsCreating an App. 3Using the Project Designer. 12Project Browser . 13Project Explorer . 15Navigate To . 17Creating a Three-Level Master-Detail Page . 19Creating the Page . 19Establishing Master-Detail Relationships . 22Rearranging Data Fields . 28Moving . 28Deleting . 28Adding . 29Designing Forms . 32Floating Category Data Fields . 32Configuring a Multi-Column Form . 34Custom Category Template . 38Configuring Charts . 42Creating the View . 42Viewing the Results . 44Creating Many-to-Many Fields . 48Changing the Child Views. 54Creating Calculated Fields . 57Creating the virtual Field. 57Updating the Custom Category Template . 60SQL Formula . 62Calculating Field Values Just-in-Time . 63SQL Business Rule . 63Code Business Rule . 65JavaScript Business Rule . 68Implementing a Custom Action . 70Adding a Custom Action . 70Creating the Confirmation Controller . 71Creating an SQL Business Rule to Handle the Action . 751 Page
Creating “Code” Business Rule to Handle the Action . 772 Page
Creating an AppLet’s create a new Web Site Factory project.Start Code On Time web application generator and select Web Site Factory under New Project.The next page will prompt to specify a name and programming language of the project.Select the programming language of your choice and specify the following name:Property ValueNameMyProject13 Page
Press Create button to create the project.The next page allows changing the Namespace and the version of Microsoft .NET Framework. Leave the defaultvalues and press Next.4 Page
This page allows specifying the Data Provider and Connection String. Select your data provider from the list.This tutorial uses Microsoft SQL Server database engine. If you do not have a database server,consider installing Microsoft SQL Server 2012 Express.Click on the button to the right of the Connection String field to open the Connection String Configuration page.5 Page
If you have SQL Server Express edition, specify the orthwindSample TablesNorthwindTo the right of Database field, click on the Create button and confirm to create the database.To the right of the Sample Tables dropdown, press Install and confirm to populate the project database with theNorthwind dataset.6 Page
Code On Time does not offer tools to design databases. Use your favorite database managementtools, such as Microsoft SQL Server Management Studio, to work with the database schema.Our application will have built-in user and role management system. Code On Time applications rely on the securityinfrastructure available in ASP.NET.Under Membership section, press Add and confirm to add ASP.NET Membership to the database.You will see a confirmation when the membership has been configured.Press OK to finish configuration of the database connection string.7 Page
If you are using a trial version of the application generator, the project size is limited to 10 tables or views. To selecta subset of tables for the project, click the Change button next to “All database tables and views are included in thisproject”. Include the following tables: Categories, Customers, Employees, EmployeeTerritories, Order Details, Orders,Products, Shippers, Suppliers, and Territories.8 Page
Press Next twice to reach the Reporting configuration page. Enable dynamic and static reports in the application.Hold down Shift key and press Next – this will skip directly to the Summary page. Press the Generate button to startcreation of the web application.9 Page
When generation is complete, the web site will open in your default browser.10 P a g e
11 P a g e
Using the Project DesignerThe Project Designer allows customizing the pages and data controllers of the web application.To activate the Project Designer, click on a project name on the start page of the application generator.Then, click on the Design button.The Project Designer will open.On the left side of the screen is the Project Browser. The right side contains the Project Explorer.12 P a g e
Project BrowserThe Project Browser allows navigating the project configuration elements. The tabs display lists of pages, datacontrollers, user controls, commands, fields, views, and data fields.Navigate to the properties page of an element by clicking on the link in the first column or using the context menuoption Open.13 P a g e
The properties page of the project configuration element will open. The breadcrumbs in the path area above theProject Browser show the location of the object. The tabs at the top of the page will change to reflect projectconfiguration elements that belong to the currently selected element.Quickly access the Learning System article for the selected project configuration element by clicking on the questionmark icon in the top right corner.14 P a g e
The Project Explorer can be synchronized with the current Project Browser element by using the Sync command onthe action bar or pressing Ctrl Period keyboard shortcut (“Ctrl” key and “.” key).Project ExplorerThe Project Explorer displays a logical hierarchy of project configuration elements separated into three tabs: Pages,Controllers, and User Controls.15 P a g e
Double-click on a node in the Project Explorer or use the Open context menu option to display the properties pagefor the relevant element.16 P a g e
Drag project elements to change the application configuration. As an alternative, you can use Cut/Copy/Pasteoptions in the context menu of project configuration element nodes. These operations can be performed onmultiple selected elements of the same type.Node names of project configuration elements can be changed using the Rename context menu option.Navigate ToThe Navigate To window will search for project configuration elements by property values as soon as you type asample search criteria.The window can be activated by clicking on the Navigate To icon on the Project Explorer toolbar or pressing theCtrl Comma keyboard shortcut (“Ctrl” key and “,” key).The Navigate To window will open. Start typing search terms. Matching entries will appear as soon as you stoptyping.17 P a g e
Highlight a result and press OK or press Enter on the keyboard to open the properties page of the element in theProject Browser and have it highlighted in the Project Explorer.18 P a g e
Creating a Three-Level Master-Detail PageLet’s create a page with a three-level master-detail relationship between Customers, Orders, and Order Detailscontrollers.Creating the PageStart the Project Designer. On the toolbar of the Project Explorer, click on the New Page icon.Enter “OrderManager” in the page Name and press OK to create a new page.PropertyValueNameOrderManagerThe Order Manager page will be added to the bottom of the list of pages in the Project Explorer. Drag Order Managernode to the right side of Home node to place it after the page.19 P a g e
Switch to the Controllers tab in the Project Explorer. While holding Ctrl, select the controllers in the following order:Customers, Orders, OrderDetails. Right-click on OrderDetails, and press Copy.Switch back to the Pages tab. Right-click on Order Manager page node, and press Paste option. The controllers willbe instantiated as data views in separate containers on the page.Right-click on Order Manager page node, and press View in Browser.20 P a g e
Navigate to the Order Manager page. Three views will be available on the page, but they do not have any masterdetail relationships established between them. The three data views are completely independent from each other.21 P a g e
Establishing Master-Detail RelationshipsSwitch back to the Project Designer. In the Project Explorer, drag the data field node Order Manager / c102 / view2 /grid1 / CustomerID onto the view node Order Manager / c101 / view1. This will configure a master-detail relationshipbetween view2 and view1, with CustomerID as the filter field.Next, drag the data field node Order Manager / c103 / view3 / grid1 / OrderID and drop it onto view node OrderManager / c102 / view2.22 P a g e
On the toolbar, press Browse.Only the Customers data view is now visible on the Order Manager page.Select a record from the list of customers, and orders related to the selection will appear in a data view underneath.23 P a g e
Select an order, and order details for that order will be displayed.24 P a g e
Select a child order detail. The record will be displayed in a modal form.25 P a g e
If a master data view enters “New” mode, the child data views will automatically become hidden.For example, if a new customer is created, the data views Orders and Order Details will be invisible. If a new order iscreated, only Order Details data view will disappear.26 P a g e
27 P a g e
Rearranging Data FieldsThe application generator composes this view of Customers from the database.Let’s change some of the data fields presented in the view. For example, let’s move Phone data field next to ContactName, remove the Region data field, and add Fax to the view.MovingSwitch to the Project Designer. In the Project Explorer, activate the Controllers tab and expand to Order Manager /c101 / view1 / grid1 data view node. Drag Phone data field and drop it on the right side of ContactName data fieldto place it after the target.DeletingRight-click on Order Manager / c101 / view1 / grid1 / Region data field node, and select Delete.28 P a g e
AddingExpand Customers / Fields node. Drag Fax field node onto Customers / Views / grid1 node to create a data field fromthe Fax field.29 P a g e
Switch to the Pages tab in the Project Explorer. Right-click on Order Manager page node, and press View in Browser.The Customers grid with new column layout will be displayed. The Phone field is more conveniently placed next tothe Contact Name. The Region field has been removed. Fax has been added.30 P a g e
31 P a g e
Designing FormsLet’s customize the forms on the Order Manager page.Floating Category Data FieldsWhen a customer is selected, the data item is displayed in the form view editForm1. The form data fields arerendered top-down.Let’s have the data fields displayed in a more compact fashion.Switch back to the Project Designer. On the Pages tab of Project Explorer, double-click on Order Manager / c101 /view1 / editForm1 / c1 – Customers category node.32 P a g e
Change the Float property:PropertyValueFloatYesPress OK to save the category. Right-click on Order Manager page node, and press View in Browser.33 P a g e
The data fields in Customers form view float from left to right and wrap when they reach the right side of thebrowser window which makes for a more compact presentation. If the browser window is resized, the form will resizeas well.Configuring a Multi-Column Form34 P a g e
The picture below shows editForm1 view of Orders data controller. Let’s use categories to organize the data fields inmultiple columns.In the Project Explorer, right-click on Order Manager / c102 / view2 / editForm1 view node. Select New Categorycontext menu option.35 P a g e
Assign the following properties:PropertyValueHeader TextShipping InfoDescriptionThis is the shipping information.New ColumnYesPress OK to save the category.In the Project Explorer, expand Order Manager / c102 / view2 / editForm1 / c1 – Orders category node. Select all datafields that start with “Ship-”. Drag the data fields onto c2 – Shipping Info category node.36 P a g e
Right-click on Order Manager page node and select View in Browser.Data fields on the Orders form will be split in two columns.37 P a g e
Custom Category TemplateThe Order Details layout of editForm1 view created by the application generator is shown below.38 P a g e
Let’s create a custom layout for the first category in Order Details form. In the Project Explorer, right-click on OrderManager / c103 container node, and select New Control.Next to the User Control property lookup, activate the New User Control icon.Assign a name to the user control.PropertyValueNameOrderDetails CustomCategoryTemplatePress OK to insert the new user control into the User Control property, and press OK again to save the control.On the Project Designer toolbar, press Generate. When complete, right-click on Order Manager / c103 / control1node, and press Edit in Visual Studio.39 P a g e
The template file will open in Visual Studio. On the menu, select Edit Advanced Format Document. Replaceeverything after the %@ Control % element with the following: div style "display: none;" div id "OrderDetails editForm1 c1" table tr td style "padding-right: 36px;font-weight:bold;" Product: /td td style "padding-right: 18px;" span class "FieldPlaceholder DataOnly" {ProductID} /span /td td style "padding-right: 18px;" Discount: /td td span class "FieldPlaceholder DataOnly" {Discount} /span /td /tr tr td Unit Price: /td td span class "FieldPlaceholder DataOnly" {UnitPrice} /span /td td Quantity: /td td span class "FieldPlaceholder DataOnly" {Quantity} /span /td /tr /table /div /div Save the file.Refresh the web browser page and select a customer, order, and order detail data rows. The first category ofeditForm1 view of Order Details data controller will be rendered using the new template.40 P a g e
41 P a g e
Configuring ChartsLet’s create a chart that will graphically present orders broken down by quarter.Creating the ViewStart the Project Designer. In the Project Explorer, activate the Controllers tab. Right-click on Orders / Views node, andpress New View.Give this view the following properties:Property ValueIdOrdersByQuarterTypeChartLabelOrders By QuarterPress OK to save the view.A chart requires at least two fields. One field will represent the values, and the other will form the x-axis of the chartthat will group values by a certain criteria. A chart may have more than one field representing values.For example, to display a chart of orders grouped by quarter, the OrderID field will represent values and OrderDatewill represent the x-axis.In the Project Explorer, expand the Orders / Fields node. Using Ctrl key, select OrderID and OrderDate fields, and dragthem onto Orders / Views / OrdersByQuarter view node.42 P a g e
This will create two data fields. Double-click Orders / Views / OrdersByQuarter / OrderID data field node.Assign the following values:PropertyValueAggregateCountChartBar (Cylinder)Press OK to save the data field. Double-click Orders / Views / OrdersByQuarter / OrderDate data field node.43 P a g e
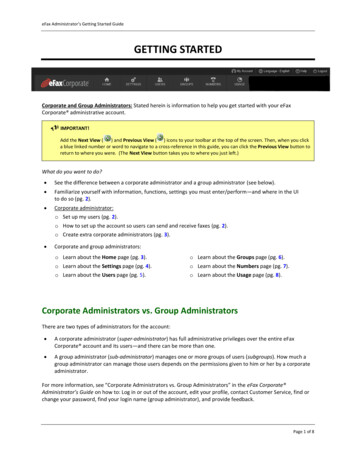
Assign these values:PropertyValueData Format String MMM yyyChartX, QuarterPress OK to save.Viewing the ResultsOn the Project Designer toolbar, press Browse.Navigate to the Order Manager page. Select a customer from the first data view. Use the View Selector in the topright corner of Orders data view to switch to Orders By Quarter view.44 P a g e
The chart will be displayed, showing the number of orders in each quarter filtered by the selected customer.45 P a g e
If you select another customer, the orders will change to reflect the new selection.46 P a g e
47 P a g e
Creating Many-to-Many FieldsThe Northwind database features a many-to-many relationship between Territories and Employees.The app generator will create a page for EmployeeTerritories that allows editing records directly.EmployeeTerritories is also available as a child data view on the Employees page. Selecting an employee will reveal alist of related territories.48 P a g e
Let’s create a many-to-many field on the employee edit form that will allow selecting territories in a check box list.Each option in the list will represent a territory from the Territories table. The checkbox next to the territory name willbe checked if there is a record in the EmployeeTerritories table linking the selected employee with the territory. Therelevant EmployeeTerritories records will be inserted or deleted when the user changes the selection of checkboxesand saves the employee record.Start the Project Designer. In the Project Explorer, switch to the Controllers tab. Right-click on Employees / Fieldsnode, and press New Field.Give this field the following values:PropertyValueNameTerritoriesAllow null valuestrueThe value of this field is computedat run-time by SQL expression.trueLabelTerritoriesItems StyleCheck Box List49 P a g e
Items Data ControllerTerritoriesData Value FieldTerritoryIdData Text FieldTerritoryDescriptionTarget ControllerEmployeeTerritoriesPress OK to save the field.Drag Employees / Fields / Territories field node onto Employees / Views / editForm1 view node.Double-click on Employees / Views / editForm1 / Territories data field node.50 P a g e
Change the Columns property:PropertyValueColumns5Press OK to save. Switch to the Pages tab. Right-click on Employees page node, and press View in Browser.51 P a g e
View the details for an employee. Territories field will display a comma-separated list of values associated with theemployee.52 P a g e
Press Edit button. All territories will be rendered as a check box list.53 P a g e
Check or uncheck several values, and press OK to save the record. Select the record to verify that the changes werepersisted.Changing the Child ViewsThe Employee Territories child data view is now unnecessary.Switch back to the Project Designer. In the Project Explorer, right-click on Employees / container2 / view4 node, andpress Delete.54 P a g e
Drag view3 node on the left side of view2 to place it in the first position.Right-click on Employees page node, and press View in Browser.Select an employee from the list, and the Orders and Employees child data view tabs will appear below. TheEmployee Territories child data view tab is no longer present. The picture also shows the many-to-many fieldTerritories in the master grid view.55 P a g e
56 P a g e
Creating Calculated FieldsThe picture below shows the Order Details form in edit mode.Let’s create a calculated field called Extended Price that will display the extended price of the Order Details item.Calculated fields are also known as virtual fields. The field value is not stored in the database - it is calculated atruntime based on values of other fields in the data row.Creating the virtual FieldActivate the Project Designer. In the Project Explorer, switch to the Controllers tab. Right-click on OrderDetails / Fieldsnode, and press New Field.Assign the following values:57 P a g e
ended PriceAllow Query-by-ExampletrueAllow SortingtruePress OK to save. Drag OrderDetails / Fields / ExtendedPrice node onto OrderDetails / Views / grid1 node to bind thefield to the view grid1.Drag OrderDetails / Fields / ExtendedPrice node onto OrderDetails / Views / editForm1 / c1 – Order Details node tobind the field to view editForm1.58 P a g e
Finally, drag OrderDetails / Fields / ExtendedPrice node onto OrderDetails / Views / createForm1 node.A binding of field to a view is called a data field.On the toolbar, press Browse and navigate to the Order Manager page. The Extended Price data field is visible in thegrid and in the form views of Order Details. However, the field is rendered as blank.59 P a g e
Note that if you have a custom category template associated with the form view, then the field will not be visibleautomatically. In that case, the custom category template for editForm1 needs to be updated to display the datafield.Read the next section to learn how to include the new virtual data field in the template, or skip to the followingsection discussing how to provide an SQL Formula for the field.Updating the Custom Category TemplateSwitch to the Project Designer. In the Project Explorer, switch to the Pages tab. Right-click on Order Manager / c103 /control1 node and press Edit in Visual Studio.The template file will be opened in Visual Studio. Replace the existing code after the %@ Control % elementwith the following: div style "display: none;" div id "OrderDetails editForm1 c1" table tr td style "padding-right: 36px;font-weight:bold;" Product: /td 60 P a g e
td style "padding-right: 18px;" span class "FieldPlaceholder DataOnly" {ProductID} /span /td td style "padding-right: 18px;" Discount: /td td span class "FieldPlaceholder DataOnly" {Discount} /span /td /tr tr td Unit Price: /td td span class "FieldPlaceholder DataOnly" {UnitPrice} /span /td td Quantity: /td td span class "FieldPlaceholder DataOnly" {Quantity} /span /td td style "padding-left:18px;" i Extended Price: /i /td td span class "FieldPlaceholder DataOnly" {ExtendedPrice} /span /td /tr /table /div /div Save the file, and refresh the webpage. The Extended Price data field will be displayed in edit form.61 P a g e
SQL FormulaLet’s provide an SQL expression evaluated when the data rows of order details are selected from the database.In the Project Explorer, switch to the Controllers tab and double-click on OrderDetails / Fields / ExtendedPrice node.Change the following:PropertyNew ValueThe value of this field is computedat run-time by SQL expression.trueSQL FormulaOrderDetails.UnitPrice * OrderDetails.Quantity *(1 - OrderDetails.Discount)Values of this field cannot beeditedtrueData Format StringcPress OK to save the field. On the toolbar, press Browse. The Extended Price field will not be editable, and the valuewill be presented when the form is rendered.62 P a g e
SQL Formula provides the highest possible performance for the calculation since it is being evaluated by thedatabase engine. The complexity of calculated fields depends on the capabilities of the database engine. There arenumerous built-in functions that the developer can take advantage of.Fields based on SQL Formula can be sorted and filtered with the highest possible performance as well.Calculating Field Values Just-in-TimeExtended Price is not recalculated when a user changes values of Unit Price, Discount, or Quantity fields.The SQL Formula of the Extended Price field is evaluated only when the data is selected from the database. If the usermakes changes in the browser window, the values will not be submitted to the server until the record is saved.Developers can implement a server-side or client-side calculation that will be performed just-in-time as userschange the values of the formula’s base fields.The application framework includes a business rule engine that allows implementing rules in SQL, C#/Visual Basic, orJavaScript.SQL and C#/Visual Basic business rules require a round-trip between the web browser and the web server. They canlook up database information and interact with external systems when necessary.JavaScript business rules are executed in the browser and provide the highest possible performance when serverside data is not required for calculation.Let’s consider implementing the calculation using all three flavors of business rules. Note that the developer needsonly one of them to accomplish just-in-time calculation of Extended Price.SQL Business RuleIn the Project Explorer, double-click on OrderDetails / Fields / ExtendedPrice node.63 P a g e
Make the following changes:PropertyNew ValueThe value of this field is calculated by truea business rule expression.Context FieldsUnitPrice,Quantity,DiscountPress OK to save. Right-click on OrderDetails / Business Rules node, and press New Business Rule.Assign these values:PropertyValueTypeSQLCommand NameCalculatePhaseExecuteScriptset @ExtendedPrice @UnitPrice * @Quantity * (1 - @Discount)64 P a g e
Press OK to save. On the toolbar, press Browse. Select and start editing an Order Details record.Change the value in Quantity field. Press Enter or shift the focus to a different field. The Extended Price will beupdated.The client library executes Calculate action, which causes transfer of field values to the server. The applicationframework will pass the business rule script along with the parameter values to the database engine for execution.Then, it evaluates parameters and returns changed values to the client web browser.SQL business rules involve client, application server, and database engine tiers. The advantage of SQL business rulesis the ability to access any database information when necessary.Code Business RuleThe business rule can also be implemented using C# or Visual Basic.If you have the SQL business rule created in the previous section, then you will need to delete or rename thebusiness rule. Double-click on OrderDetails / Business Rules / Calculate node.Change the Command Name property:PropertyValueCommand NameDoNotRunPress OK to save. Alternatively, business rule r100 can be deleted.65 P a g e
Right-click on OrderDetails / Business Rules node, and press New Bus
Using the Project Designer The Project Designer allows customizing the pages and data controllers of the web application. To activate the Project Designer, click on a project name on the start page of the application generator. Then, click on the Design button. The Project Designer will open. On the left side of the screen is the Project Browser.