Transcription
ZOLL Data Getting Started GuideSoftware version 3.10, Manual 3.10 2002, 2003, 2004 by ZOLL Data Systems, a subsidiary of ZOLL Medical Corporation. All rights reserved.RescueNet Code Review – Standard, Professional, and Enterprise Editions are trademarks of ZOLL Medical Corporation. Other product and company names may be the trademarks of their respective owners.RescueNet Ready!RescueNet Code Review software is a component of RescueNet —integrated, performance-driven software and medical devices forEMS organizations brought to you by ZOLL Data Systems and ZOLLMedical.The RescueNet suite includes several products designed specifically for the EMSindustry, including: RescueNet Code Review – Standard, Professional, and Enterprise Editions.Uniform resuscitation data collection, analysis, reporting, and management.Standard Edition is a free download available at www.zolldata.com/ZOLLData/.Standard Edition users can upgrade to Professional or Enterprise Editions bycontacting a ZOLL Regional Sales Manager or visiting: www.zolldata.com/ZOLLData/Store/. ZOLL M Series. The smallest, lightest, most advanced defibrillator monitor. ZOLL AED Plus. Guides users through the entire rescue process. Features ZOLL’shallmark durability, advanced technology, quality, and value. RescueNet Dispatch advanced computer-aided dispatch. RescueNet Billing integrated billing. RescueNet Field Data for PC field data collection for Windows. RescueNet Filed Data for Pocket PC field data collection for Pocket PCs. RescueNet Mobile mobile data system. RescueNet Dispatch Web Scheduler Web-based trip ordering. RescueNet Dispatch Web Viewer online transport tracking.For more information: www.ZOLL.com and www.zolldata.com.
Getting startedWelcome to RescueNet Code Review – Standard, Professional, and Enterprise Editions,Windows-based software you can use to easily access, view, annotate, maintain, and printresuscitation incident data.TopicsStarting Code Review – page 2Exporting cases – page 17Transferring AED Plus cases via infrared (IR) – page 2Printing reports – page 18Transferring M Series cases via Bluetooth – page 3Closing cases – page 21Transferring cases via card reader – page 3Erasing cards – page 21Transferring cases via serial cable – page 4Tools › Options – page 22Reviewing cases – page 5Using Code Review for multiple users – page 22Viewing the entire ECG – page 6Licenses for upgrades – page 24Magnifying ECG and playing animation – page 7Utstein data – page 25Zooming – page 8Advanced parameters – page 26Saving added case data – page 912-lead details – page 27Adding annotations – page 10Trend reports – page 28Opening existing cases (zol or crd files) – page 12ZOLL InterLink – page 29Searching for cases – page 13ZOLL Director – page 37Creating new blank cases – page 14ZOLL Grabber – page 39Linking cases – page 15Getting help – page 41Sending cases to another folder – page 16Latest information and updates – page 41Upgrades – page 41Code Review – Getting started › Topics1
Starting Code Review1. Click!2. RescueNet Code Review opens.Transferring AED Plus cases via infrared (IR)1. Position AED Plus near infrared readerof an infrared-enabled PC.“Communicationsestablished.”2. Click!3. Press and hold for about 5 seconds, untilyou hear “Non-rescue mode.”4. Incident data is transferred. See also Infrared transfersettings on page 22 and ZOLL InterLink on page 29.2Code Review – Getting started › Starting Code Review
Transferring M Series cases via Bluetooth2. Click!1. Position M Series within 30 feet (10meters) of PC (Bluetooth is omnidirectional).3. Press and hold the leftmostsoftkey, and then turn on defibrillator.4. Hold leftmost softkey until “System Utilities” mode isdisplayed, and then press Upload and Send.5. Incident data is transferred.See also Bluetooth transfer settings on page 23 and ZOLLInterLink on page 29.Transferring cases via card reader1. Remove flash card from M Series or1600/1700 and insert into cardreader attached to PC.2. Click!3. Incident data is transferred.See also Card reader transfer settings on page 22.Code Review – Getting started › Transferring M Series cases via Bluetooth3
Transferring cases via serial cable2. Click!1. Attach M Series (or 1600/1700) withthe flash card inserted to the PC,using ZOLL serial cable.3. On M Series, press and hold downleftmost softkey, and then turn ondefibrillator.4. Continue to hold down leftmost softkey until “SystemUtilities” mode is displayed, and then press Uploadand Send.5. Incident data is transferred. See also Serial transfer settings on page 23.4Code Review – Getting started › Transferring cases via serial cable
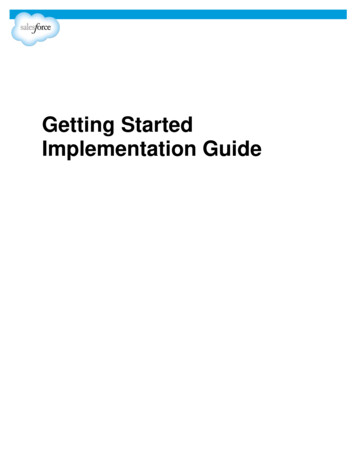
Reviewing casesMenusCommand buttonsTabsUnique case IDDefibrillator dataCase tree contains alist of resuscitationincident cases andassociated events.Patient informationTo add date of birth,click!Case date:1. Click!Patient name:2. Click!4. To view long text in the tree, pause Case events:Case ID:3. Click!Case event symbols indicatethe item’s data source or origin: M Series events AED and AED Plus events User-entered events 1600/1700 eventsCode Review – Getting started › Reviewing cases5
Mark cases as reviewedor not reviewedWhen cases are first opened, they are marked unreviewed. After being selected for five seconds, they are automatically marked reviewed.You can also manuallymark a case not reviewed(or reviewed).1. Right-click!2. Click!Viewing the entire ECG1. Click!1 strip 00:00:30 5.00 mVCase events6-second reference box5 strips 00:02:30Gain 1MidpointScroll ECGTime modeTime mode for an AED Plus case: Real time is displayed unless it is not known, in which caseelapsed time is displayed. (This can occur if the AED Plus was reset or its batteries werechanged between the time of the incident and the time of the data transfer.)6Code Review – Getting started › Viewing the entire ECG
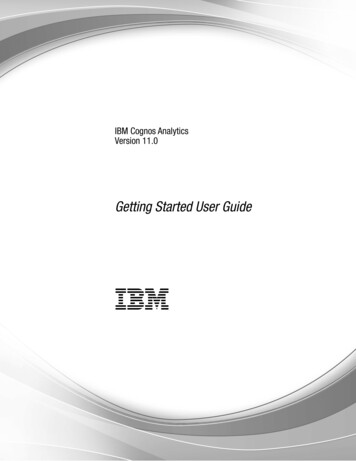
Magnifying ECG and playing animationNote: The animation includes sound recorded on an AED Plus or an M Series, if any.Method 1:Method 2:Click!Method 3:Click!6-secondreference boxClick!Grid 00:00:00.2 0.50 mVStrip 00:00:06Default gain 1Animated ECG:PlayStopMidpointCPRInches of compressionTo show a different parameter, click!Time that compressionoccurred(compression depth andrate only appear for AEDPlus)Scroll ECGCode Review – Getting started › Magnifying ECG and playing animation7
Copying1. Right click!2. Click!3. Paste in another program.Zooming2. Choose view.1. Click!– or –2. Choose Zoom In or Out.1. Click!8Code Review – Getting started › Magnifying ECG and playing animation
Saving added case data1. No changes.2. Add or change case data.Added info.3. Click!Code Review – Getting started › Saving added case data9
Adding annotationsMethod 1:1a. Click!1c. Type:- Time- Title- Annotation1b. Click!1d. Click OK.Method 2:2a. Right-click grid at desiredtime.2c. Time is prefilled.2d. Type:- Title- Annotation2e. Click OK.2b. Click!3. Annotation added.10Code Review – Getting started › Adding annotations
Editing/viewing annotations1. Right-click!32. Click!Deleting annotations1. Right-click!2. Click!3. Annotation deleted.Code Review – Getting started › Editing/viewing annotations11
Opening existing cases (zol or crd files)1. Click!2. Looks first in your Default data files folder(see page 22), but you can look in anyfolder.3. Click a zol or crd file.4. Click!5. Case displayed.6. If you open a crd file, its cases areautomatically saved as zol files inyour Default data files folder (seepage 22).File name date time computername (time hour minutes seconds milliseconds).12Code Review – Getting started › Opening existing cases (zol or crd files)
Searching for cases1. Click!2. Starts in Default data files folder (see page 22). Click Browse tosearch a different folder.3. You can search using any combination of thesearch criteria.5. Click!Note: Blank patient name Unknown4. You can also search with a custom query.6. Cases that match the search criteriaare displayed. You can open or deletethe selected case.Note: Hold the Shift or Ctrl key to select multiple cases ,and then click Export, Reports, or Open.Code Review – Getting started › Searching for cases13
Creating new blank cases1. Click!2. At any time, you can add case datato a blank case.3a. At any time, you can insert a defibrillator record into a blank case.3b. If you insert from a card file that contains multiple incidents, select one.If necessary, you can link the other incidents. See Linkingcases on page 15.4. You can also remove a defibrillator record from a case.The removed records are stored as card (crd) files.14Code Review – Getting started › Creating new blank cases
Linking cases1. Separate cases (on the same or different days).2. Select the case to be linked.3. Drag it to the case towhich you want to link it.4. Click!5. Cases linked.(See also Data options on page 22.)Unlinking cases1. Right-click!2. Click!Code Review – Getting started › Linking cases15
Sending cases to another folderBy default, cases are saved in the Default data files folder (see page 22). You can also save acopy of a case in another folder.1. Right-click!3. Select folder.4. Click!2. Click!5. A copy of the case is saved, including patient, case,defibrillator, and ECG data.16Code Review – Getting started › Sending cases to another folder
Exporting casesB. Enter the location to save to, thefile name, and the file type.A. To export any of these, select thedata to export.1. To export Waveform Data, selectWaveform Data.2. Indicate the number of samplesper second.3. Click, and then follow the instructionsfor exporting other types of data (A&B).Note: To export multiple cases, hold the Shift or Ctrl key whileyou select the cases, and then click Export.(See also Data options on page 22.)Code Review – Getting started › Exporting cases17
Printing reportsIncident Log1. Click!2. Click!3. Click!Notes and events entered in Code Revieware in italics.18Code Review – Getting started › Printing reports
Strips: Full Disclosure or Event Summary for selected eventsEvent Summary displays at least 15seconds before and after eachinstance of the selected event(s).If there is a gap of no activity, “TimeGap: # seconds” is printed betweenstrips.Code Review – Getting started › Printing reports19
HIPAA Disclosure1. Click!2. Click!3. Click!20Code Review – Getting started ›
Closing casesMethod 1:Method 2:Method 3:Erasing cardsOnce you have downloaded the data from a card usedin an M Series or 1600/1700, you can erase the card toprepare it for recording new incidents in the defibrillator.Code Review – Getting started › Closing cases21
Tools › OptionsData optionsDefault data files folderThe location where all data files are stored.To browse to and select a new location fordefault data files, click!Using Code Review for multiple usersTo use Code Review for multiple users, share thedefault data files folder on your network.Infrared transfer settingsIf you have trouble using the infrared reader, youcan manually select different settings.To return to the automatically selected settings,click the Detect button.Card reader transfer settingsInternal. Works for most internal laptop cardreaders using the default Memory Window setting (100D0000).External. Works for OmniDrive Pro - parallel orOmniDrive USB LF external card readers.Test. Checks whether the selected Memory Window is a valid choice for a card reader.Detect. Finds the first free Memory Window in the list. If you have trouble reading a card, trymanually selecting a different Memory Window setting.Erase card automatically. You can have the system automatically erase cards once the datahas been successfully read from them. This prepares the card for recording new incidents inthe defibrillator.22Code Review – Getting started › Tools › Options
Serial transfer settingsCOM and Baud. You must identify the COM portand the defibrillator’s baud (the M Seriesdefaults to 115200, the 1600/1700 defaults to57600).Enable time synchronization (M Series only). Ifthere is a discrepancy between the defibrillatorand PC time, then Code Review will adjust thecase time to be based on the PC time.Important! This feature should only be used for cases that are recorded on and downloadedfrom the same defibrillator. The defibrillator’s time must not be reset between the time thecase was recorded and when it is downloaded.Note: AED case time is always automatically synchronized to the PC time.Serial transfer technical noteM SeriesIf you are transferring data from an M Series via a serial cable, you must use a ZOLL M Series RS232 data transfer cable (ZOLL part number 8000-0605-01), which terminates in a female DB9connector.1600/1700If you are transferring data from a 1600/1700 via a serial cable, you must use a ZOLL 1600 SerialLink Cable and Connector (ZOLL part number 8000-1614).Transfer from M Series or1600/1700 to ZOLL InterLinkIf you are transferring data to ZOLL InterLink on a Pocket PC, you must connect the ZOLL cableto a NULL modem cable, which must be connected to the appropriate cable for your Pocket PC.You might need serial adapters (gender changers) to connect the cables.Bluetooth transfer settingsCOM and Baud. You must identify the COM portand the defibrillator’s baud (the M Seriesdefaults to 115200).Enable time synchronization. See the Serialtransfer settings for an explanation.Code Review – Getting started › Tools › Options23
View selected event types in the case treeClick!Licenses for upgradesYou can upgrade to Professional Edition orEnterprise Edition.To purchase an upgrade license, contact yourZOLL Regional Sales Manager or visit:www.zolldata.com/ZOLLData/Store/.Controlling access to Code ReviewIf you use a Windows domain or Active Directory, you can create network groups:24 ZDUsers — If this group exists, you must be a member to use RescueNet Code Review. ZDAdmins — If this group exists, you must be a member to use Tools Options to modify settings.Code Review – Getting started › Tools › Options
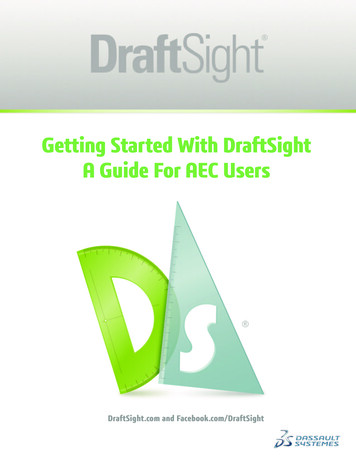
Utstein dataProfessional Edition and Enterprise Edition can capture and print Utstein data.1. Click!Capture Utstein data1. Click!2. Select an option.3. Select an option.Note: To save the case, you must complete the form or clear it.Print population-based Utstein report1. Click!2. Provide report parameters.3. Click!Code Review – Utstein data › Tools › Options25
Advanced parametersEnterprise Edition can display advanced parameters.1. Parameter readings atmidpoint.2. By default, CO2 is displayed onthe lower graph.3. To change what is displayed on the lower graphor its zoom level, click!4. Click!26Code Review – Advanced parameters › Tools › Options
12-lead detailsEnterprise Edition can display and print 12-lead details.1. Click!2. Select events.5. Report is printed.3. Selectoutput.4. Click!Code Review – 12-lead details › Tools › Options27
Trend reportsEnterprise Edition can print trend reports.1. Click!2. Click!3. Click one.4. Select Zoom level.5. Report is printed.28Code Review – Trend reports › Tools › Options
ZOLL InterLinkThis Pocket PC-based software enables you to collect and transfer case data.Enterprise Edition users can also use ZOLL InterLink (ZI) to transmit real-time 12-lead dataand vital trends.Installing ZOLL InterLink1. After you have installed Code Review on your workstation, install Microsoft ActiveSyncon your workstation.a. Click!b. Click!c. Click!2. Establish an ActiveSync partnership between the workstation and the Pocket PC.3. Click to installZOLL InterLink.Code Review – ZOLL InterLink › Installing ZOLL InterLink29
Starting and configuring ZOLL InterLink (ZI)1. Click!2. Click!3. Click!4. As needed, select COMport and baud (bps) forserial and Bluetooth.30Code Review – ZOLL InterLink › Starting and configuring ZOLL InterLink (ZI)
Transferring case data to ZOLL InterLinkYou can transfer case data from an AED Plus, M Series, or 1600/1700.Transfer case data from an AED Plus to ZOLL InterLink1. Click!2. Click!34. Click!“Communicationsestablished.”6. Data is transferred to Pocket PC.5. Press and hold for about5 seconds, until you hear“Non-rescue mode.”Code Review – ZOLL InterLink › Transferring case data to ZOLL InterLink31
Transfer case data from an M Series or 1600/1700 to ZOLL InterLink1. Use Bluetooth or serial cable connection.2. Click! For Bluetooth connection (M Series only), defibrillatormust be within 10 meters of Pocket PC. For serial cable connection (M Series or 1600/1700), seeSerial transfer technical note on page 23.3. For M Series, press and hold down leftmost softkey, and thenturn on defibrillator.4. Continue to hold down leftmost softkey until “System Utilities”mode is displayed, and then press Upload and Send.5. Click!7. Click!6. Click!8. Data transferred to Pocket PC.32Code Review – ZOLL InterLink › Transferring case data to ZOLL InterLink
Linking and editing cases in ZOLL InterLinkTo link cases:To edit patient:1. Click to select cases tobe linked.1. Select patient.2. Click!3. Type data2. Click!3. Linked cases are displayed with matchingletters.Uploading case data from ZOLL InterLink via ActiveSync1. Connect to workstation (typically, via a cable connection).2. Microsoft ActiveSync automaticallyuploads the case data to the ActiveSync My Documents folder.3. In Code Review, when you click File ›Open, the files are automaticallymoved to your Default data filesfolder (see page 22), and you’ll seethem in the list of available files.Code Review – ZOLL InterLink › Linking and editing cases in ZOLL InterLink33
Transmitting real-time 12-lead / vital trendsRequires Enterprise Edition and an M Series that can collect 12-lead and vital trend data.Transmit1. Use Bluetooth or serial cable connection. For Bluetooth connection, defibrillator mustbe within 10 meters of Pocket PC. For serial cable connection, see Serial transfer settings on page 23.2. Click!3. On the M Series, press Summary, and thenpress Real Time Start softkey.(When finished, press Real Time Stop orsimply disconnect.)4. Click!5. Select destination.Or, select custom , and thentype an email or fax destination.6. Add patient data to thetransmitted data.a. Click!b. Type data.34Code Review – ZOLL InterLink › Transmitting real-time 12-lead / vital trends
7. Set delivery method:Auto relay. If you want data to be automatically delivered,click!When auto relay is on, the transmission is performed whenevera 12-lead is generated. The transmission includes any vital trenddata that has accumulated.Send Now. Otherwise, you must select items in the list, and thenclick Send Now to send the data.Note: To clear all items in the list, click Clear List.8. ZOLL Director transmits the data in the form of a report to the destination you selected(see ZOLL Director on page 37).TWL 12-leadVT Vital trend. The number after the VT code is the number ofvitals gathered in the report. Vitals are gathered in a single trendreport until there is a transmission (or an interruption in connectivity), and then a new trend report is started.U UndeliveredT TransmittingD Delivered. If you send an item additional times using the Send Now option, D isreplaced with 2, 3, 4, etc.Delivered items in the list are cleared when you exit.Code Review – ZOLL InterLink › Transmitting real-time 12-lead / vital trends35
Set up the list of fax and email destinationsTo add your own fax and email destinations to ZOLL InterLink , use the ZOLL Data Administration utility.To send the destinations to ZOLL InterLink, cradle your Pocket PC, and then click Sync.1. Click!2. Create, edit, or delete destinations.3. Cradle the Pocket PC, and then click.Your changes show up in InterLink.Configure ZOLL InterLink and ZOLL DirectorFor a detailed explanation of how to configure ZOLL Interlink and ZOLL Director, see theDiagnostic Data Server Configuration Guide.36Code Review – ZOLL InterLink › Transmitting real-time 12-lead / vital trends
ZOLL DirectorZOLL Director can
Code Review – Getting started › Topics 1 Getting started Welcome to RescueNet Code Review – Standard, Professional, and Enterprise Editions, Windows-based software you can use to easily access, view, annotate, maintain, and print resuscitation incident data. Topic