Transcription
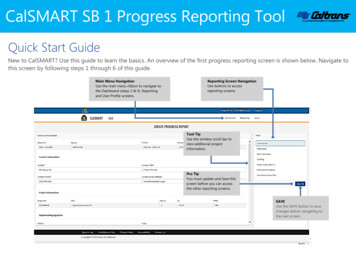
CalSMART SB 1 Progress Reporting ToolQuick Start GuideNew to CalSMART? Use this guide to learn the basics. An overview of the first progress reporting screen is shown below. Navigate tothis screen by following steps 1 through 6 of this guide.Main Menu NavigationUse the main menu ribbon to navigate tothe Dashboard (steps 3 & 4), Reportingand User Profile screens.Reporting Screen NavigationUse buttons to accessreporting screens.Tool TipUse the window scroll bar toview additional projectinformation.Pro TipYou must update and Save thisscreen before you can accessthe other reporting screens.SAVEUse the SAVE button to savechanges before navigating tothe next screen.
CalSMART SB 1 Progress Reporting ToolStep 1 Sign OnStep 3 Program SelectionIf you have a CalSMART account enter your email account and password andselect Login. If you do not have a CalSMART account select Register.Once you have an approved account and program you can login. Afterlogging in the system will display the CalSMART Dashboard screen.From the drop down menu labeled “Current Program:” select “OtherSB 1 Funded Programs.” Access will be denied to programs you arenot authorized to report on.Program SelectionSelect “Other SB 1 FundedPrograms.”Step 2 RegisterFill out the form to register for an account. All fields must be filled out.Select Submit. You will receive an email with a link to verify your email.Pro TipFor Agency enter a fewcharacters to filter thedrop down list. Forexample, for the City ofLos Angeles begin typing“los ang ” and the list willfilter all agenciescontaining Los Angeles.Program SelectionSelect “Other SB 1 FundedPrograms.”Step 4 Progress ReportingOnce you select “Other SB 1 Funded Programs” the system will display theDashboard screen for “Other SB 1 Funded Programs.” To view or report onprojects select “Progress Reporting.”Progress ReportingSelect “Progress Reporting”to view and report onprojects.
CalSMART SB 1 Progress Reporting ToolStep 5 View Reportable ProjectsStep 7 Update General InfoTo view the list of projects for your agency which require a progress report select“View Reportable Projects.”This screen must be updated and saved before the other reporting screens canbe accessed. The only information on this screen that can be edited is thecontact information. Update this information and select Save.Select Save to save changesbefore accessing theremaining reporting screens.Update the contactinformation.View Reportable ProjectsSelect “View ReportableProjects.”Report ProgressAfter saving you will have access tothe remaining reporting screens.Select the next reporting screen.Step 6 Create a ReportStep 8 Update MilestonesA list of projects requiring a report will be displayed for your agency. From the listselect a project to report on by checking the box on the left side of the screen andthen selecting the Create Report button in the bottom right corner of the screen.For on-system projects dates are auto-populated. For off-system projectslocal agencies should enter planned and actual completion dates. Acorrective action plan must be entered on the corrective action plan screen ifany cells are highlighted in yellow.Select a ProjectCheck the box on theleft side of the row.Create a ReportTo create a new reportselect the Create Reportbutton.Planned Completion DateA fiscal year change for anyphase requires a correctiveaction plan.Actual Completion DateInput actual completiondates for off-system projects.
CalSMART SB 1 Progress Reporting ToolStep 9 Time ExtensionsStep 11 ExpendituresInput time extensions that have been approved by the CTC. Do not inputunapproved time extensions. After updating select Save and navigate to the nextreporting screen.Award Time ExtensionsFor on-system projects input any additional local expenditures. For off-systemlocal projects input local expenditures and planned expenditures at completion.Enter required corrective action plans (indicated by yellow highlighted cells) onthe corrective action plan screen. After updating select Save and navigate to thenext reporting screen.Required when the constructioncontract cannot be awarded toa contractor within six monthsof the CTC allocation.Allocation Time ExtensionsRequired when a phase cannot beallocated by the CTC by theapproved deadline. Input any CTCapproved allocation time extensions.Step 10 FundingExpenditure Time ExtensionsRequired when expenditureswill continue beyond threeyears (or other CTC-approvedduration) from the allocationdate. Input any CTC-approvedexpenditure time extensions.On the funding screen input the actual construction contract award amount (in 1000’s). After updating select Save and navigate to the next reporting screen.Award AmountInput the actual constructioncontract award amount.Additional Local ExpendituresEnter any additional localexpenditures for each phase.Planned Expenditure atCompletion For off-system projectsenter the planned expenditure atcompletion for each phase.Step 12 Outcomes & OutputsUpdate outputs or add new outputs. After updating select Save and navigateto the next reporting screen.Update OutputsUpdate identified outcomesin the current data field.Add New OutputsAdd new outputs by selecting the AddOutput button. Under the Output fielduse the drop-down menu to select theoutput for your program.
CalSMART SB 1 Progress Reporting ToolStep 13 Corrective Action PlanStep 15 Correct ErrorsIf there is a change in the project cost, schedule, scope, and/or expected benefits,provide a summary describing the reason for the change and describe thecorrective action plan to manage any risk to the implementation of the project asprogrammed.If errors are identified during the submit process select the Back button,address all errors, and resubmit the progress report.Corrective Action PlanEnter a corrective action planas required for cost, schedule,scope and/or benefits change.CTC Action RequiredIf required enter the anticipateddate for CTC action to implementthe Corrective Action Plan.Step 14 Submit ReportAfter updating project information on all seven reporting screens select theSubmit button on any of the reporting screens to submit the progress report.Submit Report ProgressSelect the Submitbutton to submit thereport.Correct ErrorsSelect the Back button to return tothe project. Address all errors andresubmit the progress report.
An overview of the first progress reporting screen is shown below. Navigate to this screen by following steps 1 through 6 of this guide. Main Menu Navigation Use the main menu ribbon to navigate to the Dashboard (steps 3 & 4), Reporting and User Profile screens. Reporting Screen Navigation . Use buttons to access reporting screens. Tool Tip