Transcription
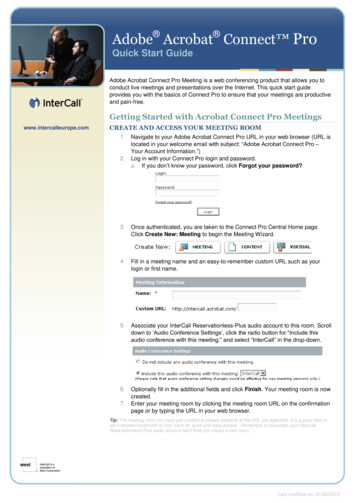
Adobe Acrobat Connect ProQuick Start GuideAdobe Acrobat Connect Pro Meeting is a web conferencing product that allows you toconduct live meetings and presentations over the Internet. This quick start guideprovides you with the basics of Connect Pro to ensure that your meetings are productiveand pain-free.Getting Started with Acrobat Connect Pro Meetingswww.intercalleurope.comInformation Hotline0871 7000 170 44 (0)1452 546742conferencing@intercalleurope.comCREATE AND ACCESS YOUR MEETING ROOM12Reservations0870 043 4167 44 (0)1452 553456resv@intercalleurope.comNavigate to your Adobe Acrobat Connect Pro URL in your web browser (URL islocated in your welcome email with subject: “Adobe Acrobat Connect Pro –Your Account Information.”)Log in with your Connect Pro login and password.a. If you don‟t know your password, click Forgot your password?www.intercalleurope.com3Once authenticated, you are taken to the Connect Pro Central Home page.Click Create New: Meeting to begin the Meeting Wizard.4Fill in a meeting name and an easy-to-remember custom URL such as yourlogin or first name.5Associate your InterCall Reservationless-Plus audio account to this room. Scrolldown to „Audio Conference Settings‟, click the radio button for “Include thisaudio conference with this meeting:” and select “InterCall” in the drop-down.6Optionally fill in the additional fields and click Finish. Your meeting room is nowcreated.Enter your meeting room by clicking the meeting room URL on the confirmationpage or by typing the URL in your web browser.7Tip: The meeting room you have just created is always available at the URL you specified. It is a good idea toset a browser bookmark to your room for quick and easy access. Remember to associate your InterCallReservationless-Plus audio account each time you create a new room.Last modifiedon: 7/5/2010Last modifiedon: 01/06/2010
INSTALL THE ACROBAT CONNECT ADD-INIf you have never hosted a Connect Pro meeting, you are prompted to install the Acrobat Connect Add-In. Click Install andfollow the online instructions.Note: Meeting participants are only required to have the Adobe Flash player installed and do not need to install the Connect Pro add-inINVITE ATTENDEES1You can easily invite attendees to your meeting by sharing the meeting room URL in an email, meeting invitation,chat message or even verbally over the phone. From within a meeting, you can invite attendees by opening MeetingMenu and selecting Manage Access & Entry Invite Participants.2In the Invite Participants dialog, click Compose email. An email appears in computer‟s default email client that ispre-populated with meeting information.Invite attendees by entering in their email addresses and sending the email.3When attendees arrive to your meeting room, a notification window appears asking you to either accept or declinethe attendee. Once accepted, the attendee appears in the attendee list.
MANAGING ATTENDEES1Meeting attendees fall into three roles:a. Host: organises and facilitates the meeting.b. Presenter: assists in meeting facilitation, presenting content, screen sharing.c. Participant: largely a spectator in the meeting who can chat, respond to polls and change status.To change an attendee‟s role, select the name in the attendee list and click Set User Role, then choose the role toassign to selected attendees.Tip: If you wish to change multiple attendees‟ roles at the same time, hold down the Control key while selecting their namesand then set their role using Set User Role.2The promoted presenter is prompted to download the Add-in if they go to share their computer screen and have notpreviously completed the download.Starting your InterCall Reservationless-Plus AUDIO CONFERENCEClick the phone icon in the Attendee List pod and select „Start Audio Conference‟.1In the Join Teleconference dialog box, enter your phone number then click „Call My Phone‟.Tip: As noted in the Join Teleconference box, please include your country code (Country code Area/city code number (E.g. 441234567890)2When you answer your phone you will be connected to the audio portion of the conference.
SHARING YOUR SCREEN1Click My Computer Screen in the Share pod.2In the Start Screen Sharing dialog, choose how you would like to share your screen.a.b.c.3Desktop: Share your entire desktopWindows: Choose specific, already open windows to shareApplications: Share one or more applications and all its related windows After selecting your desired option,click Share.A Connect Pro icon appears in your system tray while you are sharing your screen. Click this icon to view a menu tostop sharing or access other available options.Tip: If you choose to share your entire desktop, it is recommended that your screen resolution is set to 1024x768pixels or lower. Also, if possible, you should reduce your color quality from Millions of Colors to 32 or 16 bit. Doingthis reduces the chances that meeting attendees will encounter issues seeing your screen.
SHARING POWERPOINT CONTENT1Click Documents in the Share pod. Then choose Select from My Computer 2In the Browse dialog, locate the PowerPoint presentation you wish to share and click Open. The file is uploaded andbegins converting.3Once the file is done converting, it appears in the Share pod. Click Next or Previous to navigate through yourpresentation.Tip: You can also follow these steps to share other supported file types including image files (JPG), video files (FLV), flashfiles (SWF) and MP3 audio files.
Using Voice over IP (VoIP) for Audio Communication1Voice over IP (VoIP) allows you to communicate with meeting attendees using your computer‟s microphone andspeakers. If you intend to use this feature, it is highly recommended that you first run through the Audio SetupWizard. To do this, begin by selecting Meeting Manage My Settings Audio Setup Wizard .2The wizard guides you through five steps in which you are asked to test your speakers, select a microphone andother options.If you have never used Connect Pro before, you may see a Flash Player settings box asking you for permission to accessyour camera and microphone. Choose Allow. If you wish to avoid this step in the future, click Remember.3To begin using VoIP, locate Talk in the Layout bar. While pushing Talk your voice is being broadcast and you shouldsee an indicator next to your name in the participant list. Once you let go of Talk your voice is no longer broadcast. Ifyou wish to continually broadcast your voice, click LockTip: If you intend to have multiple attendees using VoIP at the same time, it is recommended that they install the Connect ProAdd-In and run through the Audio Setup Wizard prior to the meeting.
Sharing Web cam Video1 You can easily share web cam video with meeting attendees. To do this, make sure your web cam is plugged in, andclick Start my camera and voice in the Camera and Voice pod.2Once your webcam is being shared, you can change the rate at which your video stream is broadcast to attendees. Ifmeeting attendees are on slower connections (dial-up for example), it is recommended that the camera should be setto Fast Images or Slow Images. To change this setting click Pod Options on the lower right hand corner of the Pod.Fast Images is the default setting.TECHNICAL SUPPORTTechnical support during conferenceOn your phone keypad:*0 (conference) or 00 (individual)TRAINING AND RESOURCESSign up for free online training, access resources anddownload a user nferencing/adobe-connect.php
Adobe Acrobat Connect Pro Quick Start Guide Adobe Acrobat Connect Pro Meeting is a web conferencing product that allows you to conduct live meetings and presentations over the Internet. This quick start guide provides you with the basics of Connect Pro to ensure that your meetings are productive and pain-free. Getting Started with .