Transcription
PLC Basics Featuring Micro800 andConnected Components Workbench(RA-11-L01)(CC-11-L02)For Classroom Use Only!Publication Number -- Date
PLC Basics Featuring Micro800 and ConnectedComponents WorkbenchContentsBefore you begin . 4About this lab . 4Tools & prerequisites . 4Programming the Built-in Smart Relay Function Blocks in a Micro810 . 6Programming a Micro800 using Connected Components Workbench . 193 of 66
Before you beginIMPORTANT: Power cycle your Micro800 demo kit off and back on before starting. Also, power off yourPanelView Component terminal and leave it powered off until instructed to turn it back on.About this labThis lab will cover the basic capabilities of Programmable Logic Controllers (PLCs) as well as introduceyou to the new Micro800 Allen-Bradley family of micro PLCs and the Connected Components Workbench(CCW) software used to program and monitor Micro800 controllers, PanelView Component terminals andPowerFlex 4-class drives.Note that you will be using pre-release software and pre-release firmware, so the procedures you arefollowing and the screens you are viewing may change between now and the final release of the CCWsoftware and Micro800 controllers.This lab takes approximately 90 minutes to complete.Tools & prerequisites Micro800 demo kit consisting of a 12-pt. Micro810 controller (v0.33 prerelease firmware) and a 16-pt.Micro830 controller (v0.40 prerelease firmware) PanelView Component 6” color terminal (STN or TFT) connected to the Micro830 controller using a1761-CBL-PM02 cable. Connected Components Workbench Release 1 software (prerelease build 43) Project.Micro830.Micro830.TRAFFIC CONTROLLER FB.7z User Defined Function Block import file Traffic Light.cha or Traffic Light TFT.cha PVc application file4 of 66
5 of 66
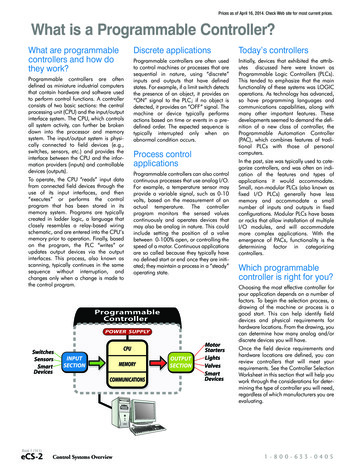
Programming the Built-in Smart Relay Function Blocks in a Micro810The Micro810 12-point (8 Inputs & 4 Outputs) controller comes with eight Smart Relay function blocksbuilt-in that can be configured using the optional LCD Display and pushbuttons to control the four relayoutputs, without using any software! These built-in function blocks are: TON – On-delay Timing CTU – Count Up DOY – Turning on an output if the value of real-time clock is in the range of Year Time setting. TOW – Turning on an output if the value of real-time clock is in the range of Day Time setting. CTD – Count Down TONOF – On-delay timing on a true rung, and then Off-delay timing on the false rung. TP – Pulse Timing TOF – Off-delay TimingThis lab will cover the configuration of the first four function blocks above to fulfill a “Lighting Control”application.6 of 66
1. The LCD should now display the Micro810 controller’s I/O Status screen. This screen shows that thecontroller is currently in RUN mode. The first thing you need to do is change the controller to PROGmode.Pressandsimultaneously to enter the Main Menu:7 of 66
2. To put the Micro810 into Program mode, scroll down usingPressto select Mode Switch, then press8 of 66to find the Mode Switch option.to select PROG Mode and presstwice.
3. Pressonce and scroll back up to the top of the main menu using. Pressto select SRFunction which will take you to the Smart Relay function blocks for each of the four Outputs. You willnow go ahead and configure four different function blocks and then go back and test out theiroperation.4. The first function block displayed on the LCD is for Output 0 or O00 as displayed flashing in the upperleft corner of the Micro810 screen – it is a Timer ON function block (TON). A TON is used to turn anoutput on some time delay after an input has turned on. It has an input trigger (IN), a preset timevalue (PT), an elapsed time value (ET) and an output trigger (Q). MM:SS is the default time formatfor the PT and the ET. (Other time format options for timers are HH:MM and SS:MS.) When IN turnson, the ET starts timing. When the ET equals the PT, the ET stops timing and Q turns on. WheneverIN turns off, Q turns off and the ET resets to zero. If I wanted Output 0 to be controlled by one of theother seven choices of function blocks, I would pressuntil the cursor was flashing on top of TON.Then I would pressorto select a different function block. However, you are going to useTON to control Output 0.9 of 66
5. By default, the PT is set for two minutes, 30 seconds. You are going to change this to zero minutes,five seconds. Pressuntil the flashing cursor is on the 2 to the left of PT. Presstwice to setthe minutes to zero. Likewise, change 30 seconds to 05 seconds. Presstwice to accept andsave your changes. Your LCD should look like this:6. Pressuntil the cursor is flashing over O00 in the upper left-hand corner, then pressonce todisplay the function block controlling Output 1 (O01). This is a CounT Up function block (CTU). TheCTU has a count input (CLK), a reset input (RESET), a preset value (PV), a counter value (CV) andan output trigger (Q). When CLK goes from off to on, and CV is less than PV, CV increments by one.When CV PV, Q turns on. Whenever RESET is on, CV is cleared back to zero and Q is off.10 of 66
7. By default, I02 is assigned to CLK and I03 is assigned to RESET. Pressis on I02, then pressonce to change CLK to Input 1 (I01). Next, pressuntil the flashing cursoronce so that theflashing cursor is on I03, then pressonce to change RESET to Input 2 (I02). Then pressuntil the flashing cursor is to the left of PV. Change 00888 to 00003. Finally, presstwice toaccept and save your changes. Your LCD should look like this:until the cursor is flashing over O01 in the upper left-hand corner, then pressonce to8. Pressdisplay the function block controlling Output 2 (O02). This is a Time Of Week (TOW) function block.The TOW has an enable input (EN), a Daily (D/W 0) or Weekly (D/W 1) setting, an On day and time(ON), an Off day and time (OFF) and an output (Q). With the default settings, as long as Input 4 ison, Output 2 will be turned on from 9:15AM through 5:30PM (off at 5:31PM) each day from Sundaythrough Wednesday every week. With only the D/W setting changed from 0 (Daily) to 1 (Weekly), aslong as Input 4 is on, Output 2 will be turned on from 9:15AM Sunday morning through 5:30PMWednesday afternoon every week.11 of 66
9. Pressuntil the cursor is flashing over I04 to the left of EN, then pressuntil Output 1 (O01) isdisplayed. Next, pressuntil the cursor is flashing over WE to the left of OFF and presstochange the day to SU. Change the OFF time to 09:16. As long as Output 1 is on, this will turn onOutput 2 every Sunday from 9:15AM through 9:16AM (off at 9:17AM). Presstwice to acceptand save your changes. Your LCD should look like this:10. Notice the A in the lower right-hand corner of the LCD. The TOW function block actually allows forfour separate sets of on/off times to be configured to control this one output. These are entered aschannels A-D. Pressuntil the cursor is flashing over A, then pressto view the preconfigured TOW blocks for channels B, C and D. You are going to leave them as they are. The DayOf Year (DOY) function block is the other function that includes four channels. You will look at thisone more time to put the channel back to A.function block next. Press12 of 66
11. Pressuntil the cursor is flashing over O02 in the upper left-hand corner, then pressonce todisplay the function block controlling Output 3 (O03). This is a Day Of Year (DOY) function block.The DOY has an enable input (EN), a Yearly (Y/C 0) or Centurial (Y/C 1) setting, an On date (ON),an Off date (OFF) and an output (Q). With the default settings, as long as Input 6 is on, Output 3 willststbe turned on from January 1 through October 31 in 2009 and again in 2010. With only the Y/Csetting changed from 0 (Yearly) to 1 (Centurial), as long as Input 6 is on, Output 3 will be turned onststfrom January 1 , 2009 through October 31 , 2010.12. Pressuntil the cursor is flashing over I06 to the left of EN, then pressuntil Input 3 (I03) isdisplayed. Next, pressuntil the cursor is flashing over the 0 to the left of Y/C, then pressonce to change Y/C to 1. Finally, change the OFF date to 11/01/01. Now, as long as Input 3 is on,ststOutput 3 will be turned on from January 1 , 2009 through January 1 , 2011. Presstwice toaccept and save your changes. Your LCD should look like this:13 of 66
13. You are now ready to test out the function blocks in Run mode. PressMain Menu:14 of 66once to get back to the
14. To put the Micro810 into Run mode, scroll down usingPressto select Mode Switch, then pressto find the Mode Switch option.to select RUN Mode and press15 of 66twice.
15. Pressonce and scroll back up to the top of the main menu usingFunction. Pressto select SR16. To test the Timer ON delay function block (TON) controlling Output 0 (which is wired to the blue pilotlight/pushbutton labeled DO0/DI0 beneath the Micro810 controller), press and hold this pushbuttonwhich turns on Input 0. Notice that the Elapsed Time (ET) in the TON function block begins timing upto 00:05 seconds, and then pilot light DO0 turns on. Release pushbutton DIO and note that pilot lightDO0 turns off and ET resets to 00:00.16 of 66
17. Pressonce to display the CounT Up function block (CTU) controlling Output 1. Press andrelease blue pushbutton DI1 once and notice that the Count Value (CV) increments by one. Pressand release this pushbutton two more times and pilot light DO1 will turn on, since CV now equals thePreset Value (PV). If you continue to press and release this pushbutton, nothing further happens.However, if you press blue pushbutton DI2, CV resets to 0 and DO1 turns off. Press and release bluepushbutton DI1 three times and verify that pilot light DO1 is on before proceeding.to get18. Before you can test the next two function blocks, you need to set the built-in clock. Pressback to the main menu, then scroll down to Advanced Set and press. Now scroll down toClock Set and presstwice. Adjust the YEAR to 2010, the MM.DD to 11.07 and the HH:MM to09:13.Pressonce, then presstwice to get back to the main menu and scroll back up to SRFunction. From this screen you can monitor the time in the upper right-hand corner. Assuming thatpilot light DO1 is still on from the previous step, pilot light DO2 should turn on when the time equals09:15 SU. If you are patient enough to wait two more minutes before going to the next step, you willsee DO2 turn off when the time equals 09:17 SU.17 of 66
19. Pressto display the Output 0 function block, then pressthree times to display the Day OfYear function block (DOY) controlling Output 3. Press blue pushbutton DI3 and pilot light DO3 shouldststturn on, since the date is between January 1 , 2009 and January 1 , 2011.Congratulations - you have completed the Micro810 Basics lab!18 of 66
Programming a Micro800 using Connected Components WorkbenchConnected Components Workbench is the programming environment for all Micro800 family controllers.Although the following functionality could be programmed and downloaded into the Micro810 controller(and replace the Smart Relay functionality), you will use the 16-point Micro830 controller for this portion ofthe lab because the traffic controller application requires six outputs (which exceeds the available numberof outputs on the 12-point Micro810 controller).1. Verify that the Micro830 is connected via USB cable to the PC. Then, click on VM (found in thecenter and top of the screen), select Removable Devices and verify that 2080-LC30 is checked:If 2080-LC30 is not checked, click on Connect (Disconnect from Host):19 of 66
2. Once the Micro830 is “connected”, you should get the following screen. Select No, not this time andclick Next:Click Next again:20 of 66
Then click Finish:3. You are now ready to start the Connected Components Workbench software.Double click on the Connected Components Workbench iconor from the Start menu,select Programs Rockwell Automation CCW Connected Components Workbench21 of 66
4. Begin a new project by clicking on Catalog and expanding the Controllers folder in the DeviceToolbox, which is located on the right-hand side of the Workbench screen. Double click on 2080LC30-16QWB:22 of 66
5. A new Micro830 project based on this controller has now been created. The Micro830 should showup in the Project Organizer on the left-hand side of the Workbench screen:6. Change the Name for the project to Traffic Light:7. The goal for this lab is to program the Micro830 to control the traffic light at a typical 4-wayintersection. The good news is that by taking advantage of a Traffic Controller User Defined FunctionBlock (UDFB) that someone else has already created for us, it will be very straightforward toimplement. The first thing you need to do is import this UDFB. Right click on the Micro830 icon,select Import and Import Exchange File:23 of 66
8. Click Browse:24 of 66
9. Click Desktop, double click on the Lab Files folder, select the file shown below and click Open:25 of 66
10. Verify that the TRAFFIC CONTROLLER FB is selected, then click Import, followed by Cancel:26 of 66
11. You should see an output message at the bottom indicating that the import was successful and youshould see the TRAFFIC CONTROLLER FB showing up under the Function Blocks within ProjectOrganizer:12. Next you will create a new ladder program that will use the TRAFFIC CONTROLLER FB. UnderProject Organizer, right click on Programs select Add and select New LD : Ladder Diagram:27 of 66
13. Right click on UntitledLD and select Rename:14. Type Traffic Light Control and Enter:15. Double click on Traffic Light Control within Project Organizer to start editing the ladder logicprogram. If the Description Editor window below pops open, click X to close it for now.28 of 66
16. Click on the Toolbox tab in the lower right-hand corner and click on the in front of Ladder to list theavailable ladder instructions:29 of 66
17. Click and hold on the Block instruction within the Toolbox and drag a Block onto the rung as shown:18. When you release the mouse button, the Block Selector screen appears:30 of 66
19. Under Name, type tr and note that only the instructions starting with tr are listed. Click onTRAFFIC CONTROLLER FB and notice that all of the Parameters associated with this functionblock are listed below it:31 of 66
20. Select TRAFFIC CONTROLLER FB in the list and click OK. The Traffic Controller function blockshould be displayed on the rung as shown below:32 of 66
21. By convention, function blocks list inputs on the left-hand side of the block and outputs on the righthand side of the block. In order to see the full names and data types of the variables that theseinputs and outputs are associated with, move your cursor over the block - you should get thefollowing listing:22. The first function block input that connects directly to the ladder rung is the function block enable bit.The remaining four function block inputs are “real world” inputs that indicate whether a car is waitingat a red light in any of the four possible directions – North, South, East and West. These inputs getmapped to four Boolean input variables local to the function block: N Car Sensor, S Car Sensor,E Car Sensor and W Car Sensor. You are going to assign four Micro830 controller inputs to thesefunction block inputs.33 of 66
23. Click on the top of the input variable block that connects to N Car and you will get a dropdownmenu of all the existing variable names that could be assigned to N Car Sensor. Scroll down andselect IO Embedded Digital Input 0 and enter:24. Notice that because of the length of embedded input 0 variable name, it is hard to tell what input isactually assigned to N Car Sensor when viewing the function block. One way to tell is to positionyour cursor over the block as shown below.34 of 66
25. Another way is to assign shorter Alias names to these variables. Double click on the first input block– this brings up the Variable Selector screen. Go ahead and type in Alias names for the six outputs(DO0-DO5) and the first six inputs (DI0-DI5):Notice that these Alias names match the push button/pilot light names on the Micro800 demo kit forthe Micro830. Make sure to select the IO Embedded Digital Input 0 row before clicking on OKor a different variable will get assigned to the first input block.35 of 66
26. Assign the remaining three input variable blocks as follows: IO Embedded Digital Input 1 toS Car , IO Embedded Digital Input 3 to E Car , and IO Embedded Digital Input 4 toW Car (note that we skipped using Input 2!):36 of 66
27. The first function block output that connects directly to the ladder rung is the function block enabledbit – it reflects the status of the input enable bit. The remaining six function block outputs are “realworld” outputs that connect to the red, yellow and green traffic signal lights for each direction. Theseoutputs get mapped to six Boolean output variables local to the function block: NS Green Light,NS Yellow Light, NS Red Light, EW Green Light, EW Yellow Light, and EW Red Light.Assign the first six Micro830 digital outputs to the output variable blocks starting withIO Embedded Digital Output 0 to NS R and ending with IO Embedded Digital Output 5to EW G :37 of 66
28. Our rung is now complete except for a description of what the rung does. Double click on the greenarea just above the rung and type in “This rung assigns the Micro830 I/O to theTRAFFIC CONTROLLER function block.”:38 of 66
29. Next you are going to configure the controller plug-ins. Double click on the Micro830 icon in theProject Organizer to bring up the following screen:30. Plug-in slot 1 has an isolated serial port module installed in it. Right click on the graphic of the firstplug-in slot and select 2080-SERIALISOL:39 of 66
31. Plug-in slot 2 has 4-channel analog input module installed in it. Right click on the graphic of thesecond plug-in slot and select 2080-IF4:Notice that the Micro830 graphic changes to show the installed plug-ins. Now change the Channel 0Input Type under Properties from Current to Voltage:40 of 66
32. You are now ready to build, save, download and test out your one-rung program. Right click on theMicro830 icon in Project Organizer and select Build:33. You should get verification in the Output window at the bottom center of the screen that the buildsucceeded (if your build failed, get your lab instructor to review your work thus far):Click the Save iconto save your work thus far.34. Next you need to establish communications with the controller before you can download yourprogram to it. Click on the Connect button. Select the controller from the Connection Browserscreen. If successfully connected, the button changes to Disconnect and the Controller Mode isdisplayed. Verify that the Controller Mode is Program (Remote). If not, move the Micro830 modeswitch (just below the USB connector) to the right (Program) position and then back to the center(Remote) position and/or click the Program radio button:41 of 66
35. Right click again on the Micro830 icon in Project Organizer and select Download:If you get the following screen, click No:36. You should get verification in the Output window at the bottom of the screen that the downloadsucceeded (if your download failed, get your lab instructor to review your work thus far):37. When asked “Do you want to change to Run mode?”, click Yes:38. If you momentarily push and release either the DI0 input button (N Car Sensor) or the DI1 inputbutton (S Car Sensor), you should see the EW traffic light output change from green (DO5 on) toyellow (DO4 on) after five seconds, and two seconds later, from yellow to red (DO3 on), at the sametime that the NS traffic light changes from red (DO0 on) to green (DO2 on). Similarly, once the EWtraffic light is red, if you momentarily push and release either the DI3 input button (E Car Sensor) orthe DI4 input button (W Car Sensor), you should see the NS traffic light output change from green(DO2 on) to yellow (DO1 on) after five seconds, and two seconds later, from yellow to red (DO0 on),at the same time that the EW traffic light changes from red (DO3 on) to green (DO5 on).39. Next you are going to modify the ladder to provide a way to flash the lights in the middle of the night.If the Micro830 controller had the Real Time Clock plug-in installed in it, you could use the Time ofDay instruction to, for instance, flash the lights between 11PM and 5AM. However, it doesn’t, sowe’re just going to use the dial potentiometer in the demo kit (which is connected to the analog inputplug-in channel 0) to switch between daytime normal mode and nighttime flashing mode.42 of 66
40. From the Toolbox in the right-hand screen, click and hold on Block, drag it onto the rung betweenthe left-hand rail and the TRAFFIC CONTROLLER function block and release:41. When the Instruction Block Selector screen appears, select Comparator and click OK:43 of 66
42. Click on the top of the input variable block that connects to i1 and you will get a dropdown menu of allthe existing variable names that could be assigned. Scroll down and selectIO Plugin2 Analog Input 0 and enter:43. Similarly, click on the top of the input variable block that connects to i2 and this time type in 32000.As the potentiometer varies the voltage at the analog input between 0-10 volts, the variableIO Plugin2 Analog Input 0 varies between approximately 0-65000. Therefore, when thepotentiometer is between 0-5, the output o1 of the comparator block will be off and therefore thefunction block will be disabled, and when the potentiometer is between 5-10, the output o1 of thecomparator block will be on and therefore the function block will be enabled.44 of 66
44. Next drag a Return from the Toolbox onto the rung to the right of the TRAFFIC CONTROLLERfunction block and release. Click once on the Return and then press F1 to bring up the contextsensitive help about this instruction. If you get the following Visual Studio screen first, just click OK:From the return instruction help we see that “You can use return elements as outputs representing aconditional end of a diagram.” and “When the left connection line has the TRUE Boolean state, thediagram ends without executing the equations located on the next lines of the diagram.” Therefore,by connecting a Return to the output of the TRAFFIC CONTROLLER function block, if the functionblock is enabled, no other rungs of ladder in this file will get executed. If the function block isdisabled, then the remaining rungs in this ladder program will get executed. Go ahead and close thehelp screen.45 of 66
45. Your first rung should now look like this:46. Next you are going to add a rung which will flash the traffic lights when the TRAFFIC CONTROLLERfunction block is disabled (potentiometer/analog input value is not greater than 32000). From theToolbox in the right-hand screen, click and hold on Rung and drag it beneath the existing rung andrelease:46 of 66
47. Now add a 1 second on/1 second off timer to control the flashing of the red lights in the North/Southdirection and the yellow lights in the East/West direction. Drag a Block from the Toolbox and placeit on the new rung. When the Block Selector screen appears, enter in “to” for the name, selectTONOFF for Timer On-Off and click OK:Your rung should look like this so far:47 of 66
48. As long as the Input (IN) to the TONOFF is true, then the Elapsed Time (ET) begins timing until theElapsed Time equals the Preset Time (PT), at which time the Output (Q) becomes true. When the INgoes false, the ET resets and begins timing until the ET equals the Preset Time Off (PTOF), at whichtime the Q goes false. The caution trianglesnext to PT and PTOF indicate that either a variablename or a constant value must be entered into these input blocks. We want this timer to be a 1second on/1-second off timer, so click in the top of the PT input block and enter in “T#1s”, where T#means this is a Time constant and 1s indicates 1 second:Repeat for the PTOF input block.49. When the on-timer has timed out and the output Q becomes true, we want the NS Red Light (DO0)to turn on, as well as the EW Yellow Light (DO4). Since there are two outputs to be controlled off ofQ, a parallel branch is needed on the rung. Drag a Branch from the Toolbox onto the rung just rightof the TONOFF:48 of 66
50. Both DO0 and DO4 are to be controlled by TONOFF output Q, so drag a Direct Coil from theToolbox to the upper branch and assign variable IO Embedded Digital Output 0 to it and drag asecond Direct Coil from the Toolbox to the lower branch and assign variableIO Embedded Digital Output 4 to it:51. Next, IN needs to turn off once Q turns on in order to trigger the off timer. Therefore, you will add aReverse Contact to the left of the TONOFF IN that is controlled by the TONOFF Q bit. Drag aReverse Contact to the left of the TONOFF block. When the Variable Selector screen appears,click on the Local Variables – Traffic Light Control tab. If no names appear in the Name column,click on the cell to the right of the “*“and you should see the following:49 of 66
52. Click on the “ ” to the left of TONOFF 1 to expand its variables. Select TONOFF 1.Q and click OK:53. Document the rung by double clicking in the green space and typing “When theTRAFFIC CONTROLLER function block is disabled, this rung flashes the North/South redlights and the East/West yellow lights – 1 second on and 1 second off.” Your rung 2 should looklike this:54. Build, Save and Download the updated program. With the controller back in Run mode, test theprogram out. As long as the potentiometer is between 5-10, the program should work as before.However, if the potentiometer is between 0-5, the traffic lights should flash on and off (outputs DO0and DO4) once a second. Put the potentiometer between 5-10 before going to the next step.50 of 66
55. Next you will configure the Micro830 serial port for communications with the PanelView Component(PVc) terminal. Although in the future the PVc terminal will be able to read the Micro830 variablesdirectly using CIP-based drivers, only the Modbus driver can be used for PVc to Micro830communications in the first release, and the Micro830 variables must be mapped to Modbusaddresses.56. Click on the Micro830 tab to get back to the controller configuration screen and then click on SerialPort to view the default configuration:51 of 66
57. Change the Driver to Modbus RTU, the Unit Address to 1, and the Modbus Role to Modbus RTUSlave:58. Next click Modbus Mapping. You are going to map the six Micro830 outputs to Modbus Coiladdresses 000001-000006 and four of the inputs to Modbus Contact addresses 100001-100004.Double click on the cell under Variable Name:52 of 66
59. When the Variable Selector screen appears, select IO Embedded Digital Output 0 from the I/O– Micro830 tab and click OK:60. Type 000001 under Address and Enter:53 of 66
61. Similarly, map Variable Names IO Embedded Digital Output 1 throughIO Embedded Digital Output 5 to Modbus Coil Addresses 000002-000006,IO Embedded Digital Input 0 and IO Embedded Digital Input 1 to Modbus ContactAddresses 100001 and 100002 and IO Embedded Digital Input 3 andIO Embedded Digital Input 4 to Modbus Contact Addresses 100003 and 100004. Whencomplete, the Modbus Mapping should appear as follows:62. Now Build, Save and Download the updated program. Then return the Micro830 to Run mode.63. Go ahead and power up your PanelView Component terminal now.64. Within the Device Toolbox, locate the PanelView Component terminal icon as shown below, clickon it, hold and drag it into the Project Organizer:54 of 66
65. Now you can double click on the PanelView Component icon to bring up the new PanelView offlinedevelopment software (an emulator is no longer required for offline PVc application development).55 of 66
66. Next you will transfer the Traffic Light TFT application to the offline terminal. Click on File Transfer,then click on New Transfer:67. Click on My Computer, then click Next:56 of 66
68. Click on Application, then click Next:69. Click on , then click on Desktop, browse to Lab Files\Traffic Light TFT.cha and click Next:57 of 66
70. Click on Internal Storage, then click Transfer:71. Click on Dashboard to return back to the Application Dashboard screen:58 of 66
72. Now click Test. When you maximize CHMI App, a preview of the screen isdisplayed:73. Once your PanelView Component terminal has completed powering up, the screen should similarlyappear, but will be reading the live Modbus variables from the Micro830 controller:59 of 66
74. Push and hold button DI0 for several seconds, and you should see a car appear North of theintersection, and after five seconds, you should see the green light change to yellow and a couple ofseconds later, see the North/South light change to green, at the same time that the East/West lighthas changed to red. Use buttons DI1, DI3 and DI4 to trip the car sensors South, East and West ofthe intersection.75. Although we don’t have a PowerFlex drive for you to connect to today, you can still take a look atwhat some of the capabilities are in an “offline” mode. Expand the Drives folder within DeviceToolbox:60 of 66
76. Click on the PowerFlex 4M icon, hold and drag it across to the Project Organi
Connected Components Workbench Release 1 software (prerelease build 43) Project.Micro830.Micro830.TRAFFIC_CONTROLLER_FB.7z User Defined Function Block import file Traffic_Light.cha or Traffic_Light_TFT.cha PVc application file . 5 of 66. 6 of 66 Programming the Built-in Smart Relay Function Blocks in a Micro810