Transcription
Jabber for iPhone - Quick Start GuideContentsIntroductionPrerequisitesSoftware RequirementsHardware RequirementsConfiguring Phone ServicesJabber SoftphoneConfiguring VoicemailUnity Connection ConfigurationCUCM ConfigurationConfiguring DirectoryLDAP Directory ServicesUDS Directory ServicesConfiguring CUCM End UsersService DiscoveryDownloading and Installing Cisco JabberLogging in to JabberIntroductionThis document describes the necessary steps required for a successful deployment of CiscoJabber for iPhone with basic features. This is a quick start guide and will not cover any of theadvanced features supported by Cisco Jabber for iPhone.PrerequisitesCisco recommends you have a basic understanding of the Cisco Unified CommunicationsManager (CUCM) administration web page as well as experience with basic phoneconfigurations.Software RequirementsThis guide assumes the following software versions are in use: Cisco Unified Communications Manager (CUCM) version 10.5(2) or higher.Cisco Unified IM and Presence (IM&P) version 10.5(2) or higher.Cisco Unity Connection (CUXN) version 10.5 or higher.Jabber for iPhone 12.1 or higher.iPhone IOS 11, 12 or higherHardware Requirements
The Jabber for iPhone hardware specifications are based off specific Apple device models. Pleaserefer to the list below: Supported DevicesiPhone 5siPhone 6, iPhone 6 Plus, iPhone 6s, iPhone 6s Plus,iPhone SE,iPhone 7 iPhone 7Plus,iPhone 8, iPhone 8 Plus,iPhone X, iPhone XS, and iPhone XS Max.iPod touch 6thgenerationConfiguring Phone ServicesJabber SoftphoneJabber for iPhone provides a option to supply phone services through a Cisco Dual Mode foriPhone device which is often referred to as a TCT or Softphone.To configure a TCT device, log in to the CUCM Administration web page and navigate to Device Phone.From the Find and List Phones menu select Add New.Once on the Add a New Phone menu search the phone type drop down for the Cisco Dual Modefor iPhone device type. Once selected click Next.The table below (Table 1.0) contains all the fields that must be configured when setting up a CiscoDual Mode for iPhone (TCT) device in CUCM. Majority of required fields have defaultconfigurations and don't need to manually configured unless otherwise required for yourdeployment. You must manually configure all the fields where the Configured by Default columnin the table below is set to NO.
Tip: Cisco recommends that all Cisco Dual Mode for iPhone devices be configured with adevice name prefix of TCT. For example, you provision a user named Holly Day with a TCTdevice. Her CUCM end user user ID Is hday so her TCT device name would be TCTHDAY.Table 1.0RequiredFieldsDevice NameDevice PoolPhone ButtonTemplateCommonPhone ProfileLocationBuilt In BridgePrivacyDevice MobilityModeOwner User IDDefault ConfiguredDescriptionParameter by DefaultMust bemanuallyadded,deviceNOEnter a name to identify software-based telephonesnameshouldbegin withTCT.Must selectChoose the device pool to which you want thisone ofphone assigned. The device pool defines sets ofthe availableNOcommon characteristics for devices, such as region,devicedate/time group, and softkey template.pools.StandardChoose the appropriate phone button template. TheClientphone button template determines the configurationNOServiceof buttons on a phone and identifies which featureFramework(line, speed dial, and so on) is used for each button.StandardCommonChoose a common phone profile from the list ofYESPhoneavailable common phone profilesProfileUse locations to implement call admission control(CAC) in a centralized call-processing system. Thelocation specifies the total bandwidth that is availablefor calls to and from this location. A location settingof Hub None means that the locations feature doesHub NoneYESnot keep track of the bandwidth that this CiscoUnified IP Phone consumes. A location setting ofPhantom specifies a location that enables successfulCAC across intercluster trunks that use H.323protocol or SIP.Enable or disable the built-in conference bridge forDefaultYESthe barge feature by using the Built In Bridge dropdown list box (choose On, Off, or Default)For each phone that wants Privacy, choose On in thePrivacy drop-down list box. When privacy is enabled,DefaultYESthe system removes the call information from allphones that share lines and blocks other sharedlines from barging in on its calls.Turn the device mobility feature on or off for thisdevice or choose Default to use the default deviceDefaultYESmobility mode. Default setting uses the value for theDevice Mobility Mode service parameter for thedevice.Set the userFrom the drop-down list box, choose the user ID ofNO
IDUse TrustedRelay PointDefaultYESAlways UsePrimary LineDefaultYESAlways UsePrime Line forVoice MessageDefaultYESPacket CaptureModeNoneYESBLF PresenceGroupStandardPresenceGroupYESthe assigned phone user. The user ID gets recordedin the call detail record (CDR) for all calls made fromthis device. Assigning a user ID to the device alsomoves the device from "UnassignedDevices" to "Users" in the License Usage Report.From the drop-down list box, enable or disablewhether Cisco Unified CM inserts a trusted relaypoint (TRP) device with this media endpoint. ATrusted Relay Point (TRP) device designates anMTP or transcoder device that is labeled as TrustedRelay Point.From the drop-down list box select (Off, On orDefault). Default - Cisco Unified CommunicationsManager uses the configuration from the Always UsePrime Line service parameter, which supports theCisco CallManager serviceFrom the drop-down list box select (Off, On orDefault). Default - Cisco Unified CM uses theconfiguration from the Always Use Prime Line forVoice Message service parameter, which supportsthe Cisco CallManager service.This setting exists for troubleshooting encryptiononly; packet capturing may cause high CPU usageor call-processing interruptions.Choose a Presence group for the end user. Theselected group specifies the devices, end users, andapplication users that can monitor this directorynumber.The default value for Presence Group specifiesStandard Presence group, configured withinstallation.You must apply a security profile to all phones thatare configured in Cisco Unified CommunicationsManager Administration. Installing Cisco UnifiedCommunications Manager provides a set ofpredefined, nonsecure security profiles for autoregistration. To enable security features for a phone,you must configure a new security profile for thedevice type and protocol and apply it to the phone. Ifthe phone does not support security, choose anonsecure profile.Choose the default SIP profile or a specific profilethat was previously created. SIP profiles providespecific SIP information for the phone such asregistration and keepalive timers, media ports, anddo not disturb control. Typically the Standard SIPProfile for Mobile Devices would be used on a TCTdevice.Device SecurityProfleMust bemanuallyselected.NOSIP ProfileMust bemanuallyselected.NOCertificateOperationNo PendingOperationYESThis field is related to CAPF enrollment.DND OptionCall RejectYESWhen you enable DND on the phone, this parameterallows you to specify how the DND features handle
incoming calls.Once you have configured all the required field for the TCT configuration save the configuration byselecting the Save button.Now that you have created a TCT you will need to add a directory number to the device. This canbe done by select the Add a new DN option located at the top left of the TCT configuration.Note: This document does not cover the complete line configuration for the TCT device. Lineconfiguration is a standard configuration that must be performed for all phones and is not aconfiguration that is specific to TCT devices.Tip: Once you have configuring a directory number your TCT device make sure to associatethe CUCM end user to the directory number. This can be done by scrolling to the bottom ofthe directory number configuration and selecting Associate End Users. This configurationis required if you plan to use Jabber for phone presence.Configuring VoicemailJabber for iPhone is able to retrieve and playback voicemail messages that have been stored onCisco Unity Connection. To setup voicemail for Jabber for iPhone please follow the steps below:Unity Connection ConfigurationStart by logging into Cisco Unity Connection web administration web page and navigating toUsers Users.When presented with Search Users page search for and select your Jabber for iPhone usersmailbox.
Once presented with the Edit User Basics page of the user Mailbox notate the Calls ofService that is configured.Via the left hand navigation pane navigate to Class of Service Class of Service.When presented with the Search Class of Service page search for and select the class of serviceyou previously notated.Once on the Edit Class of Service page verify that the following:
1. Verify that the check box is checked for the Allow Users to Use the Web Inbox and RSSFeeds feature.2. Also verify that the Allow Users to Use Unified Client to Access Voicemail feature isenabled by checking the box near the feature name.Once the Class of Service configuration has been verified navigate to System Settings Advanced API Settings in the left navigation pane. Enable all three of the settingspresented on the API Configuration page.CUCM ConfigurationNow that Unity Connection is setup we will move on to the CUCM configuration for Jabber foriPhone voicemail. Start by navigating to User Management User Settings UC Service.Once on the Find and List UC Services page select Add New.When presented with the UC Service Configuration page select Voicemail from the UC ServiceType drop down then select Next.
You will then be presented with the UC Service Configuration page. Start by selecting UnityConnection from the Product Type dropdown. You will also need to configure a Name forthe Voicemail UC Service as well as provided the IP, Hostname or Fully Qualified DomainName (FQDN) of the Unity Connection server that is running the REST and Jetty services.Note: Up to three Voicemail UC Services can be assigned to a UC Service Profile.Now that the Voicemail UC Service(s) are defined we will assign them to the Service Profile. Startby navigating to User Management User Settings Service Profile.
From the Find and LIst Service Profiles menu search for and select the service profile used byyour Jabber for iPhone users or create a new service profile by selecting Add New.Once on the Service Profile Configuration page scroll down to the Voicemail Profile sectionand assign the Voicemail UC Service(s) to the service profile then select Save.Note: The Jabber for iPhone setup above assumes that Unity Connection is using LDAPauthentication. In cases where mailboxes are not LDAP integrated please refer to the CiscoOn-Premises Deployment Guide.Configuring DirectoryJabber for iPhone is dependent on directory services for resolution of corporate contacts. Jabberis able to perform directory resolution through Lightweight Directory Access Protocol (LDAP) or
CUCM User Data Services (UDS). Please refer to the sections below for information onconfiguration of LDAP or UDS directory services for Jabber for iPhone.LDAP Directory ServicesJabber for iPhone supports three well known LDAP directory services, as seen below:Active Directory Domain ServicesOpenLDAPActive Directory Lightweight Directory Service (AD LDS)This guide will provide the steps to configure Jabber for iPhone 12.1 or above to integrate withActive Directory Domain Services, as this is a common integration. Start by logging into the CUCM Administration web page and navigating to User Management User Settings UC Service.Once on the Find and List UC Services page select Add New.When presented with the UC Service Configuration page select the Directory from theUC Service Type drop down and select Next.
You will then be presented with the UC Service Configuration page. Select EnhancedDirectory from the Product Type drop down. You will also need to configure a Name forthe Directory UCService as well as provided the IP, Hostname or Fully Qualified Domain Name(FQDN) of the directory server.By default the Connection Type will be set to Global Catalog which assumes that a MicrosoftDomain Controller is being used as the the directory source. If a Global Catalog server is in usethe Port number in the configuration should be set to 3268. Cisco does recommend the use of aGlobal Catalog server as a directory resource as it provides more efficient resolutions of queries.Tip: In cases where you are not using a domain controller for Microsoft Active DirectoryDomain Services the Directory UC Service should have the Port set to 389 to ConnectionType should be set to Ldap.Note: Up to three Directory UC Services can be assigned to a UC Service Profile.Now that the Directory UC Service(s) are defined we will assign them to the Service Profile. Startby navigating to User Management User Settings Service Profile.
From the Find and LIst Service Profiles menu search for and select the service profile used byyour Jabber for iPhone users or create a new service profile by selecting Add New.Once on the Service Profile Configuration page scroll down to the Directory Profile section andassign the Directory UC Service(s) to the service profile. You will also need to define the ActiveDirectory search base, this should be the organization unit or directory where your corporate usersexist.While configuring the Directory Profile section you will also have to configure adirectory authentication method. Check the check box near the "Use Logged On UserCredential" to prevent anonymous queries and force Jabber to authenticate with thecredentials that were entered during Jabber log in. If the Use Logged On User Credential is leftunchecked Jabber will attempt to perform anonymous access to the directory server. Anonymousdirectory access is not recommended by Cisco.Once you are done configuring the Directory Profile select Save.Note: If you are using CUCM 10.X - 11.5.X the Directory Profile section of the ServiceProfile will also include username and password fields that allow for a distinguished name tobe used as the user ID that is authorized to run queries on the LDAP server. In CUCM 12.Xif you want to use a single user ID for authentication for directory services you will need touse the Connection Username and Connection Password parameters in the jabberconfig.xml.
Caution: Cisco Jabber queries contact source using various attributes, not all of theseattributes are indexed by default. To ensure efficient searches the attributes used by CiscoJabber must be indexed on the directory server. For more information please refer to theLDAP Prerequisites section of the Jabber Planning Guide.UDS Directory ServicesCUCM User Data Services (UDS) provides a contact source API that can be used by Jabber overCisco Expressway mobile and remote access for the contact resolution and it is an optionalcontact service for clients on the corporate network. The UDS contact source uses the Unified CMend user table information to provide a directory resolution.Start by logging into the CUCM Administration web page and navigating to User Management User Settings Service Profile.
From the Find and LIst Service Profiles menu search for and select the service profile used byyour Jabber for iPhone users or create a new service profile by selecting Add New.Once on the Service Profile Configuration page scroll down to the DirectoryProfile section and check the check box labeled Use UDS for Contact Resolution thenselect Save.
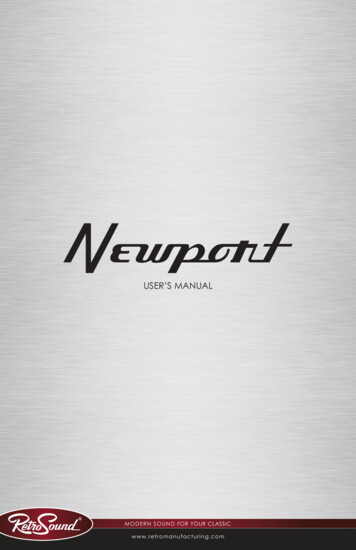
Once UDS Is enabled on the service profile Jabber for iPhone will automatically discover theCUCM UDS servers during the Jabber log in process.Configuring CUCM End UsersThe CUCM end user configuration is a crucial step in deploying Jabber for iPhone as many ofJabbers features are dependent on this configuration. The image below depicts all the Jabberconfigurations that are dependent on the CUCM end user configuration.To configure the Jabber for iPhone CUCM end user start by logging into the CUCM Administrationweb page and navigating to User Management End User.
From the Find and LIst Users menu search for and select the CUCM end user you wish toconfigure for Jabber for iPhone.Once on the End User Configuration web page scroll down to the Service Settings section,here you can assign the end user the services you want them to use. To enable a user to be ableto log in to Jabber for iPhone you must enable the Home Cluster service by checking the checkbox next to the service name.If your end users will be using Jabber for iPhone for instant messaging you will needto enable their end user for the service by checking the check box next to the field labeled EnableUser for Unified IM and Presence.Next you will want to assign a service profile by selecting a service profile from the UC ServiceProfile drop down. The service profile is used to provide the Jabber client with CUCM UC serviceconfiguration. .Note: If you don't assign a service profile to the CUCM end user then the user willautomatically use the service profile that is set as the system default service profile.Next scroll down to the Device Information section. Here you can manage the CUCM end userscontrolled devices. Assign the user their softphone (TCT). CUCM provides this list of device toJabber for iPhone during Jabber log in.
You can assign a device to a user by selecting the Device Association button. You will then bepresented with the User Device Association menu. From here you can search for the CUCM endusers devices. When you find a device place a check mark in the check box next to the device andselect Save Selected Changes.Now scroll down to the Directory Number Association section and select the CUCM end usersprimary extension from the Primary Extension drop down.Next scroll down to the Permissions Information section. Here will will assign the permissionsthat are needed by Jabber for iPhone.The table below (Table 1.1) lists all the required roles, their privileges and the reason why Jabberneeds the role assigned.Table 1.1RolesStandard CCM End UsersStandard CCMUSERAdministrationPrivileges/ResourcesGrant an end user log-in rights to the Cisco Unified CMUser Options.Allows access to the Cisco Unified CM User Options.Jabber Role UsagJabber SOAPAuthenticationJabber SOAPAuthenticationTo assign a permission group to the CUCM end user select the Add to Access ControlGroup button.Next, search for the access control group you would like to add and select the checkbox locatednear the access control groups name. When finished select the Add Selected button.
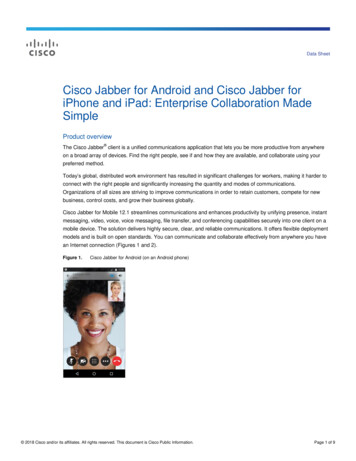
Service DiscoveryFor the Cisco Jabber client to be able to log in it must first be aware of the services (CUCM, IM&Por Expressway) it will use for authentication and configuration retrieval. Ciscorecommends configuring automatic service discovery through the use of Domain Name System(DNS) Service Location (SRV) records as this provides a seamless user experience and ease ofadministration.The image below is graphical depiction of the Jabber automatic service discovery process.To add DNS SRV record to Microsoft DNS Manager navigate to your domain and expand the tree.Right click on the tcp folder and select Other New Records.
When presented with the Resource Record Type window, highlight the Service Location(SRV) then select Create Record.Next you will be presented with the "New Resource Record" pane. Here you will configure a SRVrecord for each of the CUCM servers that will be used for Jabbers initial UDS home clusterlookup.Below is a configuration example for the cisco-udsSRV record. In this example the cisco-udsrecord resolves to three CUCM nodes within a CUCM cluster.cisco-uds. tcp.testlab.comSRV service location:priority 6weight 30port 8443svr hostname cucm3.testlab.comcisco-uds. tcp.testlab.comSRV service location:priority 2weight 20port 8443svr hostname cucm2.testlab.comcisco-uds. tcp.testlab.comSRV service location:priority 1weight 5port 8443svr hostname cucm1.testlab.com
Downloading and Installing Cisco JabberStart by opening the App Store on the iPhone device.Once in the App Store application select the Search option from the lower navigation pane.Next, search for Jabber using the app store search bar.Once you have found the Cisco Jabber application simply select GET to start the installation.
Logging in to JabberTo perform a first time login for Jabber for iPhone, start by finding the Cisco Jabber application onthe iPhone device and launching it .Once the Jabber for iPhone application launches you will be presented with the End user licenseagreement. Please read through the notices and terms of service. If you wish to continueselect Accept.
Jabber will then request permission to access the iPhone microphone as this is needed for Jabbervoice services. If this is acceptable and you wish to continue with Jabber logIn select OK.
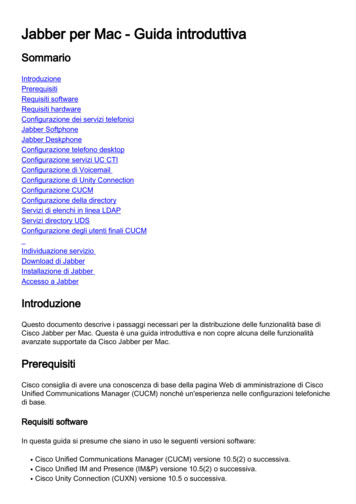
Next the Jabber application will display the service discovery login screen. Here you will providedthe Jabber username and the domain that will be used for service discovery (example.tuser@testlab.com). To proceed with login select the Continue button.
Once service discovery has finished you will be prompted to provide the credentials for Jabberlogin. Provide a valid Jabber username and password and select Sign In.
The Jabber for iPhone hardware specifications are based off specific Apple device models. Please refer to the list below: Supported Devices iPhone 5siPhone 6, iPhone 6 Plus, iPhone 6s, iPhone 6s Plus,iPhone SE,iPhone 7 iPhone 7 Plus,iPhone 8, iPhone 8 Plus,iPhone X, iPhone XS, and iPhone XS Max.iPod touch 6th generation Configuring Phone .