Transcription
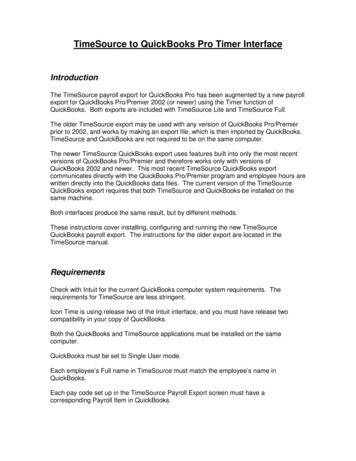
TimeSource to QuickBooks Pro Timer InterfaceIntroductionThe TimeSource payroll export for QuickBooks Pro has been augmented by a new payrollexport for QuickBooks Pro/Premier 2002 (or newer) using the Timer function ofQuickBooks. Both exports are included with TimeSource Lite and TimeSource Full.The older TimeSource export may be used with any version of QuickBooks Pro/Premierprior to 2002, and works by making an export file, which is then imported by QuickBooks.TimeSource and QuickBooks are not required to be on the same computer.The newer TimeSource QuickBooks export uses features built into only the most recentversions of QuickBooks Pro/Premier and therefore works only with versions ofQuickBooks 2002 and newer. This most recent TimeSource QuickBooks exportcommunicates directly with the QuickBooks Pro/Premier program and employee hours arewritten directly into the QuickBooks data files. The current version of the TimeSourceQuickBooks export requires that both TimeSource and QuickBooks be installed on thesame machine.Both interfaces produce the same result, but by different methods.These instructions cover installing, configuring and running the new TimeSourceQuickBooks payroll export. The instructions for the older export are located in theTimeSource manual.RequirementsCheck with Intuit for the current QuickBooks computer system requirements. Therequirements for TimeSource are less stringent.Icon Time is using release two of the Intuit interface, and you must have release twocompatibility in your copy of QuickBooks.Both the QuickBooks and TimeSource applications must be installed on the samecomputer.QuickBooks must be set to Single User mode.Each employee’s Full name in TimeSource must match the employee’s name inQuickBooks.Each pay code set up in the TimeSource Payroll Export screen must have acorresponding Payroll Item in QuickBooks.
InstallationBefore preceding the TimeSource QuickBooks export program needs to be installed onthe computer. The program, called QBPlusExport.exe, is not installed during theTimeSource installation. The installation file called SetupTS 7Qbinterface.exe is locatedon the following path:CD ROM:\QbTimerInterface\SetupTS 7Qbinterface.exePlease place your TimeSource CD in the computers CD ROM drive and using a WindowsExplorer window navigate to the SetupTS 7Qbinterface.exe file at the path above. To runthe setup program just double click on the file and proceed with the install.Setup TimeSourceBefore attempting the TimeSource QuickBooks export certain fields in TimeSource needto be configured for the export to work.Export TypeFrom the TimeSource SwitchBoard open the Payroll Export screen by clicking on thePayroll Export button under the File heading. Please set the “Export Type” field of thePayroll Export screen to “QuickBooks Pro Timer”. Refer to the circled area of Figure 1.Figure 1.2
Since the QuickBooks Pro Timer export sends the TimeSource punch data directly to theQuickBooks database file an “Export Path” is not required. Please leave the “Export Path”as no path .Export CodesIn the same Payroll Export window enter the TimeSource “Export Codes”. The circledarea of Figure 2 shows where you need to enter the “Export Codes”.In the example below all regular hours in TimeSource are exported to QuickBooks withthe Regular code, OT1 hours with the Overtime code and so on. The “Export Codes”must each match a “Payroll Item” code in QuickBooks. The codes listed below are justsuggestions if you have existing “Payroll Items” setup in QuickBooks please enter thosevalues in as the Export Codes. Please refer to the information at Figure 5, Setting upPayroll Items, to see what “Payroll Item” codes you currently have established.IMPORTANT. TimeSource limits the export of regular time to a single code. If you havemultiple “Payroll Item’s” in QuickBooks for regular time a single Payroll Item must beselected for the export of the information.The example below was taken from TimeSource Lite if you have TimeSource Full you willadditional codes. The “Export Codes” are limited to 10 characters in length.Figure 2.Employee NameFrom the TimeSource SwitchBoard open the Employee screen by clicking on the“Employee” button under “Edit”. Each employee’s “Full Name” must match the3
corresponding employees name in QuickBooks. Please refer to the circled area of Figure3 to see where to edit the “Full Name” in TimeSource.Figure 3.The employee “Full Name” in TimeSource must match the name displayed in theQuickBooks Employee List as shown in Figure 5.Setup QuickBooksThis user guide is not a primer on the use of QuickBooks Pro. However, there are a fewoperations that must be performed before the interface will run. Our purpose here is justto point them out. Refer to your Intuit documentation for details on how to accomplishthese steps.Enabling Time TrackingBefore you try to run the interface, check the Edit- Preferences menu of QuickBooksand make sure that you have selected to track time.In the “Preferences” screen select “Time Tracking”. Then select the “CompanyPreferences” tab of the “Time Tracking” screen. Make sure the “Yes” radio button isselected for “Do You Track Time” as shown in figure 4.If “Track Time” is not set to “Yes” the TimeSource QuickBooks Pro Timer interface willsimply not run.4
Figure 4.Employee NameEach employee’s name in the QuickBooks Employee List, Figure 5, must match thecorresponding employee’s “Full Name” in TimeSource, Figure 3. If the names are not thesame, change the “Full Name” in TimeSource to match the employee’s name in theQuickBooks Employee list. If this is not possible, double click on the employees name tomake the edit in QuickBooks.5
Setting up Payroll ItemsFigure 5.Before QuickBooks will accept information from the TimeSource program the Payroll Itemlist in QuickBooks must be edited so the “Payroll Items” match “Export Codes” entered inthe “QuickBooks Pro Timer” payroll export screen of TimeSource, Figure 2. To accessthe Payroll Item list select Lists Payroll Item from the QuickBooks menu bar.See Figure 6 to see an example of the Payroll Item list of QuickBooks.of Figure 6 show the “Payroll Items” used in this example.The circled areaThe Payroll Item list is pre-configured with certain “Federal Tax “ entries. For ourpurposes you can ignore these items.You can use one of three possible methods to configure you QuickBooks “Payroll Items”to match TimeSource “Export Codes”.1. If you have existing “Payroll Items” other than the “Federal Tax” entries you canenter your existing “Payroll Items” as “Export Codes” in the “QuickBooks ProTimer” payroll export interface. In our example your current “Payroll Item” forregular time would replace the Regular “Export Code” in QuickBooks Pro Timerinterface screen, Figure 2, as long as the Payroll Item name did not exceed 10characters in length.2. If using your existing “Payroll Items” is not an option you can edit the names of anexisting “Payroll Item” to match an “Export Code” name already entered into the“QuickBooks Pro Timer” export interface. Simply edit an existing “Payroll Item” bydouble clicking on the item name. Enter the new “Payroll Item” name following theinstructions displayed until the existing item has been updated. In our example anexisting “Payroll Item” would be edited to Regular to correspond to the Regular“Export Code” in TimeSource.3. If you need to add a new “Payroll Item” to the list, select the “Payroll Item” buttonat the bottom of the Payroll Item screen and then select “New”. QuickBooks willask which method you want to use to set up the “Payroll Item”. Select “Custom”.Follow the instructions on the following screens to add the new “Payroll Item”.Make sure the name of the new “Payroll Item” matches one of the “Export Codes”,Figure 2, in the “QuickBooks Pro Timer” interface. In our example the new “PayrollItem” for regular hours would be named Regular as it is in the “QuickBook ProTimer” export interface.6
Figure 6.For our example after all of the “Payroll Items” have been entered the screen will look likethe circled area of Figure 6 and the “QuickBooks Pro Timer” export interface will look likeFigure 2.Again the names of the “Payroll Items” listed in Figure 6 are just suggestions. Please usethe “Payroll Item” name appropriate for your set up making sure they have matching“Export Codes” in TimeSource.Assigning Payroll Items to EmployeesOnce the “Payroll Items” have been entered into the Payroll Item list each item must beassigned to an employee. To assign the “Payroll Items” to each employee please openthe Employee list by selecting Lists Employee Lists from the QuickBooks menu bar,Figure 7.7
Figure 7.Double click on the first employee in the list. This opens the “Personal Info” screen forthis employee as shown in Figure 8. From the “Change Tabs” drop down of the EditEmployee screen select the “Payroll and Compensation Info” option as shown if Figure 8.Figure 8.8
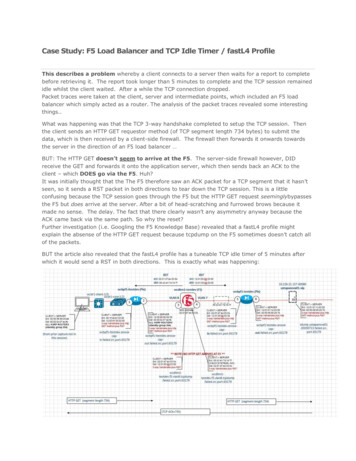
In the “Payroll and Compensation Info” screen please assign each “Payroll Item” andcorresponding pay rate to the employee. Please refer to the circled area of Figure 9.Figure 9.Its important to note here that each employees “Use time data to create paychecks”located in the circled area of Figure 9 must be checked.Run ExportStart QuickBooksStart QuickBooks manually and leave the program running the very first time you run theexport. Failure to do so will result in error messages because a connection cannot beestablished between TimeSource and QuickBooks.Start TimeSourceStart TimeSource. Open the Payroll Export screen by selecting File Payroll Export fromthe TimeSource Switchboard. Please make sure the “Export Type” is set to QuickBooksPro Timer as shown if Figure 10. In addition make sure you have entered the appropriateExport Codes as demonstrated in Figure 2.From the Payroll Export screen select the Time Frame for your export. Next select the“All” value from the drop down list for both the Employee and the Department field. Beginthe export process by clicking on the “Run Export” in Figure 10.9
Figure 10.Locate the TimeSource ApplicationBefore the export can run it needs to locate the TimeSource applications file,tsourcev7.mde. Select Ok in the “Locate TSDATA” screen, Figure 11.After selecting “Ok” a typical Windows“Open” file window appears, Figure 12. Tocontinue you must locate the TimeSourceapplication file in this window and open thefile.Figure 11.The TimeSource application is typicallyinstalled on the following page C:\ProgramFiles\Tsourcev7\Tsourcev7.mde. Navigateto the Tsourcev7 folder in the “Open”window and highlight the “Tsourcev7.mde”file and then select open.If you have installed TimeSouce in a different folder navigate to that folder and open thetsourcev7.mde file located there.10
Figure 12.Locate the QuickBooks Data FileNext you will be prompted to locate your QuickBooks data file. The QuickBooks data filehas a .QBW extension and is usually named after the company.After selecting “Ok” a typical Windows“Open” file window appears, Figure 14. Tocontinue you must locate your QuickBooksdata file in this window and open the file.Figure 13.The QuickBooks data file is typicallyinstalled on the following path C:\ProgramFiles\Intuit\QuickBooks Pro\CompanyName.QBW. Where the “CompanyName.QBW” file will be the name of yourQuickBooks data file. Navigate to the file inthe “Open” window, highlight the file andselect “Open”.If the QuickBooks data file is in a different location navigate to that location and open thefile.11
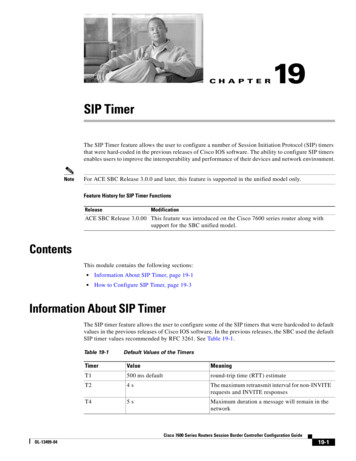
Figure 14.Respond to QuickBooksQuickBooks must be running the first time you run this interface. QuickBooks recognizesthat a new application is asking for access to the data, and responds with the followingdialog box, Figure 15.Figure 15.The TimeSource interface does not require access to Social Security Numbers and otherpersonal data, so you do not need to check the option.12
Click either “Yes, this Time” Or “Yes, Always” to proceed with the data transfer.If you select “Yes, this Time” then you must run QuickBooks manually before running thisinterface again, and QuickBooks will prompt you with this same screen.If you select “Yes, Always” then this screen will not appear again. Whether you need torun QuickBooks manually or not depends on how you structure QuickBooks Preferencesat a later step.In either case, the TimeSource interface begins its work.Check for Unresolved IssuesAfter allowing TimeSource to access the QuickBooks data the “QuickBooks Pro Timer(Payroll Export)” screen is automatically opened, Figure 16.TimeSource validates the export data as much as possible before allowing the export tocomplete.Any employees or payroll items whichcannot be found in your QuickBooksdata file will be reported here as anunresolved issue. These issues mayrepresent a simple difference inspelling, or a data item that is actuallymissing in QuickBooks.Any issues reported in the“QuickBooks Pro Timer (PayrollExport)” screen must be resolved ineither TimeSource or QuickBooksbefore returning here and running theinterface again. The interface will notallow you to proceed with unresolvedissues. You may want to use the“Print Screen” button to generate aquick list of issues.Figure 16.Check After Resolving IssuesWhen the QuickBooks Pro Timer (Payroll Export) programs no longer detects any issuesbetween the TimeSource export data and QuickBooks the screen in Figure 17 appears.13
The data is now ready to export toQuickBooks. Before proceeding withthe export it is advisable to make abackup of your QuickBooks data. Iffor whatever reason somethingunexpected happens during theexport you only need to restore theQuickBooks backup file. If you decideto make a back up of yourQuickBooks data select the “Close”button and run the export again aftercreating the backup.To run the export click on the “Export”button.Figure 17.Export CompletedWhen the export has completed the window in Figure 18 is displayed.With the error checking performedprior to the data exchange, it isextremely unlikely that an error wouldoccur during the actual transfer ofdata during the export. If this shouldever happen, the screen in Figure 18will inform you of that fact and will tellyou in which file it has saved thetransaction results. That file isformatted as XML data, and may beviewed in a browser.You have successfully completed theexport. Click the close button to exitthe export screen.Open QuickBooks to view theexported data.Figure 18.14
View the Results in QuickBooksThe first time you complete a data transfer, you will most likely want to view the results ofthe export. To view the export, open the Weekly Timesheet screen by selectingEmployees Time Tracking Use Weekly TimeSheet from the menu bar, Figure 19.Figure 19.When the “Weekly Timesheet” opens it defaults to a blank timesheet.Select an employee by choosing the drop down arrow next to the “Name” label in the“Weekly Timesheet” as shown in Figure 20.Please make sure you select an employee whose time was included in the export.15
Figure 20.Once an employee has been selected from the drop down list the employee’s timeinformation is displayed as shown in Figure 21.Figure 21.If the “Weekly Timesheet” is displaying the incorrect time period use the “Previous” or“Next” options circled in Figure 21 to locate the correct export time period.16
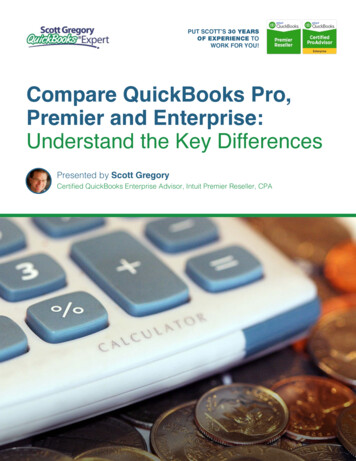
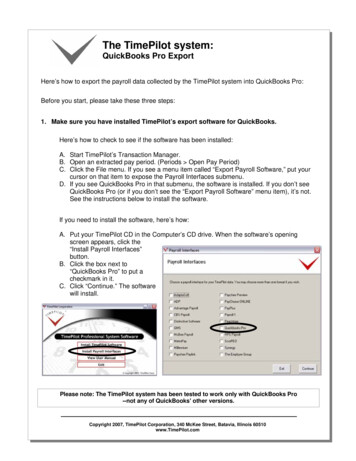
Unattended OperationIt is possible to allow TimeSource to run QuickBooks in the background while exchangingdata so that you will not have to manually start QuickBooks. If you choose this method ofoperation, you must authorize TimeSource to access QuickBooks always by editing the“Access to QuickBooks Company File” screen.Navigate to the screen by selecting Edit Preferences from the menu bar. In thePreferences window select the “Integrated Applications” preference screen and thenselect the “Company Preferences” tab, as shown in Figure 22.Highlight the TimeSource interface line and click Properties.Figure 22.Click the “Access Rights” tab. Enable “Allow this application to access this company file”.Then enable the “Allow this application to login automatically” and select a user from thedropdown list box as shown in Figure 23.17
Figure 23.The selected user will now be able to run the Payroll Export from TimeSource and it willnot be necessary to manually start QuickBooks first. The QuickBooks Operation will betransparent to the user.18
Before QuickBooks will accept information from the TimeSource program the Payroll Item list in QuickBooks must be edited so the “Payroll Items” match “Export Codes” entered in the “QuickBooks Pro Timer” payroll export screen of TimeSource, Figure 2. To access the Payroll Item list s