Transcription
ST8-WiFi TimerInstallation Guide and Operations ManualMINAMMD YYYYEnglish
ST8-WiFi TimerInstallation Guide and Operations ManualContentsIntroductionEven Days. 9Cyclic Days. 10Welcome to Rain Bird. 1Timer Features. 1Controls and Indicators. 1Key Functions. 1Options and Special FeaturesRain Delay. 10Copy Zone to Zone. 10InstallationNormal OperationTools and Supplies Needed. 2Mount Timer. 2Wiring Connections. 3Connect Zone Valves. 3Valve Connections. 3Timer Connections. 3Optional Accessories. 4Master Valve. 4Pump Start Relay. 4Rain Sensor. 5Auto. 11Off. 11Additional FeaturesWater Now. 12Water ALL Zones:. 12Water ONE Zone:. 12Seasonal Adjust. 13TroubleshootingError Detection. 14Connection Issues. 14Watering Issues. 15Electrical Issues. 15Install Batteries. 5Connect Power. 5Indoor Timer. 5Outdoor Timer. 6App ProgrammingSymbolsActivate Hotspot . 7Launch the Rain Bird App . 7NOTE: Alerts user to important operatingfunctionality or installation instructions.Programming at the TimerWARNING: Alerts user to the presence ofelectricity which may pose a risk of shock orother hazard.Date/Time. 7Zone Schedule. 7Select Zone. 8Set Watering Run Times. 8Set Watering Start Times. 8Set Watering Start Days. 8Custom Days. 9Odd Days. 9For help setting up or operating the ST8-WiFi Timer,please call Rain Bird toll-freeTechnical Support at:1-800- RAIN BIRD (800-724-6247)or visit www.rainbird.comII
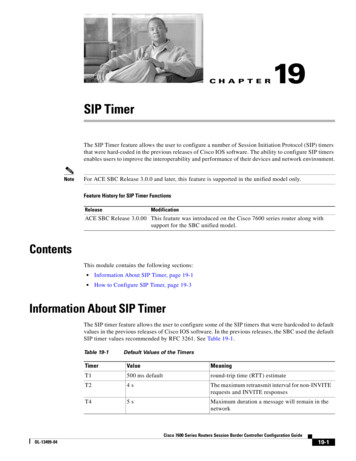
This Product IncludesOutdoor TimerMINMounting Screws andanchors (if needed)Batteries (2) AAA3-ProngplugIndoor TimerAMMD YYYYMounting Screws andanchors (if needed)TransformerBatteries (2) AAAIII
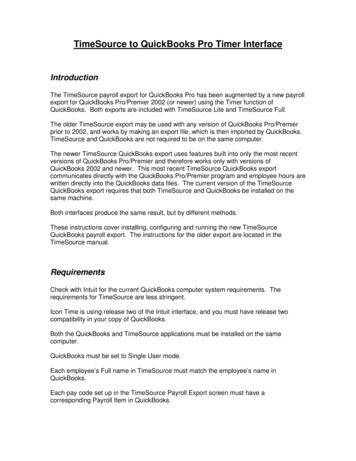
IntroductionWelcome to Intelligent Watering!Timer FeaturesThank you for purchasing a WiFi-enabled Smart Timer fromRain Bird, a trusted name in irrigation throughout the worldfor over 80 years.The Timer has a variety of advanced watermanagement features, including: Zone based programming allows independentirrigation scheduling for different areas (Zones), basedon the specific water requirements for each area.In this manual are step by step instructions for how toinstall and operate your timer. P rograms can be set to water on selected days ofthe week, odd or even calendar days, or at customintervals, allowing enhanced flexibility and control ofirrigation schedules. M ultiple Watering Start Times allow you to run thesame program multiple times on the same day.Timer manual interface controlsand indicators. S easonal Adjust allows quick adjustment of wateringduration based on weather or other conditions.The manual timer interface allows for visualconfirmation of schedule as well as customprogramming when a mobile device is not available. M anual Water feature to allow immediate watering ofall Zones or one Zone at a time.Key FunctionsOFFCancel all active wateringimmediately and disableautomatic irrigation.Seasonal AdjustIncrease or decreasewatering duration (RunTimes) for all Zones.AUTOWatering occurs automaticallyaccording to programmed schedules.1234567MTWTHFSSUDisplay ScreenDisplays programminginformation andirrigation er NowStart wateringimmediately for all Zonesin sequence, or for anysingle Zone.Date/TimeSet the current Dateand Time.MANUALD YY YYYYYYDNext/Back ButtonsSelect programmingoptions.SCHEDULEESP-RZXBACKOFFONNEXT or – ButtonsAdjust programsettings.Watering ScheduleCreate customizedirrigation schedules torun automatically atspecific times, durationsand intervals.NOTE: Press andHOLD or – toaccelerate settingadjustments.1
InstallationMount TimerTools and Supplies NeededMount the Timer in an accessible location Phillips screwdriverNOTE: Indoor models are for indoor useonly. Outdoor models can be used indoorsor outdoors. Wire stripper HammerNOTE: For indoor models, choose a locationwithin 6 feet of an AC power outlet and atleast 15 feet away from major appliances orair conditioners. V alve wire: direct burial, color coded multistrand (not included) 18 gauge for runs less than 800 feet.Drive a screw into the wall, leaving an 1/8” gapbetween the screw-head and the wall (use thesupplied wall anchors if necessary). 14 gauge for runs greater than 800 feet. Watertight splice connectors (not included)Locate the keyhole slot on back of the unit andhang it securely on the screw.Before Removing Old TimerRemove the wiring bay cover at the bottom ofthe unit and drive a second screw through thecenter hole at the bottom of the unit as shown(use the supplied wall anchors if necessary).ABAT&TAT&T4:24:211PPMM100%24VACSENSOR COM12345INDOOR MODEL6100%1/8 IN.A. Check WiFi signalWith your phone, check WiFi signal strength of yourtimer’s location (2 bars minimum is recommended).Boost signal if needed by adding a wireless router ormoving the timer and router closer together.B. Take A Photo of Wiring DetailsOUTDOOR MODELThis photo will be useful reference when installing thenew timer.1/8 IN.Record Current Watering TimesZone1Days Per WeekMo, We, FrDuration20 minutesTHEN UNPLUG TRANSFORMER/TURN OFF POWER ANDREMOVE WIRES.CONNECT120 VAC2If hard wiring for AC power,remove knockout for conduit
Wiring ConnectionsConnect the valve wires for each Zone.NOTE: If installing an outdoor model, route all valvewires through conduit and through the knock-outon bottom of the unit.Connect Zone ValvesRESET24VACSENSC M 12345678A CCESSORYValve ConnectionsUse direct burial cable to run wiring from the Timerto valves in the field.TERMINALBLOCKConnect a color coded wire from the direct burialcable to either wire on the valve.Connect the remaining wire on each valve to a“common” wire which then connects to the Timer.DIRECTBURIALCABLENOTE: Use water-tight connectors for all wire spliceconnections. Depending on your landscape setup,you may need to run extension wires for the powerand common connections.WIRES TOZONES 3 & 4POWERTimer ConnectionsConnect the color coded power wire from eachexternal valve (or zone) to the corresponding zonenumber on the terminal block.ZONE 1VALVEPOWERCOMMONWIREWARNING: To prevent damage to the Timer, connectonly ONE valve to each open terminal.ZONE 2VALVEConnect the common wire to the common (C)terminal.NOTE: Do not remove the yellow jumper wire on theterminals marked SENS.Check that all wiring connections are secure.Turn on external power (outdoor model) or plug intransformer (indoor model).3WATER-TIGHTCONNECTORS
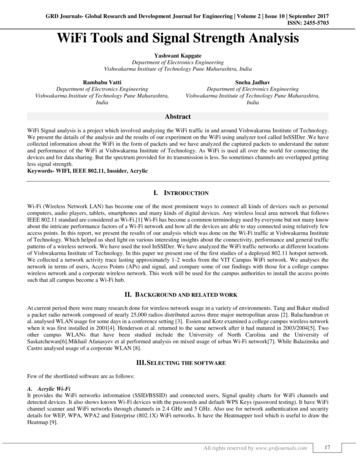
Optional AccessoriesPump Start RelayConnect an optional Master Valve, Pump StartRelay or Rain Sensor to the Timer.Pumps are used in some places to draw water from awell or other source. If you are activating a pump fromthe Timer, you must install a pump start relay.Master ValveA pump start relay connects to the Timer in the sameway as a Master Valve, but connects differently at thewater source.Timers support the use of a master valve.Using a direct burial cable, connect one of thewires from the master valve (or pump start relay)to the master valve terminal (M).To avoid possible pump damage, connecta short jumper wire from any unused zoneterminal(s) to the nearest zone terminal in use.Connect the remaining wire from the mastervalve (or pump start relay) to the commonterminal (C).Example: If a 4 zone model Timer is in use withonly two zones connected, route the terminalsfor zones 3 and 4 to the nearest active terminal(in this example, zone 2).RESET24VACSENSC M 12345678A CCESSORYACTIVETERMINALRESET24VACA PERWIRES4SENSC M 12345678
Install BatteriesRain SensorRemove the wiring bay cover at the bottom ofthe unit.The Timer can keep Date and Time if batteries areinstalled for backup.Remove the yellow jumper wire from theterminals marked SENS on the terminal block.NOTE: Your programming is stored in NonVolatile memory and will remain in the Timereven if batteries are not installed.Insert two AAA batteries into the battery slotabove the terminal block, as shown below.RESET24VACSENSC M 12345678A CCESSORYC M 1RESET24VACSENSC M 12345672345678A CCESSORYREMOVEJUMPER WIRENOTE: Do not remove the jumper wire unlessconnecting a rain sensor. The Timer will notfunction if the jumper wire is removed and arain sensor is not connected.Connect PowerWARNING: DO NOT plug in or apply powerto the Timer until you have completed andchecked all wiring connections.Connect the two wires from the sensor to theSENS terminals.Indoor TimerRoute the transformer power cord through theopening at the bottom of the unit.Connect the two end wires on the power cordto the two 24VAC terminal connections on theTimer.RESET24VACSENSC M 12345678A CCESSORYWARNING: Do not attempt to link two or moreTimers together using a single transformer.POWERCONNECTION24VACSENSC M 1234567A CCESSORYRESET24VACA CCESSORYCONNECTWIRES5SENSC M 1234567888
Outdoor TimerThe outdoor controller comes with a standard 6 ftpower cord so it can be installed indoors, or outdoorsif plugged into a weatherproof external outlet.The outdoor controller can also be wired directly intoa power supply by removing the power cord. It has aninternal transformer that reduces supply voltage (120VAC in US) to 24 VAC. You will need to connect powersupply wires to the transformer’s three wires. (Line,Neutral, Ground).CONNECT120 VACWIRING COMPARTMENTRoute the three wires from an external powersource into the wiring compartment.WARNING: Electric shock can cause severeinjury or death. Make sure power supply isturned OFF before connecting power wires.Using wire nuts, connect the external powerwires to the internal connection wires inside thewiring compartment.WARNING: All electrical connections andwiring runs must comply with local buildingcodes.WARNING: Be sure to connect the coloredcoded external wires to the same color internalconnection wires, as follows:WARNING: DO NOT apply power to the unituntil you have completed and checked all wiringconnections.WARNING: Disconnect or shut off theexternal power source before connecting ordisconnecting wires to the ve the wiring bay cover at the bottom ofthe unit.Remove the WIFI Module to access the wiringcompartment.Locate the wiring compartment in the lower lefthand corner of the unit and using a screwdriver,unscrew wiring compartment front cover.EXTERNALPOWER WIRESUnscrew the wire nuts connecting the powercord and the transformer wires. Remove thepower cord wires from the transformer box.WIRENUTSWIFIMODULEPower Wiring Connections120 VAC (US)Black supply wire (hot) to the blacktransformer wireWhite supply wire (neutral) to the whitetransformer wireGreen supply wire (ground) to the greentransformer wireVerify that all wiring connections are secure,then replace the wiring compartment cover.Reinstall the WiFi Module6
App ProgrammingProgramming at the timerSearch and download the Rain Bird App, available inboth the Apple App Store for iPhone and Google Playstore for Android.Date-TimeSet the current calendar Date and Time of day."" ""Press the DATE-TIME button.PressNEXT.Activate Hotspotor– to set the month (M); then pressRepeat above step to set the day (D) and year(YYYY).AMDATEVerify WiFi Module is ready to connectMD YYYYIf the module is alternating blinking green and red,proceed to next step. If blinking red only, press buttonon the WiFi module to broadcast WiFi signal.LIGHT FLASHES:BROADCASTING WIFIRed OnlyNOAlternatingRed & GreenYESGreen OnlyNO (connected to router)"" "" –Pressorto set the hour (ensuring thatAM/PM setting is correct); then press NEXT.PressAUTO.3 Quick Green flashes can occur at two differenttimes:or– to set the minutes; then pressWhen the WiFi module is first installed in theaccessory port - this means the WiFi modulecommunicated successfully with the timerWhen the App is connecting to a WiFi signal - thismeans there has been a successful connection.AMMLaunch the Rain Bird AppTIMED YYYYFollow the App Setup Wizard to enter informationabout your yard and create an initial brtllerotonHetorppSulp/For additionalinformation onprogrammingthe timer throughthe app, refer tovideos found atwifi.rainbird.com.NOTE: Two AAA batteries can be installed toretain date and time in the event of a poweroutage. See “Install Batteries” for details.7
Set Watering Start TimesWatering ScheduleWatering Start Times are times of day at whichwatering is set to begin.Create customized irrigation schedules to runautomatically at specific times, durations andintervals.NOTE: A total of up to six Start Times (1-6) areavailable for each Zone."" These schedules will stay in sync with the schedulescreated in the app. If changes are made in the timer,they will be updated to the app the next time it isopened. Once changes are made in the app andsaved, they will be shown at the timer screen.–Press or to set the 1st Start Time (ensuringthat AM/PM setting is correct); then press NEXT.NOTE: Start Time adjustments are set in 10minute increments.""Press the SCHEDULE button.Select ZoneZones are designated areas (for example, “RoseGarden”) that you define as locations for watering."" –MINPressorto select the desired ZoneNumber; then press NEXT.Zone2REPEAT as desired to set additional Start Timesfor that Zone.1MINSTARTTIME12-:-(OFF) isNOTE: Pressing NEXT whenblinking on the display will advance to Step 4.NOTE: If multiple zones have the same or overlapping watering times, the Timer will water thezones in sequence (multiple zones will not runat the same time).Set Watering Run TimesSet Watering Start DaysWatering Run Times are durations (for example,20 minutes) set for watering.Watering Start Days are the calendar days orintervals (for example, Monday, Wednesday andFriday) on which watering is allowed.NOTE: Run Times can be set between 1 to 199minutes."" –Pressorto select one of four availableWatering Start Day options:"" –Press or to set the desired Run Time (MIN);then press NEXT.a. Custom Days - To schedule watering to occuron selected days of the week, go to 4a.b. Odd Days - To schedule watering to occur on allodd calendar days (1,3,5.29 etc.), go to 4b.RUNTIME1MINc.2Even Days - To schedule watering to occur onall even calendar days (2,4,6.30 etc.), go to 4c.d. Cyclic Days - To schedule watering to occur atintervals (every 2 days, or 3 days, etc.), go to 4d.8
4a Custom Days""Press or – to select"" 4b Odd Days""then press NEXT.Press– or – to select1,3,5. 29 then pressNEXT.REPEAT Steps 1-4 for remaining zones.Press(to enable) or(to disable) theblinking Selection Day. Cursor will then advanceto the next Selection Day.4c Even DaysSELECTIONDAY"" –Press or to set each subsequent day of theweek as desired.""PressREPEAT Steps 1-4 for remaining zones. or – to select2,4,6.30 then pressNEXT.REPEAT Steps 1-4 for remaining zones.9
Options and SpecialFeatures4d Cyclic Days""PressNEXT. or – to select Cyclic Days; then pressRain DelayWatering schedules can be delayed manually for upto 14 days due to rain or other needs. While rain delayis enabled no scheduled watering will take place forany zones. The WATER NOW feature can still be used.After the immediate watering is complete from aWATER NOW session the rain delay feature willresume for the programmed number of days.""During normal operation, AUTO has beenpressed,Press and hold theNOTE: If any settings for Day Cycle or Start Datehave already been entered for previous zones,those values will be shown on the display."" buttonThe number 01 will appear on the screen alongwith the stop icon.–Pressorbutton to set the desiredDay Cycle; then press NEXT.This means the rain delay has been enabled for1 day."" To increase or decrease the rain delaypress or–To turn off the rain delay pressof rain delay turns to 0DAYCYCLE– until the daysAfter the rain delay days are completed thewatering schedule will resume.Copy Zone to Zone"" –Pressorthen press NEXT.Scheduling information can be copied from onezone to another zone to speed up programming.to set desired Start Date;"" """"Press the SCHEDULE button.Press ornumber.– to select the SUBSEQUENT ZonePress and hold BACK, then press and releasethe SCHEDULE button.STARTDATENOTE: The Start Date should be the first day thezone is to be watered. Only Start Dates that fallwithin the selected Day Cycle are available.REPEAT Steps 1-4 for remaining zones.10
Normal OperationNOTE: The next Zone will start wateringimmediately if Start Times are stacked.Otherwise, the next Zone will start according tothe programmed schedule.AutoOffWatering occurs automatically according toprogrammed irrigation schedules.""Cancel all active watering immediately anddisable automatic irrigation.Press the AUTO button to resume normaloperation whenever programming is completedand to monitor active watering.""Press the OFF button to immediately cancel allactive watering.NOTE: Unless the OFF button is pressed, theTimer will revert to AUTO mode after 10 minutesif no programming activity (button presses)occurs during that time.In Auto Mode:The display shows the current time, date and day ofthe week:Programmed irrigation schedules remain storedin memory even when the Timer is turned off or ifpower is lost.NOTE: Press the AUTO button to resume normaloperation. Automatic irrigation will NOT occur ifthe Timer remains in OFF mode.During Watering:The display shows a blinking sprinkler symbol,the active Zone number and watering Run Timeremaining for that Zone.ZoneRunTimeMIN"""" –Pressorto adjust watering Run Timeremaining for the active Zone as desired.Press NEXT to cancel watering for the activeZone and advance to the next Zone in theirrigation cycle.11
Additional FeaturesWater ONE Zone:"" ""Press the MANUAL WATERING button.Water NowPressorpress NEXT.Start watering immediately for ALL Zones or foran
single Zone. Watering Schedule Create customized irrigation schedules to run automatically at . Volatile memory and will remain in the Timer . Search and download the Rain Bird App, available in both the Apple App