Transcription
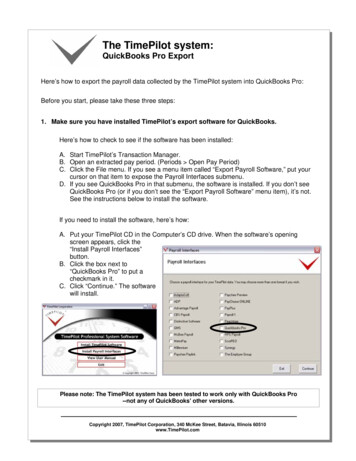
The TimePilot system:QuickBooks Pro ExportHere’s how to export the payroll data collected by the TimePilot system into QuickBooks Pro:Before you start, please take these three steps:1. Make sure you have installed TimePilot’s export software for QuickBooks.Here’s how to check to see if the software has been installed:A. Start TimePilot’s Transaction Manager.B. Open an extracted pay period. (Periods Open Pay Period)C. Click the File menu. If you see a menu item called “Export Payroll Software,” put yourcursor on that item to expose the Payroll Interfaces submenu.D. If you see QuickBooks Pro in that submenu, the software is installed. If you don’t seeQuickBooks Pro (or if you don’t see the “Export Payroll Software” menu item), it’s not.See the instructions below to install the software.If you need to install the software, here’s how:A. Put your TimePilot CD in the Computer’s CD drive. When the software’s openingscreen appears, click the“Install Payroll Interfaces”button.B. Click the box next to“QuickBooks Pro” to put acheckmark in it.C. Click “Continue.” The softwarewill install.Please note: The TimePilot system has been tested to work only with QuickBooks Pro--not any of QuickBooks' other versions.Copyright 2007, TimePilot Corporation, 340 McKee Street, Batavia, Illinois 60510www.TimePilot.com
The TimePilot system:QuickBooks Pro Export2. Make sure that the names of the “Holiday Schedule,” “Pay Type” and “OvertimePolicy” in TimePilot exactly match their names in QuickBooks Pro’s Payroll ItemList. If they don’t match, rename them in TimePilot.2
The TimePilot system:QuickBooks Pro Export3. Make sure that each employee’s name is entered in TimePilot’s “Personal(Optional)” screen and that the names exactly match those in QuickBooks.Here’s how to get to the Personal (Optional) screen:A. Start TimePilot’s Configuration Manager.B. Call up the employee’s personal profile by double-clicking on his or hername. If you’re addingan employee toTimePilot, click “Setup”in the Menu Bar, thenEmployee Add.C. Click on the Personal (Optional) tab.3
The TimePilot system:QuickBooks Pro ExportExport instructions:Can’t find Timer?1. Start QuickBooks Pro.2. Click File Timer Export Lists forTimer. This step will place a file calledQuickBooks.iif with your QuickBooksinformation on your hard drive. Wesuggest you save the file asX:\TimePilot\TA\Export\Quickbooks.iif.(With X as the drive where yourTimePilot data is stored.) Click OK.3. Exit QuickBooks Pro.4. Start the TimePilot software and openTransaction Manager.5. Open an extracted pay period byclicking Periods Open Pay Period,choose the pay period you wish toexport and click OK.If “Timer” does not appear inQuickBooks’ File menu, here’show to install it:1. In QuickBooks Pro 2005, clickEdit Preferences .2. In the left panel of icons, scrolldown to “Time Tracking” andclick the icon.3. Click the “CompanyPreferences” tab.4. Click the “Yes” button in the“Do You Track Time” box.5. Select the first day of your workweek in the drop-down menu.6. Click OK.(Instructions continue on next page)4
The TimePilot system:QuickBooks Pro Export6. Click File Export To Payroll Software QuickBooks Pro. You’ll see ascreen (shown above) that lists the employees set up in QuickBooks and theemployees set up in TimePilot. Make sure that the names that appear inboth columns are exactly the same (for instance, Hanlon, Mike in onecolumn and Hanlon, Michael in the other column do not match). If any don’tmatch, use the TimePilot Configuration Manager to change the name andrepeat the above steps. Click “Next.” (If the path shown in the “Export Listsfor Timer File” field doesn’t match the location you specified in Step 2, then5
The TimePilot system:QuickBooks Pro Exportclick the folder button to navigate to the file.)7. In this screen (shown above), enter the codes you use in QuickBooks. Atthe bottom of the box is a field labeled “QuickBooks Time Data Export File”that tells you where the file created by TimePilot (timepilot.iif) will be saved.Write down this location—you’ll need it for Step 10. Click “Export.” You willsee a pop-up box that indicates that the data has been exportedsuccessfully.8. Exit TimePilot and start QuickBooks Pro.9. Click File Timer Import Activities from Timer.10. Navigate to the timepilot.iif file you saved in Step 7.11. Follow the instructions in QuickBooks to complete the process.Note: Steps 1 through 3 need only be performed once, unless your companyadds or removes employees. If that happens, repeat Steps 1-3 to update yourTimePilot software with the new QuickBooks.iif file.6
8. Exit TimePilot and start QuickBooks Pro. 9. Click File Timer Import Activities from Timer. 10. Navigate to the timepilot.iif file you saved in Step 7. 11. Follow the instructions in QuickBooks to complete the process. Note: Steps 1 through 3 need only be perfo