Transcription
Adafruit Flora Bluefruit LECreated by lady ruit-leLast updated on 2021-11-15 06:28:18 PM EST Adafruit IndustriesPage 1 of 54
Table of ContentsOverview5 Get started fast with the Bluefruit App You can do a lot more too!66Pinouts8 88910Power PadsData PadsOther PadsReverse SideSewing10Factory Reset11 11111212Factory Reset via DFU ButtonFactoryReset Sample SketchAT FACTORYRESETFactory Reset via F.RST Test PadFirmware Updates Adafruit Bluefruit LE Connect1313Installing Software13Example Code14 Configuring for Flora15ATCommand Opening the Sketch Configuration Running the SketchBLEUart Opening the Sketch Configuration Running the SketchController Opening the SketchConfigurationRunning the SketchUsing Bluefruit LE Connect in Controller ModeStreaming Sensor DataControl Pad ModuleColor Picker ModuleHIDKeyboard Opening the SketchConfigurationRunning the SketchBonding the HID KeyboardAndroid Adafruit 3535Page 2 of 54
iOS OS XUriBeacon Opening the Sketch Configuration Running the SketchHeartRateMonitor Opening the SketchConfigurationIf Using Hardware or Software UARTRunning the SketchnRF Toolbox HRM ExampleCoreBluetooth HRM Example37383939404142424343444546HALP!47Data Mode49 Switching Command/Data Mode via 50Command Mode51 Hayes/AT Commands52UART Service52 Characteristics TX (0x0002) RX (0x0003)535353Downloads53 Schematic Fabrication print Adafruit Industries5354Page 3 of 54
Adafruit IndustriesPage 4 of 54
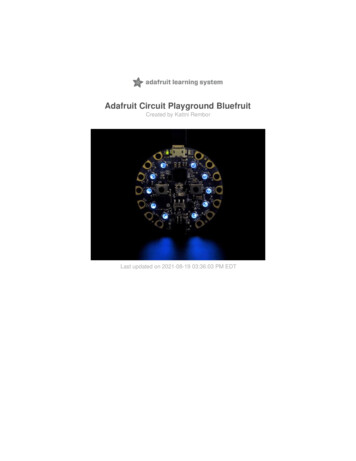
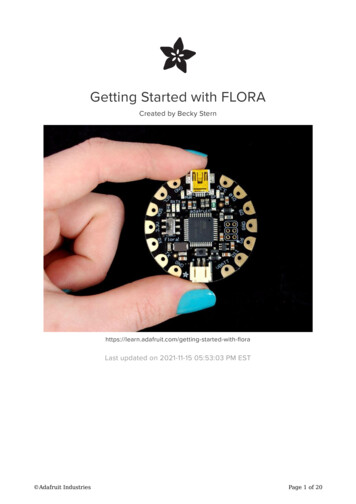
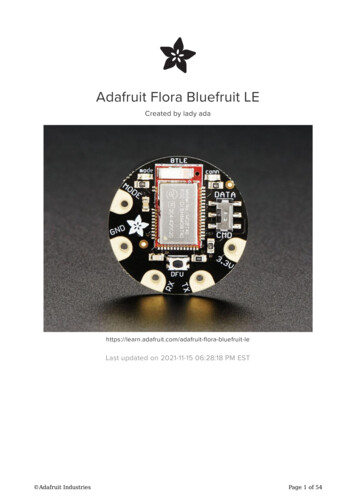
OverviewWould you like to add powerful and easy-to-use Bluetooth Low Energy to yourwearable FLORA project? Heck yeah! With BLE now included in modern smart phonesand tablets, its fun to add wireless connectivity. So what you really need is the newAdafruit Flora Bluefruit LE!The Flora Bluefruit LE makes it easy to add Bluetooth Low Energy connectivity to yourFlora. Sew 4 traces (or solder 4 wires) and BooM! Bluetooth Low Energy! Adafruit IndustriesPage 5 of 54
Get started fast with the Bluefruit AppUsing our Bluefruit iOS App (https://adafru.it/iCi) or Android App (https://adafru.it/f4G),you can quickly get your interactive project prototyped by using your iOS or Androidphone/tablet as a controller. We have a color picker (https://adafru.it/iCI), quaternion/accelerometer/gyro/magnetometer or location (GPS) (https://adafru.it/iCI), and an 8button control game pad (https://adafru.it/iCI). After you connect to the Bluefruit, youcan send commands wirelessly in under 10 minutesFor advanced hackers, they'll be very happy to use the standard Nordic UART RX/TXconnection profile. In this profile, the Bluefruit acts as a data pipe, that can'transparently' transmit back and forth from your iOS or Android device. You can useour iOS App (https://adafru.it/iCi) or Android App (https://adafru.it/f4G), or write yourown to communicate with the UART service (https://adafru.it/iCF).You can do a lot more too! The Bluefruit can also act like an HID Keyboard (https://adafru.it/iCJ) (for devicesthat support BLE HID) Can become a BLE Heart Rate Monitor (https://adafru.it/iCK) (a standard profilefor BLE) - you just need to add the pulse-detection circuitry Turn it into a UriBeacon (https://adafru.it/iCL), the Google standard for BluetoothLE beacons. Just power it and the 'Friend will bleep out a URL to any nearbydevices with the UriBeacon app installed. Adafruit IndustriesPage 6 of 54
Built in over-the-air bootloading capability so we can keep you updated with thehottest new firmware. (https://adafru.it/iCM) Use any Android or iOS device toget updates and install them!This is the same module and firmware as our BLE UART Friend (http://adafru.it/2479) but in a nice rounded shape, so you can switch between the two and have the sameworking code. This Bluefruit LE does not have the hardware flow control pins so it isbest used with a microcontroller with hardware serial support (like, y'know, the Flora!) Adafruit IndustriesPage 7 of 54
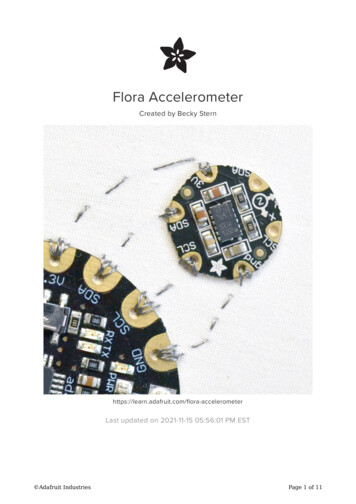
PinoutsPower Pads 3.3V: This is the power supply for the module, supply with 3.3V power supplyinput. You can dip down to maybe 2.7V and up to 3.6V or so, but regulated 3.3Vis ideal GND: The common/GND pad for power and logicData Pads TX - This is the UART Transmit pin out of the breakout (Bluefruit LE -- Flora RX),it's at 3.3V logic level. RX - This is the UART Receive pin into the breakout (Flora TX -- Bluefruit LE) itrequires 3.3V logic level.These 4 pads are in perfect order to connect directly to your Flora! Adafruit IndustriesPage 8 of 54
Other Pads MODE: Mode Selection. The Bluefruit has two modes, Command and Data. Youcan keep this pin disconnected, and use the slide switch to select the mode. Or,you can control the mode by setting this pin voltage, it will override the switchsetting! High Command Mode, Low UART/DATA mode. This pin requires3.3V logic Adafruit IndustriesPage 9 of 54
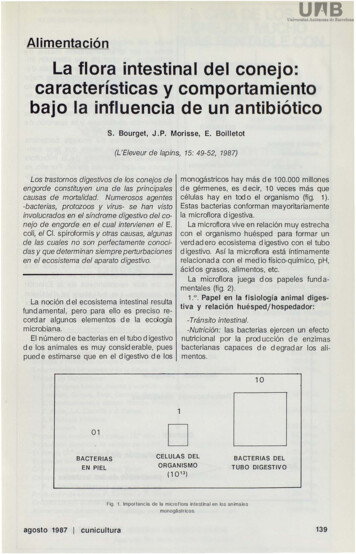
Reverse SideOn the back we also have a few breakouts!Opt. 32 KHz: If you're doing some funky low power work, we wanted to give you theoption of solderin in a 32khz oscillator. (https://adafru.it/f4U)Our firmware doesn'tsupport it yet but its there!SWDCLK: This is the SWD clock pin, 3v logic - for advanced hackers!SWDIO: This is the SWD data pin, 3v logic - for advanced hackers!F.RST: This is the factory reset pin. When all else fails and you did something to reallyweird out your module, tie this pad to ground while powering up the module and itwill factory reset. You should try the DFU reset method first tho (see that tutorial page)SewingSewing the Flora BLE to a Flora is very straight-forward: the four required pads line upso just sew those in short straight lines from one module to another. the MODE pad isnot required for most uses so you can leave that unconnected.When you power it on, you should see the red LED on the BLE blink a few times andthen pause & repeat, so you know that it has power! Adafruit IndustriesPage 10 of 54
Factory ResetThere are several methods that you can use to perform a factory reset on yourBluefruit LE module if something gets misconfigured, or to delete persistent changeslike UriBeacon or advertising payload changes, etc.Factory Reset via DFU ButtonOnce the module is powered up, if you hold the DFU button down for 5 seconds, theblue LED on the module will start blinking and the device will perform a factory resetas soon as you release the DFU button.FactoryReset Sample SketchThere is a FactoryReset sample sketch in the Adafruit Bluefruit LE library, which canbe access in the File Examples Adafruit BluefruitLE nRF51 folder:Upload this sketch and open the Serial Monitor and it should perform a factory resetfor you: Adafruit IndustriesPage 11 of 54
AT FACTORYRESETYou can also perform a factory reset by sending the AT FACTORYRESET command toyour Bluefruit LE module in your favorite terminal emulator or using the ATCommand (https://adafru.it/iCk) example sketch. Make sure its in command mode first, then typein:AT FACTORYRESETOKThis command will also cause the device to reset.Factory Reset via F.RST Test PadOn the back of the Bluefruit LE UART Friend board there is a test pad that exposesthe Factory Reset pin on the modules (marked F.RST). Setting this pad low when thedevice is powered up will cause a factory reset at startup. Adafruit IndustriesPage 12 of 54
Firmware UpdatesWe're constantly working on the Bluefruit LE firmware to add new features, and keepup to date with what customers need and want.To make sure you stay up to date with those changes, we've included an easy to useover the air updater on all of our nRF51 based Bluefruit LE modules.Adafruit Bluefruit LE ConnectUpdating your Bluefruit LE device to the latest firmware is as easy as installing Adafruit's Bluefruit LE Connect application (https://adafru.it/f4G) from the Google Play Store.(An updated iOS version with DFU support will be available shortly!)Any time a firmware update is available, the application will propose to download thelatest binaries and take care of all the details of transferring them to your Bluefruitdevice, as shown in the video below:Installing SoftwareIn order to try out our demos, you'll need to download the Adafruit BLE library for thenRF51 based modules such as this one (a.k.a. Adafruit BluefruitLE nRF51) Adafruit IndustriesPage 13 of 54
You can check out the code here at github, (https://adafru.it/f4V) but its likely easier tojust download by clicking:DownloadAdafruit BluefruitLE nRF51https://adafru.it/f4WRename the uncompressed folder Adafruit BluefruitLE nRF51 and check that the Adafruit BluefruitLE nRF51 folder contains Adafruit BLE.cpp and Adafruit BLE.h (as wellas a bunch of other files)Place the Adafruit BluefruitLE nRF51 library folder your arduinosketchfolder/libraries/folder.You may need to create the libraries subfolder if its your first library. Restart the IDE.We also have a great tutorial on Arduino library installation duino-libraries-install-use (https://adafru.it/aYM)After restarting, check that you see the library folder with examples:Example CodeWe have tons of examples that will get you going with the Bluefruit, and its reallyeasy! Since we have one library for both wearable and non-wearable Bluefruit's, theexample code is the same but may require some minor tweaks to adjust for Flora. Adafruit IndustriesPage 14 of 54
Most importantly, the flora bluefruit is for use with Hardware Serial only and does nothave flow control pins. Also, we expect you will not use the mode pad so you cankeep the switch set to CMD and then change into Data mode by sending .Configuring for FloraFor all of the examples, look near the top for a line like this://#define BLUEFRUIT HWSERIAL NAMESerial1and remove the // comment marks. Do the same for://Adafruit BluefruitLE UART ble(BLUEFRUIT HWSERIAL NAME, BLUEFRUIT UART MODE PIN);Next, remove the code for the SoftwareSerial type, find these lines and delete them:/* Create the bluefruit object, either software serial. */SoftwareSerial bluefruitSS SoftwareSerial(BLUEFRUIT SWUART TXD PIN,BLUEFRUIT SWUART RXD PIN);Adafruit BluefruitLE UART ble(bluefruitSS, BLUEFRUIT UART MODE PIN,BLUEFRUIT UART CTS PIN, BLUEFRUIT UART RTS PIN);Finally, unless you happen to be using the MODE pad, make sure BLUEFRUIT UARTMODE PIN is set to -1#define BLUEFRUIT UART MODE PIN-1// Not used with FLORASame with RTS and CTS, find these lines and set both to -1#define BLUEFRUIT UART CTS PIN#define BLUEFRUIT UART RTS PIN-1-1// Not used with FLORA// Not used with FLORAATCommandThe ATCommand example allows you to execute AT commands from your sketch, andsee the results in the Serial Monitor. This can be useful for debugging, or just testingdifferent commands out to see how they work in the real world. It's a good one tostart with! Adafruit IndustriesPage 15 of 54
Opening the SketchTo open the ATCommand sketch, click on the File Examples Adafruit BluefruitLE nRF51 folder in the Arduino IDE and select atcommand:This will open up a new instance of the example in the IDE, as shown below: Adafruit IndustriesPage 16 of 54
ConfigurationCheck the Configuration! page earlier to set up the sketch for Software/HardwareUART or Software/Hardware SPI. The default is hardware SPIIf using software or hardware Serial UART: This tutorial does not need to use the MODE pin, make sure you have the modeswitch in CMD mode if you do not configure & connect a MODE pin Don't forget to also connect the CTS pin on the Bluefruit to ground if you are notusing it! (The Flora has this already done)Running the SketchOnce you upload the sketch to your board (via the arrow-shaped upload icon), andthe upload process has finished, open up the Serial Monitor via Tools Serial Monitor,and make sure that the baud rate in the lower right-hand corner is set to 115200: Adafruit IndustriesPage 17 of 54
To send an AT command to the Bluefruit LE module, enter the command in the textboxat the top of the Serial Monitor and click the Send button:The response to the AT command will be displayed in the main part of the SerialMonitor. The response from 'ATI' is shown below: Adafruit IndustriesPage 18 of 54
You can do pretty much anything at this prompt, with the AT command set. Try AT HELP to get a list of all commands, and try out ones like AT HWGETDIETEMP (gettemperature at the nRF51822 die) and AT HWRANDOM (generate a random number) Adafruit IndustriesPage 19 of 54
BLEUartThe BLEUart example sketch allows you to send and receive text data between theArduino and a connected Bluetooth Low Energy Central device on the other end(such as you mobile phone using the Adafruit Bluefruit LE Connect application for Android (https://adafru.it/f4G) or iOS (https://adafru.it/f4H) in UART mode).Opening the SketchTo open the ATCommand sketch, click on the File Examples Adafruit BluefruitLE nRF51 folder in the Arduino IDE and select bleuart cmdmode:This will open up a new instance of the example in the IDE, as shown below: Adafruit IndustriesPage 20 of 54
ConfigurationCheck the Configuration! page earlier to set up the sketch for Software/HardwareUART or Software/Hardware SPI. The default is hardware SPIIf using software or hardware Serial UART: This tutorial does not need to use the MODE pin, make sure you have the modeswitch in CMD mode if you do not configure & connect a MODE pin Don't forget to also connect the CTS pin on the Bluefruit to ground if you are notusing it! (The Flora has this already done) Adafruit IndustriesPage 21 of 54
Running the SketchOnce you upload the sketch to your board (via the arrow-shaped upload icon), andthe upload process has finished, open up the Serial Monitor via Tools Serial Monitor,and make sure that the baud rate in the lower right-hand corner is set to 115200:Once you see the request, use the App to connect to the Bluefruit LE module in UARTmode so you get the text box on your phoneAny text that you type in the box at the top of the Serial Monitor will be sent to theconnected phone, and any data sent from the phone will be displayed in the serialmonitor: Adafruit IndustriesPage 22 of 54
You can see the incoming string here in the Adafruit Bluefruit LE Connect app below(iOS in this case): Adafruit IndustriesPage 23 of 54
The response text ('Why hello, Arduino!') can be seen below: Adafruit IndustriesPage 24 of 54
ControllerThe Controller sketch allows you to turn your BLE-enabled iOS or Android device in ahand-held controller or an external data source, taking advantage of the wealth ofsensors on your phone or tablet.You can take accelerometer or quaternion data from your phone, and push it out toyour Arduino via BLE, or get the latest GPS co-ordinates for your device withouthaving to purchase (or power!) any external HW.Opening the SketchTo open the Controller sketch, click on the File Examples Adafruit BluefruitLE nRF51 folder in the Arduino IDE and select controller: Adafruit IndustriesPage 25 of 54
This will open up a new instance of the example in the IDE, as shown below:ConfigurationCheck the Configuration! page earlier to set up the sketch for Software/HardwareUART or Software/Hardware SPI. The default is hardware SPIIf using software or hardware Serial UART: This tutorial will also be easier to use if you wire up the MODE pin, you can useany pin but our tutorial has pin 12 by default. You can change this to any pin. If Adafruit IndustriesPage 26 of 54
you do not set the MODE pin then make sure you have the mode switch in CMDmode If you are using a Flora or otherwise don't want to wire up the Mode pin, set theBLUEFRUIT UART MODE PIN to -1 in the configuration tab so that the sketchwill use the method to switch between Command and Data mode! Don't forget to also connect the CTS pin on the Bluefruit to ground if you are notusing it! (The Flora has this already done)Running the SketchOnce you upload the sketch to your board (via the arrow-shaped upload icon), andthe upload process has finished, open up the Serial Monitor via Tools Serial Monitor,and make sure that the baud rate in the lower right-hand corner is set to 115200:Using Bluefruit LE Connect in ControllerModeOnce the sketch is running you can open Adafruit's Bluefruit LE Connect application(available for Android (https://adafru.it/f4G) or iOS (https://adafru.it/f4H)) and use the Controller application to interact with the sketch. (If you're new to Bluefruit LE Connect,have a look at our dedicated Bluefruit LE Connect learning guide (https://adafru.it/iCm).) Adafruit IndustriesPage 27 of 54
On the welcome screen, select the Adafruit Bluefruit LE device from the list of BLEdevices in range:Then from the activity list select Controller:This will bring up a list of data points you can send from your phone or tablet to yourBluefruit LE module, by enabling or disabling the appropriate sensor(s).Streaming Sensor DataYou can take Quaternion (absolute orientation), Accelerometer, Gyroscope,Magnetometer or GPS Location data from your phone and send it directly to yourArduino from the Controller activity.By enabling the Accelerometer field, for example, you should see accelerometer dataupdate in the app: Adafruit IndustriesPage 28 of 54
The data is parsed in the example sketch and output to the Serial Monitor as .27 Adafruit -0.76-0.82Page 29 of 54
Note that even though we only print 2 decimal points, the values are received fromthe App as a full 4-byte floating point.Control Pad ModuleYou can also use the Control Pad Module to capture button presses and releases byselecting the appropriate menu item:This will bring up the Control Pad panel, shown below:Button presses and releases will all be logged to the Serial Monitor with the ID of thebutton essedreleasedColor Picker ModuleYou can also send RGB color data via the Color Picker module, which presents thefollowing color selection dialogue: Adafruit IndustriesPage 30 of 54
This will give you Hexadecimal color data in the following format:RGB #A42FFFYou can combine the color picker and controller sample sketches to make colorconfigurable animations triggered by buttons in the mobile app-- very handy for Adafruit IndustriesPage 31 of 54
wearables! Download this combined sample code (configured for Feather but easy toadapt to FLORA, BLE Micro, etc.) to get started:feather bluefruit neopixel animation controller.ziphttps://adafru.it/kzFHIDKeyboardThe HIDKeyboard example shows you how you can use the built-in HID keyboard ATcommands to send keyboard data to any BLE-enabled Android or iOS phone, or otherdevice that supports BLE HID peripherals.Opening the SketchTo open the ATCommand sketch, click on the File Examples Adafruit BluefruitLE nRF51 folder in the Arduino IDE and select hidkeyboard:This will open up a new instance of the example in the IDE, as shown below: Adafruit IndustriesPage 32 of 54
ConfigurationCheck the Configuration! page earlier to set up the sketch for Software/HardwareUART or Software/Hardware SPI. The default is hardware SPIIf using software or hardware Serial UART: This tutorial does not need to use the MODE pin, make sure you have the modeswitch in CMD mode! Don't forget to also connect the CTS pin on the Bluefruit to ground if you are notusing it! (The Flora has this already done)Running the SketchOnce you upload the sketch to your board (via the arrow-shaped upload icon), andthe upload process has finished, open up the Serial Monitor via Tools Serial Monitor,and make sure that the baud rate in the lower right-hand corner is set to 115200: Adafruit IndustriesPage 33 of 54
To send keyboard data, type anything into the textbox at the top of the Serial Monitorand click the Send button. Adafruit IndustriesPage 34 of 54
Bonding the HID KeyboardBefore you can use the HID keyboard, you will need to 'bond' it to your phone or PC.The bonding process establishes a permanent connection between the two devices,meaning that as soon as your phone or PC sees the Bluefruit LE module again it willautomatically connect.The exact procedures for bonding the keyboard will varying from one platform toanother.When you no longer need a bond, or wish to bond the Bluefruit LE module toanother device, be sure to delete the bonding information on the phone or PC,otherwise you may not be able to connect on a new device!AndroidTo bond the keyboard on a Bluetooth Low Energy enabled Android device, go tothe Settings application and click the Bluetooth icon.These screenshots are based on Android 5.0 running on a Nexus 7 2013. Theexact appearance may vary depending on your device and OS version.Inside the Bluetooth setting panel you should see the Bluefruit LE module advertisingitself as Bluefruit Keyboard under the 'Available devices' list: Adafruit IndustriesPage 35 of 54
Tapping the device will start the bonding process, which should end with the BluefruitKeyboard device being moved to a new 'Paired devices' list with 'Connected' writtenunderneath the device name:To delete the bonding information, click the gear icon to the right of the device nameand the click the Forget button: Adafruit IndustriesPage 36 of 54
iOSTo bond the keyboard on an iOS device, go to the Settings application on your phone,and click the Bluetooth menu item.The keyboard should appear under the OTHER DEVICES list:Once the bonding process is complete the device will be moved to the MY DEVICEScategory, and you can start to use the Bluefruit LE module as a keyboard: Adafruit IndustriesPage 37 of 54
To unbond the device, click the 'info' icon and then select the Forget this Deviceoption in the menu:OS XTo bond the keyboard on an OS X device, go to the Bluetooth Preferences windowand click the Pair button beside the Bluefruit Keyboard device generated by thisexample sketch:To unbond the device once it has been paired, click the small 'x' icon beside BluefruitKeyboard: Adafruit IndustriesPage 38 of 54
. and then click the Remove button when the confirmation dialogue box pops up:UriBeaconThe UriBeacon example shows you how to use the built-in UriBeacon AT commandsto configure the Bluefruit LE module as a UriBeacon advertiser, following Google'sPhysical Web UriBeacon (https://adafru.it/edk) specification.Opening the SketchTo open the ATCommand sketch, click on the File Examples Adafruit BluefruitLE nRF51 folder in the Arduino IDE and select uribeacon: Adafruit IndustriesPage 39 of 54
This will open up a new instance of the example in the IDE, as shown below. You canedit the URL that the beacon will point to, from the default http://www.adafruit.com orjust upload as is to testConfigurationCheck the Configuration! page earlier to set up the sketch for Software/HardwareUART or Software/Hardware SPI. The default is hardware SPIIf using software or hardware Serial UART: This tutorial does not need to use the MODE pin, make sure you have the modeswitch in CMD mode if you do not configure & connect a MODE pin Don't forget to also connect the CTS pin on the Bluefruit to ground if you are notusing it! (The Flora has this already done) Adafruit IndustriesPage 40 of 54
Running the SketchOnce you upload the sketch to your board (via the arrow-shaped upload icon), andthe upload process has finished, open up the Serial Monitor via Tools Serial Monitor,and make sure that the baud rate in the lower right-hand corner is set to 115200:At this point you can open the Physical Web Application for Android (https://adafru.it/edi) or for iOS (https://adafru.it/edj), and you should see a link advertising Adafruit'swebsite: Adafruit IndustriesPage 41 of 54
HeartRateMonitorThe HeartRateMonitor example allows you to define a new GATT Service andassociated GATT Characteristics, and update the characteristic values using standardAT commands.Opening the SketchTo open the ATCommand sketch, click on the File Examples Adafruit BluefruitLE nRF51 folder in the Arduino IDE and select heartratemonitor:This will open up a new instance of the example in the IDE, as shown below: Adafruit IndustriesPage 42 of 54
ConfigurationCheck the Configuration! page earlier to set up the sketch for Software/HardwareUART or Software/Hardware SPI. The default is hardware SPIIf Using Hardware or Software UARTThis tutorial does not need to use the MODE pin, make sure you have the modeswitch in CMD mode if you do not configure & connect a MODE pinThis demo uses some long data transfer strings, so we recommend defining andconnecting both CTS and RTS to pins, even if you are using hardware serial. Adafruit IndustriesPage 43 of 54
If you are using a Flora or just dont want to connect CTS or RTS, set the pin #define'sto -1 and Don't forget to also connect the CTS pin on the Bluefruit to ground! (TheFlora has this already done)If you are using RTS and CTS, you can remove this line below, which will slow downthe data transmission// this line is particularly required for Flora, but is a good idea// anyways for the super long lines ahead!ble.setInterCharWriteDelay(5); // 5 msRunning the SketchOnce you upload the sketch to your board (via the arrow-shaped upload icon), andthe upload process has finished, open up the Serial Monitor via Tools Serial Monitor,and make sure that the baud rate in the lower right-hand corner is set to 115200: Adafruit IndustriesPage 44 of 54
If you open up an application on your mobile device or laptop that support thestandard Heart Rate Monitor Service (https://adafru.it/f4I), you should be able to seethe heart rate being updated in sync with the changes seen in the Serial Monitor:nRF Toolbox HRM ExampleThe image below is a screenshot from the free nRF Toolbox (https://adafru.it/e9M) application from Nordic on Android (also available on iOS (https://adafru.it/f4J)), showingthe incoming Heart Rate Monitor data: Adafruit IndustriesPage 45 of 54
CoreBluetooth HRM ExampleThe image below is from a freely available CoreBluetooth sample application (https://adafru.it/f4K) from Apple showing how to work with Bluetooth Low Energy servicesand characteristics: Adafruit IndustriesPage 46 of 54
HALP!When using the Bluefruit Micro or a Bluefruit LE withFlora/Due/Leonardo/Micro the examples dont run?We add a special line to setup() to make it so the Arduino will halt until it seesyou've connected over the Serial console. This makes debugging great but makesit so you cannot run the program disconnected from a computer.Solution? Once you are done debugging, remove these two lines from setup()while (!Serial);delay(500);I can't seem to "Find" the Bluefruit LE!Getting something like this? Adafruit IndustriesPage 47 of 54
For UART/Serial Bluefruits: Check you have the MODE switch in CMD and the MODE pin not wired toanything if it isnt used! If you are trying to control the MODE from your micro, make sure you set theMODE pin in the sketch Make sure you have RXI and TXO wired right! They are often swapped byaccident Make sure CTS is tied to GND if you are using hardware serial and not usingCTS Check the MODE red LED, is it blinking? If its blinking continuously, you might bein DFU mode, power cycle the module! If you are using Hardware Serial/Software Serial make sure you know which oneand have that set upIf using SPI Bluefruit: Make sure you have all 5 (or 6) wires connected properly. If using hardware SPI, you need to make sure you're connected to the hardwareSPI port, which differs depending on the main chipset.If using Bluefruit Micro: Make sure you change the RESET pin to #4 in any Config file. Also be sure youare using hardware SPI to connect! Adafruit IndustriesPage 48 of 54
Data ModeBy placing the Flora BLEFriend module in 'UART Data' mode (set the mode selectionswitch to DATA or setting the MODE pin to gound) you can use the module as a'tranparent UART connection' to the Bluefruit app. This makes data transfer supersimple. Data is sent to the app when any 9600 baud data is received on the RX pinand any data from the app is automatically transmitted via the TX pin to your FloraYou can determine if you are in Data Mode by looking at the mode LED. It shouldblink two times followed by a three second pause, as shown below:You can then connect the the app in UART mode and send/receive data transparently Adafruit IndustriesPage 49 of 54
Switching Command/Data Mode via On either side of the connection (via the Flora or in your mobile app), you candynamically switch between command and data mode by sending the " \n" string,as detailed in the command summary (https://adafru.it/iCN). Adafruit IndustriesPage 50 of 54
If you start in data mode, you can send text for example, with " \nATI\n \n", whichwill cause the Bluefruit LE module to switch to command mode, execute the ATIcommand, and then switch back to data mode.The command can be sent from either side, making it possible to executecommands from the mobile application as well as on the Bluefruit LE side.# Start in Data Mode> Hello, World! Data mode!# Send command to switch modes> # Bluefruit LE module switches to CMD mode# Send ATI command and wait for the response> ATI< BLEFRIEND< nRF51822 QFAAG00< B122AAC33F3D2296< 0.6.2< 0.6.2< May 01 2015< OK# Switch back to DATA mode> < OK# We're back in data mode nowWelcome back!Command ModeBy placing the Bluefruit LE module in 'Command' mode (set the mode selection switchto CMD or setting the MODE pin to a high voltage) you can enter a variety of HayesAT style commands to configure the device or retrieve basic information about themodule of BLE connection.You can determine if you are in Command Mode by looking at the mode LED. Itshould
wearable FLORA project? Heck yeah! With BLE now included in modern smart phones and tablets, its fun to add wireless connectivity. So what you really need is the new Adafruit Flora Bluefruit LE! The Flora Bluefruit LE makes it easy to add Bluetooth Low Energy connectivity to your Flora. Sew 4 traces (or solder 4 wires) and BooM! Bluetooth Low .