Transcription
Adafruit Feather 32u4 Bluefruit LECreated by lady adaLast updated on 2016-09-16 08:12:44 PM UTC
Guide ContentsGuide ContentsOverviewPinoutsPower PinsLogic pinsBluefruit LE Module Indicator LEDsOther Pins!AssemblyHeader Options!Soldering in Plain HeadersPrepare the header strip:Add the breakout board:And Solder!Soldering on Female HeaderTape In PlaceFlip & Tack SolderAnd Solder!18181920202121Power ManagementBattery USB PowerPower suppliesMeasuring BatteryENable pinArduino IDE x/package adafruit index.jsonUsing with Arduino IDEInstall Drivers (Windows Only)BlinkManually bootloadingUbuntu & Linux Issue FixInstalling BLE LibraryInstall the Adafruit nRF51 BLE LibraryRun first example Adafruit 5262728292930313131Page 2 of 125
Uploading to the Feather Bluefruit LEUploading to a brand new board/Upload failuresRun the sketchAT command testingConfiguration!Which board do you have?Bluefruit Micro or Feather 32u4 BluefruitFeather M0 Bluefruit LEBluefruit LE SPI FriendBluefruit LE UART Friend or Flora BLEConfigure the Pins UsedCommon settings:Software UARTHardware UARTMode PinSPI PinsSoftware SPI Pins33343536363636373737383838383838Select the Serial BusUART Based Boards (Bluefruit LE UART Friend & Flora BLE)SPI Based Boards (Bluefruit LE SPI Friend)BLEUartOpening the SketchConfigurationRunning the SketchHIDKeyboardOpening the SketchConfigurationRunning the SketchBonding the HID KeyboardAndroidiOSOS XControllerOpening the SketchConfiguration Adafruit 849515151Page 3 of 125
Running the SketchUsing Bluefruit LE Connect in Controller ModeStreaming Sensor DataControl Pad ModuleColor Picker ModuleHeartRateMonitorOpening the SketchConfigurationIf Using Hardware or Software UARTRunning the SketchnRF Toolbox HRM ExampleCoreBluetooth HRM ExampleUriBeaconOpening the SketchConfigurationRunning the SketchHALP!AT CommandsTest Command Mode ' ?'Write Command Mode ' xxx'Execute ModeRead Command Mode '?'Standard ATATATIATZATE General PurposeAT FACTORYRESETAT DFUAT HELP Adafruit 26364656565656667676767676869696969Page 4 of 125
AT NVMWRITEAT NVMREADHardwareAT BAUDRATEAT HWADCAT HWGETDIETEMPAT HWGPIOAT HWGPIOMODEAT HWI2CSCANAT HWVBATAT HWRANDOMAT HWMODELEDAT UARTFLOWBeaconAT BLEBEACONAT BLEURIBEACONDeprecated: AT EDDYSTONEENABLEAT EDDYSTONEURLAT EDDYSTONECONFIGENAT EDDYSTONESERVICEENAT EDDYSTONEBROADCASTBLE GenericAT BLEPOWERLEVELAT BLEGETADDRTYPEAT BLEGETADDRAT BLEGETPEERADDRAT BLEGETRSSIBLE ServicesAT BLEUARTTXTX FIFO Buffer HandlingAT BLEUARTRXAT BLEUARTFIFO Adafruit 57677777778787979797980808181818282Page 5 of 125
AT BLEKEYBOARDENAT BLEKEYBOARDAT BLEKEYBOARDCODEModifier Values83AT BLEHIDENAT BLEHIDMOUSEMOVEAT BLEHIDMOUSEBUTTONAT BLEHIDCONTROLKEYAT BLEHIDGAMEPADAT BLEMIDIENAT BLEMIDIRXAT BLEMIDITXAT BLEBATTENAT BLEBATTVALBLE GAPAT GAPCONNECTABLEAT GAPGETCONNAT GAPDISCONNECTAT GAPDEVNAMEAT GAPDELBONDSAT GAPINTERVALSAT GAPSTARTADVAT GAPSTOPADVAT GAPSETADVDATABLE GATTGATT LimitationsAT GATTCLEARAT GATTADDSERVICEAT GATTADDCHARAT GATTCHARAT GATTLISTAT GATTCHARRAW Adafruit 989898990909191919393939394959697Page 6 of 125
DebugAT DBGMEMRDAT DBGNVMRDAT DBGSTACKSIZEAT DBGSTACKDUMPHistoryVersion 0.7.0Version 0.6.7Version 0.6.6Version 0.6.5Version 0.6.2Version 0.5.0Version 0.4.7Version 0.3.0Command ExamplesHeart Rate Monitor ServicePython 05SDEP (SPI Data Transport)SDEP OverviewSPI SetupSPI Hardware RequirementsIRQ PinSDEP Packet and SPI Error IdentifierSample TransactionSDEP (Simple Data Exchange Protocol)EndiannessMessage Type IndicatorSDEP Data TransactionsMessage TypesCommand MessagesResponse MessagesAlert 111Standard Alert IDs111Error Messages111Standard Error IDs112Existing Commands Adafruit her-32u4-bluefruit-le112Page 7 of 125
SDEP AT Wrapper UsageGATT Service Details112114UART Service114UART ServiceCharacteristics115115TX (0x0002)RX (0x0003)115115Software ResourcesBluefruit LE Client Apps and LibrariesBluefruit LE Connect (http://adafru.it/f4G) (Android/Java)Bluefruit LE Connect (http://adafru.it/f4H) (iOS/Swift)116116116116Bluefruit LE Connect for OS X (http://adafru.it/o9F) (Swift)116Bluefruit LE Command Line Updater for OS X (http://adafru.it/pLF)(Swift)117Deprecated: Bluefruit Buddy (http://adafru.it/mCn) (OS X)ABLE (http://adafru.it/ijB) (Cross Platform/Node Electron)Bluefruit LE Python Wrapper (http://adafru.it/fQF)Debug Tools119AdaLink (http://adafru.it/fPq) (Python)Adafruit nRF51822 Flasher (http://adafru.it/fVL) (Python)BLE FAQ119119120Bluefruit LE Connect (Android)Nordic nRF ToolboxAdafruit nRF51822 FlasherDFU Bluefruit UpdatesDownloadsSchematicFabrication Print Adafruit 5Page 8 of 125
OverviewFeather is the new development board from Adafruit, and like it's namesake it is thin, light, and lets you fly! We designed Feather to be a newstandard for portable microcontroller cores.This is the Adafruit Feather 32u4 Bluefruit - our take on an 'all-in-one' Arduino-compatible Bluetooth Low Energy with built in USB and batterycharging. Its an Adafruit Feather 32u4 with a BTLE module, ready to rock! We have other boards in the Feather family, check'em outhere (http://adafru.it/jAQ)Bluetooth Low Energy is the hottest new low-power, 2.4GHz spectrum wireless protocol. In particular, its the only wireless protocol that you canuse with iOS without needing special certification and it's supported by all modern smart phones. This makes it excellent for use in portableprojects that will make use of an iOS or Android phone or tablet. It also is supported in Mac OS X and Windows 8 At the Feather 32u4's heart is at ATmega32u4 clocked at 8 MHz and at 3.3V logic, a chip setup we've had tons of experience with asit's the sameas the Flora (http://adafru.it/dVl). This chip has 32K of flash and 2K of RAM, with built in USB so not only does it have a USB-to-Serial program &debug capability built in with no need for an FTDI-like chip, it can also act like a mouse, keyboard, USB MIDI device, etc. Adafruit her-32u4-bluefruit-lePage 9 of 125
To make it easy to use for portable projects, we added a connector for any of our 3.7V Lithium polymer batteries and built in battery charging. Youdon't need a battery, it will run just fine straight from the micro USB connector. But, if you do have a battery, you can take it on the go, then plug inthe USB to recharge. The Feather will automatically switch over to USB power when its available. We also tied the battery thru a divider to ananalog pin, so you can measure and monitor the battery voltage to detect when you need a recharge.Here's some handy specs! Like all Feather 32u4's you get:Measures 2.0" x 0.9" x 0.28" (51mm x 23mm x 8mm) without headers soldered inLight as a (large?) feather - 5.7 gramsATmega32u4 @ 8MHz with 3.3V logic/power3.3V regulator with 500mA peak current outputUSB native support, comes with USB bootloader and serial port debuggingYou also get tons of pins - 20 GPIO pinsHardware Serial, hardware I2C, hardware SPI support8 x PWM pins10 x analog inputsBuilt in 100mA lipoly charger with charging status indicator LEDPin #13 red LED for general purpose blinkingPower/enable pin Adafruit her-32u4-bluefruit-lePage 10 of 125
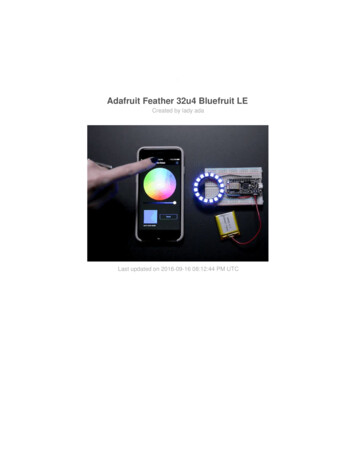
4 mounting holesReset buttonThe Feather 32u4 Bluefruit LE uses the extra space left over to add our excellent Bluefruit BTLE module two status indicator LEDsThe Power of Bluefruit LEThe Bluefruit LE module is an nRF51822 chipset from Nordic, programmed with multi-function code that can do quite a lot! For most people, they'llbe very happy to use the standard Nordic UART RX/TX connection profile. In this profile, the Bluefruit acts as a data pipe, that can 'transparently'transmit back and forth from your iOS or Android device. You can use our iOS App (http://adafru.it/iCi) or Android App (http://adafru.it/f4G), or writeyour own to communicate with the UART service (http://adafru.it/iCF).The board is capable of much more than just sending strings over the air! Thanks to an easy to learnAT command set (http://adafru.it/iCG), youhave full control over how the device behaves, including the ability to define and manipulate your own GATT Services andCharacteristics (http://adafru.it/iCH), or change the way that the device advertises itself for other Bluetooth Low Energy devices to see. You canalso use the AT commands to query the die temperature, check the battery voltage, and more, check the connection RSSI or MAC address, andtons more. Really, way too long to list here!Use the Bluefruit App to get your project startedUsing our Bluefruit iOS App (http://adafru.it/iCi) or Android App (http://adafru.it/f4G), you can quickly get your project prototyped by using your iOSor Android phone/tablet as a controller. We have a color picker (http://adafru.it/iCI), quaternion/accelerometer/gyro/magnetometer or location(GPS) (http://adafru.it/iCI), and an 8-button control game pad (http://adafru.it/iCI). This data can be read over BLE and piped into the ATmega32u4chip for processing & controlYou can do a lot more too!The Bluefruit can also act like an HID Keyboard (http://adafru.it/iOA) (for devices that support BLE HID)Can become a BLE Heart Rate Monitor (http://adafru.it/iOB) (a standard profile for BLE) - you just need to add the pulse-detection circuitryTurn it into a UriBeacon (http://adafru.it/iOC), the Google standard for Bluetooth LE beacons. Just power it and the 'Friend will bleep out aURL to any nearby devices with the UriBeacon app installed.Built in over-the-air bootloading capability so we can keep you updated with the hottest new firmware(http://adafru.it/iOD). Use any Androidor iOS device to get updates and install them. This will update the native code on the BLE module, to add new wireless capabilities, notprogram the ATmega chip. Adafruit her-32u4-bluefruit-lePage 11 of 125
Comes fully assembled and tested, with a USB bootloader that lets you quickly use it with the Arduino IDE. We also toss in some header so youcan solder it in and plug into a solderless breadboard. Lipoly battery, MicroSD card and USB cable not included (but we do have lots of optionsin the shop if you'd like!) Adafruit her-32u4-bluefruit-lePage 12 of 125
PinoutsThe Feather 32u4 Bluefruit LE is chock-full of microcontroller goodness. There's also a lot of pins and ports. We'll take you a tour of them now!The DFU pin is accidentally labeled GND on the bottom, sorry about that! it should be labeled DFU, dont use it as a GNDPower Pins Adafruit her-32u4-bluefruit-lePage 13 of 125
GND - this is the common ground for all power and logicBAT - this is the positive voltage to/from the JST jack for the optional Lipoly batteryUSB - this is the positive voltage to/from the micro USB jack if connectedEN - this is the 3.3V regulator's enable pin. It's pulled up, so connect to ground to disable the 3.3V regulator3V - this is the output from the 3.3V regulator, it can supply 500mA peakLogic pinsThis is the general purpose I/O pin set for the microcontroller. All logic is 3.3V#0 / RX - GPIO #0, also receive (input) pin forSerial1 and Interrupt #2#1 / TX - GPIO #1, also transmit (output) pin forSerial1 and Interrupt #3#2 / SDA - GPIO #2, also the I2C (Wire) data pin. There's no pull up on this pin by default so when using with I2C, you may need a 2.2K-10Kpullup. Also Interrupt #1#3 / SCL - GPIO #3, also the I2C (Wire) clock pin. There's no pull up on this pin by default so when using with I2C, you may need a 2.2K-10Kpullup. Can also do PWM output and act as Interrupt #0.#5 - GPIO #5, can also do PWM output#6 - GPIO #6, can also do PWM output and analog inputA7#9 - GPIO #9, also analog input A9 and can do PWM output. This analog input is connected to a voltage divider for the lipoly battery so beaware that this pin naturally 'sits' at around 2VDC due to the resistor divider#10 - GPIO #10, also analog input A10 and can do PWM output.#11 - GPIO #11, can do PWM output.#12 - GPIO #12, also analog input A11#13 - GPIO #13, can do PWM output and is connected to thered LED next to the USB jackA0 thru A5 - These are each analog input as well as digital I/O pins.SCK/MOSI/MISO - These are the hardware SPI pins, used by the Bluefruit LE module too! You can use them as everyday GPIO pins ifyou don't activate the Bluefruit and keep the BLE CS pin high. However, we really recommend keeping them free as they should be keptavailable for the Bluefruit. If they are used, make sure its with a device that will kindly share the SPI bus! Also used to reprogram the chipwith an AVR programmer if you need.Bluefruit LE Module Indicator LEDs Adafruit her-32u4-bluefruit-lePage 14 of 125
Since not all pins can be brought out to breakouts, due to the small size of the Feather, we use these to control the BLE module#8 - used as the Bluefruit CS (chip select) pin#7 - used as the Bluefruit IRQ (interrupt request) pin.#4 - used as the Bluefruit Reset pinSince these are not brought out there should be no risk of using them by accident!Other Pins!RST - this is the Reset pin, tie to ground to manually reset the AVR, as well as launch the bootloader manuallyARef - the analog reference pin. Normally the reference voltage is the same as the chip logic voltage (3.3V) but if you need an alternativeanalog reference, connect it to this pin and select the external AREF in your firmware. Can't go higher than 3.3V!DFU - this is the force-DFU (device firmware upgrade) pin for over-the-air updates to the Bluefruit module. You probably don't need to usethis but its available if you need to upgrade! Check out the DFU Bluefruit Upgrades page for how to use it. Otherwise, keep it disconnected.On the back we also have SWDIO/SWCLK/RST pins, these are used for programming the Bluefruit LE module itself. You should not connect tothese, unless you want to wipe out the Bluefruit LE module firmware for some reason. The RST pin is the factory reset pin, which is also rarelyused, but you can use it to set the module back to the factory default settings if it gets really messed up. Adafruit her-32u4-bluefruit-lePage 15 of 125
AssemblyWe ship Feathers fully tested but without headers attached - this gives you the most flexibility on choosing how to use and configure your FeatherHeader Options!Before you go gung-ho on soldering, there's a few options to consider!The first option is soldering in plain male headers, this lets you plug in the Feather into asolderless breadboardAnother option is to go with socket female headers. This won't let you plug the Featherinto a breadboard but it will let you attach featherwings very easily Adafruit her-32u4-bluefruit-lePage 16 of 125
We also have 'slim' versions of the female headers, that are a little shorter and give amore compact shapeFinally, there's the "Stacking Header" option. This one is sort of the best-of-both-worlds.You get the ability to plug into a solderless breadboard and plug a featherwing on top.But its a little bulky Adafruit her-32u4-bluefruit-lePage 17 of 125
Soldering in Plain HeadersPrepare the header strip:Cut the strip to length if necessary. It will be easier to solder if you insert it into abreadboard - long pins downAdd the breakout board:Place the breakout board over the pins so that the short pins poke through the breakout Adafruit her-32u4-bluefruit-lePage 18 of 125
padsAnd Solder!Be sure to solder all pins for reliable electrical contact.(For tips on soldering, be sure to check out ourGuide to ExcellentSoldering (http://adafru.it/aTk)).Solder the other strip as well. Adafruit her-32u4-bluefruit-lePage 19 of 125
You're done! Check your solder joints visually and continue onto the next stepsSoldering on Female HeaderTape In PlaceFor sockets you'll want to tape them in place so when you flip over the board they don'tfall out Adafruit her-32u4-bluefruit-lePage 20 of 125
Flip & Tack SolderAfter flipping over, solder one or two points on each strip, to 'tack' the header in placeAnd Solder!Be sure to solder all pins for reliable electrical contact.(For tips on soldering, be sure to check out ourGuide to ExcellentSoldering (http://adafru.it/aTk)). Adafruit her-32u4-bluefruit-lePage 21 of 125
You're done! Check your solder joints visually and continue onto the next steps Adafruit her-32u4-bluefruit-lePage 22 of 125
Power ManagementBattery USB PowerWe wanted to make the Feather easy to power both when connected to a computer as well as via battery. There'stwo ways to power a Feather.You can connect with a MicroUSB cable (just plug into the jack) and the Feather will regulate the 5V USB down to 3.3V. You can also connect a4.2/3.7V Lithium Polymer (Lipo/Lipoly) or Lithium Ion (LiIon) battery to the JST jack. This will let the Feather run on a rechargable battery. Whenthe USB power is powered, it will automatically switch over to USB for power, as well as start charging the battery (if attached) at100mA. This happens 'hotswap' style so you can always keep the Lipoly connected as a 'backup' power that will only get used when USB power islost.The JST connector polarity is matched to Adafruit LiPoly batteries. Using wrong polarity batteries can destroy your FeatherThe above shows the Micro USB jack (left), Lipoly JST jack (top left), as well as the 3.3V regulator and changeover diode (just to the right of theJST jack) and the Lipoly charging circuitry (to the right of the Reset button). There's also a CHG LED, which will light up while the battery ischarging. This LED might also flicker if the battery is not connected.Power suppliesYou have a lot of power supply options here! We bring out theBAT pin, which is tied to the lipoly JST connector, as well asUSB which is the 5Vfrom USB if connected. We also have the 3V pin which has the output from the 3.3V regulator. We use a 500mA peak SPX3819. While you can get500mA from it, you can't do it continuously from 5V as it will overheat the regulator. It's fine for, say, powering an ESP8266 WiFi chip or XBee radio Adafruit her-32u4-bluefruit-lePage 23 of 125
though, since the current draw is 'spiky' & sporadic.Measuring BatteryIf you're running off of a battery, chances are you wanna know what the voltage is at! That way you can tell when the battery needs recharging.Lipoly batteries are 'maxed out' at 4.2V and stick around 3.7V for much of the battery life, then slowly sink down to 3.2V or so before the protectioncircuitry cuts it off. By measuring the voltage you can quickly tell when you're heading below 3.7VTo make this easy we stuck a double-100K resistor divider on theBAT pin, and connected it to D9 (a.k.a analog #9 A9). You can read this pin'svoltage, then double it, to get the battery voltage.#define VBATPIN A9float measuredvbat analogRead(VBATPIN);measuredvbat * 2; // we divided by 2, so multiply backmeasuredvbat * 3.3; // Multiply by 3.3V, our reference voltagemeasuredvbat / 1024; // convert to voltageSerial.print("VBat: " ); Serial.println(measuredvbat);This voltage will 'float' at 4.2V when no battery is plugged in, due to the lipoly charger output, so its not a good way to detect if a battery is pluggedin or not (there is no simple way to detect if a battery is plugged in)ENable pinIf you'd like to turn off the 3.3V regulator, you can do that with theEN(able) pin. Simply tie this pin to Ground and it will disable the 3V regulator.The BAT and USB pins will still be powered Adafruit her-32u4-bluefruit-lePage 24 of 125
Arduino IDE SetupThe first thing you will need to do is to download the latest release of the Arduino IDE. You will need to be usingversion 1.6.4 or higher for thisguide.Arduino IDE v1.6.4 Downloadhttp://adafru.it/f1PAfter you have downloaded and installed v1.6.4, you will need to start the IDE and navigate to thePreferences menu. You can access it from theFile menu in Windows or Linux, or the Arduino menu on OS X.A dialog will pop up just like the one shown below.We will be adding a URL to the newAdditional Boards Manager URLs option. The list of URLs is comma separated, and you will only have toadd each URL once. New Adafruit boards and updates to existing boards will automatically be picked up by the Board Manager each time it is Adafruit her-32u4-bluefruit-lePage 25 of 125
opened. The URLs point to index files that the Board Manager uses to build the list of available & installed boards.To find the most up to date list of URLs you can add, you can visit the list ofthird party board URLs on the Arduino IDE wiki (http://adafru.it/f7U).We will only need to add one URL to the IDE in this example, but you can add multiple URLS by separating them with commas. Copy andpaste the link below into the Additional Boards Manager URLs option in the Arduino IDE rd-index/package adafruit index.jsonHere's a short description of each of the Adafruit supplied packages that will be available in the Board Manager when you add the URL:Adafruit AVR Boards - Includes support for Flora, Gemma, Feather 32u4, Trinket, & Trinket Pro.Adafruit SAMD Boards - Includes support for Feather M0Arduino Leonardo & Micro MIDI-USB - This adds MIDI over USB support for the Flora, Feather 32u4, Micro and Leonardo using thearcoreproject (http://adafru.it/eSI).If you have multiple boards you want to support, say ESP8266 and Adafruit, have both URLs in the text box separated by a comma (,)Once done click OK to save the new preference settings. Next we will look at installing boards with the Board Manager. Adafruit her-32u4-bluefruit-lePage 26 of 125
Using with Arduino IDESince the Feather 32u4 uses an ATmega32u4 chip running at 8 MHz, you can pretty easily get it working with the Arduino IDE. Many libraries(including the popular ones like NeoPixels and display) work great with the '32u4 and 8 MHz clock speed.Now that you have added the appropriate URLs to the Arduino IDE preferences, you can open theBoards Manager by navigating to the Tools Board menu.Once the Board Manager opens, click on the category drop down menu on the top left hand side of the window and selectContributed. You willthen be able to select and install the boards supplied by the URLs added to the prefrences. In the example below, we are installing supportfor Adafruit AVR Boards, but the same applies to all boards installed with the Board Manager.Next, quit and reopen the Arduino IDE to ensure that all of the boards are properly installed. You should now be able to select and upload to thenew boards listed in the Tools- Board menu. Adafruit her-32u4-bluefruit-lePage 27 of 125
Install Drivers (Windows Only)When you plug in the Feather, you'll need to possibly install a driverClick below to download our Driver InstallerDownload Adafruit Drivers Installerhttp://adafru.it/maiDownload and run the installerRun the installer! Since we bundle the SiLabs and FTDI drivers as well, you'll need to click through the licenseSelect which drivers you want to install:Click Install to do the installin' Adafruit her-32u4-bluefruit-lePage 28 of 125
BlinkNow you can upload your first blink sketch!Plug in the Feather 32u4 and wait for it to be recognized by the OS (just takes a few seconds). It will create a serial/COM port, you can now selectit from the dropdown, it'll even be 'indicated' as Feather 32u4!Now load up the Blink example// the setup function runs once when you press reset or power the boardvoid setup() {// initialize digital pin 13 as an output.pinMode(13, OUTPUT);}// the loop function runs over and over again forevervoid loop() {digitalWrite(13, HIGH); // turn the LED on (HIGH is the voltage level)delay(1000);// wait for a seconddigitalWrite(13, LOW); // turn the LED off by making the voltage LOWdelay(1000);// wait for a second}And click upload! That's it, you will be able to see the LED blink rate change as you adapt thedelay() calls.Manually bootloadingIf you ever get in a 'weird' spot with the bootloader, or you have uploaded code that crashes and doesn't auto-reboot into the bootloader, click theRST button to get back into the bootloader. The red LED will pulse, so you know that its in bootloader mode. Do the reset button press right as theArduino IDE says its attempting to upload the sketch, when you see the Yellow Arrow lit and the Uploading. text in the status bar. Adafruit her-32u4-bluefruit-lePage 29 of 125
Don't click the reset button before uploading, unlike other bootloaders you want this one to run at the time Arduino is trying to uploadUbuntu & Linux Issue FixNote if you're using Ubuntu 15.04 (or perhaps other more recent Linux distributions) there is an issue with the modem manager service whichcauses the Bluefruit LE micro to be difficult to program. If you run into errors like "device or resource busy", "bad file descriptor", or "port is busy"when attempting to program then you are hitting this issue. (http://adafru.it/fP6)The fix for this issue is to make sure Adafruit's custom udev rules are applied to your system. One of these rules is made to configure modemmanager not to touch the Bluefruit Micro board and will fix the programming difficulty issue. Follow the steps for installing Adafruit's udev rules onthis page. (http://adafru.it/iOE) Adafruit her-32u4-bluefruit-lePage 30 of 125
Installing BLE LibraryInstall the Adafruit nRF51 BLE LibraryIn order to try out our demos, you'll need to download the Adafruit BLE library for the nRF51 based modules such as this one (a.k.a.Adafruit BluefruitLE nRF51)You can check out the code here at github, (http://adafru.it/f4V) but its likely easier to just download by clicking:Download the Adafruit nRF51 BluefruitLE Libraryhttp://adafru.it/f4WRename the uncompressed folder Adafruit BluefruitLE nRF51 and check that the Adafruit BluefruitLE nRF51 folder containsAdafruit BLE.cpp and Adafruit BLE.h (as well as a bunch of other files)Place the Adafruit BluefruitLE nRF51 library folder your arduinosketchfolder/libraries/ folder.You may need to create the libraries subfolder if its your first library. Restart the IDE.We also have a great tutorial on Arduino library installation duino-libraries-install-use (http://adafru.it/aYM)After restarting, check that you see the library folder with examples:Run first exampleLets begin with the beginner project, which we can use to do basic tests. To open the ATCommand sketch, click on theFile Examples Adafruit BluefruitLE nRF51 folder in the Arduino IDE and select atcommand:This will open up a new instance of the example in the IDE, as shown below: Adafruit her-32u4-bluefruit-lePage 31 of 125
Don't upload the sketch yet! You will have to begin by changing the configuration.Go to the second tab labeled BluefruitConfig.h and find these lines// SHARED SPI SETTINGS// -------------------------------------------// The following macros declare the pins to use for HW and SW SPI communication.// SCK, MISO and MOSI should be connected to the HW SPI pins on the Uno when// using HW SPI. This should be used with nRF51822 based Bluefruit LE modules// that use SPI (Bluefruit LE SPI Friend).// -------------------------------------------#define BLUEFRUIT SPI CS8#define BLUEFRUIT SPI IRQ7#define BLUEFRUIT SPI RST6 // Optional but recommended, set to -1 if unusedAnd change the last line to:#define BLUEFRUIT SPI RST4 // Optional but recommended, set to -1 if unused(The Bluefruit Feather has the reset on digital #4 not #6)Now go back to the main tab atcommand and look for this line of code/* .hardware SPI, using SCK/MOSI/MISO hardware SPI pins and then user selected CS/IRQ/RST */Adafruit BluefruitLE SPI ble(BLUEFRUIT SPI CS, BLUEFRUIT SPI IRQ, BLUEFRUIT SPI RST);Make sure that the second line is uncommented (it should be)OK now you can upload to the Bluefruit Feather!If you're using Ubuntu 15.04 or other Linux distributions and run into errors attempting to upload a program to the board, scroll up to the Ubuntuand Linux issue fix in the previous sectionUploading to the Feather Bluefruit LEIt's
To make it easy to use for portable projects, we added a connector for any of our 3.7V Lithium polymer batteries and built in battery charging.