Transcription
Flora GPS JacketCreated by Becky Stern Adafruit IndustriesPage 1 of 22
https://learn.adafruit.com/flora-gps-jacket Adafruit IndustriesPage 2 of 22
Last updated on 2021-11-15 05:55:03 PM EST Adafruit IndustriesPage 3 of 22
Table of ContentsOverview5Tools & supplies7Build it10The Code13Wear it!21 Adafruit IndustriesPage 4 of 22
OverviewMake your coat react to your location with color-changing LEDs! The Flora GPS Jackettracks your coordinates and then pulses the lights around the collar when you reachyour destination. Change the waypoints and range in the provided project code tomake your garment light up near your favorite coffee shops or the perfect picnic spot.Before you begin this project, please freshen up on the following guides containingskills you'll need: Getting started with FLORA (https://adafru.it/aSZ) Flora RGB Smart Neo Pixels (https://adafru.it/aRT) Flora Wearable GPS (https://adafru.it/aRP) Conductive Thread (https://adafru.it/aVx) Flora with Snaps (https://adafru.it/aUQ) Adafruit IndustriesPage 5 of 22
Adafruit IndustriesPage 6 of 22
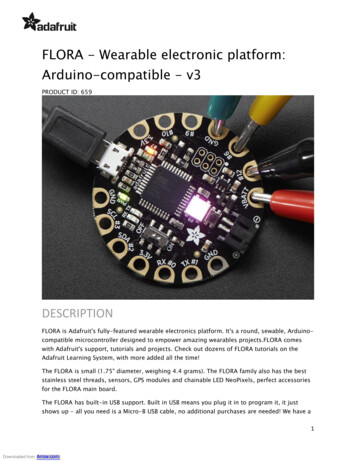
Tools & suppliesThe Flora GPS Starter Pack (http://adafru.it/1090) is perfect for this project.It contains all of the supplies you need,just grab a few tools and get to work!If you don't have the starter pack, you'llneed a Flora main board (http://adafru.it/659), Flora GPS (http://adafru.it/1059) andeight Flora pixels (http://adafru.it/1060).Other parts: Battery holder (3xAAA w/JST (http://adafru.it/260) recommended) USB cable (A to miniB) (http://adafru.it/260) Sewable battery holder (http://adafru.it/653) and coincellbattery (http://adafru.it/654)(optional for faster GPS fix) Adafruit IndustriesPage 7 of 22
Conductive thread3 ply conductive thread (http://adafru.it/641) is best for thick fabrics like that ofour jacket. Don't forget sewingneedles (http://adafru.it/615) and scissors!Check out our guide to working withconductive thread! (https://adafru.it/aVx)MultimeterYou will need a good quality basicmultimeter that can measure voltage andcontinuity.Click here to buy a basicmultimeter. (http://adafru.it/71)Click here to buy a top of the linemultimeter. (http://adafru.it/308)Click here to buy a pocketmultimeter. (http://adafru.it/850)Don't forget to learn how to use yourmultimeter too! (https://adafru.it/aOy) Adafruit IndustriesPage 8 of 22
Alligator ClipsGreat for testing out your circuit ormocking up designs, alligator clips canconnect different components or clip toconductive threads and your multimeterfor measuring continuity and resistance.Click here to buy a set of small alligatorclip test leads. (http://adafru.it/1008) Adafruit IndustriesPage 9 of 22
Snaps (optional)Snaps can be used for quick-connectingcircuit boards. You can sew them withconductive thread and/or solder them tocircuit boards.Click here to buy 5mm tin-plated brasssnaps. (http://adafru.it/1126)Check out our guide to using snaps withFlora! (https://adafru.it/aUQ)Build itHere's a diagram of the jacket's circuit. You'll chain eight pixels together around thecollar and attach the GPS to 3.3v, TX, RX, and ground. A 3xAAA battery holder hidesin a pocket and extends through a seam to plug into the JST port on the Flora. Adafruit IndustriesPage 10 of 22
Make the connections in your circuit withconductive thread.Follow our guide on conductive thread (https://adafru.it/aVx) so you can stitch up yourcircuit like a pro!Start by stitching the ground bus fromGND on Flora to the (-) pads on eachpixel.Next stitch the power bus from VBATT toall of the ( ) pads on your pixels.Then connect up the short data connections between each pixel. Be sure to seal theknots with clear nail polish or Fray Check. Adafruit IndustriesPage 11 of 22
Attach the GPS next! You can sew it directly to your garment or make it snappy withour Flora with Snaps tutorial. Connect 3.3v on the Flora to 3.3v, GND to GND, and RX TX and TX- RX.You can hide the conductive threadtraces just under the top layer of fabric,just make sure the stitches aren't so longthat they can move and come intocontact with each other. You can see thatthe thread periodically appears on theoutside of the garment to anchor thestitched lines.You can optionally sew a coincell batteryholder on the inside of the garment,connecting to BAT on the GPS and - toGND. This will help the GPS get a fix onyour position faster, since it can keeptrack of its last known position evenwhen the device is off.The battery holder is hidden in a pocket, with the JST connector poking out through aseam to connect to the Flora. If your pocket is far away from your circuit, Use one ofour handy JST battery extension cables (http://adafru.it/1131). Adafruit IndustriesPage 12 of 22
The CodeThe code for the Flora GPS Jacket is pretty simple and straightforward. We are usingthe standard Adafruit GPS Library, and the NeoPixel Library. In modern Arduino IDEversions, go to the Arduino Library Manager and select the following libraries to load: Adafruit GPS Library Adafruit NeoPixel Library.If you are using versions of the IDE older than 1.5, links to the code for the librariesare below. Click the buttons below to download.Download the Adafruit GPS Libraryhttps://adafru.it/aMmDownload the NeoPixel Libraryhttps://adafru.it/aZUFollow the Flora Sewable NeoPixel tutorial (https://adafru.it/aRT) for more informationabout installing the library. Test out the pixel sample code to be sure your pixels arefunctioning properly.Next follow the Flora GPS tutorial (https://adafru.it/aVC) to test out your GPS module.To make sure your GPS has a direct view of the sky, dip your jacket out the window(but don't let it fall out!). I used a USB extension cable so I could have the jacket outthe window but still plugged in to the computer! Adafruit IndustriesPage 13 of 22
If both your pixels and your GPS module are working perfectly in your jacket circuit, head to GitHub to download the Flora GPS Jacket code (https://adafru.it/ECN) or grabthe code directly from this page://////////////////////Flora GPS LED Pixel CodeThis code shows how to listen to the GPS module in an interruptwhich allows the program to have more 'freedom' - just parsewhen a new NMEA sentence is available! Then access data whendesired.Tested and works great with the Adafruit Flora GPS module------ http://adafruit.com/products/1059Pick one up today at the Adafruit electronics shopand help support open source hardware & software! -ada#include Adafruit GPS.h #include SoftwareSerial.h #include "Adafruit NeoPixel.h"Adafruit GPS GPS(&Serial1);// Set GPSECHO to 'false' to turn off echoing the GPS data to the Serial console// Set to 'true' if you want to debug and listen to the raw GPS sentences#define GPSECHO false// this keeps track of whether we're using the interrupt// off by default!boolean usingInterrupt -------- //WAYPOINTS -- //Please enter the latitude and longitude of your //desired destination: #define GEO LAT44.995012#define GEO --------------- -- //DISTANCE -- //Please enter the distance (in meters) from your //destination that you want your LEDs to light up: #define DESTINATION ------------ // Navigation locationfloat targetLat GEO LAT;float targetLon GEO LON;// Trip distancefloat tripDistance;boolean isStarted false;// Set the first variable to the NUMBER of pixels. 25 25 pixels in a row// second var is pinAdafruit NeoPixel strip Adafruit NeoPixel(2, 6, NEO GRB NEO KHZ800);uint8 t LED Breathe Table[] {80, 87, 95, 103, 112, 121, 131, 141, 151, 161,172, 182, 192, 202, 211, 220,228, 236, 242, 247, 251, 254, 255, 255, 254, 251, 247, 242, 236, 228,220, 211, Adafruit IndustriesPage 14 of 22
202, 192, 182, 172, 161, 151, 141, 131, 121, 112, ,20,20,22,24,31,34,38,41,45,50,55,60,66,73 };#define BREATHE TABLE SIZE (sizeof(LED Breathe Table))#define BREATHE CYCLE5000/*breathe cycle in milliseconds*/#define BREATHE UPDATE(BREATHE CYCLE / BREATHE TABLE SIZE)uint32 t lastBreatheUpdate 0;uint8 t breatheIndex 0;void setup(){// connect at 115200 so we can read the GPS fast enough and echo without droppingchars// also spit it outSerial.begin(115200);// 9600 NMEA is the default baud rate for Adafruit MTK GPS's- some use 4800GPS.begin(9600);// uncomment this line to turn on RMC (recommended minimum) and GGA (fix data)including altitudeGPS.sendCommand(PMTK SET NMEA OUTPUT RMCGGA);// uncomment this line to turn on only the "minimum recommended" data//GPS.sendCommand(PMTK SET NMEA OUTPUT RMCONLY);// For parsing data, we don't suggest using anything but either RMC only orRMC GGA since// the parser doesn't care about other sentences at this time// Set the update rateGPS.sendCommand(PMTK SET NMEA UPDATE 1HZ);// 1 Hz update rate// For the parsing code to work nicely and have time to sort thru the data, and// print it out we don't suggest using anything higher than 1 Hzdelay(1000);// Ask for firmware versionSerial1.println(PMTK Q RELEASE);// Start up the LED stripstrip.begin();// Update the strip, to start they are all 'off'strip.show();}uint32 t timer millis();void loop()// run over and over again{// read data from the GPS in the 'main loop'char c GPS.read();// if you want to debug, this is a good time to do it!if (GPSECHO)if (c) Serial.print(c);// if a sentence is received, we can check the checksum, parse it.if (GPS.newNMEAreceived()) {// a tricky thing here is if we print the NMEA sentence, or data// we end up not listening and catching other sentences!// so be very wary if using OUTPUT ALLDATA and trytng to print out data//Serial.println(GPS.lastNMEA());// this also sets the newNMEAreceived()flag to false Adafruit IndustriesPage 15 of 22
if (!GPS.parse(GPS.lastNMEA()))// this also sets the newNMEAreceived() flagto falsereturn; // we can fail to parse a sentence in which case we should just waitfor another}if (GPS.fix) {//Serial.print("Location: ");//Serial.print(GPS.latitude, 2); Serial.print(GPS.lat);//Serial.print(", ");//Serial.print(GPS.longitude, 2); Serial.println(GPS.lon);float fLat decimalDegrees(GPS.latitude, GPS.lat);float fLon decimalDegrees(GPS.longitude, GPS.lon);if (!isStarted) {isStarted true;tripDistance (double)calc dist(fLat, fLon, targetLat, targetLon);}//Uncomment below if you want your Flora to navigate to a certaindestination. Then modify the headingDirection function./*if ((calc bearing(fLat, fLon, targetLat, targetLon) - GPS.angle) 0) {headingDirection(calc bearing(fLat, fLon, targetLat, targetLon)-GPS.angle);}else {headingDirection(calc bearing(fLat, fLon, targetLat, targetLon)GPS.angle 360);}*/headingDistance((double)calc dist(fLat, fLon, targetLat, targetLon));//Serial.print("Distance Remaining:"); Serial.println((double)calc dist(fLat,fLon, targetLat, targetLon));}//}}int calc bearing(float flat1, float flon1, float flat2, float flon2){float calc;float bear calc;float x 69.1 * (flat2 - flat1);float y 69.1 * (flon2 - flon1) * cos(flat1/57.3);calc atan2(y,x);bear calc degrees(calc);if(bear calc 1){bear calc 360 bear calc;}return bear calc;}void headingDirection(float heading){//Use this part of the code to determine which way you need to go.//Remember: this is not the direction you are heading, it is the direction to thedestination (north forward).if ((heading 348.75) (heading 11.25)) {Serial.println(" N");//Serial.println("Forward");} Adafruit IndustriesPage 16 of 22
if ((heading 11.25)&&(heading 33.75)) {Serial.println("NNE");//Serial.println("Go Right");}if ((heading 33.75)&&(heading 56.25)) {Serial.println(" NE");//Serial.println("Go Right");}if ((heading 56.25)&&(heading 78.75)) {Serial.println("ENE");//Serial.println("Go Right");}if ((heading 78.75)&&(heading 101.25)) {Serial.println(" E");//Serial.println("Go Right");}if ((heading 101.25)&&(heading 123.75)) {Serial.println("ESE");//Serial.println("Go Right");}if ((heading 123.75)&&(heading 146.25)) {Serial.println(" SE");//Serial.println("Go Right");}if ((heading 146.25)&&(heading 168.75)) {Serial.println("SSE");//Serial.println("Go Right");}if ((heading 168.75)&&(heading 191.25)) {Serial.println(" S");//Serial.println("Turn Around");}if ((heading 191.25)&&(heading 213.75)) {Serial.println("SSW");//Serial.println("Go Left");}if ((heading 213.75)&&(heading 236.25)) {Serial.println(" SW");//Serial.println("Go Left");}if ((heading 236.25)&&(heading 258.75)) {Serial.println("WSW");//Serial.println("Go Left");}if ((heading 258.75)&&(heading 281.25)) {Serial.println(" W");//Serial.println("Go Left");}if ((heading 281.25)&&(heading 303.75)) {Serial.println("WNW");//Serial.println("Go Left");}if ((heading 303.75)&&(heading 326.25)) {Serial.println(" NW");//Serial.println("Go Left");} Adafruit IndustriesPage 17 of 22
if ((heading 326.25)&&(heading 348.75)) {Serial.println("NWN");//Serial.println("Go Left");}}void headingDistance(float fDist){//Use this part of the code to determine how far you are away from thedestination.//The total trip distance (from where you started) is divided into five tripsegments.Serial.println(fDist);if ((fDist DESTINATION DISTANCE)) { // You are now within 5 meters of yourdestination.//Serial.println("Trip Distance: 1");//Serial.println("Arrived at destination!");int i;for (i 0; i strip.numPixels(); i ) {strip.setPixelColor(i, 0, 0, 0);}strip.show();// write all the pixels out}if ((fDist DESTINATION DISTANCE)) { // You are now within 5 meters of yourdestination.//Serial.println("Trip Distance: 0");//Serial.println("Arrived at destination!");breath();}}unsigned long calc dist(float flat1, float flon1, float flat2, float flon2){float dist calc 0;float dist calc2 0;float diflat 0;float diflon 0;diflat radians(flat2-flat1);flat1 radians(flat1);flat2 radians(flat2);diflon radians((flon2)-(flon1));dist calc (sin(diflat/2.0)*sin(diflat/2.0));dist calc2 cos(flat1);dist calc2* cos(flat2);dist calc2* sin(diflon/2.0);dist calc2* sin(diflon/2.0);dist calc dist calc2;dist calc (2*atan2(sqrt(dist calc),sqrt(1.0-dist calc)));dist calc* 6371000.0; //Converting to metersreturn dist calc;}// Convert NMEA coordinate to decimal degreesfloat decimalDegrees(float nmeaCoord, char dir) {uint16 t wholeDegrees 0.01*nmeaCoord;int modifier 1;if (dir 'W' dir 'S') {modifier -1;} Adafruit IndustriesPage 18 of 22
return (wholeDegrees (nmeaCoord - 100.0*wholeDegrees)/60.0) * modifier;}void breath(){uniformBreathe(LED Breathe Table, BREATHE TABLE SIZE, BREATHE UPDATE, 127, 127,127);}void uniformBreathe(uint8 t* breatheTable, uint8 t breatheTableSize, uint16 tupdatePeriod, uint16 t r, uint16 t g, uint16 t b){int i;uint8 t breatheBlu;if ((millis() - lastBreatheUpdate) updatePeriod) {lastBreatheUpdate millis();for (i 0; i strip.numPixels(); i ) {breatheBlu (b * breatheTable[breatheIndex]) / 256;strip.setPixelColor(i, 0, 0, breatheBlu);}strip.show();breatheIndex ;if (breatheIndex breatheTableSize) {breatheIndex 0;}}}Unzip the package and drag the Flora GPS Jacket folder into your Arduino folder(located by default in Documents on OS X). Open the enclosed Flora GPS Jacket.inofile in the Adafruit Arduino IDE. (https://adafru.it/aVE) Adafruit IndustriesPage 19 of 22
The code is easy to modify for your own waypoint and range of sensitivity. Adjustthese variables to your own preference. We like GetLatLong.Net (https://adafru.it/ECO)for finding latitudes and longitudes online. Upload your customized code to yourjacket. Adafruit IndustriesPage 20 of 22
Wear it!Wear your GPS jacket with pride! Try changing the colors for different types ofnotifications, and make this project your own. We like to wear the Flora board on theoutside of our jackets so we can show it to people and talk to them about it, but youcan just as easily hide the main board inside the lining. The GPS, however, must befacing outward to have direct line of sight to the sky.To wash the jacket, simply remove the batteries. All other components can get wetwhile off, but should be thoroughly dry before powering back up. Adafruit IndustriesPage 21 of 22
Adafruit IndustriesPage 22 of 22
The code for the Flora GPS Jacket is pretty simple and straightforward. We are using the standard Adafruit GPS Library, and the NeoPixel Library. In modern Arduino IDE versions, go to the Arduino Library Manager and select the following libraries to load: Adafruit GPS Library Adafruit NeoPixel Library.