Transcription
AD Phonebook 3.6Installation and configurationAD Phonebook Manual3.6 v11Manual
Table of ContentsIntroduction . 4AD Self Update . 4Technical Support . 5Prerequisites . 5Installation. 5Accessing the AD Phonebook web page. 7Accessing the Admin page . 8Saving Changes . 9Data Source . 9Who is shown in the phonebook? . 10OUs to Query . 10Hidden Users, Groups and OUs . 11Azure AD Query . 13General Settings . 14Page Title and Logo Text. 15Page Size . 15Default Domain. 15Domain Dropdown List . 15Export Options. 15Button Labels . 15Show Searched Users Only. 15Empty Grid Text . 16Use Local Photos . 16Footer Text (HTML) . 16Display HTML Header . 16Display Department Filter . 17Display Location Filter . 17Use Local Fonts and jQuery . 18AD Self Update Link . 18AD Phonebook Manual3.6 v12Manual
Column Photo . 19PDF Export Settings. 20Column Data . 20Column Header Text and LDAP Property . 22Visibility . 22Hyperlinks . 22Regular Expressions . 23Hide On Mobile . 23Sort by this Column . 23Include in PDF . 24Truncate long values . 24Width and Mobile Width . 24Details Section . 24Detail Data . 26Search Filters . 27Domain Mappings . 27Interface and Logo . 27Using HTTPS and SSL Certificates . 28Querying the phonebook via a URL . 28Querying the phonebook from other web pages . 29Example . 29Simple example . 30Help and Support . 30AD Phonebook Manual3.6 v13Manual
IntroductionAD Phonebook is a browser-based program that is installed on a Windows Server running IIS. The ADPhonebook reads user data you already have stored in Active Directory and displays it to yourorganization in a readable accessible form. Active Directory is normally an organizations companywide user database, the data you have stored here can be used to create the perfect employeedirectory. There are many uses for the AD Phonebook and we have seen it used in many creativeways. If you have users or contacts stored in Active Directory that you would like to present to yourusers or even a third party then AD Phonebook can help.AD Self UpdateAD Self Update is a separate program that allows your users to update their own Active Directorycontact information, we mention it here as it is the perfect companion to AD Phonebook.Empowering employees or HR to update AD user data ensures your phonebook is as up to date aspossible. To read more about AD Self Update click here.AD Phonebook Manual3.6 v14Manual
Technical SupportThis document will walk you through AD Phonebook installation and configuration. Should you haveany further questions please contact us at support@dovestones.com.PrerequisitesThe following software should be installed before installing the application: Windows Server 2008 R2, 2012, 2012 R2, 2016.Internet Information Services (IIS) with World Wide Web Service installed.Microsoft .NET Framework 4.5SQL Compact 4 (added during installation) or external Microsoft SQL ServerAn Active Directory user that you will use as the service account to connect and read ActiveDirectory, this should be a standard account that has a strong password which doesn’texpire.InstallationPlease follow these steps to install AD Phonebook on a Windows Server with the prerequisites listedabove:1. Run the installer file and click Next at the welcome screen2. Select the web site where you would like the phonebook installed. Select an Application Poolto use or click Next and one will be created for the program named ADPhonebook.AD Phonebook Manual3.6 v15Manual
3. Wait for the installation to complete then click Finish.4. Upon a successful installation run the AD Phonebook Configuration to add a service accountwhich will be used to connect to and read data from Active Directory.Follow these steps to configure the Active Directory domain(s) that the application will use.1. From the Start menu open the AD Phonebook Configuration program2. Click on the ‘Add Domain’ button or if connecting to Azure AD click ‘Add Azure’.3. Enter the required information to connect to Active Directory, Domain Controller, DomainName and the user credentials then click OK. For Azure AD specify a user for the connectionand a Client ID. To obtain a client ID follow the steps on the following o-connect-to-azure-ad-using-ad-phonebook/)Note: You must supply user credentials that has sufficient permissions to read user andcontact objects.AD Phonebook Manual3.6 v16Manual
4. Repeat steps 3 and 4 to add additional domains (this is optional, multiple domains aresupported).5. Press ‘Test Connection’ to check the username and password are valid.6. Basic configuration is now complete close the program.Accessing the AD Phonebook web pageWhen you have added your service account using the AD Configuration tool you can visit the ADPhonebook web page, the address depends on the web site where you have chosen during theinstallation (step 2), if this was the default web site then the URL http://localhost/ADPhonebookshould work.Your URL would be the web site address followed by /ADPhonebook.Example 1.2/adphonebook/AD Phonebook Manual3.6 v17Manual
honebook/Note: The first load of the phonebook will take a little longer than normal.Accessing the Admin pageThe Admin page allows you to customize the phonebook and define which users will be shown. TheAdmin page can be accessed by adding /Admin to the phonebook URL, by default, users that aremembers of the Domain Admins, Built-In\Administrators (in AD not local) can access the adminpage. Alternatively, you can create a group named ADPhonebookAdmins anywhere in AD andmembers of this group are granted access. Regular domain users will be unable to access the adminpage.Example URL: http://servername/adphonebook/admin/AD Phonebook Manual3.6 v18Manual
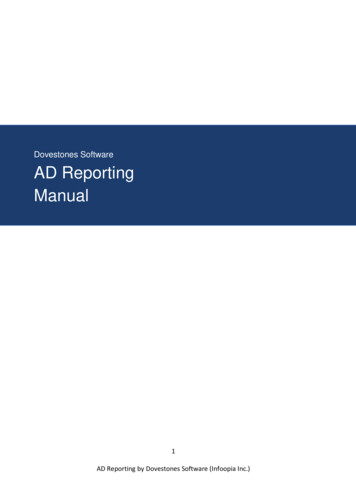
Saving ChangesWhen you have made changes on the Admin page click the save button in the header to save thechange, changes are written to the ‘Settings.config’ file which can be found in the App Data folder(typically: C:\inetpub\wwwroot\ADPhonebook\App Data\). Backing up this file is recommended.Data SourceBelow is a screen shot of the Admin page showing the Data Source section. Here you can specify adata source and how frequently the program will synchronize with Active Directory, the default is 60minutes. The default data source is SQL Compact. An external Microsoft SQL Server is alsosupported.Note: Click the button ‘Sync DB Now’ to start the synchronization with Active Directory.AD Phonebook Manual3.6 v19Manual
Who is shown in the phonebook?The Active Directory Query section of the Admin page controls which users/contacts are shown inthe phonebook. The LDAP Filter will show users and contacts but hide disabled users, the filter canbe changed, you will find many examples on the web of modifying Active Directory LDAP filters.By default, the program will display all users in Active Directory that have a value in the telephonenumber (telephoneNumber attributre) and an email address (mail attribute), other users will beexcluded. Below we’ll explain how to include and exclude users.OUs to QueryUnder the section named OUs to Query you can add Organization Units which the program will read,users/contacts outside of these OUs will be excluded.AD Phonebook Manual3.6 v110Manual
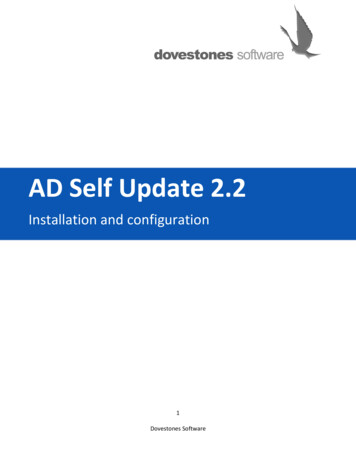
Click the Insert button to add an OU, in the example below, users in the New York, Staff andStudents OUs would appear in the phonebook, users outside of these OUs would not be shown.Users in these OUs could still be excluded if the meet the criteria of another exclusion setting such asare they a member of an excluded groups or are they missing a telephone number or email address.Hidden Users, Groups and OUsShould you want to hide certain users or groups add them to the Exclude Users/Group/OUs section,see the example below.AD Phonebook Manual3.6 v111Manual
AD Phonebook Manual3.6 v112Manual
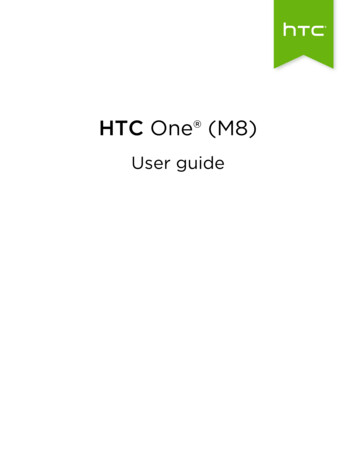
Azure AD QueryThe Azure AD Query tab allows you to exclude users and groups that exist in Azure AD thatyou do now want shown in the phonebook.AD Phonebook Manual3.6 v113Manual
General SettingsFrom the General Settings tab you can change labels, export options, search options etc.We’ll cover each setting below.AD Phonebook Manual3.6 v114Manual
Page Title and Logo TextThe phonebook title will appear on the logon page and browser tab.Page SizeThe Page Size value controls how many users/rows are shown per page.Default DomainIf you have more than one domain specified using the AD Phonebook Config program and you wouldlike this to be shown first in the Domains drop down filter specify it here.Domain Dropdown ListIf you have multiple domains and you want users to be able to switch between domains (e.g. Staffand Students) and perform searches against a specific domain set ‘Domains Drop-Down List’ toVisible.You will need to add each domain to the AD Phonebook Configuration utility then enable thedomains drop-down list in the Admin page.Also see Domain Mappings.Export OptionsYou can give your users the option of export the phonebook to a file. The export formats are PDF,XLS (Excel), RTF (opens in Word or similar) and CSV (Comma Separated Value).Button LabelsThe labels users see in the header such as ‘Search’ and ‘Sort By’ can be changed on theGeneral Settings tab. You can change the language here or change it to a word or phraseyou prefer.Show Searched Users OnlyBy default, when the phonebook loads you will see some users, if you would rather no usersbe shown and only display users when searched for then enable this option.AD Phonebook Manual3.6 v115Manual
Empty Grid TextRelated to the ‘Show Searched Users Only’ option, the text here is what your users will seewhen they visit the phonebook and no users are loaded.Use Local PhotosBy default the program will load users photos from Active Directory by reading thethumbnailPhoto attribute (by default, you can change this to jpegPhoto if needed).Alternatively you can load photos from a local folder. Enable this option and specify thelocation of the files in ‘Local Photo Path Format’, the file names should be %username%.jpg.Footer Text (HTML)You can add text to display in the footer of the phonebook. You can use HTML here.Display HTML HeaderAt the top of the phonebook beneath the header is a section of text where you can addinstructions or links to other users or external pages. The HTML Header can be disabled ifyou would rather it not be there.AD Phonebook Manual3.6 v116Manual
Display Department FilterIn the header is a filter named Department, the program reads the values found in the‘department’ attribute and lists them here, this allows user to quickly locate users in thechosen department. You can remove this filter by setting this option to Disabled.Display Location FilterLike the option above, the Location filter allows users to filter users by office location, countryor domain. You can specify which attribute is used for the filter under ‘Location Column’.AD Phonebook Manual3.6 v117Manual
Use Local Fonts and jQueryBy default, the program will load fonts and jquery (JavaScript library) from Google, if yourcomputers do not have internet access or you would rather fonts and jQuery is loaded locallychoose this option.AD Self Update LinkFrom this tab you can enable or disable the Update tab which is shown in the ‘DetailsSection’. This is useful i you are using AD Self Update; your users can then update their owninformation using AD Self Update should they see information that is incorrect. This isdisabled by default.AD Phonebook Manual3.6 v118Manual
Column PhotoBy default a user’s photo is shown in the main grid, if you would prefer not to see the users photoyou can disable this here.The photos are read from the thumbnailPhoto attribute in Active Directory, you can change this ifneeded. You can also change the size of the image that is shown in the phonebook, the default sizeis 100px x 100px, the photo is rendered round and scaled using css.AD Phonebook Manual3.6 v119Manual
PDF Export SettingsThere are a several options you can use when exporting to PDF. You can set the orientation of thepage, landscape maybe better if you have more than five columns shown. The option ‘Auto-FitWidth’ will expand the columns to fill the page width. You add text you would like shown in theheader and footer of the PDF to the header and footer sections. You can adjust the font size andchange the margin size.Column DataColumn Data contains the column your users will see in the phonebook, by default the phonebookwill display the columns listed below. In the Column Settings section you can add, remove or editcolumns. You hide columns, specify which column the users will be sorted by, create hyperlinks anduse regular expressions to format the values shown.AD Phonebook Manual3.6 v120Manual
Clicking on the ‘New Column’ button will open the Edit column window, here you can add additionalcolumns that will be shown in the main grid. Clicking on the editexisting columns.AD Phonebook Manual3.6 v121button will allow you to editManual
Column Header Text and LDAP PropertyBelow is an example column, the Header Text can have any name you like but the LDAP Propertymust exactly match the Active Directory property name. For example you could have the ‘HeaderText’ value read ‘Car Parking Space’ and the ‘LDAP Property’ could be ‘extensionAttribute1’.VisibilityIf you want to hide a column from view you can change the visibilty to Hide, alternatively removethe column. Hide can be helpful if you think you may use the column again in the future.HyperlinksIf you would like the column value to be a hyperlink check the Hyperlink check box and enter aprotocol or scheme name e.g. mailto:{0} or tel:{0} . You can also use the URI text box to passarguments in the URL for example the default manager column contains the URI value./ADPhonebook/?name {0} this is used to display the managers details when the managers name isclicked.AD Phonebook Manual3.6 v122Manual
Regular ExpressionsYou can use regular expressions (abbreviated as Regex Pattern) to manipulate the displayed values.Certain attributes such as ‘manager’ contain the full LDAP path to the mangers user object (E.g.CN John Smith,OU Managers,DC Domain,DC Com), Regular Expressions can be used to remove thepath and leave just the managers name (E.g. John Smith) which is easier to read. Regular expressionscan be applied to any column/attribute by clicking the ‘Edit’ button for that column on the ‘ListColumns’ tab.Hide On MobileWhen the phonebook is viewed on a mobile device you’ll want to hide some columns to make it easyto read due to the limited width on mobile devices. Use the hide on mobile check box to hidecolumns you don’t want to show on mobiles, some of the default columns already have thischecked. You can still see hidden values by adding them to the users details (clicking/touching theusers name).Example showing two columns on mobile, touch the row to view details on that user.Sort by this ColumnBy default the main grid is sorted using the cn attribute (Name column), you can change this toanother column by checking Sort by this column, ensure this is checked for one column only.AD Phonebook Manual3.6 v123Manual
Include in PDFIf PDF export is enabled under ‘General Settings’ then your users can export a copy of thephonebook to PDF. Due to the constraints of the paper size and fonts sizes all the columnsyou see on screen may not fit in the exported PDF. To choose which columns are used inthe PDF export, check or uncheck the ‘Include in PDF’ option.Truncate long valuesYou may find certain columsn/attributes such as title or department contain long values, oneusers long job title may make the column unnecessarily wide meaning there isn’t room onthe screen for other columns or other columns become squashed or the value overlaps tothe line below. By checking Truncate long values the width of the column will be fixed andany long values will be truncated and will appear after the displayed value to indicate thevalue is longer. The user can click the to see more data on the contact and read the fullvalue.Width and Mobile WidthYou can force one column to be a certain width and the others will adjust i.e. those with novalue will expand or contract but the ones you define a fixed width will keep that width.Truncated or overlapping telephone numbers aren’t much use so you may want to fix thewidth of columns containing a phone number.Details SectionWhen you click or touch a user’s name or the symbol additional information (details) about theuser are displayed. You can customize the tabs and the content shown on these tabs via the DetailsSection.AD Phonebook Manual3.6 v124Manual
Above shows the ‘Details Section’ as your users see it after the is clicked.AD Phonebook Manual3.6 v125Manual
Detail DataYou can add and remove fields from the details section like you can with the Column Data. On theDetails Section tab you will see ‘Detail Data’, the values shown in the grid relate to the tabs yourusers will see. Tabs can be added, edited or removed.Clicking on the ‘New Section’ button will open a new window, here you can add additional tab(s)that show next to the existing tabs. Clicking on the New Row button will allow you to add newrow/attribute.You can change the order the tabs appear by using the arrows.AD Phonebook Manual3.6 v126Manual
Search FiltersIn the header next to the search box is a drop down menu of fields a user can search within.If non are selected all fields are searched. To add or remove items from this list use theSearch Filters tab.The search is performed against the database, for the search filters to work the filters addedneed to also appear in the Columns Data section and a Sync needs to have taken place.Domain MappingsIf you have more than one domain and you have the domain drop down box shown you can assign afriendly name to each domain.For example instead of users seeing miami3.internal.net they can see Miami Office (or similar).Interface and LogoYou can customize the colours used in the phonebook via the Interface tab, the colour values is ahexadecimal colour value. Click the Restore button to restore the original default colours.Add logo can be added via the Logo tab, the logo size needs to be 160px x 70px.AD Phonebook Manual3.6 v127Manual
Using HTTPS and SSL CertificatesWhilst the phonebook will work perfectly using HTTP its best practice when a web site containssensitive data to install an SSL certificate and access the site using HTTPS. A SSL certificate can beadded to the web site (normally Default Web Site) via IIS. There are many documents and videos onthe web showing how to add a SSL certificate and enable HTTPS in IIS (Internet Information Server).Querying the phonebook via a URLThe AD Phonebook can take queries passed via the URL, you can query any of the columns that arebeing displayed in the phonebook. The url should be followed by a question mark then the columnname and the value you want to search for. You can combine two or more using &.e.g. http://server/adphonebook?columnName valueBelow are a few examples:http://server/adphonebook?department saleshttp://server/adphonebook?department sales&title manager (& AND operator)AD Phonebook Manual3.6 v128Manual
http://server/adphonebook?title supervisor title manager ( OR operator)Querying the phonebook from other web pagesThe AD Phonebook can take queries passed from another web page such as an intranet page. Belowis an example html form that will query the phonebook. Form elements can be added or removed.Example html head title Example /title /head body form action "/adphonebook" method "get" table tr td Full Name /td td input type "text" name "Full Name" / /td /tr tr td First Name /td td input type "text" name "First Name" / /td /tr tr td Last Name /td td input type "text" name "Last Name" / /td /tr tr td Email Address /td td input type "text" name "Email Address" / /td /tr tr td Department /td td input type "text" name "Department" / /td /tr tr td Title /td td input type "text" name "Title" / /td /tr tr td Phone /td td input type "text" name "Phone" / /td /tr tr td /td td input type "submit" value "Search" / input type "reset" value "Reset" / /td /tr /table /form /body /html AD Phonebook Manual3.6 v129Manual
Simple example html head title Example /title /head body form action "/adphonebook" method "get" table tr td Full Name /td td input type "text" name "Full Name" / /td /tr tr td Department /td td input type "text" name "Department" / /td td /td td input type "submit" value "Search" / /td /tr /table /form /body /html Help and SupportIf you require any help installing or configuring AD Phonebook contact support@dovestones.com.AD Phonebook Manual3.6 v130Manual
Please follow these steps to install AD Phonebook on a Windows Server with the prerequisites listed above: 1. Run the installer file and click Nextat the welcome screen 2. Select the web site where you would like the phonebook installed. Select an Application Pool to use or click Next and one will be created for the program named ADPhonebook.