Transcription
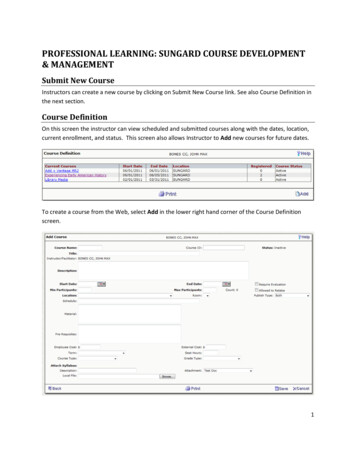
PROFESSIONAL LEARNING: SUNGARD COURSE DEVELOPMENT& MANAGEMENTSubmit New CourseInstructors can create a new course by clicking on Submit New Course link. See also Course Definition inthe next section.Course DefinitionOn this screen the instructor can view scheduled and submitted courses along with the dates, location,current enrollment, and status. This screen also allows Instructor to Add new courses for future dates.To create a course from the Web, select Add in the lower right hand corner of the Course Definitionscreen.1
When an instructor creates a course it is created in an Inactive status. The Professional DevelopmentAdministrator (Tricia Herring) will review the course and mark the status as Active upon approval. Oncethis process is completed, the course will be Active online. Participants will be able to register for thecourse and the instructor will view it as Active in the Course Status column on the Course Definitionscreen.The instructor enters all of the relevant information for the course definition. Required fields are: Course NameTitleDescription – must provide the learning goal(s) for the activity and targeted audience forwhom the professional learning is intended Start Date End Date Min(imum) Participants Max(imum) Participants LocationAfter completing all required fields, select Save.To navigate back to the Course Definition list page, select Back on the lower left hand of the screen.To edit a course, click the course name link. This will advance to the screen where the instructor canmake changes. After the changes are all made, select Save to record the changes.2
On clicking Save the screen automatically moves the instructor to the Class Date/ Time tab when in Addmode. When not in Add mode, the Instructor can select the Class Date/Time tab to update Class Date/Time details.To create a new class, enter the date and time. Time can be entered in different formats.Example: “10” or “10” or “10a” or “10aM” will be converted to “10:00 AM”. Similarly, ”10:00 PM” or“2215” or “1015p” or “1015pM” will be converted to “10:15 PM”. The Duration and Alternate Locationare optional, however when attendance hours are tracked and printed on the Transcript, make sure theDuration (in Hours) is provided. Select Add and continue until each class is defined.Please Note: In-service points are based on attendance hours. Attendance hours arerounded down.Example: A participant would receive 2 in-service points for attending a 2.5 hour in-service.3
Assigning Points/CreditsTo Add/modify credits for a course, select the Course Credits tab. Each credit will be listed here.To add a new credit, select the credit type from the drop-down and enter credits. Select Add andcontinue until every credit(s) is defined. The screen will verify that no duplicate Credit Types areselected.Example: A participant would receive 2 in-service points for attending a 2.5 hour in-service.4
FLDOE Survey Reporting RequirementsThe FLDOE Survey Requirements can be found under the miscellaneous tab. Click the Type dropdownbox for the Reporting Requirements. Once you have selected the Reporting Requirement, click the Itemdropdown box to select the appropriate response. When you click Add, the requirement you justcompleted will be displayed under Course Miscellaneous List. Click the dropdown box to select the nextrequirement. Continue until you have completed all five requirements. The requirements and responsechoices are below:1. Primary PurposeA. Add-on EndorsementB. Alternative CertificationC. Florida Educators Certificate RenewalD. Other Professional Certificate/License RenewalE. Professional Skill BuildingF. W. Cecil Golden Professional Development program for School LeadersG. Approved District Leadership Development Program2. Student Evaluation MethodA. Results of District-developed/standardized student testB. Results of School/Teacher-constructed student testC. Portfolios of student workD. Observation of student performanceF. Other performance assessmentG. Did not evaluate student outcomes3. Implementation MethodM. Structured Coaching/MentoringN. Independent Learning/Action Research related to trainingO. Collaborative planning related to training, including learning communitiesP. Participants Product related to trainingQ. Lesson Study GroupR. Electronic – InteractiveS. Electronic – non-Interactive5
4.Learning MethodA. WorkshopB. Electronic, InteractiveC. Electronic, non-InteractiveD. Learning Community/Lesson Study GroupF. Independent Inquiry (includes, for example, Action Research)G. Structured Coaching (May include one or small groups)5. Evaluation MethodA. Changes in classroom practicesB. Changes in instructional leadership practicesC. Changes in student services practicesD. Other changes in practiceZ. Did not evaluate staff outcomes6
Course AttendanceThis screen will list all current courses with an option to select Class Date/ Time as well as selecting thecourse name for course information.By selecting Class Date/Time, an instructor can view each class separately.To get a listing of all enrolled participants, select Attendance next to the day that you would like torecord attendance.7
Select the Attendance checkbox if the participant attended the training on the day selected. Enter anyneeded comments. On the lower left of the screen there is a Select All link; selecting this would put acheck in each participant’s attendance field. The instructor then has the ability to unselect the few thatwere not present. Selecting Clear All will erase all attendance check marks that were made.Select Save to save the attendance for the class.8
Complete CourseIn order to complete a course, the instructor needs to mark a course as complete. When the course issetup with credits, the instructor needs to complete attendance and assign credits to the participantsbefore completing the course.A list of all Active students enrolled in a course can be viewed by selecting Complete Course from theComplete Course screen.Attendance and Assign Credits columns show for each participant. The Assign Credits column will not bedisplayed if credits were not defined during the course set-up.Assigned credits default based on global settings for Attendance. Attendance based: When the rule for this setting is satisfied, Participant is assigned default fullcredits based on his/her course attendance. Instructor can then adjust the credits based onparticipant’s performance during the course.9
The attendance column shows the ratio of classes and class attendance. For example, if a course had 2classes and the participant was marked as “attended” for both classes, the value 2/2 is displayed(attended 2 out of 2 classes). If a participant only attended 1 class, the value 1/2 is displayed (attended 1out of 2 classes). Whenever the participant does not have complete attendance, the attendance ratio isdisplayed in the color red.Attendance and Credits based:10
Email NotificationAn instructor can send out an email to participants by selecting the Email Notification tab. Within thescreen, each course that is a current course will be listed. Selecting Email Notification next to thedesired course will allow you to create an email.You can compose an email and send it directly from the Web to all registered participants. SelectingEmail in the lower right corner of the screen will send the email out to all registered participants.By default all participants are selected to receive the email notification. The instructor can un-check (orre-check) the participants from the Active Participant List to determine who needs to receive the emailnotification.After composing the email text, click Email to submit the email notification to the workflow engine foremailing the selected participants.Email communications can be sent to participants when the course is in Active or Completed status.11
Current CoursesCurrent Courses will list all courses that are open for enrollment with a Course Status of Active orInactive. The courses can be sorted by clicking on the column headers.Selecting the course name will give the course definition. This area reflects the information that wasentered on the Course Definition screen.If a professional learning offering (course) has more than one event (class), the instructor is able to vieweach class associated with the course independently.12
Selecting Attendance next to the class, will give the instructor an attendance record.13
To navigate back, select Back in the lower left hand corner of the screen. You may also print the CourseInformation by selecting Print.Selecting the Cancel Course link from the list page will advance to the Course Cancellation screen. Thisscreen shows the course information and provides option to cancel the course.Select the check box before the question, “Are you sure you want to cancel this course?” and clickCancel Course button to cancel a course. When a course is canceled notification is sent to theProfessional Development Administrator, the Instructor/Facilitator of the course and the registeredparticipants.14
An instructor can view cancelled courses listed in Current Courses until the course start date occurs.15
Prior CoursesPrior courses identifies all courses that the instructor has taught (Done) and for which grades/creditshave been assigned (Completed).Select the course name to view detailed course information.Select Print in the lower middle of the screen to print the information. To navigate back to PriorCourses, select Back in the lower left hand corner.16
PROFESSIONAL LEARNING: SUNGARD COURSE DEVELOPMENT & MANAGEMENT Submit New Course Instructors can create a new course by clicking on Submit New Course link. See also Course Definition in the next section. Course Definition On this screen the instructor can view scheduled and submitted courses along with the dates, location,