Transcription
Dovestones SoftwareAD ReportingManual1AD Reporting by Dovestones Software (Infoopia Inc.)
CONTENTS1Quick Introduction . 42System Requirements . 43Main features . 44Installing AD Reporting . 44.1Remove AD Reporting . 55Getting Started . 56Columns and Attributes . 87Starting a query in AD Reporting . 98Logical operators . 19Condition . 210 Group . 311 Add/Remove Columns . 312 Actions . 513 Enable/disable accounts . 514 Delete . 615 Move . 716 Add to Group, Remove from Group and Remove from All Groups . 717 Set Expire Date . 918 Export Tab . 919 Scheduler Tab . 1120 Configuring a Scheduled Task item . 1221 Settings . 2122 Command line operation . 2223 AD Reporting Command Line Syntax . 2223.1General options: . 2323.2Query Options:. 2323.3Export options: . 2423.4Database export options: . 2423.5Action options:. 2523.6Notes: . 2523.7Example use: . 2524 Copyright Notice . 262AD Reporting by Dovestones Software (Infoopia Inc.)
25 Support . 263AD Reporting by Dovestones Software (Infoopia Inc.)
1Quick IntroductionAD Reporting can be used to automate your Active Directory audits. You can also perform one offqueries such as locating computers that haven’t been used in the last six months. You can also use it toclean up your Active Directory by easily identifying unused or obsolete user and computer accountsbased on their last logon time and account status. You can use the built-in scheduler to run scheduledreports, perform actions such as disabling accounts, removing the user from sensitive groups etc.2System RequirementsMicrosoft .Net 4.5 FrameworkMicrosoft Windows 7, 2008 R2 or later3Main features 4Pre-built and custom reportsAccurately locate the last time users and computers were used.Detailed account statusAutomate reports and bulk changesBuilt-in schedulerPowerful bulk administration toolsMove, Delete or Disable redundant accountsCommand line operationEmail, print or export reportsNo server components or agents to installNo changes to Active Directory requiredInstalling AD ReportingFiles installed by AD ReportingProgram executable: ADReporting.exeName:AD ReportingPath:C:\Program Files (x86)\Dovestones Software\AD ReportingUpon being installed, the software adds a Windows Service, which is designed to run continuously in thebackground to execute the scheduled jobs.Note: Ensure that you have necessary privileges to install and run the productBy default, AD Reporting will be installed as an application, run the self-extracting EXE and follow theinstructions. To continue with the Start-up Wizard, click Next.4AD Reporting by Dovestones Software (Infoopia Inc.)
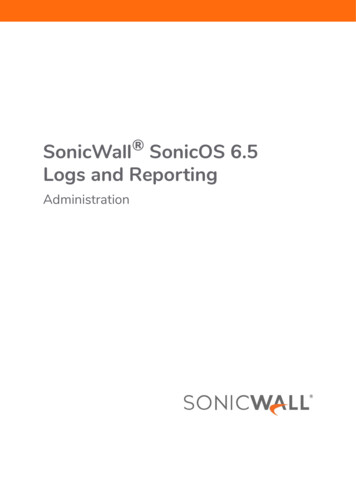
Follow the prompts. A progress bar shows you how long it will take to install AD Reporting.4.1Remove AD ReportingYou can uninstall AD Reporting from your computer by using the Add/Remove Program feature in theWindows Control Panel. 5On the Start menu (for Windows Server 2012, right-click the screen's button-left corner),click Control Panel.Under Programs, Click Uninstall a Program:When you find the program AD Reporting, click it, and then Click Uninstall.Follow the prompts. A progress bar shows you how long it will take to remove AD Reporting.Getting StartedWhen running AD Reporting for the first time you will want to select your domain and choose whichdomain controllers to query.1. Click the Domain Query button in the ribbon and select a Domain you want to query. When youclick the domain you will see a list of DCs discovered in your domain, by default all domaincontrollers will be queried, this will get you the most recent logon time and makes sure you getthe values that are not replicated to all DCs. However, you may not want to query certain DCs (if5AD Reporting by Dovestones Software (Infoopia Inc.)
they are across a slow link for example), in this case select the DCs you want to query and thenclick OK.2. When you have selected the domain and DCs to query click the Credentials button to specifythe credentials to use for the connection. Unless specified the connection is made using thecredentials of the currently logged user.If you are going to use the reports for Office 365 you can specify the credentials here for theconnection.6AD Reporting by Dovestones Software (Infoopia Inc.)
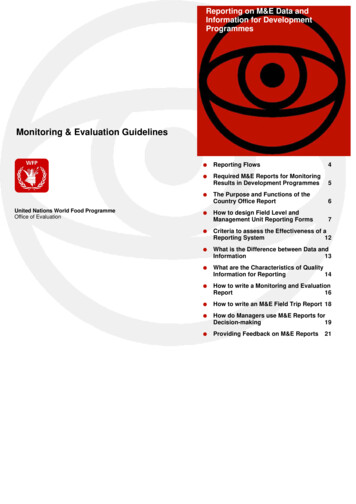
3. Click the Domain button in the ribbon to switch between domains.4. Click the Browse button in the ribbon to see your domain tree, check OrganizationalUnits (OUs) or Groups to query and then OK. Paths to query will be listed below the tree.Details of the users or computers found in the selected OUs or Groups will be displayedin the main grid after we click the Start button.7AD Reporting by Dovestones Software (Infoopia Inc.)
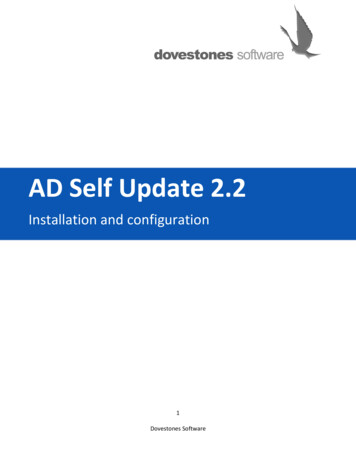
6Columns and AttributesBy default, the values of certain attributes are retrieved such as sAMAccountName (username),lastLogon, accountExpires etc. You can add additional attributes/columns that you want to display byclicking the Add/Remove Columns button. You can create your own preset groups to help with differentreports. These presets can be used in the Scheduler.8AD Reporting by Dovestones Software (Infoopia Inc.)
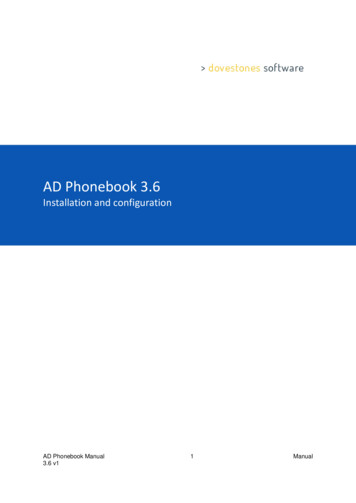
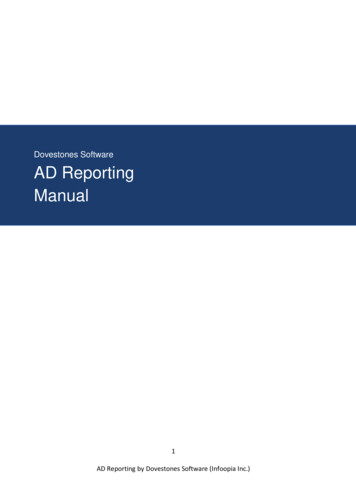
7Starting a query in AD ReportingWhen you have selected the domain(s) that you wish to target and chosen the OUs/Groups to queryyou can run the query by clicking the Start button.7.1Basic FiltersQuick filters allow you to further filter the objects appeared in the AD Reporting grid.9AD Reporting by Dovestones Software (Infoopia Inc.)
By default, AD Reporting contains thirteen Quick filters:1.2.3.4.5.6.7.8.9.10.11.12.13.NoneAccount that have not logged on in the last (Filter days)Accounts that have logged on in the last (Filter days)Accounts that have never logged onAccount with password that expire in less than (Filter days)Accounts with password that expire in more than (Filter days)Accounts with non-expiring passwordAccounts that expire in the next (Filter days)Accounts that have expiredLocked accountsUnlocked accountsDisable accountsEnable account10AD Reporting by Dovestones Software (Infoopia Inc.)
You can set also the days for some filter, so you will be able to track:Accounts that have not logged or that have logged for a certain period of time.Accounts with password that expire in less or more than days.Accounts that are set to expire in the next days.7.1.1 Advanced FilterEach query has a list of parameters that determine which objects that query will find. Eachparameter consists of the following: An attribute, an operator, and a value. An example of aparameter for a User query could be: "Disabled accounts" and this would obviously only returnUsers accounts that are disabled. In this example, the attribute is the "Enable" attribute, theoperator is the "Equals" and the value is " " (check/uncheck the box for enable/disabledaccounts).Filter editor can be customized to meet specific conditions that results from a query. Aconditions has one more clauses, each enclosed in parentheses. Each clause evaluates to eitherTrue or False. A syntax filter clause is in the following form: AD Attribute comparisonoperator value 7.2Logical operatorsManual v3.0
Logical operators are used to create logical combinations of other filter operators. They may benested to any depth. The following logical operators are available: And Or Not And Not or The content for And and Or is two filter operator elements. The content for Not is asingle filter operator element.7.3ConditionYou can combine two or more conditions to build complex queries. You can use the AND and ORoperators into a compound condition. AND, OR and NOT, are logical operators. When you use2
multiple logical operators in a compound condition, NOT is evaluated first, then AND, and finallyOR. Operator’s important characteristics are:-7.4AND connects two conditions and returns true only if both conditions are trueOR connects two conditions and returns true if either condition is true or if bothconditions are trueUnlike AND and OR, NOT does not connect two conditions. Instead, it negates(reverse) a single condition.GroupBy grouping query clauses, you specify that those clauses should be evaluate as a single unitwithin the rest of the query, similar to putting parentheses around an expression in amathematical equation or logical statement.8Add/Remove ColumnsBy default, AD Reporting displays 12 columns of attributes data for objects, as thesaMAccountName and cn attributes.3
To change the display, selects add/Remove Columns. In the Add/Remove Columns dialog box,there is a list of columns to choose from to display in the result pane.4
Add Column: Can be configured to display operational attributes that are not shown by default.Import Columns: Can be used to select properties to import from a domain controllerSave Preset: Save the current selected view giving ID and Name9ActionsThe actions tab contains a set of commands for the most important use of AD Reporting . Thispanel can be quickly accessed by clicking the Actions tab in the grey bar panel or by clicking theicon located in the query tab section.Eight actions can be performed in this tab, let us review section by section.10 Enable/disable accountsIn the details pane, right-click the user or computer or just Click Enable/disable from the toolbarActions menu. Depending on the status of the account, do one of the following:5
To disable, click Disable Account. Click yes to confirm. To enable, click Enable Account, Click Yes to Confirm.11 DeleteIn the details pane, right-click the user account or just click Delete from the toolbar Actionsmenu, and then click Delete. This will remove the selected user(s) or computer(s) object fromActive Directory. Click yes to confirm.6
12 MoveIn the details pane, right-click the user that you want to move, and then click Move. In the Movedialog box, click the folder to which you want to move the user account.In the Move dialog box, click the folder to which you want to Move the user account. Click Yes to Move the user to another folder.Note: To perform this procedure, you must be a member of the Account Operators group,Domain Admins group, or Enterprise Admins group in Active Directory Domain Services (AD DS),or you must have been delegated the appropriate authority. As a security best practice, considerusing Run as to perform this procedure.13 Add to Group, Remove from Group and Remove from All GroupsIn the details pane, right-click the User you want to Add or just clicking the equivalent commandfrom the toolbar actions menu. On the Members tab, click Add/RemoveIn enter the object names to select, type the name of the group, or computer that you want toadd/Remove to the group, and then click OK.7
Click yes to add the user to the group. Click yes to remove the user to the group. Click yes to remove the user from all groups.Note: To perform this procedure, you must be a member of the Account Operators group,Domain Admins group, or Enterprise Admins group in Active Directory Domain Services (AD DS),8
or you must have been delegated the appropriate authority. As a security best practice, considerusing Run as to perform this procedure.14 Set Expire DateIn the details pane, right-click the User you want to set the expiration time or just Click SetExpiry Date from the toolbar Actions menu. To specify an exact time, just specify the periodfrom the current time. Sets the expiration date for an Active Directory account. Click Yes to confirm the account expire at the end of a specific day.15 Export TabAD Reporting reads the Users/Computers from Active Directory, then you can export theseobjects to a data source such as a CSV file, Excel (XLS and XLSX), PDF, database (SQL Server andMicrosoft ODBC for Oracle) or print.9
16 Pre-built ReportsAD Reporting has many pre-built reports, this makes accessing the most commonly used data asquick and as easy as possible. Need to know which users have been created this week? Simplyclick on ‘Prebuilt Reports’ in the ribbon and then ‘User Reports’ followed by ‘Users created thisweek’. There are reports for Users, Passwords, Computers, Groups and Office 365.10
17 Custom ReportsYou may come across a pre-built report that is close to what you need but not exactly what youneed. Click ‘Create Report’ then locate the report that is closest to what you need and clickClone. Then you can give your report a name and modify the time frequency and attributesused. Click Save to complete your report. You will find your custom report under ‘CustomReports’ in the ribbon and also available in the Scheduler if you chose ‘Report’ type schedule.18 Scheduler TabUsing the Scheduler feature of AD Reporting you can schedule various Actions to runautomatically at predefined intervals. Scheduler are often used to automatically add or removeAD objects from groups, send e-mail notifications, clean inactive user and computer accountsfrom Active Directory, move objects between OUs based on certain policies, etc.11
19 Configuring a Scheduled Task itemWhen setting up a task, first decide what will trigger that task to start. A trigger is a set ofcriteria that, when met, starts the execution of a task. You can use a time-based trigger or anevent-based trigger to start a task. Each task can contain one or more triggers, allowing the taskto be started in many ways. If a task has multiple triggers, the task will start when any of thetriggers occur. Click the New icon to start the schedule wizard. Enter the name for the new Scheduled Task, and click Next.12
On the Trigger Type and Once Trigger page, you need to define the time ortime interval at which the task must be run. Select the desired time or timeinterval and click Next. Select your Schedule Type13
Select the frequency14
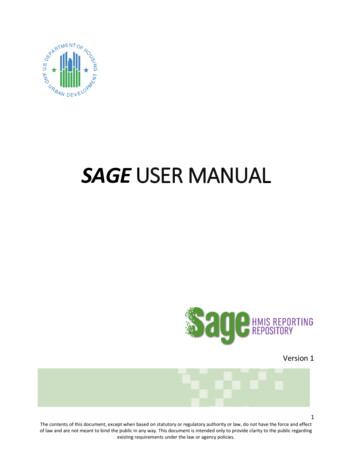
Select the type of schedule, Export or ReportOn the query Information page will change depending on if you chose Export or Report, in eithercase you will need to select the Groups/OUs that the Export/Report will use.The Scheduled Task will be executed on all objects of the chosen type included in the activityscope of the task. You can use the Test Query button to see if you get the desired results.15
16
If you chose Export type schedule then the next step is to choose where to export to,database or file. If you chose Report tyep schedule you will be give the option ofapplying Actions to the report (see later in this section).17
If you chose File in the previous step now select a location to save the file and theoption to have it sent via email. If you choose ‘Email file’ then the file is temporarilysaved and once the email has been sent the file is removed.The final page in the wizard is the summary, here you can review your choices and testthe schedule. Please note if you have applied Actions then these will be run and effectthe objects found in the report.18
If you chose ‘Report’ type towards the beginning of the wizard you will see the Actionspage (below). Here you can specify which actions the task will perform when it isexecuted. To add an action: Click the Add Action button. Select the action you need inthe list.19
You can also automatically send actions report by email. The email you receive will list eachaction and the objects effected by that action.20
20 SettingsThe option Settings provide an additional window to change the default language, enablelogging, Clear the History, set the client timeout and to see the AD Reporting version.You can also find the AD Reporting Command line. For info about this feature go to thecommand line operation content.21
21 Command line operationThe scheduler built-in to AD Reporting contains a wizard that will help you automate ADReporting, however if you do need to use a command line you can use ADReportingCLI.exe. Youcan find the syntax and command line examples for ADREPORTINGCLI.exe below.22 AD Reporting Command Line SyntaxADReportingCLI ERS COMPUTERS}]22
[/COLUMNS:{columns} NotLoggedOnInXDays LoggedOnInXDays NeverLoggedOn PasswordExpiresInLessThanXDays PasswordExpiresInMoreThanXDays AccountExpiresInTheNextXDays AccountExpired LockedAccount UnlockedAccount DisabledAccount EnabledAccount [/SORT:{sort}][/FORMAT:{CSV XLS XLSX PDF DB}][/FILE:{file}][/ENCODING:{ASCII UNICODE ENAME:{tablename}][/TABLEACTION:{NONE CREATE TRUNCATE DROP}][/ACTION:{ENABLE DISABLE DELETE MOVE ADDTOGROUP REMOVEFROMGROUP REMOVEFROMALLGROUPS SETEXPIRYDATE}][/ACTIONPARAM:{param}]22.1 General options:/? /HELP/LANG/LOGDisplays command-line helpChanges the application language (e.g. /lang:de)Enables application logging22.2 Query Options:/DOMAIN/DCThe domain name (e.g. mydomain.com)The list of domain controllers to queryMultiple DCs should be separated by a commaIf none are specified, all DCs will be queried/TIMEOUTThe amount of time in seconds to wait for the DC to respond/USERNAME The username to authenticate to Active Directory/PASSWORD The password to authenticate to Active Directory/OUThe list of OUs or groups to include in the queryMultiple OUs should be separated by a semicolon/OBJECTSThe object classes to be retrievedParameter values: USERS or COMPUTERSMultiple object classes can be separated by a commaIf not passed, the default object class will be USERS/COLUMNS The list of column IDs to be included in the queryMultiple column IDs should be separated by a comma23
/PRESET/FILTERThe preset columns list IDThe filter expression applied to the retrieved datae.g.: /filter:"cn LIKE '%myname%'"/QUICKFILTER Use one of the MS Use to specify the days param to the quick filterUse with quick filters that need a parametere.g.: /QUICKFILTERPARAMS:7/SORTThe sort expression applied to the retrieved datae.g. /sort:"cn ASC"22.3 Export options:/FORMATThe export format (Parameter value: CSV,XLS,XLSX,PDF or DB)File export Options:/FILE/ENCODINGThe full path of the destination fileRequired for CSV, XLS, XLSX and PDF export formatsThe encoding of the file when the export format is CSVParameter value: ASCII, UNICODE or UTF8If not passed, the default encoding will be ASCII22.4 Database export options:/CONNECTIONSTRING The database ODBC connection string/TABLENAMEThe destination table name/TABLEACTIONThe action to perform on the table before inserting thedataParameter value: NONE, CREATE, TRUNCATE or DROP24
NONE: Does not modify the tableCREATE: Creates the tableTRUNCATE: Truncates the tableDROP: Drops and recreates the tableIf this argument is not passed, the default action will be DROP22.5 Action options:/ACTIONDefines the action to execute on the results.Use on of the AMThe parameter to pass to the action if it requires it.For MOVE action, the parameter should be the DN of the destination OUFor ADDTOGROUP and REMOVEFROMGROUP actions, it should be thegroup's DNFor SETEXPIRYDATE action, it should be expiry date in system format22.6 Notes:- The command-line arguments and their values are case insensitive- When an argument value contains spaces, surround it by double quotes22.7 Example use:Export the default columns present for users in TestOU1 and TestOU2 organizationalunits to a CSV fileADREPORTINGCLI /domain:mydomain.com/ou:"OU TestOU1,DC mydomain,DC com;OU TestOU2,DC mydomain,DC com"/preset:default /format:csv /file:"c:\testfile.csv"Export "cn" and "displayName" attributes for users in the "TestOU" organizational unitto a database table named "TestTable" located in a a SQL Server database25
ADREPORTINGCLI /domain:mydomain.com /ou:"OU TestOU,DC mydomain,DC com"/objects:users /columns:cn,displayName /format:db /connectionstring:"Driver {SQLServer};server MyServer;database TestDB;trusted connection no;uid sa;pwd sa"/tablename:TestTable23 Copyright NoticeCopyright 2017 Dovestones Software. All rights reserved.The software contains proprietary information of Dovestones Software (Infoopia Inc.); itis provided under a license agreement containing restrictions on use and disclosure andis also protected by copyright law. Reverse engineering of the software is prohibited.Due to continued product development, this information may change without notice.The information and intellectual property contained herein is confidential betweenDovestones Software and the client and remains the exclusive property of DovestonesSoftware (Infoopia Inc.). If you find any problems in the documentation, please reportthem to us. Dovestones Software does not warrant that this document is error-free.No part of this publication may be reproduced, stored in a retrieval system, ortransmitted in any form or by any means, electronic, mechanical, photocopying,recording or otherwise without the prior written permission of Dovestones Software(Infoopia Inc.).24 SupportIf you require help with AD Reporting or simply need to ask a question please you cancontact us via our support form at https://dovestones.com/support-request-form/ orsend an e-mail to support@dovestones.com.See also the Frequently Asked Questions at https://dovestones.com/faqs/.26
AD Reporting by Dovestones Software (Infoopia Inc.) Follow the prompts. A progress bar shows you how long it will take to install AD Reporting. 4.1 Remove AD Reporting You can uninstall AD Reporting from your computer by using the Add/Remove Program feature in the Windows Control Panel.