Transcription
SwitchvoxUser ManualDigium, Inc.April 7, 2009
SwitchvoxContentsWhat’s New in SMB Version 4.0? . . . . . . . . . . . . . . . . . . . . . . . 4Unified Communications . . . . . . . . . . . . . . . . . . . . . . . . . . . . . . . . . . . . . . . . . . . .4General Features . . . . . . . . . . . . . . . . . . . . . . . . . . . . . . . . . . . . . . . . . . . . . . . . . .4Switchboard Features . . . . . . . . . . . . . . . . . . . . . . . . . . . . . . . . . . . . . . . . . . . . . .5Getting Started . . . . . . . . . . . . . . . . . . . . . . . . . . . . . . . . . . . . . . 7About the User Suite . . . . . . . . . . . . . . . . . . . . . . . . . . . . . . . . . . . . . . . . . . . . . . .7Logging Into the User Suite . . . . . . . . . . . . . . . . . . . . . . . . . . . . . . . . . . . . . . .7Getting Help . . . . . . . . . . . . . . . . . . . . . . . . . . . . . . . . . . . . . . . . . . . . . . . . . . .7User Suite Navigation . . . . . . . . . . . . . . . . . . . . . . . . . . . . . . . . . . . . . . . . . . .8Settings . . . . . . . . . . . . . . . . . . . . . . . . . . . . . . . . . . . . . . . . . . . . 9Modify Account . . . . . . . . . . . . . . . . . . . . . . . . . . . . . . . . . . . . . . . . . . . . . . . . . . .9Call Rules. . . . . . . . . . . . . . . . . . . . . . . . . . . . . . . . . . . . . . . . . . . . . . . . . . . . . . .10Call Rule Sets . . . . . . . . . . . . . . . . . . . . . . . . . . . . . . . . . . . . . . . . . . . . . . . .10Call Rules . . . . . . . . . . . . . . . . . . . . . . . . . . . . . . . . . . . . . . . . . . . . . . . . .10Creating a New Call Rule Set . . . . . . . . . . . . . . . . . . . . . . . . . . . . . . . . .12Managing Call Rule Sets . . . . . . . . . . . . . . . . . . . . . . . . . . . . . . . . . . . . .12Call Blocking . . . . . . . . . . . . . . . . . . . . . . . . . . . . . . . . . . . . . . . . . . . . . . . . .13Messages/Prompts . . . . . . . . . . . . . . . . . . . . . . . . . . . . . . . . . . . . . . . . . . . .13Time Frames . . . . . . . . . . . . . . . . . . . . . . . . . . . . . . . . . . . . . . . . . . . . . . . . . . . .14Creating a New Time Frame . . . . . . . . . . . . . . . . . . . . . . . . . . . . . . . . . . . . .14Editing a Time Frame. . . . . . . . . . . . . . . . . . . . . . . . . . . . . . . . . . . . . . . . . . .15Deleting a Time Frame. . . . . . . . . . . . . . . . . . . . . . . . . . . . . . . . . . . . . . . . . .16Phonebooks . . . . . . . . . . . . . . . . . . . . . . . . . . . . . . . . . . . . . . . . . . . . . . . . . . . . .16Adding Phonebook Entries. . . . . . . . . . . . . . . . . . . . . . . . . . . . . . . . . . . . . . .16System Extension Entries . . . . . . . . . . . . . . . . . . . . . . . . . . . . . . . . . . . .16External Number Entries . . . . . . . . . . . . . . . . . . . . . . . . . . . . . . . . . . . . .18Status Indicator Entries . . . . . . . . . . . . . . . . . . . . . . . . . . . . . . . . . . . . . .18Managing Phonebooks . . . . . . . . . . . . . . . . . . . . . . . . . . . . . . . . . . . . . . . . .18Additional Numbers . . . . . . . . . . . . . . . . . . . . . . . . . . . . . . . . . . . . . . . . .19My Profile . . . . . . . . . . . . . . . . . . . . . . . . . . . . . . . . . . . . . . . . . . . . . . . . . . . . . . .19Conference Setup . . . . . . . . . . . . . . . . . . . . . . . . . . . . . . . . . . . . . . . . . . . . . . . .20General Settings . . . . . . . . . . . . . . . . . . . . . . . . . . . . . . . . . . . . . . . . . . . . . .20Admin Settings . . . . . . . . . . . . . . . . . . . . . . . . . . . . . . . . . . . . . . . . . . . . . . . .22Voicemail / Fax . . . . . . . . . . . . . . . . . . . . . . . . . . . . . . . . . . . . . 23Mailbox. . . . . . . . . . . . . . . . . . . . . . . . . . . . . . . . . . . . . . . . . . . . . . . . . . . . . . . . .23Voicemail . . . . . . . . . . . . . . . . . . . . . . . . . . . . . . . . . . . . . . . . . . . . . . . . . . . .23Faxes . . . . . . . . . . . . . . . . . . . . . . . . . . . . . . . . . . . . . . . . . . . . . . . . . . . . . . .24Putting the Mailbox on Your Desktop. . . . . . . . . . . . . . . . . . . . . . . . . . . . . . .25Sample IMAP Setup . . . . . . . . . . . . . . . . . . . . . . . . . . . . . . . . . . . . . . . . .25Subscribing to Folders . . . . . . . . . . . . . . . . . . . . . . . . . . . . . . . . . . . . . . .28Digium, Inc.2
SwitchvoxVoicemail Options . . . . . . . . . . . . . . . . . . . . . . . . . . . . . . . . . . . . . . . . . . . . . . . .29Managing Greetings. . . . . . . . . . . . . . . . . . . . . . . . . . . . . . . . . . . . . . . . . . . .29Setting Notifications . . . . . . . . . . . . . . . . . . . . . . . . . . . . . . . . . . . . . . . . . . . .31Managing Notification Templates. . . . . . . . . . . . . . . . . . . . . . . . . . . . . . . . . .32Automatically Forwarding Voicemail . . . . . . . . . . . . . . . . . . . . . . . . . . . . . . .34Fax Options . . . . . . . . . . . . . . . . . . . . . . . . . . . . . . . . . . . . . . . . . . . . . . . . . . . . .35Advanced Options . . . . . . . . . . . . . . . . . . . . . . . . . . . . . . . . . . . . . . . . . . . . .36Creating & Sending a Fax . . . . . . . . . . . . . . . . . . . . . . . . . . . . . . . . . . . . . . .36Setting up a Fax Printer . . . . . . . . . . . . . . . . . . . . . . . . . . . . . . . . . . . . . .37Sample Printer Setup . . . . . . . . . . . . . . . . . . . . . . . . . . . . . . . . . . . . .37Sending a Fax . . . . . . . . . . . . . . . . . . . . . . . . . . . . . . . . . . . . . . . . . . . . .43Call History . . . . . . . . . . . . . . . . . . . . . . . . . . . . . . . . . . . . . . . . 44Call Log . . . . . . . . . . . . . . . . . . . . . . . . . . . . . . . . . . . . . . . . . . . . . . . . . . . . . . . .44Call Reporting . . . . . . . . . . . . . . . . . . . . . . . . . . . . . . . . . . . . . . . . . . . . . . . . . . .45The Switchboard . . . . . . . . . . . . . . . . . . . . . . . . . . . . . . . . . . . 46About the Options Menu . . . . . . . . . . . . . . . . . . . . . . . . . . . . . . . . . . . . . . . . . . .46Save Layout . . . . . . . . . . . . . . . . . . . . . . . . . . . . . . . . . . . . . . . . . . . . . . . . . .46Panels . . . . . . . . . . . . . . . . . . . . . . . . . . . . . . . . . . . . . . . . . . . . . . . . . . . . . .47My Presence . . . . . . . . . . . . . . . . . . . . . . . . . . . . . . . . . . . . . . . . . . . . . . . . .47Panels . . . . . . . . . . . . . . . . . . . . . . . . . . . . . . . . . . . . . . . . . . . . . . . . . . . . . . . . .47Current Calls Panel . . . . . . . . . . . . . . . . . . . . . . . . . . . . . . . . . . . . . . . . . . . .47Directory Panel. . . . . . . . . . . . . . . . . . . . . . . . . . . . . . . . . . . . . . . . . . . . . . . .48Parking Lot Panel. . . . . . . . . . . . . . . . . . . . . . . . . . . . . . . . . . . . . . . . . . . . . .48Phonebook Panels . . . . . . . . . . . . . . . . . . . . . . . . . . . . . . . . . . . . . . . . . . . . .48Chat Panel . . . . . . . . . . . . . . . . . . . . . . . . . . . . . . . . . . . . . . . . . . . . . . . . . . .50Queue Panels . . . . . . . . . . . . . . . . . . . . . . . . . . . . . . . . . . . . . . . . . . . . . . . .50CRM Panels . . . . . . . . . . . . . . . . . . . . . . . . . . . . . . . . . . . . . . . . . . . . . . . . . .50Google Maps Panel . . . . . . . . . . . . . . . . . . . . . . . . . . . . . . . . . . . . . . . . . . . .50Custom Panels. . . . . . . . . . . . . . . . . . . . . . . . . . . . . . . . . . . . . . . . . . . . . . . .50Popup URLs. . . . . . . . . . . . . . . . . . . . . . . . . . . . . . . . . . . . . . . . . . . . . . . . . .51Digium, Inc.3
SwitchvoxWhat’s New in SMBVersion 4.0?Welcome to Switchvox SMB version 4.0! The following sections describe the newfeatures in version 4.0, and provide links to more information about how to use thosefeatures.If you are using the Free version of Switchvox, or Switchvox SOHO, you will not beable to automatically update your software to version 4.0.UnifiedCommunicationsSwitchvox SMB 4.0 integrates your phone system with additional communicationtools.FaxSend and receive faxes using Switchvox! You can use your fax machine, or fax filesfrom your desktop computer. For more information, see the following: Fax OptionsTo set up fax notification email addresses and a fax header. You can also set theextension to treat all outgoing calls as faxes. Setting up a Fax Printer and Creating & Sending a FaxFor information on using your desktop computer for faxing.ChatThe new Switchvox private chat server uses the XMPP protocol. The Switchboardoffers a Chat Panel, or you can use your favorite XMPP-based client.Video callingYou can now use video phones with Switchvox. See About Video Calling.IMAP MailboxEach phone-type extension now has a one-stop IMAP Mailbox for voicemail andfaxes. See Putting the Mailbox on Your Desktop.General FeaturesThe new user features add flexibility, and offer great tools for organization.Voicemail GreetingsYou can customize multiple voicemail greetings, specify which greeting should beactive, and assign different greetings to play when you are unavailable versus on thephone. See Voicemail Options.Digium, Inc.4
SwitchvoxOrganized PhonebooksYou can create and manage multiple phonebooks, to keep your contacts organized.You can also see each contact’s ‘Additional Numbers’ that they publish, and createand modify your own additional numbers for them. See Phonebooks.Additional NumbersYou can set up your own ‘Additional Numbers’ so that co-workers can easily call youat the numbers you publish (your mobile phone, or an extension on the manufacturingfloor). See My Profile.Call queue improvementsYou can log into, out of, and pause your status on each queue. When you pause yourstatus, you can add a comment to let people know when you might be back. SeeQueue Panels.Conference AnnouncementA caller can record his name before entering a conference room. Then, when he entersand exits the conference room, the recording is played. See Conference Setup.SwitchboardFeaturesThe new Switchboard features give you some great organizational options, and moreone-click options to Switchvox features. See The Switchboard.Chat PanelThe chat panel includes the company directory for easy communications.Company Directory PanelThe Company Directory panel offers type-to-find, to help you quickly find your coworkers’ extensions.Multiple Phonebook PanelsEach of the your Phonebooks is available as a Switchboard panel.Centralized presenceAcross peered Switchvoxes, Phonebook entries show consistent Presence and calldetails.Presence SettingsPresence settings include: Available Away (includes a comment) Chatty Extended Away (includes a comment) Do Not DisturbDigium, Inc.5
SwitchvoxOne-click optionsThese features are now available with quick one-click access in your Switchboardpanels: Phonebook entries let you dial additional phone numbers. Extended entries let you Barge and Whisper into a call. In/out/pause queue-status icons let you set your status for each queue (including acomment for a paused status)Digium, Inc.6
SwitchvoxThe User Suite: Getting StartedGetting StartedWelcome to Switchvox, the world’s most powerful, yet easy to configure IP-PBX.This document describes how to use the Web-based Switchvox User Tool Suite.Throughout this document, we refer to the User Suite menu options as a path, using‘ ’. Instead of saying “select the Modify Account option from the Settings menu inthe navigation bar, we say “select Settings Modify Account.”IMPORTANT: You may find some features described in this document that are notavailable to you. This is determined by the version of Switchvox you are using, andwhat features your Switchvox administrator has given you permission to use. Pleasecontact your administrator if you have any questions.A b o u tt h eU s e rS u i t eEach user has a Switchvox account that is his or her phone extension, and a passwordfor that account. Ask your Switchvox administrator for your extension number andpassword, and for the URL of your Switchvox User Tool Suite (the User Suite).Logging Into theUser SuiteOn a computer that is on the same network as Switchvox, open a Web browser andenter the URL of the User Suite:https://YourServerIPaddress/mainThe Login page is displayed. Enter your extension and password (provided by youradministrator). Once you are logged in, you may have to change your password. Ifyou do, the strength of your new password is indicated, to help you create a goodpassword. The next time you go to the User Suite, log in using your new password.To log out of the User Suite, click Logout (located in the upper right-hand corner).Getting HelpClick any help link to open a pop-up window with information about a particular tool.Help links are available as question-mark icons and as text links.If a pop-up window does not display, set your Web browser to allow pop-ups from thedomain of your Switchvox server.Digium, Inc.7
SwitchvoxUser SuiteNavigationThe User Suite: Getting StartedThe User Suite navigation bar contains the following dropdown menus:SettingsSet up your account, specify how you want to handle calls, manage yourPhonebooks, and set up your own conference room.Voicemail / FaxManage incoming and outgoing voicemail and faxes, set up voicemail greetings,and customize email notifications for voicemail.Call HistorySee logs of all calls to and from your extension and run usage reports.Digium, Inc.8
SwitchvoxThe User Suite: SettingsSettingsThe Settings area is where you set up your account, specify how you want to handlecalls, manage your Phonebooks, and set up your own conference room.M o d i f yA c c o u n tThis section lists basic information about your account: first and last name, emailaddress, and password. Your administrator may have given you permission to changethis information. If you do make changes, click Modify Extension to save yourchanges. A message is displayed to indicate that your changes were successfullysaved.If you are changing your password, the strength of your new password is indicated asyou type, to help you create a good password. The next time you go to the User Suite,log in using your new password.Digium, Inc.9
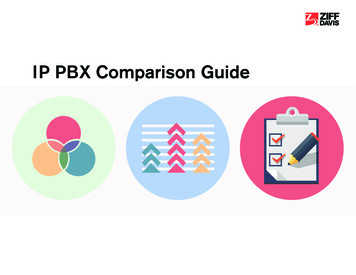
SwitchvoxC a l lThe User Suite: SettingsR u l e sCall Rules control how your calls are handled. Here are some examples: When I’m on the phone, go straight to voicemail If I don’t answer, ‘cascade’ calls to my mobile phone then my home phone Forward all my calls to another extension On weekends and evenings, forward all my calls to another extension Hang up on calls from a certain phone numberCall Rule SetsUnanswered Call Rule Sets specify how a call is handled after a certain number ofrings. Busy Call Rule Sets specify how a call is handled when your line is busy. Youcan set up different rules for those situations, or use the same rules.When a call is unanswered or your line is busy, Switchvox evaluates each of your CallRules in the order listed. The first set is evaluated in order, then the second set, and soon. That means that the ‘During Business Hours’ rule that forwards a call to yourmobile phone must come before the ‘Anytime’ rule that sends a call straight to yourvoicemail.It’s a good idea to test your rules by calling your extension from another phone.Call RulesCall-Rule types include the following:Send to VoicemailThis rule sends a call to your voicemail so the caller can leave a message.Call ForwardThis rule forwards a call to another Switchvox extension. The extension can beanother phone, a call queue, or any other type of extension. Once a call isforwarded to the extension, the call rules for that extension are followed.Call CascadeThis rule rings another extension or an external phone number (i.e., your mobilephone), and if the call isn’t answered then it is passed on to the next rule in the set.This action depends on your Outgoing Call Provider, but if your provider supportsit, you can stack several rules that try and reach you at several phone numbers.Note: If you are cascading a call to an external phone number, be sure to add a ‘9’or other necessary digits that you normally use to dial out.Secret CodeThis rule prompts the caller to enter a secret code, then passes the caller to the nextrule in the set. If the caller cannot enter the correct secret code after the specifiednumber of tries, then you can specify what to do with the call.Ring AllThis rule simultaneously rings up to 3 extensions or external phone numbers. Note:If you are ringing an external phone number, be sure to add a ‘9’ or other necessarydigits that you normally use to dial out.Digium, Inc.10
SwitchvoxThe User Suite: SettingsDigium, Inc.11
SwitchvoxThe User Suite: SettingsCreating a New Call Rule SetTo create a new Call Rule Set under Unanswered or Busy, click the appropriate NewRule Set button. To create a new Busy Call Rule Set, you must first un-check the boxUse my unanswered call rule sets. That makes the Add New Busy Rule Set buttonactive (it turns blue), so you can click it and create a new rule set.The settings are as follows:Rule Set NameEnter a unique name for this rule set.Rule Set Time FrameSelect a time frame from the dropdown. Switchvox evaluates the current date andtime against this time frame, and if they match then the rule is followed. If they donot match, Switchvox moves on to the next rule. See Time Frames for moreinformation.Click on Save Ruleset Settings to create the new rule set and add its rules.1. Select the type of rule to add from the dropdown2. Click Add Rule.3. Specify whether the rule applies to direct calls, queue calls, or all calls.4. Depending on the type of rule you are adding, enter the appropriate extensions orphone numbers.5. If you are adding a Secret Code rule, enter 1 to 10 digits.6. If you are creating an Unanswered rule, specify the number of time to ring yourphone before following this rule.Managing Call Rule SetsIf you have multiple Rule Sets, you can drag and drop them to prioritize themappropriately, or you can delete them and replace them with new rules. Your rulesneed to be put in order because they are executed from top to bottom.You can have different rule sets for different times, and activate or deactivate them asyou see fit. In order to activate a rule set, click on the Activate button to the right ofthe rule, and fill in the time you want the rule to occur. The active rule set will behighlighted yellow and will display how long it will be active on the right side. Thisprocess is the same for Unanswered or Busy Call Rule Sets.Digium, Inc.12
SwitchvoxCall BlockingThe User Suite: SettingsSwitchvox lets you specify phone numbers that you do not want to accept calls from.You can block specific phone numbers, or any numbers that begin with the sameprefix, and you can block them at all times or during specified time frames. You canalso choose how Switchvox handles the blocked calls.Click Add Call Block Rule and a new blank rule section appears. Select PhoneNumber or Prefix from the dropdown, then enter the number. Be careful entering aprefix; if you put in the wrong prefix you might end up blocking more calls than youexpected. Select the action Switchvox should take with the blocked call, then select aTime Frame if you want to control when these calls are blocked. Click Save to saveyour changes to the Call Block Rule.Messages/PromptsIf you use the Secret Code feature in a Call Rule, the default sound prompts areprovided here. You can change the prompts by recording your own sound over yourphone, or uploading a new sound file.To add or change your own sound, click the prompt’s New button. To play the sound,click the prompt’s Play button. To remove a sound that you created, and go back tothe default sound, click the prompt’s Use Default button.Digium, Inc.13
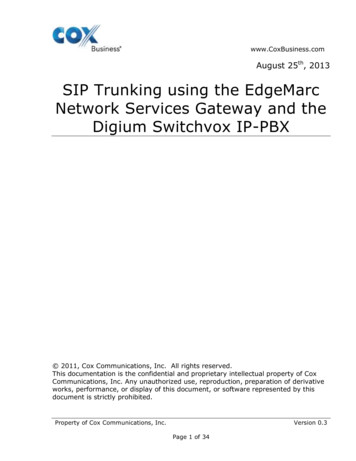
SwitchvoxT i m eThe User Suite: SettingsF r a m e sSwitchvox can operate differently based on the date, day, and time. You can set upyour Call Rules to check for a Time Frame, and then act accordingly. Your Switchvoxadministrator maintains a set of default time frames that you can use, or you cancreate, edit, and delete your own time frames.A time frame is considered valid when the current date and time match any one of atime frame’s rules. Not all of the rules have to match.Creating a NewTime FrameTo create a new time frame, enter a unique name and click Create New.Enter any appropriate Start and End Dates, Start and End Days, and Start and Endtimes, then click Add. Continue adding rules until you have completed the TimeFrame definition.The following are some sample time frame definitions:Mondays 12:01AM to 12:00PM, and Wednesdays 12:01AM to 12:00PMStart DateEnd DateStart DayEnd DayStart TimeEnd Time--MondayMonday----WednesdayWednesday--Digium, Inc.14
SwitchvoxThe User Suite: SettingsEarly MorningStart DateEnd DateStart DayEnd DayStart TimeEnd Time----3:00 AM6:00 AMThe First Week in July 2009Start DateEnd DateStart DayEnd DayStart TimeEnd Time07/01/200907/07/2009----After January 21, 2009Table 1:Start DateEnd DateStart DayEnd DayStart TimeEnd Time01/21/2009-----Weekdays in February, 2009 between 6:00 and 7:00 in the morningStart DateEnd DateStart DayEnd DayStart TimeEnd Time02/01/200902/28/2009MondayFriday6:00 AM7:00 AMEditing a TimeFrameTo change one of your own time frames, click its Edit button. This displays theManage This Time Frame page. Create a new rule, or multiple rules, and delete anyrules that you do not want to include in this time frame. (You cannot edit a rule.)Digium, Inc.15
SwitchvoxDeleting a TimeFrameThe User Suite: SettingsTo delete one of your own time frames, click its Delete button. Be sure that you doindeed want to delete this time frame, then click Yes, Delete Time Frame. The TimeFrames main page is deleted with a message that the time frame was deleted.Before you delete a Time Frame, be sure you do not have any Call Rules that dependon it.P h o n e b o o k sYour Switchvox Phonebooks let you organize your contacts so that you can easilyaccess them from your Switchboard. Phonebooks can include your fellow Switchvoxusers, and external contacts.AddingPhonebookEntriesThere are three types of Phonebook entries:System ExtensionOther extensions on your Switchvox PBX.External NumberPhone numbers outside of your Switchvox PBX. Make sure to enter these as youwould dial them from your phone. For example, if you must dial 9 to get anexternal line, this entry must begin with a 9.Status IndicatorThese entries are only available for Polycom and snom phones that Switchvox hasconfigured in the Phone Setup tool. If you don’t see this type of entry, check withyour Switchvox administrator. A Status Indicator entry controls a line statusindicator light on your phone.This feature is only available in Switchvox SMB.System Extension EntriesPhonebookSelect the Phonebook this entry belongs in. To create a new Phonebook, use theNew Phonebook tab.This feature is only available in Switchvox SMB. Other versions of Switchvoxhave just one Phonebook.Extension(s)Enter at least one extension here. To enter multiple extensions, put a comma (,)after each extension. Click the people icon to see a directory of your Switchvoxextensions. Hold down Ctrl to select many extensions, or hold down Shift to selecta block of extensions.Permission TypeNormal: Shows the user’s Presence, and whether or not he or she is on the phone.Also includes a dropdown that lets you open a chat, call additional numbers, orIntercom the person.Extended: Shows the Normal features, plus the caller ID name and number of theuser’s active calls. It also includes options to monitor, record, whisper, barge into,or pick up the user’s calls.Digium, Inc.16
SwitchvoxThe User Suite: SettingsOnly phone-type extensions can be Extended Permission entries. If you try to addany other type of extension (e.g., a Call Queue), it is added as a Normal entry.You can change an entry’s permission type at any time.If you cannot see or use an option in an Extended Entry, your Switchvoxadministrator has not given you permission to do so.Digium, Inc.17
SwitchvoxThe User Suite: SettingsExternal Number EntriesPhonebookSelect the Phonebook this entry belongs in. To create a new Phonebook, use theNew Phonebook tab.NumberEnter the phone number.NameEnter a name.Jabber IDEnter this person’s Jabber ID to display his Jabber presence on your Switchboardin his Phonebook entry.Status Indicator EntriesPhonebookSelect the Phonebook this entry belongs in. To create a new Phonebook, use theNew Phonebook tab.IMPORTANT: This must be the same Phonebook as the one in the PhoneProvisioning Options for this entry to affect your phone (see ManagingPhonebooks). Also, it must be one of the first entries in the Phonebook if you wantit to display without having to scroll through the entries on your phone.Entry NameEnter a name for this entry. This isn’t required, as you don’t see the entry in yourSwitchboard.Monitor TypeParking Lot: This lights up the line status indicator on your phone when a caller iswaiting in the specified Parking Lot Extension.Queue Login Status: This lights up the line status indicator on your phone whenyou are logged into the specified queue. Enter the Agent Login Extension that youuse to log into this queue, and the queue that you want to monitor.ManagingPhonebooksTo create a new Phonebook, click the New Phonebook tab. Enter a unique name forthis Phonebook, and click Create New Phonebook. This Phonebook is created and isnow available in the Phonebook dropdown when you create a new entry.This feature is only available in Switchvox SMB.To move an entry back and forth as a Normal or Extended entry, drag the entry’sgreen arrow icon.To delete an entry, click its Delete button. Be sure that you do indeed want to deletethis entry, then click Yes, Delete.The Phonebook is refreshed, and this entry is gone.To delete a Phonebook, click its X icon. Be sure that you do indeed want to delete thePhonebook, then click Yes, Delete.The Phone Provisioning Options let you specify a Phonebook to push out to yourphone. If you have a Polycom or a snom phone that Switchvox manages with thePhone Setup tool, you can use this option. When you make changes to a Phonebook,or you want to change the Phonebook that is already on your phone, click RebootDigium, Inc.18
SwitchvoxThe User Suite: SettingsPhone to send the correct Phonebook out to your phone. Rebooting your phone takesa few minutes, and you will not be able to make or receive calls while it is rebooting.Note: If the phone is not on the same network as Switchvox, the phone might not berebooted. In that case, you must reboot the phone manually.Additional NumbersEach Phonebook entry is based on one main extension or phone number, but it canhave also have additional numbers associated with it. This way, you can have onePhonebook entry for a person, and have all of their contact numbers included in thatentry. The Additional Numbers are available via a dropdown (the blue plus sign) inthe Switchboard Phonebook entry.This feature is only available in Switchvox SMB.To see and modify Additional Numbers for an entry, click the entry’s Show button.Additional Numbers can be entered by an extension owner, or you can enter them inyour Phonebook entry.Additional Numbers entered by an extension owner are available when you add theextension to your Phonebook. These numbers appear as locked and cannot be edited,but you can choose to hide them in the Switchboard.Additional numbers that you add to your Phonebook entry can be edited and deleted.You can also copy any Additional Numbers (including the owner’s numbers), andthen edit or delete the copy.M yP r o f i l eYour profile includes Additional numbers that are used to help others in yourorganization find you when you are away from your desk. For example, you can addyour mobile phone number, your home phone number, or even another extension thatyou use frequently. Numbers added here are shown in your co-workers’ Phonebookentries.This feature is only available in Switchvox SMB.To create a new number, click Add A Number. You can set an icon, title, and a phonenumber or extension. The icon and title are displayed in your co-workers’ Phonebookentries. To change the icon for an entry, click the icon.Digium, Inc.19
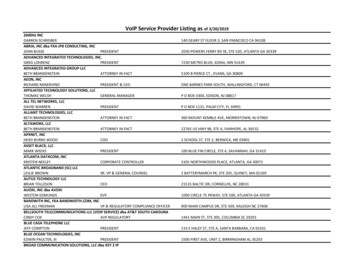
SwitchvoxThe User Suite: SettingsClick the pencil icon to change a number, or the red X to delete a number. Drag thegreen arrows to change the order that your numbers are shown in.C o n f e r e n c eS e t u pThis section lets you create your own conference room. Ask your SwitchvoxAdministrator for the main conference room extension number. When a caller dialsthat number, he or she can access your conference room by dialing your conferenceroom number.This feature is only available in Switchvox SMB.General SettingsYou can change the behavior of your conference room using the following options:Your Conference Room NumberEnter a unique 5-digit number for your conference room. This is the number thatyou give to callers so they can access your conference room. Click the green arrowto have the system pick a random, unused room number for you.Play sound when people enter/leaveCheck this box and select a sound to play to all members of the conference roomwhen a new caller enters the room. There are three options for the sound type thatis played when a caller enters and exits your conference room:Only Sound: Only a sound is played, no information about the caller.Sound with Caller Name: The caller is prompted to record his or her name. Therecorded name is then played along with a sound.Sound with Caller Name (user review option): This is the same as Sound withCaller Name, but it gives the caller an opportunity to listen to the recorded name,then accept or re-record it before joining the conference room.Digium, Inc.20
SwitchvoxThe User Suite: SettingsDigium, Inc.21
SwitchvoxThe User Suite: SettingsPlay Mus
Switchvox Digium, Inc. 6 One-click options These features are now available with quick one-click access in your Switchboard panels: Phonebook entries let you dial additional phone numbers.