Transcription
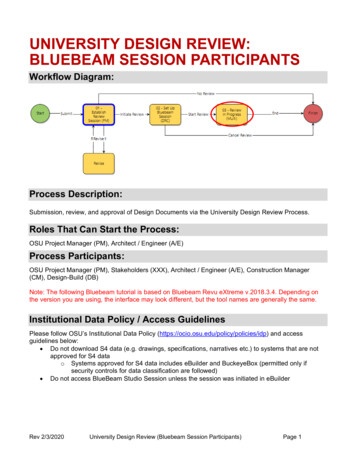
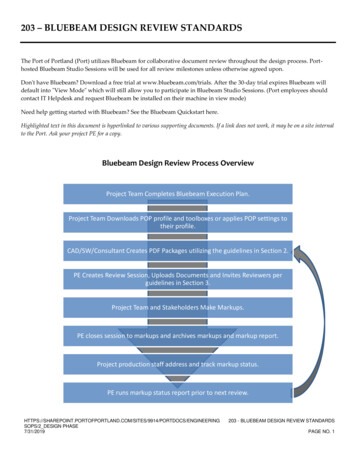
203 – BLUEBEAM DESIGN REVIEW STANDARDSThe Port of Portland (Port) utilizes Bluebeam for collaborative document review throughout the design process. Porthosted Bluebeam Studio Sessions will be used for all review milestones unless otherwise agreed upon.Don't have Bluebeam? Download a free trial at www.bluebeam.com/trials. After the 30-day trial expires Bluebeam willdefault into "View Mode" which will still allow you to participate in Bluebeam Studio Sessions. (Port employees shouldcontact IT Helpdesk and request Bluebeam be installed on their machine in view mode)Need help getting started with Bluebeam? See the Bluebeam Quickstart here.Highlighted text in this document is hyperlinked to various supporting documents. If a link does not work, it may be on a site internalto the Port. Ask your project PE for a copy.Bluebeam Design Review Process OverviewProject Team Completes Bluebeam Execution Plan.Project Team Downloads POP profile and toolboxes or applies POP settings totheir profile.CAD/SW/Consultant Creates PDF Packages utilizing the guidelines in Section 2.PE Creates Review Session, Uploads Documents and Invites Reviewers perguidelines in Section 3.Project Team and Stakeholders Make Markups.PE closes session to markups and archives markups and markup report.Project production staff address and track markup status.PE runs markup status report prior to next /9914/PORTDOCS/ENGINEERINGSOPS/2 DESIGN PHASE7/31/2019203 - BLUEBEAM DESIGN REVIEW STANDARDSPAGE NO. 1
Table of Contents1234Project Kickoff1.1Bluebeam Execution Plan (BBXP)1.2Getting Started with Bluebeam1.3POP Bluebeam StandardsDesign Review PDFs2.1Printing to PDF2.2PDF Setup2.3Document Saving and StorageBluebeam Studio Sessions3.1Coordinating with Sharepoint3.2Starting a Review Session3.3Studio Session Settings3.4Joining a Session and Making MarkupsClosing, Archiving, and Tracking4.1Finishing a Review /9914/PORTDOCS/ENGINEERINGSOPS/2 DESIGN PHASE7/31/2019203 - BLUEBEAM DESIGN REVIEW STANDARDSPAGE NO. 2
1 Project KickoffAt the Project Kick off Meeting, the project team fills out the Bluebeam Execution Plan and reviews the Bluebeamrequirements and SOP.1.1Bluebeam Execution Plan (BBXP)Description:The BBXP is filled out at or prior to the Project Kickoff Meeting. It is intended to document the project team’s use ofBluebeam for design reviews and any deviations from this SOP that are agreed upon by the project team. Once completedand agreed upon by all parties, the BBXP is loaded to the project ePort site.Responsibility: Port Project Manager (PM)The PM may delegate the filing out and archiving of the BBXP to other project team members but it is the PM'sresponsibility to ensure that the BBXP is properly completed and archived.1.2Getting Started with BluebeamDescription:For those unfamiliar with Bluebeam, it is a PDF reader similar to Adobe Acrobat, that allows for multiple parties to viewand markup a PDF document simultaneously. If you do not have Bluebeam software, download the free trial of BluebeamRevu here: https://www.bluebeam.com/trials.The trial version will give you access the full Bluebeam Revu software for 30 days, at which time if a license is notpurchased, will default into View Mode. View Mode is the free version of the software and requires no license (formerlyBluebeam Vu). While in View Mode you will be able to join review sessions and make markups within those sessions.You will not be able to utilize the markup tools outside of a review session. For more information on how to utilizeBluebeam Revu in View Mode, see the quick start guide.Responsibility:The project team is responsible for ensuring that everyone has access to the appropriate software for participation indesign reviews.Port staff can request Bluebeam View Mode be installed on their computers through the IT Help 914/PORTDOCS/ENGINEERINGSOPS/2 DESIGN PHASE7/31/2019203 - BLUEBEAM DESIGN REVIEW STANDARDSPAGE NO. 3
1 Project Kickoff1.3POP Bluebeam StandardsThe Port has developed the following standards to bring clarity and consistency to the markups in a Bluebeam designreview session. To adopt these standards you can download the POP Design Review Profile and Discipline Toolboxeshere (link to come soon).ORCreate or modify your own profile with the following settings:A) Utilize the Discipline color coding for markupsB) Format your username to Last Name, First Initial-Company Abbreviation (ex: Smith, K-POP)C) Set markup Status State Properties to follow Port standardsATo utilize your discipline color, right click on each of the below most commonly used markup types and select“Set as default.” The RGB color values are also provided if you need to change the default properties of othermarkup tools not provided below.Comments Color Coded by Discipline- Right Click Each Comment Type Below and Set as DefaultText BoxHighlightCalloutCloud CalloutRGBCIVILRight Click-Set as defaultCloud (K)81, 119, 158ELECTRICAL/I&CRight Click-Set as defaultCloud (K)253, 192, 134ARCHITECTURAL/ P&DRight Click-Set as defaultCloud (K)102, 102, 102MECH/PLUMBINGRight Click-Set as defaultCloud (K)127, 201, 127STRUCTURALRight Click-Set as defaultCloud (K)153, 51, 102COMM/ITRight Click-Set as defaultCloud (K)240, 2, 127TRC/CAD/SPECRight Click-Set as defaultCloud (K)255, 204, 0OTHERRight Click-Set as defaultCloud (K)0, 255, 0CONTRACTORRight Click-Set as defaultCloud (K)7, 205, 248POP PROJ.MANAGERRight Click-Set as defaultCloud (K)128, 128, 255POP CONST.MANAGERRight Click-Set as defaultCloud (K)255, 128, 0**Note: These are the most commonly used tools, it is suggested that all other tools follow the color codingscheme identified here. To match additional tools, use the properties pane and click "Set As ES/9914/PORTDOCS/ENGINEERINGSOPS/2 DESIGN PHASE7/31/2019203 - BLUEBEAM DESIGN REVIEW STANDARDSPAGE NO. 4
1 Project KickoffBIn order for the settings to be active in a studio session, they must be set prior to starting or joining a studiosession. For clarity, the Port uses a "full last name, first initial - Organization abbreviation" format for the authorfield. This needs to be set in two places: Preferences and Studio Login. This will only take effect in StudioSessions that you have not previously made comments in.1.Preferences2.Under the Studio tab, expand the options next to your sign in name and select "Manage Servers" to open theServer Profiles dialogue box. Open the preferences and enter your username in the appropriate box.Troubleshooting Note: If you are having trouble with getting your username to “stick,” you may have to login tostudio.bluebeam.com under My Profile Default Name, and change it 9914/PORTDOCS/ENGINEERINGSOPS/2 DESIGN PHASE7/31/2019203 - BLUEBEAM DESIGN REVIEW STANDARDSPAGE NO. 5
1 Project KickoffCSetting the Status State Properties provides a visual indication of the status of the markup. This is particularlyuseful when tracking markup progress and during markup review.In the markup list, click on the icon to the right of the Status column and select Manage Status to bring up the ManageStatus Dialog box. Then add a new model titled, POP Review.With the POP Review model highlighted on the left, add the following State on the right with the below settings. Thenmodify the State Properties for “Rejected” and “Completed,” per these standards.20% greyRGB 210, 210, PORTDOCS/ENGINEERINGSOPS/2 DESIGN PHASE7/31/2019203 - BLUEBEAM DESIGN REVIEW STANDARDSPAGE NO. 6
2 Design Review PDFsProperly preparing the PDF package makes navigating and marking up during design review easier.2.1Printing to PDFPrint to PDF:PDF packages are to be created directly from the authoring software, not scanned or otherwise imaged. If usingAutoCAD, utilize the built-in DWG to PDF print driver, not the Bluebeam PDF driver or add-in. In Revit, use Print toPDF utilizing the Bluebeam or other print driver, not from the Bluebeam add-in.Reduce File Size and Purge SHX FontAutoCAD SHX fonts show up in the markup list as comments in a Bluebeam PDF. Check your PDF for any AutoCADSHX font prior to submitting for review by opening the PDF in Bluebeam and verifying there are no markups in themarkup list.If using AutoCAD, see additional documentation and solutions (link to come soon).If using Revit, the most common place for unexpected SHX fonts is nested families that have symbols associated withthem. These need to be changed in the /9914/PORTDOCS/ENGINEERINGSOPS/2 DESIGN PHASE7/31/2019203 - BLUEBEAM DESIGN REVIEW STANDARDSPAGE NO. 7
2 Design Review PDFsFollow the “Reduce File Size” instructions (link to come soon). Unless otherwise instructed, use of the default settings isappropriate.2.2PDF SetupCreating Page Labels:Label drawing package pages as follows: Sheet Number – Sheet TitleExample: C-1 – Civil Utilities Plan1. For sheets with multi-line sheet titles, use the second title line for the page label. Use the Select Page Regionoption of the Create Labels 914/PORTDOCS/ENGINEERINGSOPS/2 DESIGN PHASE7/31/2019203 - BLUEBEAM DESIGN REVIEW STANDARDSPAGE NO. 8
2 Design Review PDFs2.Zoom into the title block and draw a selection box around the Sheet Number. A preview of the page label willthen appear. Click OK if the label is acceptable. Click Cancel to redo the selection box.Region 23.Region 1Check the page labels in the thumbnails window and correct any mislabeled pages.Mislabeled page. Rightclick page and selectRe-Label and enter inthe correct label.Batch Linking:Anywhere a page label is referenced, there should be a hyperlink that allow users to jump to pages from the TOC and tojump to details called out in the drawing 14/PORTDOCS/ENGINEERINGSOPS/2 DESIGN PHASE7/31/2019203 - BLUEBEAM DESIGN REVIEW STANDARDSPAGE NO. 9
2 Design Review PDFsUse the Page Region option in the Batch Link tool to draw a box around the sheet number on any page in the drawing set.Under Link Options, you may choose to havelinks highlighted for easy identification.Bookmarks:Bookmarks allow for easy navigation of the PDF documents. Depending on how the PDF was created and which programit was created from, the bookmarks may automatically be created in the PDF. To check whether bookmarks already exist,just click on the bookmarks icon and verify the bookmarks are appropriately labeled. If there are no bookmarks or thebookmarks are not correct, delete existing bookmarks and create new ones.Label bookmarks as follows:DRAWINGSSPECIFICATIONSDo not include bookmarks for Section Parts.For large drawing sets with multiple disciplines, also create a bookmark higherarchy to make navigation easier. In theBookmarks panel, right click on the first page of the discipline and select "Add Before." Rename the new bookmark 14/PORTDOCS/ENGINEERINGSOPS/2 DESIGN PHASE7/31/2019203 - BLUEBEAM DESIGN REVIEW STANDARDSPAGE NO. 10
2 Design Review PDFsthe discipline. EX: General Information. Highlight all the discipline bookmarks and drag them under the new bookmarkheading you just created. Do this for all disciplines.Bluebeam Cover Page:The Bluebeam cover page must be inserted into every drawing set uploaded to a session. This cover page ensures that thecustom statuses are applied to each document and available in the Studio Session.The Bluebeam cover page can be obtained from the PE and on the Port’s internal network.2.3Document Saving and StorageDrawing packages should follow this naming convention:Project Number - Project Name ABV - Volume (if necessary) - Review Milestone.Example: 99999 - PDX Carpet Replacement - Vol 1 - 60% ReviewDocuments are to be uploaded to the project ePort site in the Drawings folder of the Design Library under the appropriatedesign review folder. (EX: 30% Design Review.) The PE will create the folders as SITES/9914/PORTDOCS/ENGINEERINGSOPS/2 DESIGN PHASE7/31/2019203 - BLUEBEAM DESIGN REVIEW STANDARDSPAGE NO. 11
3 Bluebeam Studio SessionsThe Port is responsible for creating the Bluebeam sessions and uploading the review documents. Documents should befirst stored in the project eport site and then uploaded directly to the studio session.3.1Coordinating with SharepointConnecting to Sharepoint:Start in your Bluebeam Preferences menu and click the Plus button to add the applicable Sharepoint site.Copy and paste the address of the projectSharepoint page here. Delete the part of the addressafter the project number. See Example Below.Add project title here.Specify the folder in which the documents to beloaded are located. (Usually either the Design orDrawings folder.).Project NumberDelete everything afterthe project numberSharepoint Address:Example: PORTLAND.COM/SITES/9914/PORTDOCS/ENGINEERINGSOPS/2 DESIGN PHASE7/31/2019203 - BLUEBEAM DESIGN REVIEW STANDARDSPAGE NO. 12
3 Bluebeam Studio SessionsUploading from Sharepoint:When adding documents to a session, choose the appropriate Sharepoint site and upload the documents directly fromSharepoint.1.To add files from Sharepoint or ePort, you must first connect to that site before starting the Session. See previoussection on how to connect to Sharepoint.2.Check this box to ensure the documents are checked out of eport when added to the review session.3.To open a file from a local drive (non-Sharepoint) select “Open From Disk.”NOTE: Once a file is added to a session, you can't change the file name nor add sheets to the file. To make changes to thefile, remove the file, make the changes, and then re-upload the file to the session. If additional info/pages are expectedlater, a user may want to add blank pages for adding info in the Bluebeam Session.3.2Starting a Review SessionStudio Session naming convention includes an abbreviated version of the project location and title, followed by a hyphenand the review phase. Example: PDX Taxiway B Center and Exits Rehab - 90% ReviewDocument naming convention includes the project number, project name ABV, volume or package and the current reviewphase. Example: 9999-TBAL CCB- vol 2 - 100% ReviewRemember to check all boxes under Options Permissions and check “Restrict Attendees by Email Address.”Set the session deadline for the last day of the review period. The session will become inaccessible at this deadline.Note additional files can be added and permissions can be changed after the session is S/9914/PORTDOCS/ENGINEERINGSOPS/2 DESIGN PHASE7/31/2019203 - BLUEBEAM DESIGN REVIEW STANDARDSPAGE NO. 13
3 Bluebeam Studio Sessions3.3Studio Session SettingsInvite Attendees:There are two main ways to invite attendees.Add email addresses of recipients, include a message with the comment deadline, and press OK to send the invitation. Donot send invites to the review until all documents are uploaded and the review distribution list is complete.ORUse Outlook to send out the session invitation. Copy the invitation link and paste it into an Outlook email. Add the emailaddresses and the message with the comment deadline before sending the email. Again, do not send the invite until alldocuments are uploaded and the review distribution list is complete.Expiration Date:If the session expiration date (review deadline) was not set at the time the session was created, it can be done later via theSession Settings. This means that the deadline can be changed at anytime if an extension is needed. Additionally, thesession can be accessed by the session owners after the session expiration date.3.4Joining a Session and Making MarkupsJoining a Session:There are two main ways to join a Studio Session.If you received an email invite like the one shown below, click on the session ID link and answer "Yes" or "Allow" to anypop-ups. You may also be asked to log into Bluebeam. Note your Bluebeam username and password is unique toBluebeam and not necessarily the same as any of your other Port login credentials. If you do not yet have a Bluebeam useraccount, you can create an account by clicking "Create Account." Your password needs to be between 8 and 32 characterslong with at least one uppercase letter, one lowercase letter, one number, and one special character such as (!@# % 14/PORTDOCS/ENGINEERINGSOPS/2 DESIGN PHASE7/31/2019203 - BLUEBEAM DESIGN REVIEW STANDARDSPAGE NO. 14
3 Bluebeam Studio SessionsYou can also join a session by typing in the Session ID. In the right-hand panel, select the Studio tab, make sure you areconnected to the Bluebeam Studio Server, and click "Join." Type in the Session ID in the pop-up box.JoinEnter provided Session ID numberMaking Markups:Once in the session, make markups by utilizing the default color assigned to your discipline, as defined in Chapter 1. Seethe Bluebeam Training User Guide for a how-to on using markup tools.Markups List:Every mark made on the PDF is listed in the Markups List and includes important information such as author, datacreated, comments, etc. The Markups List is located in the panel at the bottom of the screen and can be expanded orhidden using the blue bar. See the Bluebeam Training User Guide for more information on the Markups List.The Port utilizes the “Reply to Comments” and “Alert Others” features. Reply to specific questions or comments made byother reviewers without cluttering the document itself. Right click the comment needing a reply and select Reply. Typethe reply. The Markups List will record the text along with appropriate ES/9914/PORTDOCS/ENGINEERINGSOPS/2 DESIGN PHASE7/31/2019203 - BLUEBEAM DESIGN REVIEW STANDARDSPAGE NO. 15
4 Closing, Archiving, and TrackingAt the end of the review period, the Project Engineer is responsible for creating a markup report and saving the revieweddocuments to the project ePort site. Additionally, tracking the status of markups throughout the review will help projectteams pick up comments more efficiently.4.1Finishing a Review SessionArchive Documents and Restrict Access:At the end of the review period, the marked-up documents are saved back to ePort along with a markup report. Thereview session permissions are then adjusted to allow the project production team to track progress through the customstatuses but prevents additional comments from being added.Finish SessionChoose to Overwrite Existing and the documentwith markups will be saved back to its originallocation, the Eport design review milestonefolder. It is recommended to overwrite existingas best file management practice.Save a PDF summary reportof the markup history to thesame Eport location.Under Studio Session Settings Permissions, adjust the settings for the general attendees to only allow printing andsaving, deny all others. Add the production team members and set "allow" for all permissions except "Full Control." Thisgives reviewers the access to see their past markups but only allows the production team to reply to comments, changestatuses, etc.Prior to the next review milestone, run a markup report in CSV or PDF format. This report can be saved to ePort,distributed to the project team, and/or included in the Bluebeam session for the next review TES/9914/PORTDOCS/ENGINEERINGSOPS/2 DESIGN PHASE7/31/2019203 - BLUEBEAM DESIGN REVIEW STANDARDSPAGE NO. 16
4 Closing, Archiving, and TrackingConfigure the report by selecting the relevant columns, how it's organized through the "Filter and Sort" Tab, and the filelocation under the "Output" 14/PORTDOCS/ENGINEERINGSOPS/2 DESIGN PHASE7/31/2019203 - BLUEBEAM DESIGN REVIEW STANDARDSPAGE NO. 17
PDF utilizing the Bluebeam or other print driver, not from the Bluebeam add-in. Reduce File Size and Purge SHX Font AutoCAD SHX fonts show up in the markup list as comments in a Bluebeam PDF. Check your PDF for any AutoCAD SHX font prior to submitting for review by opening the PDF in Bluebeam and verifying there are no markups in the markup list.