Transcription
Integrating Cisco UCS with vSphere Distributed Power ManagementIn the current economic and environmental climate there is a focus on increasing the efficiency of ITinfrastructure by increasing the utilization of hardware through techniques like virtualization, andactively reducing the power consumption when workload levels are low.vSphere’s Distributed Power Management (DPM) is a technique to actively manage down powerconsumption of a vSphere cluster by shrinking the amount of powered up servers when workload levelsare low. vSphere can turn Cisco UCS blades on and off via the Intelligent Platform ManagementInterface (IPMI).This article explains how to configure both vSphere and UCS to create the IPMI connections and enablevCenter to manage down the power consumption of Cisco UCS during low workloads.There are four steps to integrating UCS with vSphere DPM via IPMI:1.2.3.4.Define the IPMI Policy in Cisco UCSConnect the IPMI Policy to the ESX host Service ProfileDiscover the Service Profile server’s BMC IP and MAC addressConfigure IPMI in vCenterAdditional useful resources are provided at the end. This note is part of the Cisco Support Community post you can find on the web horSascha Merg is a leading Cisco Consulting Systems Engineer specializing in Unified Computing System in Europe.View Sascha’s LinkedIn Profile1. Define the IPMI Policy in Cisco UCS
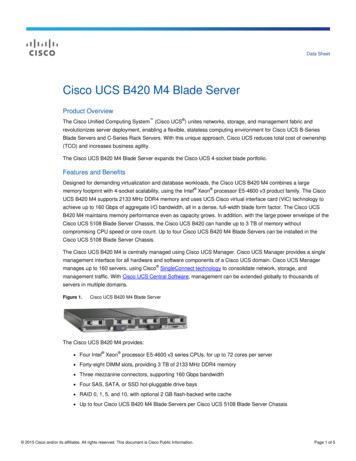
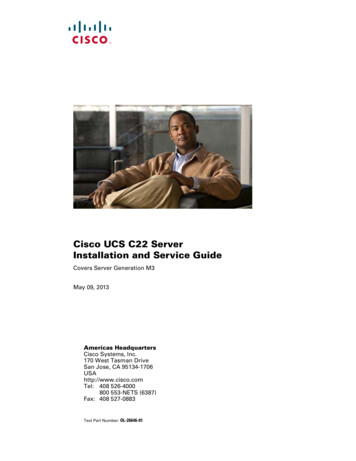
First of all you need to enable IPMI on a blade. To do so you create a new IPMI policy. Within UCSManager, go to the Server tab and drill down to the organization where you want to create this policy,then click on the green "Add" icon on the right and select "Create IPMI Profile".In the new window you provide a name, in this example "ESX". Then you need to add a user to thisprofile. In our example we specify "vmware" as username and "cisco123" as password. The BMC chip onour blade will ask for these credentials.
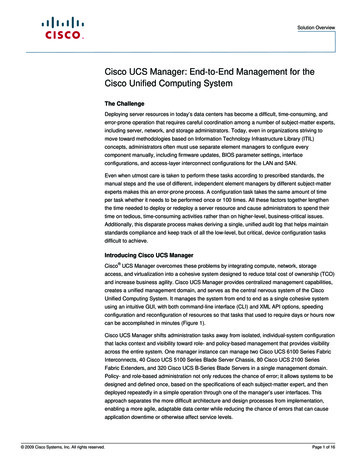
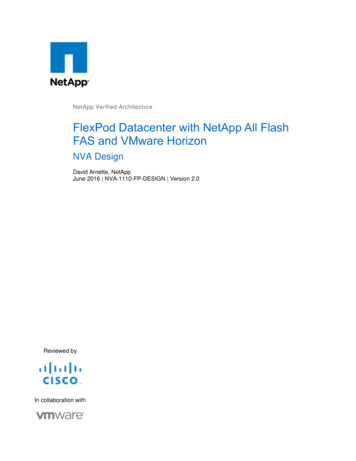
Once you are done you can confirm all windows. Done!2. Connect the IPMI Policy to the ESX host Service ProfileTo enable the new IPMI policy you have to add it to your Service Profile. In our example I select the ESXService Profile and click on Policies, then select the new ESX IPMI policy from the dropdown list:
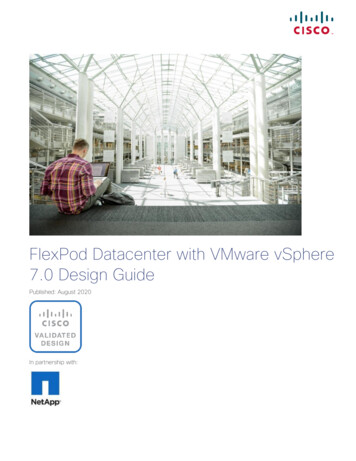
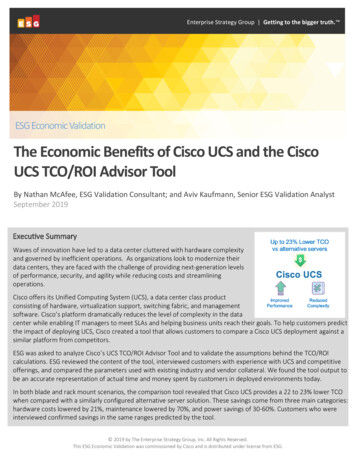
To submit the change you have to click on "Save Changes". This does not require a reboot and will be inplace immediately.3. Discover the Service Profile server’s BMC IP and MAC addressLater on we will have to specify the IP and MAC address of the BMC on our blade. We can get this fromthe Inventory tab of our blade. Your Service Profile is associated to a blade server. Pick that blade serverfrom the hardware list or via the Service Profile (there is a link to it on the "General" page of the ServiceProfile). On the Server you click on "Inventory" and then on "BMC". On this page you will see theassociated IP and MAC address:
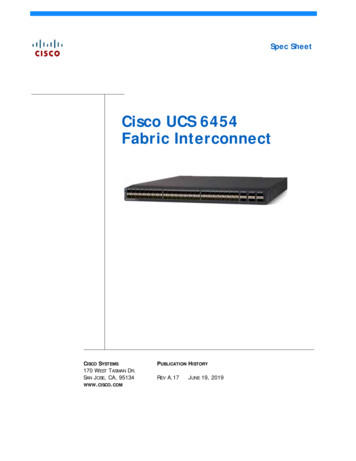
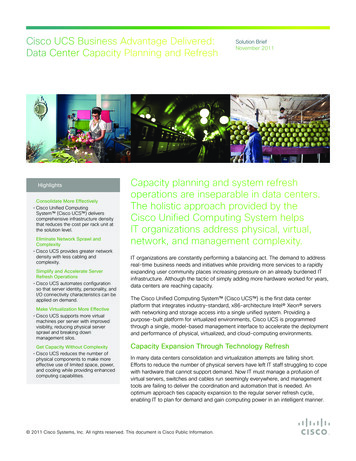
Write down the IP and MAC address of the Management Interface.4. Configure IPMI in vCenterWithin your vCenter, select the corresponding ESX host on which you enabled IPMI earlier in the UCSManager. Click on "Configuration", then "Power Management". You are now in the right place to do theIPMI/iLO Settings for Power Management. Click on "Properties" to define the settings. Right here you fillin the values that you wrote down in the previous step: username and password from the IPMI profile,IP and MAC address from the BMC:
That's all! vCenter will verify the values and throw an error message if something is wrong (i.e. IP orMAC address). You could now try the features by selecting your ESX cluster and modify the PowerManagement options. You can first try with "Manual" and then put your host in Standby mode. It shouldwork :)
Important NoteThe BMC IP of each blade is dynamically assigned when a Service Profile is associated to a blade inUCSM. If a Service Profile is disassociated from a blade and then re-associated it is likely to get adifferent BMC IP from the pool of Management IPs, even if the Service Profile is applied to the samephysical blade.
So, if you disassociate/associate a Service Profile for a vSphere OS that is being accessed via IPMI byvCenter, you must manually perform steps 3 and 4 above again to make sure that vCenter is using thecorrect (new) IP.Why? This is by design because the system should allow for many Service Profiles to be created with theunderstanding that not all of them will be active at one time (over-commitment).What impact does this have? If you don’t keep the vCenter and UCSM configurations synchronizedthen you have the possibility that DPM is managing the “wrong host”. This happens when youdisassociate your ESX Service Profile from a blade and the Mgmt/BMC IP is released back into the pool.Then another ESX Service Profile could pull that out of the pool and be managed by DPM even if that’snot the intention.What can you do about it? If you think you can manage the synchronization manually between vCenterand UCSM, so that when an ESX Service Profile is disassociate and then associated (e.g. when a bladeneeds hardware maintenance), then make sure your Standard Operational Procedures for Service Profiledisassociation/association include this “DPM Synchronization” Step.In a future release of UCSM the Mgmt IP of the blade BMC that is assigned to the Service Profiledynamically upon association will be made “sticky” to avoid this problem: NOTE, however, this meansthat if you are overcommitting your hardware with more Service Profiles than blades, then you needmany more Mgmt IPs – as always, it’s a balance Resources vSphere DPM Performance Best PracticesCisco UCS IPMIIPMI on Wikipedia
This article explains how to configure both vSphere and UCS to create the IPMI connections and enable vCenter to manage down the power consumption of Cisco UCS during low workloads. There are four steps to integrating UCS with vSphere DPM via IPMI: 1. Define the IPMI Policy in Cisco UCS 2. Connect the IPMI Policy to the ESX host Service Profile 3.