Transcription
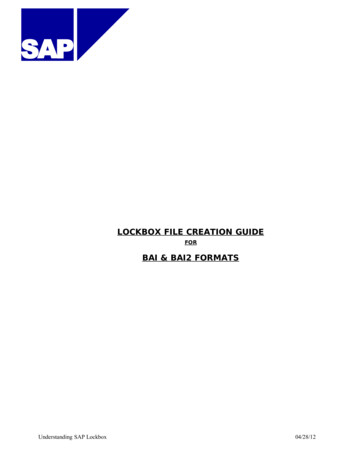
REDCap’s Custom Record Status Dashboard Plugin – Users GuideThis guide describes the configuration of the Custom Record Status Dashboard plugin. This tool provides a way to customize the view and behaviorof the Record Status Dashboard within REDCap. You can create several customized dashboards to fit your project’s needs. The custom dashboarddoes not replace the traditional Record Status Dashboard that shows all records and events.A custom record status dashboard allows you to build separate record status views to support various workflows in your project. With this feature,you can exclude certain forms and/or events to make it easier to read and faster to render - either by using the configuration panel (“CustomizeDashboard”) or by clicking on the red X in the right-hand corner when hovering over the column headers. You can also add record-level filters toomit those records you are not concerned with. For example, you could exclude those records from the Record Status Dashboard that have beenexcluded from the study or have been marked as Complete. The filtering functions the same way as using branching logic (i.e., [excluded] ‘1’ or[gender] ‘2’) or the filtering feature when creating Reports. Lastly, there are a number of visualization enhancements, such as row grouping andvertical alignment, that make the table easier to read. Users with project-design rights can save custom dashboards as bookmarks that can be usedby other users on the project.This plugin has been added to the UF CTSI’s REDCap system and is available for your use. Using this plugin is a multi-step process requiring theREDCap form designer to add a project bookmark and testing to verify the rules in the filtering were composed correctly.Follow the steps below to setup the plugin for your project and verify it is working.Add the Custom Record Status Dashboard Bookmark to your Project1) From the Project Setup page, click on Add or edit bookmarks.2/15/2017
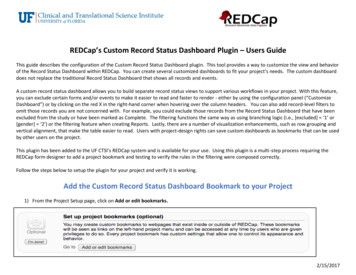
2) Give the Bookmark a name like “Custom Record Status Dashboard” under Link Label and paste the following URL into LinkURL/Destination: custom-dashboard3) Make sure to check the box to Append project ID to URL.4) Click on Add.The result should look like this:2/15/2017
To use/edit the Custom Record Status Dashboard, click on the bookmark name under Project Bookmarks.Customizing your Record Status Dashboard1) Click on Customize Dashboard2/15/2017
2) Dashboard Title: Give the dashboard a name that describes what it has been customized for, such as “Included patients,” “IncompleteRecords,” or “Event 1 Data.”3) Description/Instructions: Enter any notes you want the users of this dashboard to see. For example, you might want to list instructions forthe different groups or roles who will use this report. Any text added here will appear at the top of the dashboard.2/15/2017
4) Custom Record Label: Enter a custom label if you want. It will apply to all records in this dashboard.5) Filter Logic: Enter filter logic statement here. Similar to branching logic, if the statement evaluates to true for a report, that report will bedisplayed.6) Excluded Forms: Click on the pencil to exclude any forms you do not want to display on the dashboard.7) Excluded Events: Click on the pencil to exclude any forms you do not want to display on the dashboard.8) Click on Save New Dashboard2/15/2017
Finished result will look something like this:2/15/2017
Dashboard") or by clicking on the red X in the right-hand corner when hovering over the column headers. . Users with project-design rights can save custom dashboards as bookmarks that can be used by other users on the project. This plugin has been added to the UF CTSI's REDCap system and is available for your use. Using this plugin is a .