Transcription
Application NoteUnique Keys for ATSHA204Features Use of the Atmel ATSHA204 unique serial number and a Root Key to create aUnique Key (Diversified Key) Configuring the ATSHA204 with Unique Keys Authenticating the Unique Key using a Host ATSHA204 containing the Root Key Description of the Diversified Key Calculator in ACES (Atmel Crypto EvaluationStudio) Demonstration of Host validation using the DeriveKey command Demonstration of Host validation using the GenDig command Pseudo Code for Host validation — for systems that do not have a Host ATSHA204DescriptionA unique key can be created for each Client based on its serial number and a RootKey. This is referred to as key diversification. Since each Client device is programmedwith a unique secret, the Diversified Key is of less value to an attacker.This walkthrough will configure the ATSHA204 device with a Diversified Key based oncryptographically combining a Root Key with the ATSHA204 Serial Number which isguaranteed to be unique. After configuring the Diversified Key, this walkthrough willcontinue with a step by step to writing this Diversified Key to the Client device.Once the Client is configured, an explanation of how a system can validate theconfigured key by performing a MAC on the Client Diversified then comparing theresulting digest to the digest generated by an equivalent cryptographic calculationusing the Client Serial Number and the Root Key.A demonstration of how the GenDig command or the DeriveKey command can beused by an ATSHA204 Host device to validate the ATSHA204 Client Diversified Keywill also be Keys-ApplicationNote 042013
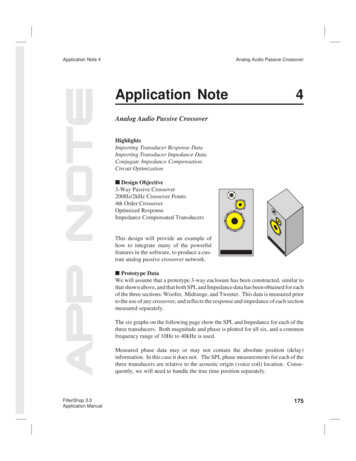
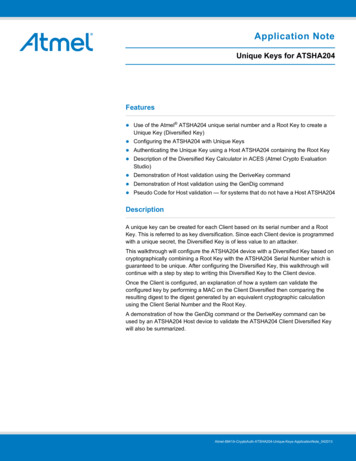
1.Diversified Key DescriptionAs shown in Figure 1-1, the Host authenticates a Client Diversified Key using the Root Key that was used to calculate theClient Diversified Key. The Diversified Key calculation cryptographically combines the Client Serial Number with the RootKey that is stored on the Host. Since Diversified Keys are based on a Root Key, the Host only needs knowledge of theClient Serial Number to validate the Client Diversified Key.Figure 1-1. Host Authenticates a Client Diversified Key Using the Root KeyHostClientEmbedded MicroprocessorHardware Security iversifiedKeyStorageChallenge5Diversified KeySHA-256HashCalculatorFor optimalsystem levelsecurity,implement HostHardwareSecurity IC.SHA-256HashEngine64Response7Do TheyMatch?8NOYESRandomNumberGeneratorEvery Client has a Unique Key — Loss of One Does Not Compromise All2Unique Keys for ATSHA204 Keys-ApplicationNote 042013
2.Walkthrough StepsThe steps in this section describe the process of configuring and authenticating diversified keys.2.1Device ConfigurationFor this walkthrough, start by setting up the Configuration zone within the ATSHA204 device. This configuration will actas both a Host and Client ATSHA204. This configuration uses a single device to demonstrate the concepts; in an actualsystem the Host device would be separate. Table 2-1 gives both the description and configuration bytes for each slotused.Table 2-1.Slot00010203Slot ConfigurationsTitleDescriptionClient Diversified KeyClient Slot: This slot will be diversified using the SerialNumber and the Host Root Key.Host TargetHost Root KeyHost Root KeySlot ConfigurationHost Slot: This is the target slot defined for the DeriveKeycommand.Read – Is SecretWrite – NeverBytes – 8F 8FRead – Is Secret, CheckOnlyWrite – DeriveKey (parent 2)Bytes – 9F 32Root used for key diversification: Use the DeriveKeyCommand to verify the Client Diversified Key. This key is tobe programmed on the Host ATSHA204.Read – Is SecretRoot used for key diversification: Use the GenDigCommand to verify the Client Diversified Key. This key is tobe programmed on the Host ATSHA204.Read – Is Secret, CheckOnlyWrite – NeverBytes – 8F 8FWrite – NeverBytes – 9F 8F1.Launch ACES Configuration Environment (CE) with an unlocked ATSHA204 device (use an AT88CK101 or anAT88CK454 development kit).2.Select Configuration Zone in the Device Navigator as shown in Figure 2-1.Figure 2-1. Select Configuration Zone3.Click on the SlotConfig00 memory location in the Memory map.Unique Keys for ATSHA204 Keys-ApplicationNote 0420133
4.The Write Bytes dialog box will be displayed as shown in Figure 2-2.Figure 2-2. Write Bytes Dialog Box — SlotConfig005.6.Type the configuration for Slot 00 in the SlotConfig00 field from Table 2-1 (8F 8F). Repeat for Slot 01 (9F 32). Repeat for Slot 02 (8F 8F). Repeat for Slot 03 (9F 8F).Lock the Configuration zone. Select Tools Lock Zones from the menu. The Lock Zone dialog box will be displayed as shown in Figure 2-3. Select the Lock Configuration Zone check box and click on the Lock Zones button. The Lock Successful message will be displayed.Figure 2-3. Lock Zone Dialog Box4Unique Keys for ATSHA204 Keys-ApplicationNote 042013
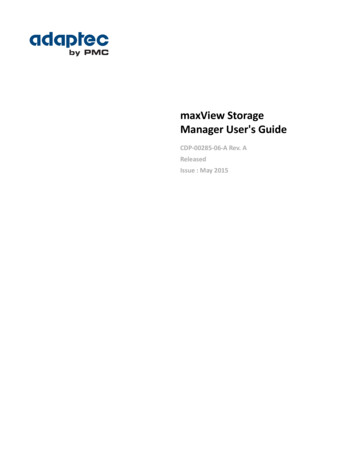
7.Launch Diversified Key Calculation dialog box. Select Tools Calculate Diversified Keys from the menu. The Diversified Key Calculation dialog box will be displayed as shown in Figure 2-4.Note: This dialog box dynamically updates the calculated Diversified Key as inputs are modified. The calculation used for this dialog box is defined by the DeriveKey command.Figure 2-4. Diversified Key Calculation Dialog Box8.9.Set the Diversified Key Inputs as per the configuration shown in Table 2-1. Set the Host Target Slot to 1. Set the Root Key Value to all threes (Use unique secret here if you have one). The Device Serial Number will be read from the device and pre-loaded. Set the Serial Number Pad to all sevens (Any pad is ok. Typically all zeros).The Input Bytes refer to the bytes that will be passed to the Atmel ATSHA256 engine. The bytes and byte order are defined in the GenDig command. The TempKey is the SN SnPad which can be initialized with the Nonce command.10. The calculated Diversified Key is the result that should be written to the Client Diversified Key (Slot 00).Note: This calculation cryptographically combines the Root Key and the Device Serial Number. Leave the Diversified Key Calculation dialog box open for later use.Unique Keys for ATSHA204 Keys-ApplicationNote 0420135
11. Select Slot 00 in the Device Navigator as shown in Figure 2-5.Figure 2-5. Slot 00 Showing Diversified Key Data12. Client Configuration — Write the calculated Diversified Key into Slot 00 of the ATSHA204. Triple-click on the calculated Diversified Key data in the Calculated Diversified Key dialog box to select allthe data. Copy the data into the clipboard. Click on any location in the Memory zone. The Write Zone dialog box will be displayed as shown in Figure2-6. Paste the Diversified Key data into the Data to Write field. Click on the Write To Zone button.13. Host Configuration — Write Root Key into Slot 02 and Slot 03 of the ATSHA204. Follow these steps to write theRoot Key (all threes or unique key) that was used to generate the Diversified Key.6 Click on any location in the Slot 02 Memory zone. The Write Zone dialog box will display as shown inFigure 2-6. Paste the Root Key data (all threes or unique key) into the Data to Write field. Click on the Write To Zone button. Repeat these Write steps for Slot 03.Unique Keys for ATSHA204 Keys-ApplicationNote 042013
Figure 2-6. Write Zone Dialog Box — Write Slot 0014. Lock the OTP and Data zones. Select the Tools Lock Zones menu. The Lock Zone dialog box will be displayed as shown in Figure 2-7. Select the Lock OTP and Data Zones check box and click on the Lock Zones button. The Lock Successful message will be displayed.Figure 2-7. Diversified Key Calculation Dialog BoxUnique Keys for ATSHA204 Keys-ApplicationNote 0420137
2.2Validating the Diversified KeyThe Diversified Key has now been configured into the Client (Slot 00).Note:The Diversified Key uses the Root Key in the cryptographic calculation that generated it — the Client does notneed to have the RootKey programmed into it.DiversifiedKey SHA256(RootKey, SerialNumber, .)In addition to when the Host has knowledge of the RootKey, only the SerialNumber needs to be available to generatethe DiversifiedKey. Since the SerialNumber can be read from each ATSHA204 Client, the Host can validate theDiversified Key in one of several different ways: Using the DeriveKey command on a ATSHA204 programmed with the Root Key (e.g. Slot 02). Using the GenDig command on a ATSHA204 programmed with the Root Key (e.g. Slot 03). Using the system code that has access to the Root Key. For most systems, this technique is not recommended.Each of these validations of the Diversified Key will be demonstrated.2.2.1Validation Pseudo CodeThe first validation technique that will be examined is the Pseudo Code Host. This technique is not recommended sincemost systems, the Root Key must be used in the clear and cannot be stored securely in firmware. This section is usefulfor secure microprocessors and to illustrate the calculations that are performed internally in the ATSHA204.Diversified Key Validation Pseudo Code — System Code with RootKey// Initialize the communicationsha204p init();// Set the Client devicesha204p set device id(CLIENT ID);// Wake up the ATSHA204sha204c wakeup();// Function Prototype: resultBuf sha204m execute(command, param1, param2,data)// Read the first 32 bytes from the config zone to get the Client Serial NumbersnRead sha204m execute(SHA204 READ, 0x80, 0x00, 0x00);// Parse the Client SerialNumberserialNumber snRead[0:3] snRead[8:12];// Generate a random number on the Host for the 32 byte challengerandChal sha204m execute(SHA204 RANDOM, 0x00, 0x0000, null);// Execute a MAC Command on the ATSHA204 & save the digestparam1Mac 0x00;param2Mac [00, 00];deviceDigest sha204m execute(SHA204 MAC, param1Mac, param2Mac, randChal);8Unique Keys for ATSHA204 Keys-ApplicationNote 042013
// Calculate the Diversified Key using the DeriveKey calculation & a soft SHA256rootKey . // 32 byte secret hereopCodeDk 0x1C;param1 0x04;param2 . // 2 byte slot ID here (LSB byte order 0x0X 00)sn8 . // 1 byte SN[8] heresn01 . // 2 bytes SN[0:1] herezeros . // 25 bytes of 0’s heresnPad . // 23 bytes of pad heredivKey sha256(rootKey opCode param1 param2 sn8 sn01 zeros serialNumber snPad);// Execute a MAC on the calculated Diversified Key// using the calculation of ATSHA204 MAC Command & a soft SHA-256opCodeMac 0x08;otpZeros [00, 00, 00, 00, 00, 00, 00, 00, 00, 00, 00, 00, 00]; // 13 bytes ofzerossn23 [00, 00]; // 2 bytes SN[2:3], use zerossn47 [00, 00, 00, 00]; // 4 bytes SN[4:7], use zerosmacBytes divKey randChal opCodeMac param1Mac param2Mac otpZeros sn8 sn47 sn01 sn23;softDigest sha256(macBytes);// Compare the resulting digests from the ATSHA204 & the soft MACmatch deviceDigest softDigest;Unique Keys for ATSHA204 Keys-ApplicationNote 0420139
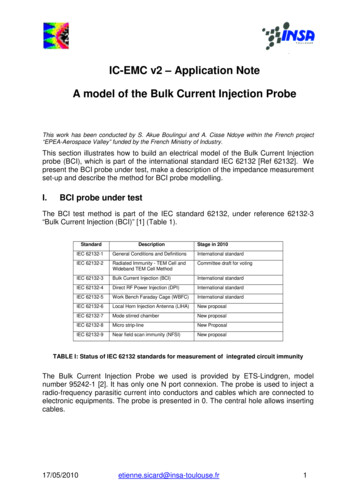
2.2.2Read Client Serial Number and Execute the MAC CommandThe next two methods involve using ACES with Step 1.; read the SerialNumber and Step 2.; execute the MAC Commandon the Diversified Key slot.1.2.Execute Read — Read the Serial Number Select the Tools Command Builder menu. The Command Builder dialog box will be displayed as shown in Figure 2-8. In the OpCode drop down list, select the Read command. Set the Zone to 80 ( 00 and 80) which indicates 32 byte read from the Configuration zone. Set the Address to 0000. Click on the Execute Command button. The Response Packet field will contain the bytes that were read.Isolate the SerialNumber. The nine byte serial number are bytes [0:3] and [8:12]. For this example: 0123375205975AEEEE.Figure 2-8. Read SerialNumber — Command Builder10Unique Keys for ATSHA204 Keys-ApplicationNote 042013
3.Execute MAC — Obtain the Digest for the Diversified Key slot. Leave the Command Builder dialog box open. In the OpCode drop down list, select the MAC command. Set the Mode to 00. Set the KeyID to 0000. Set the Data to the input challenge (all ones here). Click on the Execute Command button. The Response Packet field will contain the digest.Figure 2-9. MAC — Command BuilderUnique Keys for ATSHA204 Keys-ApplicationNote 04201311
2.3Validate Using the GenDig CommandTo validate the Client, follow the following steps using the GenDig Command. This sequence represents the Hostsequence that will be performed to validate the Client.1.Execute Nonce — Initialize TempKey with SerialNumber SnPad. Select the Tools Command Builder menu. The Command Builder dialog box will be displayed as shown in Figure 2-10. In the OpCode drop down list, select the Nonce command. Set the Mode to 03 which indicates the pass-through mode. Set the Data to SerialNumber SnPad. Click on the Execute Command button. The Response Packet field will contain 00, indicating success.Figure 2-10. Nonce — Command Builder12Unique Keys for ATSHA204 Keys-ApplicationNote 042013
2.Execute GenDig — Initialize TempKey with the Diversified Key. Leave the Command Builder dialog box open. In the OpCode drop down list, select the GenDig command. Set the MemZone to 02 which indicates the Data zone. Set the KeyID to 0300 (LSB). This is the Host slot configured for GenDig validation of the Diversified Key. Set the Data to 1C040100. This is OtherData for GenDig that makes the crypto calculation the same asDeriveKey. Click on the Execute Command button. The Response Packet field will contain 00, indicating success.Figure 2-11. GenDig — Command BuilderUnique Keys for ATSHA204 Keys-ApplicationNote 04201313
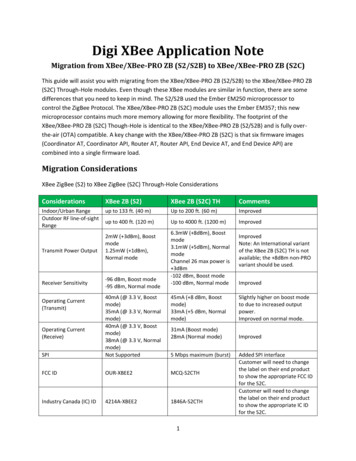
3.Execute CheckMac — Compare Client Digest with the MAC of the calculated Diversified Key (now in TempKey). Leave the Command Builder dialog box open. In the OpCode drop down list, select the CheckMac command. Set the Mode to 06 ( 04 and 02). Use TempKey and match TempKey source flag. Set the KeyID to 0100. This value is ignored by CheckMac when using TempKey. Set the Data to Challenge Response OtherData. Challenge All ones. Response Digest result from the client MAC command. OtherData 08 (MAC OpCode) 00 00 00 00 00 00 00 00 00 00 00 00 (12 bytes of 00). Click on the Execute Command button. The Response Packet field will contain 00, indicating that the digests match.Figure 2-12. CheckMac — Command Builder14Unique Keys for ATSHA204 Keys-ApplicationNote 042013
2.4Validate Using the DeriveKey Command1.Execute Nonce — Initialize TempKey with SerialNumber SnPad. Select the Tools Command Builder menu. The Command Builder dialog box will be displayed as shown in Figure 2-13. In the OpCode drop down list, select the Nonce command. Set the Mode to 03, which indicates the pass-through mode. Set the Data to SerialNumber SnPad. Click on the Execute Command button. The Response Packet field will contain 00, indicating success.Figure 2-13. Nonce — Command BuilderUnique Keys for ATSHA204 Keys-ApplicationNote 04201315
2.Execute DeriveKey — Write the Client Diversified Key into a Slot on the Host. In the OpCode drop down list, select the DeriveKey command. Set the Random to 04. This matches the TempKey source flag of pass-through mode. Set the TargetKey to 0100 (LSB). This Host slot is configured for a DeriveKey target. Click on the Execute Command button. The Response Packet field will contain 00, indicating success.Figure 2-14. DeriveKey — Command Builder16Unique Keys for ATSHA204 Keys-ApplicationNote 042013
3.Execute CheckMac — Compare Client Digest with the MAC of the derived Diversified Key (now in Slot 01). Leave the Command Builder dialog box open. In the OpCode drop down list, select the CheckMac command. Set the Mode to 06 ( 04 and 02). Use TempKey and match TempKey source flag. Set the KeyID to 0100. This value is ignored by CheckMac when using TempKey. Set the Data to Challenge Response OtherData. Challenge All ones. Response Digest result from the client MAC command. OtherData 08 (MAC OpCode) 00 00 00 00 00 00 00 00 00 00 00 00 (12 bytes of 00). Click on the Execute Command button. The Response Packet field will contain 00, indicating that the digests match.Figure 2-15. CheckMac — Command Builder3.Revision HistoryDoc. No.Date8841A04/2013CommentsInitial document release.Unique Keys for ATSHA204 Keys-ApplicationNote 04201317
X X X XAtmel Corporation1600 Technology Drive, San Jose, CA 95110 USAT: ( 1)(408) 441.0311F: ( 1)(408) 436.4200 www.atmel.com 2013 Atmel Corporation. All rights reserved. / Rev.: ationNote 042013Atmel , Atmel logo and combinations thereof, Enabling Unlimited Possibilities , CryptoAuthentication , and others are registered trademarks or trademarks of AtmelCorporation or its subsidiaries. Other terms and product names may be trademarks of others.DISCLAIMER: The information in this document is provided in connection with Atmel products. No license, express or implied, by estoppel or otherwise, to any intellectual property rightis granted by this document or in connection with the sale of Atmel products. EXCEPT AS SET FORTH IN THE ATMEL TERMS AND CONDITIONS OF SALES LOCATED ON THEATMEL WEBSITE, ATMEL ASSUMES NO LIABILITY WHATSOEVER AND DISCLAIMS ANY EXPRESS, IMPLIED OR STATUTORY WARRANTY RELATING TO ITS PRODUCTSINCLUDING, BUT NOT LIMITED TO, THE IMPLIED WARRANTY OF MERCHANTABILITY, FITNESS FOR A PARTICULAR PURPOSE, OR NON-INFRINGEMENT. IN NO EVENTSHALL ATMEL BE LIABLE FOR ANY DIRECT, INDIRECT, CONSEQUENTIAL, PUNITIVE, SPECIAL OR INCIDENTAL DAMAGES (INCLUDING, WITHOUT LIMITATION, DAMAGESFOR LOSS AND PROFITS, BUSINESS INTERRUPTION, OR LOSS OF INFORMATION) ARISING OUT OF THE USE OR INABILITY TO USE THIS DOCUMENT, EVEN IF ATMEL HASBEEN ADVISED OF THE POSSIBILITY OF SUCH DAMAGES. Atmel makes no representations or warranties with respect to the accuracy or completeness of the contents of thisdocument and reserves the right to make changes to specifications and products descriptions at any time without notice. Atmel does not make any commitment to update the informationcontained herein. Unless specifically provided otherwise, Atmel products are not suitable for, and shall not be used in, automotive applications. Atmel products are not intended,authorized, or warranted for use as components in applications intended to support or sustain life.SAFETY-CRITICAL, MILITARY, AND AUTOMOTIVE APPLICATIONS DISCLAIMER: Atmel products are not designed for and will not be used in connection with any applications wherethe failure of such products would reasonably be expected to result in significant personal injury or death (“Safety-Critical Applications”) without an Atmel officer's specific writtenconsent. Safety-Critical Applications include, without limitation, life support devices and systems, equipment or systems for the operation of nuclear facilities and weapons systems.Atmel products are not designed nor intended for use in military or aerospace applications or environments unless specifically designated by Atmel as military-grade. Atmel products arenot designed nor intended for use in automotive applications unless specifically designated by Atmel as automotive-grade.
Click on any location in the Memory zone. The Write Zone dialog box will be displayed as shown in Figure 2-6. Paste the Diversified Key data into the Data to Write field. Click on the Write To Zone button. 1