Transcription
LinkPoint Connect User Guide:Desktop Plus EditionMicrosoft Outlook & Salesforce Integration68 White Street, Suite 2, Red Bank, NJ 07701 1 732.212.8401www.linkpoint360.comCopyright LinkPoint360All Rights Reserved.
LinkPoint Connect User GuideMicrosoft Outlook & Salesforce IntegrationTable of ContentsOVERVIEW . 3About LinkPoint Connect . 3About LinkPoint Connect Editions. 3Additional Documentation . 3A Note about Software Upgrades . 3CONFIGURING DESKTOP PLUS EDITION . 4Understanding Desktop Plus Edition and Meeting Recap. 4Inviting Users from the CRM . 5Inviting Users by Email . 12Completing the Setup Wizard . 16Connecting to Salesforce . 21Connecting to Microsoft Exchange . 25Logging In and Out of the Web Portal . 29Resetting a Forgotten Password . 31Reviewing Organization Options . 34Managing Users . 41Reviewing User Details . 44COMPLETING A MEETING RECAP . 49Recapping a Meeting with the Mobile Application . 49Recapping a Meeting from the Side Panel . 55Working with Microsoft Exchange Meetings . 58Reviewing Meeting Recap Summaries and Updates . 64Winter ’17 ReleasePage 2Copyright LinkPoint360All Rights Reserved.
LinkPoint Connect User GuideMicrosoft Outlook & Salesforce IntegrationOverviewAbout LinkPoint ConnectLinkPoint Connect streamlines data entry and access by enabling users to instantly view CRM data within their emailclient. Users can record inbound/outbound emails to contacts, leads, opportunities, cases, and custom objects with justa few clicks. Users can also instantly create new contacts from an email signature with simple drag-and-dropfunctionality, eliminating manual data entry. Smart Forms make it easy to create or update CRM fields and recordsbased on CRM page layouts without leaving the email client. LinkPoint Connect synchronizes calendars, contacts, andtasks to the CRM directly from the email application, and robust configuration options let users control how and whichdata is recorded and synced.About LinkPoint Connect EditionsOrganizations and individual users work differently in their email client and can have different CRM integration needs.Different teams will work differently with the CRM or have different data access and input needs. And different userswill have different ways or platforms by which they need to engage with their CRM data.LinkPoint Connect Editions were designed to meet client need across a variety of use cases. Download our Fact Sheetfor examples and common reasons why customers choose one (or more) Edition for their email integration. Desktop Edition: Classic for PC users. Record emails, create new contacts or leads, and automatesynchronization of contacts, calendars, and tasks between your email application and CRM.Desktop Plus Edition: Everything from Desktop Edition. Plus you can add meeting notes and entries toSalesforce fields from the Side Panel or a dedicated mobile app.Cloud Edition: Server-side version for mobile & cross-platform users. Nothing to install, admin controlsavailable. Works for Mac, Mobile, and PC users.Contact your Account Executive or sales@linkpoint360.com to discuss the best fit for your organization.Additional DocumentationThis User Guide demonstrates functionality specific to the Desktop Plus Edition of LinkPoint Connect. For a completeguide to all LinkPoint Connect features, download the Desktop Edition User Guide.A Note about Software UpgradesProducts and services provided by LinkPoint360 are automatically updated by default. Individual users may, in mostcases, change their update preferences within LinkPoint Assist. Some organizations may request that upgrades bedisabled by default and then manually released at the discretion of internal IT teams. If you see new features orfunctionality listed but do not see the new features in your instance of LinkPoint Connect, please contact your SystemAdministrator.Winter ’17 ReleasePage 3Copyright LinkPoint360All Rights Reserved.
LinkPoint Connect User GuideMicrosoft Outlook & Salesforce IntegrationConfiguring Desktop Plus EditionUnderstanding Desktop Plus Edition and Meeting RecapDesktop Plus Edition includes all of the LinkPoint Connect email integration features with the added supportfor logging meeting notes via the Meeting Recap feature in the Side Panel and a dedicated mobile application.The Meeting Recap functionality enhances the business value of client interactions by capturing criticalmeeting intel from teams via mobile devices and desktop computers.Meeting Recap makes users more productive by simplifying the feedback process, and integration with Salesforce andMicrosoft Exchange eliminates the need to search for meetings or return to the CRM to manually enter data. And thedata captured fits the format companies need for reporting and compliance.Functionality highlights include: Predefined Workflows: Admins choose the questions and answers they want users to access.Mobile App: Users install the LinkPoint Connect app on their mobile device.Side Panel: Users with LinkPoint Connect installed in Outlook can launch Meeting Recap from the Side Panel.Integration: The content entered by users is synchronized to the related Salesforce records and fields.Summaries: Admins receive a Meeting Recap Summary once each Meeting Recap is complete for enhancedvisibility into team interactions with prospects and customers.Initial SetupMeeting Recap is driven by a core set of questions and answers designed to capture consistent, accurate feedback. Aspart of the implementation process, Admins review and finalize the questions and answers that are exposed to users tocustomize the experience. In order to proceed, Admins must review and complete the Implementation Plan provided byLinkPoint360 Professional Services. Once final, the Meeting Recap icon is added to the Side Panel in Outlook (asneeded) and instructions for mobile app access are provided. With all settings in place, Admins can invite their userswho will receive an email with instructions to complete a setup wizard.Connecting to HostsMeeting Recap prompts users to answer predefined questions using standardized answer options. The answers tothese questions are then pushed to Salesforce as part of the integration. In order for the data to sync to Salesforce,each user must enter their Salesforce credentials in the Desktop Plus Web Portal. For customers who implement theoptional integration with Microsoft Exchange calendars, each user must enter their Exchange credentials as well.Completing a Meeting RecapConnected users can submit Meeting Recap data as needed, reviewing the questions provided and selecting frompredefined answer choices. Admins can configure Meeting Recap to present the same questions to all users for allscenarios or develop custom or conditional questions for different records types, activities, or teams. The answers arecaptured and then synced back to Salesforce fields and manager summaries.Winter ’17 ReleasePage 4Copyright LinkPoint360All Rights Reserved.
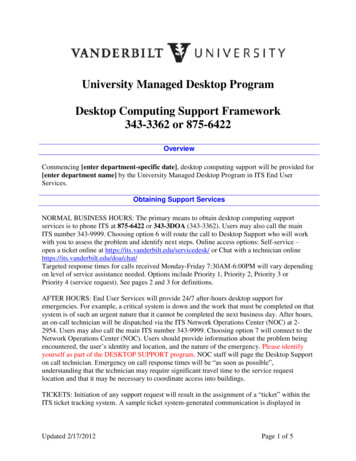
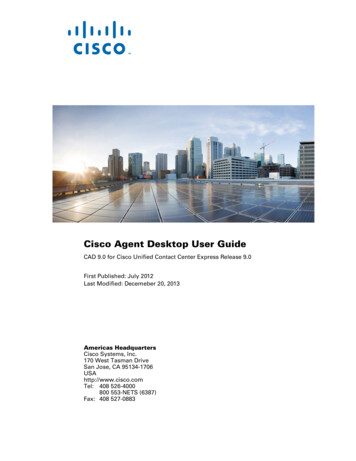
LinkPoint Connect User GuideMicrosoft Outlook & Salesforce IntegrationInviting Users from the CRMDesktop Plus Admins can invite groups of users by using the Import from CRM option. Admins can use thisfeature to include users that already exist in Salesforce, cutting down on data entry and manual usermanagement. In this section, you will learn how to add new users using the CRM import option.Admin Only: This article outlines functionality available only to Desktop Plus Admins. Standard Users shouldadvance to the next article in this User Guide.Warning: We highly recommend that you do not invite any users to the account until your question decks andanswers are complete as part of the initial implementation for your account. Once users have access toMeeting Recap, they will be able to configure their own Profiles, download the mobile application, and begin tosubmit Meeting Recaps. Inviting users prior to finalizing the question decks can cause confusion and result ininaccurate or inconsistent data capture.1Log in to Desktop Plus and select Organization in the left navigation.Winter ’17 ReleasePage 5Copyright LinkPoint360All Rights Reserved.
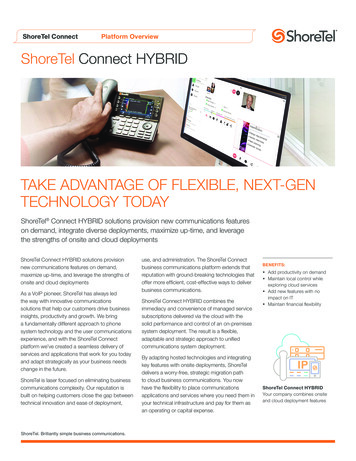
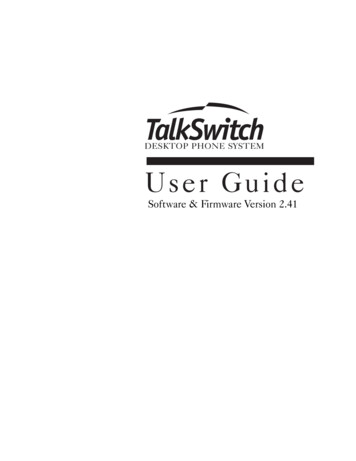
LinkPoint Connect User GuideMicrosoft Outlook & Salesforce Integration2Locate the End Users section and note the available data columns. You can click on the column headers to sortthe data by either Name, Email Address, Enabled, Team, Security Role, or Status.Tip: For first-time access and setup, the only User listed will be the Organization Administrator.3Select the Import from CRM option.Winter ’17 ReleasePage 6Copyright LinkPoint360All Rights Reserved.
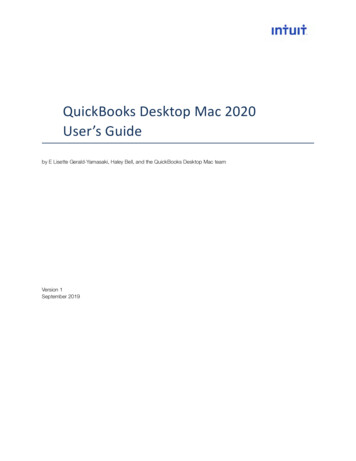
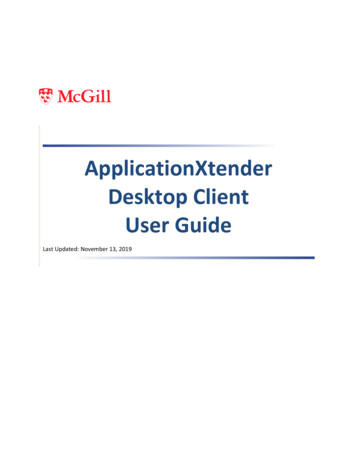
LinkPoint Connect User GuideMicrosoft Outlook & Salesforce IntegrationTip: You will need to make sure you are connected to Salesforce in order to proceed with the import.4Enter criteria in the Search field, and click the Search button. You can search by name or by a Salesforce Profile.5Select the checkbox for each user you want to invite. Click the checkbox at the top of the column to select alllisted users. This will move the selection to the Selected Users table on the right side of the screen.Winter ’17 ReleasePage 7Copyright LinkPoint360All Rights Reserved.
LinkPoint Connect User GuideMicrosoft Outlook & Salesforce IntegrationTip: Importing users by Profile is especially useful if all members of the Salesforce Profile will be assigned tothe same Desktop Plus Edition Team.6Select the Deck for all of the selected users to have access to when entering their meeting notes.Tip: Decks are sets of questions and answers used with Meeting Recap. These are configured during theimplementation process. Depending on your configuration, you have may have multiple Deck options.7Select the Team that you want to assign to all of the Selected Users.Winter ’17 ReleasePage 8Copyright LinkPoint360All Rights Reserved.
LinkPoint Connect User GuideMicrosoft Outlook & Salesforce Integration8Enter the Team Role that you want to assign to all of the Selected Users.Tip: The same Team Role may not apply to all of the users on a specific Team. You can leave the Team Roleblank for the import process and manually assign each Team Role to the users as applicable. Alternatively, youcan import a smaller batch of users so that only users who should be on the same Team and the same TeamRole are selected.Additional Resources: Refer to the Reviewing Organization Options section of this User Guide for moreinformation.Winter ’17 ReleasePage 9Copyright LinkPoint360All Rights Reserved.
LinkPoint Connect User GuideMicrosoft Outlook & Salesforce Integration9Select the Security Role that you want to assign to all of the Selected Users.Tip: The same Security Role may not apply to all of the users on a specific Team. The majority of your usersshould be assigned the Standard User Security Role. If you are importing an entire team, and one User shouldbe designated as Team Administrator, assign all of the users to the Standard User Security Role. When theimport is finished, you can manually edit the single User who should be a Team Administrator and change theirSecurity Role.10Click the Import Selected button. Then click the Close button in the Invite Confirmation window.Winter ’17 ReleasePage 10Copyright LinkPoint360All Rights Reserved.
LinkPoint Connect User GuideMicrosoft Outlook & Salesforce IntegrationTip: Desktop Plus Edition will send an automated email to each User with Setup Wizard instructions.11Note that the imported Users are listed in the End User table for the Organization.Tip: The Status column indicates whether the User has clicked the link in their invitation email to configuretheir Profile via the Setup Wizard. Once the User Profile is configured, the Status will be Accepted. Admins canresend the invitation at any time by selecting the Reinvite link.Winter ’17 ReleasePage 11Copyright LinkPoint360All Rights Reserved.
LinkPoint Connect User GuideMicrosoft Outlook & Salesforce IntegrationInviting Users by EmailDesktop Plus Admins can invite specific users by using the Invite by Email option. This method is especiallyuseful when adding one-off users after an account has been set up. In this section, you will learn how to addnew users using the Invite by Email option.Admin Only: This article outlines functionality available only to Desktop Plus Admins. Standard Users shouldadvance to the next article in this User Guide.Warning: We highly recommend that you do not invite any users to the account until your question decks andanswers are complete as part of the initial implementation for your account. Once users have access toMeeting Recap, they will be able to configure their own Profiles, download the mobile application, and begin tosubmit Meeting Recaps. Inviting users prior to finalizing the question decks can cause confusion and result ininaccurate or inconsistent data capture.1Log in to Desktop Plus and select Organization in the left navigation.Winter ’17 ReleasePage 12Copyright LinkPoint360All Rights Reserved.
LinkPoint Connect User GuideMicrosoft Outlook & Salesforce Integration2Locate the End Users section and note the available data columns. You can click on the column headers to sortthe data by either Name, Email Address, Enabled, Team, Security Role, or Status.Tip: For first-time access and setup, the only User listed will be the Organization Administrator.3Select the Invite by email option.Winter ’17 ReleasePage 13Copyright LinkPoint360All Rights Reserved.
LinkPoint Connect User GuideMicrosoft Outlook & Salesforce Integration4Enter the information into the corresponding fields in the Invite New End User window for First Name, LastName, Email Address, Deck, Team, Team Role, and Security Role.Tip: Decks are sets of questions and answers used with Meeting Recap. These are configured during theimplementation process. Depending on your configuration, you have may have multiple Deck options.Tip: The same Team Role may not apply to all of the users on a specific Team. You can leave the Team Roleblank for the import process and manually assign each Team Role to the users as applicable. Alternatively, youcan import a smaller batch of users so that only users who should be on the same Team and the same TeamRole are selected.Additional Resources: Refer to the Reviewing Organization Options section of this User Guide for moreinformation.5Click the Invite button when you are finished. Then click the Close button in the Invite Confirmation window.Winter ’17 ReleasePage 14Copyright LinkPoint360All Rights Reserved.
LinkPoint Connect User GuideMicrosoft Outlook & Salesforce IntegrationTip: Desktop Plus Edition will send an automated email to each User with Setup Wizard instructions.6Note that the imported Users are listed in the End User table for the Organization.Tip: The Status column indicates whether the User has clicked the link in their invitation email to configuretheir Profile via the Setup Wizard. Once the User Profile is configured, the Status will be Accepted. Admins canresend the invitation at any time by selecting the Reinvite link.Winter ’17 ReleasePage 15Copyright LinkPoint360All Rights Reserved.
LinkPoint Connect User GuideMicrosoft Outlook & Salesforce IntegrationCompleting the Setup WizardAll users must log into the LinkPoint Connect: Desktop Plus Web Portal and complete the Setup Wizard. TheSetup Wizard is designed to walk each user through the configuration process. In this section, you will learnhow to complete the Setup Wizard.Warning: Before you can use the Meeting Recap Side Panel icon or mobile app, you must complete the SetupWizard. The Setup Wizard includes a step to connect to Salesforce which is required to sync a Meeting Recap.1Check your email and locate the message with the Subject Line Welcome: You’re invited to join LinkPointConnect. Select the link Register Your Account link in the email.Winter ’17 ReleasePage 16Copyright LinkPoint360All Rights Reserved.
LinkPoint Connect User GuideMicrosoft Outlook & Salesforce Integration2Enter a password for the Desktop Plus Edition account in the Create Password and Confirm Password fieldsfor the Setup Wizard, and click Submit.3Select a Salesforce Login URL from the drop-down list.Winter ’17 ReleasePage 17Copyright LinkPoint360All Rights Reserved.
LinkPoint Connect User GuideMicrosoft Outlook & Salesforce IntegrationTip: The default setting is Production. You will want to use this option unless: You are testing with a Salesforce Sandbox or Test account. In this case, select Sandbox.You are using a custom URL to access Salesforce as defined by your organization. In this case, selectCustom and enter the URL detai
Mobile App: Users install the LinkPoint Connect app on their mobile device. Side Panel: Users with LinkPoint Connect installed in Outlook can launch Meeting Recap from the Side Panel. Integration: The content entered by users is synchronized to th