Transcription
ApplicationXtenderDesktop ClientUser GuideLast Updated: November 13, 2019
Table of ContentsIntroduction . 3How to request/ access .3Sign in to ApplicationXtender clients from your computer . 3Sign in to ApplicationXtender tools via RD Web Access . 4Workstation settings . 5First time users: Before logging into Document Manager . 8Document Manager – Application view . 9Document Manager – Query View . 11Document Manager – Index View . 12Document Manager – Script View . 14AX Power Users – switching between environments . 15Image Capture – Application view . 16Image Capture – Patch List View . 17Troubleshooting . 17McGill IT Customer ServicesLast Updated: November 13, 2019Table of ContentsPage 2 of 17
IntroductionApplicationXtender (AX) clients include: Document Manager client is used to create, annotate, index, and retrieve documents. Image Capture client is used for bulk scanning where the users can scan paper documentsto create batches that can be opened using the Document Manager client.Target audience: Staff who uses Banner INB and need AX tools to view, scan, and/ or indexdocuments.How to request/ accessRequestThe Data Security Designate has to submit the webform (Request access to AX) to grant access forthose who require the AX clients via RD (RemoteApp and Desktop) Web Access or installed ontheir computer.Access AX Clients(Document Manager and Image Capture client) can beoUsed Via RD (RemoteApp and Desktop) Web Access. For more details,see ApplicationXtender tools via RD Web AccessoInstalled on your computerSign in to ApplicationXtender clients from your computerNote: if you would like to have the AX clients install on your computer, you will need ask a DataSecurity Designates in your department/unit to submit the webform (Request access to AX) andprovide a reason why you need AX clients to be installed on your computer.1. Once AX clients are installed on your computer, open Document Manager.2. Sign in with your *Banner UserID and password.*Banner INB UserID and Banner Password:for more information, goto http://kb.mcgill.ca/it/easylink/article.html?id 1001McGill IT Customer ServicesLast Updated: November 13, 2019IntroductionPage 3 of 17
Sign in to ApplicationXtender tools via RD Web AccessFor details on the sign-in procedure, choose the instruction set based on your computer operating system:Windows RD Web Access to Banner INB and ApplicationXtender tools (for ALL users) Start menu for RD Web Access to Banner INB and ApplicationXtender Tools (for IT-managed computers)Mac OS MS Remote Desktop setup for Banner INB and ApplicationXtender ToolsNote: once you have logged into the RD Web Access, choose one the following ApplicationXtender tools icons:McGill IT Customer ServicesLast Updated: November 13, 2019IntroductionPage 4 of 17
Workstation settingsMake sure that 044-ISR AX-Accounts (AX service accounts) are allowed to logon locally and thatyou are able to “Impersonate a client”. This should be done by the System Administrator when AXis installed, but if you have any issues accessing the AX database, you can verify the settings asfollows:1. Go to Start Administrative Tools Local Security PolicyMcGill IT Customer ServicesLast Updated: November 13, 2019Workstation settingsPage 5 of 17
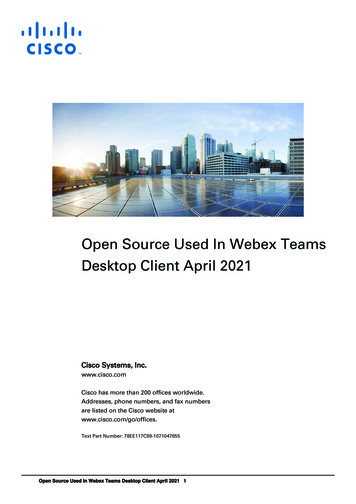
2. Go to Local Policies User Rights Assignment Allow log on locally; click Add User orGroup and enter 044-ISR AX-Accounts if it isn’t there; click OK to add it.3. Go to Local Policies User Rights Assignment Impersonate a client after authentication;if your name is not listed, click Add User or Group.McGill IT Customer ServicesLast Updated: November 13, 2019Workstation settingsPage 6 of 17
4. Enter your McGill Username (first.last@mcgill.ca) or an Active Directory group to whichyou belong in the textbox and click OK.McGill IT Customer ServicesLast Updated: November 13, 2019Workstation settingsPage 7 of 17
First time users: Before logging into Document ManagerMake BANNER.MCGILL.CA your default Data Source:1. Go to Start All Programs ApplicationXtender Desktop Data Source Selector.2. Double-click on BANNER.MCGILL.CA in the list, or select it and click Set as Default;McGill IT Customer ServicesManagerLast Updated: November 13, 2019First time users: Before logging into DocumentPage 8 of 17
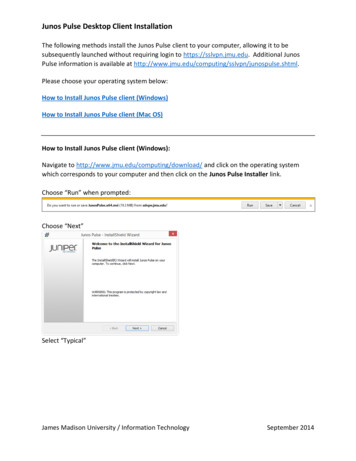
Document Manager – Application viewWhen you enter the Document Manager for the first time, you don’t see the application view. Toview the application window:1. Launch Document Manager:ooFrom Banner INB ORDirectly from your Windows Desktop (click Start ApplicationXtender Desktop Document Manager)When launching from the desktop, you will be prompted to log in with your McGill ShortUsername and Banner/AX Password.2. If the window is empty, click the View menu and select Applications.McGill IT Customer ServicesLast Updated: November 13, 2019Document Manager – Application viewPage 9 of 17
You will now see the applications that you have access to.McGill IT Customer ServicesLast Updated: November 13, 2019Document Manager – Application viewPage 10 of 17
Document Manager – Query View1. From the View menu, select Query.Query windowMcGill IT Customer ServicesLast Updated: November 13, 2019Document Manager – Query ViewPage 11 of 17
Document Manager – Index View1. Log into Document Manager.2. Select the application containing the batch for indexing from the left app view.3. Click Utilities Batch Index (List) 4. Select a batch and click Index.5. Select Document Batch Index New Document.McGill IT Customer ServicesLast Updated: November 13, 2019Document Manager – Index ViewPage 12 of 17
5. Fields and names of indexing fields will be shown.McGill IT Customer ServicesLast Updated: November 13, 2019Document Manager – Index ViewPage 13 of 17
Document Manager – Script ViewWhen you first log into Document Manager, you see the script view (shown below).This view is not used. To disable this view, click View Toolbars and click on Script.The script view will now disappear.McGill IT Customer ServicesLast Updated: November 13, 2019Document Manager – Script ViewPage 14 of 17
AX Power Users – switching between environmentsBy default AX Desktop Suite is configured to point to PROD (BANNER) environment. Some PowerUsers will be required to work with other environments, such as BANQA.To switch to a specific environment:1. In Windows Explorer, go to your local folder: C:\ProgramData (Note: you may have to typeC:\ProgramData into the address bar of Windows in order to see that folder)2. If there is already a file named xscm.config, rename it to xscm.config.LOCAL (this will be abackup)3. Open another Windows Explorer window and navigate to this folder on the \XSCM-Config4. Copy all contents of this folder into C:\ProgramData5. In C:\ProgramData, double click on the appropriate .bat file for the environment you want toaccess (DEV: switchToDEV.bat, QA : switchToQA.bat, PROD : switchToPROD.bat )6. Launch the Data Source selector as usual and follow the normal process.McGill IT Customer ServicesLast Updated: November 13, 2019AX Power Users – switching between environmentsPage 15 of 17
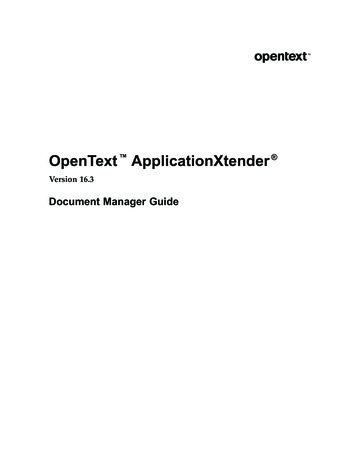
Image Capture – Application viewFirst time users do not see the application view as shown below.To view the application window:1. Launch AX Desktop Image Capture.2. From the menu, click View Applications.You will now see the applications.McGill IT Customer ServicesLast Updated: November 13, 2019Image Capture – Application viewPage 16 of 17
Image Capture – Patch List View1. Right click on the application you want to view and select Batch List The Batch list will appear.TroubleshootingIf you see error messages from the web browser or within the AX Desktop application, refer tothe IT Knowledge Base – search for “Banner Imaging (ApplicationXtender)”.If you need assistance resolving the errors, please contact the IT Service Desk at 514-398-3398or email ITSupport@mcgill.ca.McGill IT Customer ServicesLast Updated: November 13, 2019Image Capture – Patch List ViewPage 17 of 17
Document Manager – Application view When you enter the Document Manager for the first time, you don’t see the application view. To view the application window: 1. Launch Document Manager: o From Banner INB OR o Directly from your Windows Desktop (click Sta