Transcription
iPOLiSmobileEnglishAndroid ver2.8Hanwha’s iPOLiS mobile is an android based dedicatedapplication for smartphones and tablet PCs to remotelymonitor and control Hanwha’s network based products.The iPOLiS mobile application can be downloaded freely andinstalled from Google Play. To search iPOLiS mobile application from Google Play, type“iPOLiS” or “TECHWIN” and run a search, ignoring the letter case. User of previous version software (v1.0) needs to register addeddevices to the newly installed software again. User of version 1.3 orlater does not require re-registering devices after updating the software.Updating will migrate device list to the new software. You can download an application of a previous version on ourwebsite (http://security.hanwhatechwin.com/). If enabled with a password lock, updating for smartphone/tablet PCsother than Samsung Galaxy series may experience problems withupdating. In such cases, disable password lock during updating.
0. Before InstallationTo receive video by connecting your handset to the NW equipment,your handset must satisfy the following requirements.ItemRecommendedCPU1.6GHz OctaCore, 1.9GHz QuadCore or higherRAM2GB or higherAvailable RAM100MB or higherOSAndroid OS 4.4.x, 5.x, 6.xJ The video service involves lots of data transmission, so if you use3G or 4G (LTE) data communication service, excessive fees can becharged according to your service provider’s policy. To receive reliable video support, the network speed shall be as fastas 10Mbps, and when you access the 3G network or if you are underunstable Wi-Fi connection environment, the video can be delayed ordisconnected. iPOLiS mobile 2.8 supports Android OS 4.0 or higher; 4.4 isrecommended. As Wi-Fi connections may not be secure, please install anti-virussoftware on your mobile device. The device testing environment forsoftware quality is as follows:- Samsung Galaxy S4 (Android v4.4.2) series- Samsung Galaxy S6 (Android v6.0.1) series- Samsung Galaxy S7 (Android v6.0.1) series- Samsung Galaxy Note4 (Android v5.1.1) series- Samsung Galaxy Note5 (Android v5.1.1) series- Samsung Galaxy Note 10.1 (Android v4.4.4) series- Samsung Galaxy Tab S2 (Android v5.0.2) series- Nexus 5X (Android v6.0.1) series2
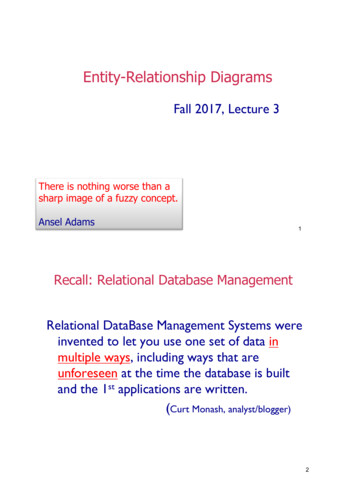
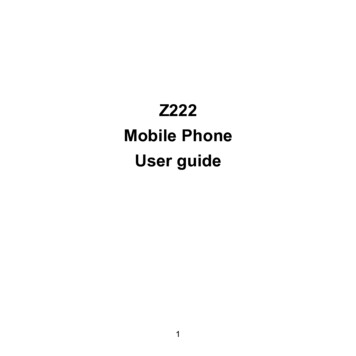
1. Register and search a deviceTo Add a Device1. Move to the Add Device page.LiveSearchBookmarkDevice ListA If visited with no added devicefor the first time, Add Device message appears.All DeviceEnter the device name.B To register a another device in thecase that there is a device alreadyregistered, tap Device List in the"Register" menu and touch Add on the right side of the device list.2. In the Add Device screen, touchthe Auto add button to launch thelist of available devices. Touch yourdesired device.J Once your smart phone is connected tothe Wi-Fi network where the device isconnected, iPOLiS automatically detectsthe device. If you are on a 3G or LTE network, youmay not search for the device list.3SetupiPOLiS mobileBefore you can view the imageproperly, you must configure theconnection settings.Add DeviceSearchiPOLiS is.com/testcnp
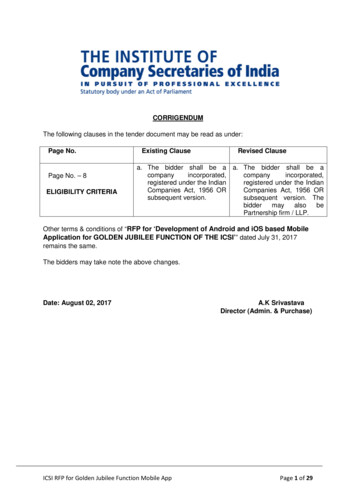
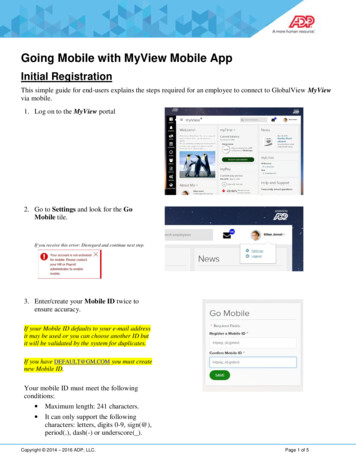
3. Enter the device information toconnect.If your device is not found, you willneed to enter the device informationon your own. Name : Name the device asdesired. If you don't enter the name, the IPaddress or DDNS of the device to beadded is used by default. Model : Select one from theproduct type listed. Actual model name is not required, it'sautomatically assigned after addingthe device.Add DeviceiPOLiS mobileAuto addTIPNameEnter the device name.ModelN/W Camera, EncoderSNB-8000Address TypeIPIP192.168.0.82HTTP Port80RTSP PortEnter RTSP port.IDInput User ID.PasswordInput password.For optimal result with live monitoring, it isrecommended to configure the video profile as advisedin help document. Address Type : Enter the IPaddress or DDNS of the device toconnect depending on the internet environment.SaveCancel If you select IP as the address type, enter the IP address; if youselect DDNS, enter the DDNS. HTTP Port : Enter the connection port for the device. RTSP Port : Enter the RTSP port number configured for thedevice. For DVR and HW NVR, enter the last port number of port rangeconfigured for the device. For example, if the range is 4520 4524,enter 4524. ID : Enter the device ID that you have specified. Password : Enter the password for the device that you havespecified.4
M If you register your device with Auto add , model / address type /IP and DDNS / HTTP port are automatically entered. SW NVR does not support the auto search function. Some DVR models support DDNS-based auto searches. If you want to use this on a 3G/LTE network, you need to eitherregister a DDNS ID or set it up as public network. You can register a DDNS ID at ddns.hanwha-security.com.4. Provide all necessary information and touch Save button.5. Select a profile. User must select a profile for video recording if the device to be added isa network camera or an encoder. A profile’s properties can be viewed andedited with Web Viewer, where iPOLiS mobile only provides selecting onethat is optimal for the displaying device from existing profiles.6. Select a channel. For adding a DVR/NVR, user must select a channel for the connection.A channel’s properties can be viewed and edited with Web Viewer, whereiPOLiS mobile only provides selecting channel to monitor, for the displayingdevice.7. Once completed with connecting to the device, it is added to thedevice list.M If settings of the added device are edited on the Web Viewer afteradding it to your application, then iPOLiS mobile may fail to recognizechanged settings. In such cases, move to the editing page of thecorresponding device and touch Save button to revive theconnection again.5
Recommended Profile InformationIt is recommended to set the profile as shown below for optimalLive video monitoring with iPOLiS mobile.ConfigurationDeviceDevice Profile Setup MenuNetwork CameraVideo ProfileDVRLive TransferNVRHWLive StreamingSWLive Streaming Video Source 2Live recommended profile settingsMCodecResolutionFrame RateCompression /TransmissionQualityMJPEG320X240 / CIF5fpsNormal (10)H.264320X240 / CIF10fpsNormal (10)H.265320X240 / CIF10fpsNormal (10) Network camera supports up to full HD (1920 x 1080) resolution.Only supported storage devices are compatible with full HDresolution. If either width or height of the video is 2040 pixel or greater, it cannot be monitored with MJPEG. According to the network stability, connection may suffer fromstuttering or interruption.6
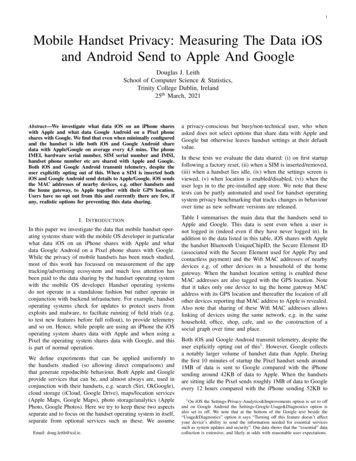
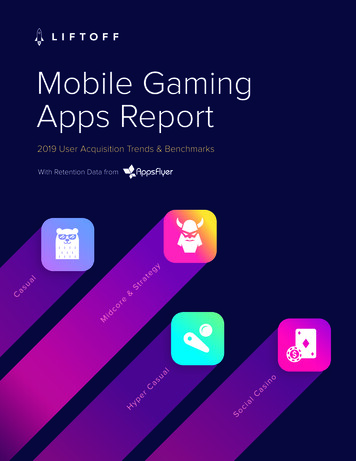
Searching a deviceTo search a registered device in thedevice list on the Live/Play tab, enter thename of the device.The list of devices containing the searchword will be filtered and displayed.7LiveSearchDevice ListAll DeviceEnter the device name.cam01BookmarkSetupiPOLiS mobile
2. Edit, delete and export a device listTo edit the device information1. Touch the Settings tab.2. Go to the "Register" menu and touch the Device List .3. Select a device to edit from the list. in the rightmost of the device item.You can also touch 4. When you have completed your changes, touch Save .To delete a device1. Touch the Settings tab.2. Go to the "Register" menu and touch the Device List .3. Touch the menu button on your device.Menu icons will appear on the bottom side of the screen.4. Touch the Delete button.5. Select a device to delete from the list.6. When done, touch OK .The selected device will be removed from the list.Exporting a device1. Touch the Settings tab.2. In the "Register" menu, touch Device List .3. Touch the Export to the right of the device list.4. Set the password.M To set a password, please refer to "Setting a Password" (page 28).8
5. Select the type of email to use and enter the email address ofthe recipient.M This function supports Android OS 4.0 or higher and Android OS 4.4or higher is recommended. Export file contains device access information.Please be careful about security when using the file.Importing a device list1. Download the attachment from the inbox.2. Select the file in the folder in which the downloaded file is savedor run the Share function.Select an app to run using iPOLiS mobile. If there is no app thatis inter-operated, iPOLiS mobile will run automatically.M In the case of a device in which zip file extraction is automaticallyactivated when selecting a file, use the Share function.3. Select iPOLiS mobile and enter the password that was set whenyou exported the file.4. Touch OK .5. Select the type of export. Append : The information of the existing registered devices ismaintained and the list of devices imported is added. Overwrite : The information of the existing registered devices isdeleted.6. Touch OK .The list of devices is imported.M This function supports Android OS 4.0 or higher and Android OS 4.4or higher is recommended.9
3. Editing a FavoriteTo add a channel to your Favorite ViewMethod 1) When a live video is monitoredDuring a live video replay, a user’s preferred channels can be addedto the Favorite View.1. Select your video, then go to the upper-right corner and touchthe button.2. When the Add popup appears in the Favorite View, enter a noteand save it. Inserting a note is optional, and it can be savedwithout input.M Up to 100 items can be registered in the Favorite View. If the limit isexceeded, some items will be selectively deleted.3. If you want to check the Favorite View, go to the Live tab and button. The Favorite View will pop up.touch the Method 2) When a new layout is configuredA user can register a device for himself and configure its layout.1. Touch button in upper-rightcorner of the device list and move tothe Favorite View.2. Touch button.10LiveSearchDevice ListFavorite ViewBookmarkSetupiPOLiS mobile
3. Select a device to register betweenCamera/Encoder and NVR/DVR.4. Select a spit-screen mode between4-split and 9-split modes.5. Touch iPOLiS mobile1. Select a device to register.Camera/EncoderNVR/DVR2. Select a split-screen mode. button.6. Select a device to register from thedevice list.7. Enter a name for the selectedFavorites screen and touch Save .M3. Enter a screen name.Enter a screen name. If you want to change a registeredchannel location, change a channeltile’s location by dragging and dropping it.Save If you want to delete a registered channel, move it onto dragging and dropping it. by It is possible for a camera to combine multiple devices and forma layout. For NVR/DVR, it is possible to form a layout only usingchannels within a device.11
To modify the Favorite View1. Touch Edit on the Favorite View screen.Moves to List Edit screen.2. Can add or delete a channel. Can modify a screen name. Canchange a tile’s location.M For a Favorite setup in a live video, it is possible to change the onlyFavorite name.To delete the Favorite View1. Touch the Menu button on the device.Menu buttons pop up at the bottom of your screen.2. Touch Delete .3. Select a Favorite to delete from the list.4. Touch OK .A selected Favorites item is deleted from the list.12
4. Live Monitoringtest2To connect to a device1. Run iPOLiS mobile, and touch the desired device to beconnected once device list appears.2. Selecting a network camera or encoder will display video screenin one-channel mode.3. Selecting a DVR/NVR will display 4-split video screen in quadmode.M 4/9 channel modes can be selected for NVR. Since the connection may be unstable due to the networkenvironment, please use a recommended profile for multi-channelmode. If you don't register a DDNS ID for the device connected to the router,you cannot use the device on a 3G/LTE network.To change the channel1. If the screen is touched, control buttons pop up on the upperscreen.2. Touch the Channel Change icon appears.13 . The camera list
3. Select a channel to display on the screen.M In case of the 4 channel mode, 4 channels are grouped as one,which results displaying CH5 CH8 if selected channel 7. In case of the 9 Channel mode, 9 channels are grouped as one,which results displaying CH10 CH18 if selected channel 11. In case of the 4 Channel mode, you can move in a group of 4 channels. In case of the 9 Channel mode, you can move in a group of 9 channels. The 9 channel mode is provided only in NVR.If you slide the screen with your finger from right to leftwhile in multi-channel mode, you will move to the nextsplit screen.14
To switch to one-channel modeTouch and hold or double-tap one of the screensdisplayed in multi-channel mode to change it to1-channel mode.M If you want to switch to the split mode, then in the bottom of thescreen, click the channel icon.192.168.0.2001/2192.168.0.200 4 Channel mode 9 Channel mode 151/1
To view the video marked as favorite1. Select Live- Tab.Live2. If you click a desired item in yourFavorite View, the selected list's livevideo will be played.3. Click the desired thumbnail image inthe list to view a magnified image.16SearchBookmarkDevice ListSetupiPOLiS mobileFavorite ViewFavorite1Test1enterance-cam4
5. Controlling the Live VideoiPOLiS mobile supports video control only in one-channel mode.test2PresetTo check device informationYou can check the configuration information of a registered device.1. Touch Check Information icon in the upper right corner.2. A popup window with basic information of the connected deviceappears.M To change the device settings, you should make a change manuallyfor each setting item.To select a profileA camera profile can be selected.1. Touch the Profile icon in the upper-right of the screen.2. If a profile is selected from the list, a video is displayed using thatprofile.M Profile selection function supports network cameras and some DVR/NVR only.17
If you want to move the channelYou can move the channel of the registered device.1. Touch the move channel the screen. icon at the upper-right area of2. Once you select the channel you want to move to whenprompted, you can move to the channel.M This function is available for DVR/NVR model.Checking the video receiving stateYou can check the video receiving state using the displayed at the bottom right of the screen. iconTo save the captured screenCaptures the currently displayed image and saves to the devicestorage as an image file.1. Touch the screen to display menu and touch icon.2. The captured screen is saved as an image file in the device’simage folder.To flip video image displayedYou can flip video image by rotating 180 .1. Touch the screen to display menu and touch 2. Touch again to revert to the original screen.18 icon.
To control zoomingYou can control the network camera’s optical zooming remotely.1. Touch the screen to display control buttons near the bottom.2. For zoom-capable cameras, touching icon zooms out.touching M icon zooms in, and Zooming range and level differ from camera to camera. The model that provides the PTZ function among box cameraproducts displays the Zoom In/Out buttons, but these buttons do notwork and the digital zoom in/out functions also do not work.The optical zoom in/out works when connected to the external Pan/Tilt drive.You can also zoom in by pinch open using two fingers onthe screen. To zoom out, pinch close on the screen.To control digital zoomingThis function is for cameras not supporting optical zooming.1. Touch the screen to display control buttons near the bottom.2. Touch digitally.M button to zoom in, and touch to zoom out Current digital zooming level is noted next to the digital zoom box,and digital zooming supports zooming up to x16.You can also zoom in by pinch open using two fingers onthe screen. To zoom out, pinch close on the screen.Touch and hold to drag the screen in any direction toreveal the hidden part of the image if enlarged biggerthan the screen.19
To control Pan / TiltSupported by PTZ cameras only.1. Touch the screen to display Pan/Tilt control buttons on thescreen.2. Touching the direction button moves camera’s pan/tilt to the nextstep one by one.3. Touch and hold any of the direction buttons to pan and tilt thecamera continuously in the selected direction.M Pan/tilt range and level differ from camera to camera. For a model that supports the external PTZ function among boxcamera products, the Pan/Tilt button works when the external Pan/Tilt drive is connected.Drag the screen in up/down/left/right direction to pan/tiltthe camera. Note that iPOLiS mobile does not recognizediagonal direction, which will interpret user’s draggingas the closest vertical or horizontal dragging.M Pan/tilt control result requires time for processing, since thecommand should reach camera device and performed by thecamera. Video data size grows as the camera moves, which mayresult in delayed display. In 3G networks, it may take more than afew seconds to receive video data. In a network environment of poor stability, using pan/tilt control withlower video quality settings may help reduce such delays.20
To adjust focusSupported by PTZ cameras only.1. Touch the screen to display focus control buttons on the screen.2. Use Near Focus the focus range.M and Far Focus icons to adjust This function is provided for DVR/NVR models.To listen to the Live AudioYou can hear sound if the network camera supports audio, and youcan hear audio from a storage device in a single channel mode.M In case of DVR, audio becomes not available for setting of less than200 kbps.To run presetsYou can run the preset saved in the network camera or NVR.1. Click the preset button to upload the saved preset list.2. Select the desired list. You can run the preset saved in thecamera or NVR.M The preset function is provided only for the camera models thatsupport external PTZ functions and the new CGI(SUNAPI). The preset function is provided only in NVR models supporting thenew CGI (SUNAPI).21
To control alarm outAn alarm out saved in the network camera can be executed.1. Click the alarm out button to load thealarm out list.2. The current status of each list can beviewed using the alarm out lists.SNBAlarm out:01- Blue : Alarm out On- White : Alarm out OFF3. Select the desired list. An alarm outsaved in the camera can be controlled(On/Off).M The alarm out function is provided onlyfor the camera models that supportnew CGI(SUNAPI).22PresetAlarm out
6. Searching / Playing Saved VideoIf you want to play based on date/timeTouch the place tab in the bottom area of the screen, andyou can view the list of playable devices.1. Select the device to be played and touch it.2. Select the channel where you want to play.3. The date when the playable data is saved in the channel of theselected device will be displayed on the calendar. Touch , button on the calendar’s both ends of year/month indicator totraverse to the previous/next month.4. If you touch the date when you want to play it, a circle-type timeline (24 hours) will appear. Time zones where there is playabledata are classified by color.M If there are overlapping multiple data for the same time range, anoverlapping list appears. For a network camera, the above 2, 3 channel selection processesare omitted. On a network camera, only the device type supporting newCGI(SUNAPI) provides a play function.23
To play searched videoAfter searching with date/time, set the beginning time to play theselected video.1. Check the time line and drag [] tothe play time zone you want, and setup the starting time or enter the timemanually.test2 - CAM 01iPOLiS mobileJan 1, 2014Overlap 010:23 AMEvent 11:23 AM2. Touch the Play button to start videoplayback, and it will play for about 60minutes from the start time.M If the recorded video being played hasinterval of having no video, playbackskips such interval and continuesfrom the next existing position. Thedisplayed play time may be differentthan the actual recording time depending
The iPOLiS mobile application can be downloaded freely and installed from Google Play. To search iPOLiS mobile application from Google Play, type “iPOLiS” or “TECHWIN” and run a search, ignoring the letter case. User of previous version software (v1.0) needs to File Size: 377KB