Transcription
Invoice Managerfor ExcelInvoicing software for Excel andWindows desktop010203Easy to use Excel spreadsheettemplateHundreds customizable invoiceformatsInvoices, payments, orders andquotes .UNIFORM SOFTWARE LIMITEDhttps://www.InvoicingTemplate.com
11. Quick Start Tutorial2. How Invoice Manager for Excel Works3. Before Using a Template - InvoicingTemplate.com4. Template File Format5. Install / Upgrade6. Settings - Template7. Settings - Taxes8. Settings - Misc. Data9. Settings - Database10. Settings - In-cell Lookup11. Settings - Print12. Settings - Extract / Email13. Customers13.1 Add New Customers13.2 Edit Existing Customers13.3 Customer Detail14. Products14.1 Add New Products14.2 Edit Existing Products14.3 Product Detail15. Invoices15.1 Create New InvoicesINVOICE MANAGER FOR EXCELINVOICINGTEMPLATE.COM
215.2 Edit Existing Invoices15.3 Invoice Detail16. Payments16.1 Add New Payments16.2 Edit Existing Payments16.3 Payment Detail17. Applying One Payment to Multiple Invoices - Batch Payment18. Reports19. Common Tasks19.1 Search Bar19.2 Data List Window19.3 Share Database19.4 Migrate Access Database to SQL Server19.5 Email Customer Statement and Aging Report19.6 Add-ins Appear in Excel20. Customizing Invoice Template21. Custom Fields - Invoice Manager for Excel22. Advanced Database Field Customization23. License Key24. Cell Name ReferenceINVOICE MANAGER FOR EXCELINVOICINGTEMPLATE.COM
31. Quick Start TutorialWhat is it about?This is a step-by-step quick example demonstrating how to create a customer, aproduct and an invoice in Invoice Manager for Excel.For a short movie tutorial, see how to create an invoice.StepsThe screen shots in this tutorial are taken on Windows 10 and Excel 2016.1. Open your template using the shortcut on Windows desktop. If you usethe standard template shipped with Invoice Manager for Excel, it connectswith the default "Sample.mdb" database.2. Click and activate the Invoice worksheet if it is not activated yet.3. Click the Customers button on the Invoice worksheet to open the Customerswindow.INVOICE MANAGER FOR EXCELINVOICINGTEMPLATE.COM
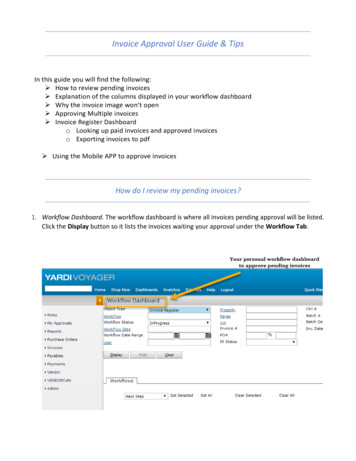
44. Click the Add Customer button on the Customers window.5. Fill in your customer information in the New Customer window. Thiswindow provides a number of fields. Only the Name field is required. Thename can be either a person's name or a company name, such as "UniformSoftware LTD". Click Save button to save this customer. The windowcaption changes to Customer Edit, and a customer ID is generatedautomatically if left blank.INVOICE MANAGER FOR EXCELINVOICINGTEMPLATE.COM
56. Press the Esc key twice to close the Customer Edit window and Customerswindow.7. Click the Products button on the Invoice worksheet to open the Productswindow.8. Click the Add Product button to open the New Product window.Fill in the description, price and stock information in this window. Click theSave button to save the new product.INVOICE MANAGER FOR EXCELINVOICINGTEMPLATE.COM
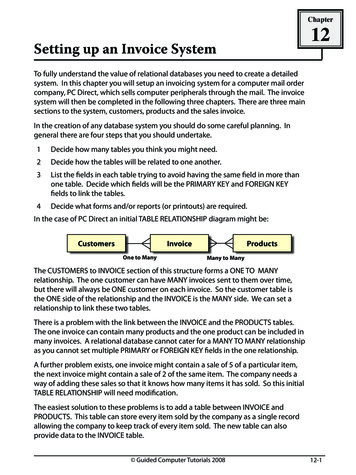
69. Press the Esc key twice to close the Product Edit and Products window.10. Now it's time to create your first invoice. On the Invoice worksheet, clickany cell inside the "Bill To" section, the "on-sheet picker" button appears.Click it to open the Customers selection dialog box, double click thecustomer name "Uniform Software LTD" to select this customer into theInvoice worksheet.INVOICE MANAGER FOR EXCELINVOICINGTEMPLATE.COM
7Note: If you know the ID value of the customer, you can also enter the IDvalue into the Customer ID cell to fill customer information into the "BillTo" section. This feature is called "In-Cell Lookup".11. Click any cell on the first line of the invoice detail section, the on-sheetpicker button appears. Click it to show the Products selection dialog box.You can double-click an item to fill the product information into the Excelworksheet. To select multiple products, select an item and then click "AddItem" to add the item to the selection. Repeat this to add all items. Oncedone, click "Close" to fill all the products in the selection into the Excelworksheet.Tip: You have a long product list, use the Search bar to locate productsquickly.INVOICE MANAGER FOR EXCELINVOICINGTEMPLATE.COM
8Tip: If you know the ID value of the product, you can also enter the IDvalue into the Product ID Excel cell to retrieve all the product information.12. Fill in or change Quantity and Unit Price if necessary.13. Click the Save To DB button on the Invoice worksheet to save the invoice.An invoice ID is generated automatically if left blank.14. If you want to print the invoice, just click the Print button on the Invoiceworksheet.To send the invoice to the client using email, click the "Extract / Email"button.That's it! You have successfully created a new invoice!2. How Invoice Manager for Excel WorksThe core of an invoicing system powered by Invoice Manager for Excel is an addin program that runs inside Microsoft Excel. On the front-end, you see and workwith an Excel-formatted invoice template with many buttons on the task paneand ribbon, like "Customers", "Products", and "Invoices". The add-in programconnects the invoice template with a backend database for storing andorganizing data.INVOICE MANAGER FOR EXCELINVOICINGTEMPLATE.COM
9With this architecture you benefit from both two mature technologies. The Excel-formatted invoice template gives you an intuitive invoice formto work with. It's easy to create an invoice even you are new to anyinvoicing program.The backend database gives you a central and organized way for storinglarge amount of data. Invoice Manager for Excel uses mature and publicdatabase format, including Microsoft Access and SQL Server. We don't useprivate database formats and don't hide your data from your eye. Youhave full control on your data.The add-in program runs inside Excel, leveraging the power of Excelspreadsheets and backend database.All the powerful Microsoft Excel tools are all available to you for furthercustomizing the invoice template.You may have very special requirements about the invoices you create. InvoiceManager for Excel allows you to use your familiar Excel tools to adjust fonts,colors, borders, patterns, and even formulas to do calculations and createrelationship between cells/fields.If you prefer to put a field on another location, or don't need it at all, you can dothis by simply dragging and dropping it.If you need new fields to further detail the goods and services you provide, usecustom files.3. Before Using a Template InvoicingTemplate.comContentsINVOICE MANAGER FOR EXCELINVOICINGTEMPLATE.COM
10 Logo image and company information Taxes Creating a new database (optional)Logo image and company informationIf you have installed Invoice Manager for Excel version 4.12 or higher versions,click the "Replace Logo Image" button on the "Invoice" ribbon tab and follow thewizard to specify your own logo image. That's all you have to do!If you're using an earlier version of Invoice Manager for Excel prior to 4.12, toreplace the default LOGO image manually and enter your company informationon the Invoice worksheet:1. Open your invoice template in Microsoft Excel.2. Switch to the "Invoice" worksheet if it is not active (or is not the currentworksheet). Switch to the Invoice ribbon tab if it is not activated.3. If you are running an earlier version of Invoice Manager for Excel that doesnot provide the "Replace Logo Image" command, now you shouldunprotect the "Invoice" worksheet.By default, the "Invoice" worksheet is protected to avoid overwritingformulas accidentally. To unprotect it, in Excel 2007/2010/2013/2016 clickReview tab / Changes group / Unprotect Sheet.4. Switch to design mode by clicking the "Design Mode" button on theInvoice ribbon.5. On the "Invoice" worksheet, enter your company information to replacethe default text labels, such as your company name, address, and contactinformation.6. To further customize your logo image, or to add / replace the logo imagemanually, follow the steps below:a. Right click the Logo image, and select Properties from the menu.INVOICE MANAGER FOR EXCELINVOICINGTEMPLATE.COM
11b. Click the Picture property, and then click the . button.c. Browse to the folder containing your icon file. Select and open theicon file.INVOICE MANAGER FOR EXCELINVOICINGTEMPLATE.COM
12d. Close the Properties dialog box.e. Drag the border of the image object to resize it, if needed.If you don't need the LOGO image, follow the steps below.I.II.III.Click the LOGO image to select it.Hit DEL key on your keyboard.Deleting the LOGO image leaves an empty area to the left ofthe Company Information section. You may like to move theentire Company Information section to fill in the empty area.To do this: Drag your mouse to select the entire CompanyInformation area, including Company Name, Street Address,City, ST Zip Code, etc.; Push your mouse key on the border ofthe selected area; drag it to the new location.f. Exit design mode, by clicking the Design button again.g. Protect the Invoice worksheet.In Excel 2007/2010/2013/2016, you can find the command in theChanges group of the Review ribbon tab.h. Save your invoice template by clicking Office button - Save inExcel 2007, or by clicking File - Save in Excel 2010 and 2013/2016.Refer to Invoice Template with Logo for more options about the logo image. Formore information about customizing the invoice template, please seeCustomizing Invoice Template.TaxesSettings the number of taxes, for example changing from two-tax to one-tax, isimplemented by hiding the tax rows on the worksheet. If you choose "One Tax",the first tax row identified by the "oknTax1" name is visible; if you choose "TwoTaxes", both the rows identified by "oknTax1" and "oknTax2" names are visible.This works well with the default invoice template shipped with Invoice Managerfor Excel installer program, where the "oknTax1" and "oknTax2" names are put ontwo separate rows and no other critical content are located there.However if a template is deeply customized, for example the "oknTax1" and"oknTax2" names are moved to one row, or other fields are put on the rowswhere the "oknTax1" and "oknTax2" name reside, the feature of setting theINVOICE MANAGER FOR EXCELINVOICINGTEMPLATE.COM
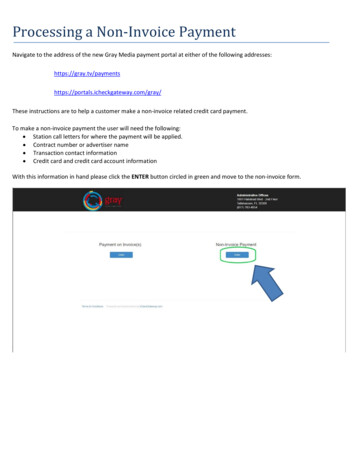
13number of taxes may not work properly. In this case, you need to customize thetaxing cells manually by making the rows hidden or visible, or by moving the cellsinside or outside the printable area.To set up the taxing rules using the "Settings" window, follow the steps below.1. Click Settings button on the Invoice worksheet to open the Settings window.2. Click Taxes.3. Choose your tax system: No Tax, One Tax, or Two Taxes. If you have 2taxes, click the option Tax2 is applied to tax1 so tax2 is calculated on thesum of the price tax1. Fill in your tax names and percentages in theappropriate text boxes.4. Click Apply.5. Close the Settings window and return to Excel.6. Click the Save button on the Excel toolbar to save the modified workbook.INVOICE MANAGER FOR EXCELINVOICINGTEMPLATE.COM
14Additionally, each product has a Taxable attribute that controls whether the taxrate will be applied to the product. For each invoice, you can also set its tax ratesand Taxable attributes.Creating a new database (optional)On a fresh installation, the default invoice template is connected with thesample.mdb database. This database is installed for demonstration purposes. Youcan use this database to try out how Invoice Manager for Excel works. Afterreviewing and testing the software, you will want to create a new database foryour own data. To create a new database, follow the steps below:1. On the Invoice worksheet, click the Settings button to open the Settingswindow.2. Click the Database tab.3. Click Create new database under the Access Database tab.4. Select a folder to store your new database file and enter the database filename. Click Save to create a new database file.INVOICE MANAGER FOR EXCELINVOICINGTEMPLATE.COM
155. If you want to open the newly created database for current workbook,click the Open database button under the Access Database tab. Then selectthe database file you just created.6. If the database is successfully opened, the database name will bedisplayed below the Current Database label on the Invoice worksheet.7. The full path and file name of the database is stored in a hidden cell in theworkbook. To make the workbook connect to/open the new databaseautomatically next time you open it, click the Save button on the Exceltoolbar to save the workbook.4. Template File FormatStarting with 2007 Microsoft Office system, Microsoft is introducing new fileformats for Word, Excel, and PowerPoint, known as the Office Open XML formats.In Office Excel 2007, the default format for an Excel workbook is the Office Excel2007 XML-based file format (.xlsx).Most of our invoice templates available on UniformSoft.com are in ".xls" format.You can open and work with the template directly in Excel 2007, Excel 2010 orExcel 2013, without any problems, but the title bar of Excel window displays thewords "[Compatibility Mode]".If you don't need to move the template to other computers that are runningprevious versions of Excel, you can save it in the following new formats supportedby Excel 2007 or the later versions.File extensionFormat.xlsxExcel XML-based file format.xlsbExcel Binary (or BIFF12) file format.xlsmExcel XML-based and macro-enabled file formatTo convert a template into a new format:1. Open the template in Excel 2007 2013.2. In Excel 2007 click the Microsoft Office Button located in the up-left cornerof Excel's main window; or in Excel 2010 and 2013, choose File.3. Click Save As.4. Click Yes on the warning message dialog displayed by Invoice Manager forExcel.5. Choose a file format in the Save As dialog. Enter your new file name, say"Invoice Template ".INVOICE MANAGER FOR EXCELINVOICINGTEMPLATE.COM
166. Click Save to save the template.5. Install / UpgradeNew installationIf you run the setup program of Invoice Manager for Excel (invoice-manager.exe)in a Windows system for the first time, or you have removed/uninstalled InvoiceManager for Excel before running the setup program, you are performing a freshnew installation.Program filesInvoice Manager for Excel supports both 32-bit and 64-bit platform. The setupprogram chooses the correct edition (32-bit or 64-bit) based on the Officeedition installed on the system.That is, if your Windows and Office are all 64-bit, Invoice Manager for Excelappears as a 64-bit program and by default installed in the following programfolder: System Driver \Program Files\InvoicingTemplate.com\Invoice Managerfor ExcelIf your Office is 32-bit and Windows is 64-bit, the program files are store in: System Driver \Program Files (x86)\InvoicingTemplate.com\InvoiceManager for ExcelIf your Windows and Office are all 32-bit, the program files are stored in: System Driver \Program Files\InvoicingTemplate.com\Invoice Managerfor ExcelData filesThe setup program installs a default template and a database file into the datafile folder. By default, the data file folder is:INVOICE MANAGER FOR EXCELINVOICINGTEMPLATE.COM
17 commondocs \Invoice Manager for Excel\So for example on Windows 8 it usually appears as:C:\Users\Public\Documents\Invoice Manager for Excel\If you are running Excel 2007 or higher versions, the default invoice template willbe in '.xlsx' format; and if your Excel is 2003, the default template will be in '.xls'format.UpgradeIf you upgrade from Invoice Manager for Excel to Invoice Manager for Excel, thesetup program keeps your original files (both data files and program files), butbreaks the links between the program and Excel. That is, Invoice Manager forExcel will no longer work. If you open an invoice template that works with InvoiceManager for Excel, now it will work with Invoice Manager for Excel.If you have a previous installation of Invoice Manager for Excel installed, andwant to upgrade to the latest version, here are the three situations that can occurwhen you run the setup program without removing the previous version in thefirst place.1. You install the program to the same folder as the previous version, andchoose "NO - Do not overwrite my data" option on the Upgrade ExistingProgram screen.INVOICE MANAGER FOR EXCELINVOICINGTEMPLATE.COM
18This is the default installation mode if you don't change any option in thesetup program and accept all the defaults. This way, you won't lose anydata saved with the previous version. However, if you already have a NEWDATA-FILE subfolder inside the data file folder, the following files will beoverwritten without any warning message:Data Files in the NEW-DATA-FILE folderNEW-DATA-FILE\INVOICE.xls (or the .xlsx version)NEW-DATA-FILE\Sample.mdbAll the shortcuts, including those on the Windows Start menu andDesktop, will point to the existing files, but not the files inside the NEWDATA-FILE folder.If there is already a shortcut named "Invoice.xlsx" on Windows desktop, itwill be kept. A new shortcut will be created for the files in the NEW-DATAFILE folder. The new shortcut will have a name like "Invoice.xlsxyyyymmdd", where yyyy, mm and dd is the year, month and day of thecurrent date.INVOICE MANAGER FOR EXCELINVOICINGTEMPLATE.COM
192. You install the program into the same installation folder and data filefolder as the previous version, and choose YES - I want to overwrite allexisting data files option on the Upgrade Existing Program screen.In this case, all the data files listed in the above table will be overwritten. Ifyou were using the Sample.mdb database file in the data file folder as theworking database, you will lose your data.3. You install the new version to a different folder than the one where theprevious version was installed.The installer will upgrade all your program files, and copy all the data fileslisted in the above table to the new folder. All the shortcuts created by theinstaller, including the ones on the Windows Start menu and Desktop, willpoint to the files in the new folder.All the data files you saved with the previous version will remain there. Touse your original template and database, just go to the folder where youstored your template, and then open the template file.Uninstall Invoice Manager for ExcelTo uninstall Invoice Manager for Excel, open Windows Control Panel, and then"Uninstall a program" (Windows 8 and Windows 7). Choose "Invoice Manager forExcel" in the program list, and then click "Uninstall".6. Settings - TemplateClick the Settings button on the Invoice worksheet to open the Settings window.INVOICE MANAGER FOR EXCELINVOICINGTEMPLATE.COM
20(Figure taken on Windows 10)Before Closing Invoice TemplateIn an Invoice Manager for Excel system, the invoice template is also used as atemporary work area, and the COM add-in constantly reads from and writes to it,sometimes even without your knowledge. For example, if you try to print aninvoice from the database, it will write the invoice data to the Invoice worksheet.So, to keep your workbook clean, Invoice Manager for Excel provides these If theinvoice template has been modified options:OptionActionPrompt for savingchangesExcel's default behavior. This option is selected bydefault.Save changesSaves changes automatically whenever you close aninvoice workbook.Discard changesDiscard changes automatically.Note: These options apply to invoice workbooks only. They don't affect otherworkbooks.INVOICE MANAGER FOR EXCELINVOICINGTEMPLATE.COM
21The Invoice worksheet is designed in a way that can be run in the protectedmode. It is highly recommended that you protect the Invoice worksheet once youfinish your design or customization. Invoice Manager for Excel checks the statusof protection every time you close the template, which you can control by usingthe "If the Invoice worksheet is not protected" option detailed below:OptionActionDisplay a warningmessageDisplay a warning messag
invoicing program. . The backend database gives you a central and organized way for storing large amount of data. Invoice Manager for Excel uses mature and public database format, including Microsoft Access and SQL Server. We don't use private database formats and don't hide you