Transcription
Magicard D PrinterMagicard K PrinterUser ManualDocument: 5068Issue 1.04 – 16/07/20201
ID Card Printer – User ManualCONTENTSGeneral Information: . 3Safety Instructions: . 3Caution . 3Printer Installation . 4Welcome. 4Printer and Dye Film Environmental requirements: . 5Printer Key Components . 6Installing the Dye Film . 7Connecting the Power Supply . 8Installing the Driver . 9USB Installation. 11Ethernet Installation . 14Advanced . 17Accessing the Driver Settings .18Printer Front Display Menu Options .20Additional Useful Information .22MAINTAINING YOUR PRINTER IS IMPORTANT! . 22Caring for your Printer . 22Cleaning Supplies . 22How to Clean your Printer . 23Replacing the Cleaning Roller . 24Using the Cleaning Pen . 25Choosing the Correct Dye Film .26Choosing the Correct Cards .27Card sizes . 27Card thickness . 27Card requirements necessary for good quality prints . 27Printable area of the Card . 27Using Magnetic Stripe Cards . 28Using Self Adhesive Cards . 28Upgrading to DUO Operation .28Printer Error Codes .29FCC Declaration and SDOC: .42CE Declaration: .432
ID Card Printer – User ManualGENERAL INFORMATION:This document contains proprietary information belonging to Magicard Ltd. and may not be wholly or partially copied,stored in a data retrieval system, or used for any purpose other than that for which it was supplied, without the expresswritten authority of Magicard Ltd. All rights are reserved.The HoloKote feature is protected by US PATENT No: 5,990,918 and by EUROPEAN PATENT SPECIFICATION EP 0 817 726B1.Microsoft and Windows 7, 8 and 10 are trademarks of Microsoft Corporation.Copyright 2011 Magicard Limited.Magicard Ltd. shall not be liable for errors contained herein or for incidental consequential damages in connection withthe furnishing, performance or use of this material. Magicard Ltd. reserves the right to change the content of thisdocument without prior notification.SAFETY INSTRUCTIONS: To prevent electric shock do not remove covers.Do not attempt to service the printer yourself.There are no user serviceable parts inside (either printer or dye film). In the event of malfunction, contact yourprinter/consumable supplier.This product is only to be used with the Power Source supplied at point of purchase.Take care not to spill any liquid on the printer.When handling the printer avoid touching the printing edge of the Thermal Print Head. Any grease andcontamination will shorten its life.Before transporting the printer, remove dye film & card hoppers and pack the printer in its original packaging toreduce the likelihood of damage in transit. Magicard is not responsible for printers/items inadequately packaged.If using this printer in Germany:To provide adequate short-circuit protection and over-current protection for this printer, the building installation mustbe protected by a 16 Amp circuit breaker.Bei Anschluß des Druckers an die Stromversorgung muß sichergestellt werden, daß die Gebäudeinstallation mit einem16 A-Überstromschalter abgesichert ist.CAUTIONUnapproved changes or modifications to the equipment could void the Users authority to operate the printer and affectany related warranty claim.3
ID Card Printer – User ManualPRINTER INSTALLATIONWelcomeThank you for choosing your ID Card Printer. This guide will help you make your printing experience moreenjoyable and cost effective. Please ensure you have the following items outlines in the QuickStartGuide below before you begin the installation:4
ID Card Printer – User ManualPrinter and Dye Film Environmental requirements:SeeBelowNormal Office environment with: Ambient temperature 10 to 30oC (50 to 86oF). Protection from direct sunlight and chemicals. Protection from sudden temperature changes. Relative Humidity 20 - 70% Sufficient space for:-Opening the printer’s Lid.-Cable access at the rear.5
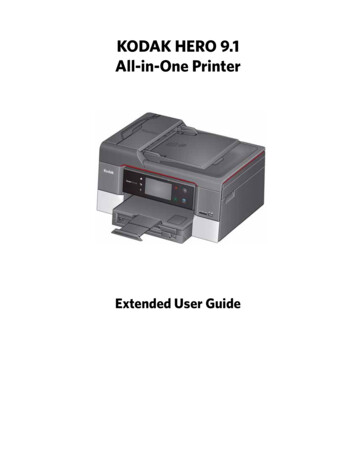
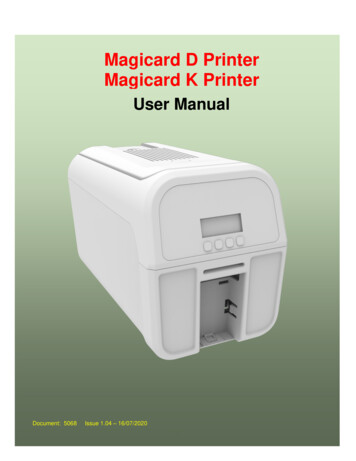
ID Card Printer – User ManualPrinter Key ComponentsPrint Head AssemblyBlue Cleaning RollerFront Panel DisplayRear Hopper(100 card capacity)DC PowerEthernetUSBRear Connector PanelPrinter Rear View6Printer Rear Connector Panel
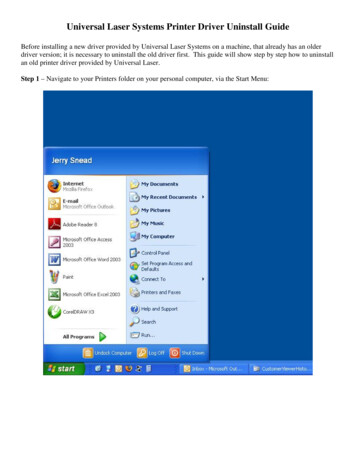
ID Card Printer – User ManualInstalling the Dye FilmOpen the printer’s Lid and insert the dye film as shown in the diagram below.If the printer’s lid is closed (with the printer powered on and the dye film fitted), the printer will begin toinitialise. As part of this process, the printer will read an identification tag in the Film which containsinformation about the film type and capacity.7
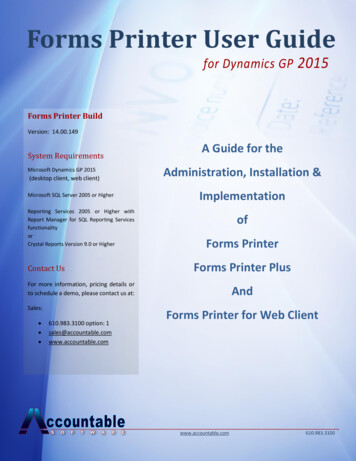
ID Card Printer – User ManualConnecting the Power SupplyConnect Mains Power Supply lead as shown below but do not connect the USB lead at the stage(the USB is connected after the Driver has successfully been installed).Do not connect the USB lead at this stage.8
ID Card Printer – User ManualINSTALLING THE DRIVERThe latest version of Driver for your Magicard D printer can be downloaded using the following weblink:https://start.magicard.comThe Driver installation software will guide you through the installation process.This website provides complete End User support covering: Unboxing and setting up your printer.Updating the printer’s firmware.Card Design software.The option to Register your printer.Please Note: For further versatility, your printer can be accessed remotely using a PC (running Windows Chrome)using the “Clix” Remote User Interface (RUI). To use, simply open Windows Chrome and type in your remote printer’sIP Address in the “Search” bar (top of screen). You can then access printer settings and statistics and also run simplediagnostic routines. (Please see the Clix Remote user Interface Guide for further details).Magicard D PrinterPrinter Model Variants Magicard D UnoMagicard D UnoMagicard D Uno MagMagicard D Uno MagMagicard D Uno SmartMagicard D Uno SmartMagicard D Uno Mag SmartMagicard D Uno Mag SmartMagicard D DuoMagicard D DuoMagicard D Duo MagMagicard D Duo MagMagicard D Duo SmartMagicard D Duo SmartMagicard D Duo Mag SmartMagicard D Duo Mag 500-0023/44500-0024/44500-0024/4
ID Card Printer – User ManualInstaller Guide: Click on the “setup.exe” icon. Select the relevant language. Click “Install”.10
ID Card Printer – User ManualUSB Installation Select the port type for the installation.Select “USB” and click “Next”. Agree to the license agreement.11
ID Card Printer – User Manual Wait for the installation progress bar to finish. You will be prompted for a printer to be connected via USB. If no printer is connected, you will be asked to reconnect and retry.NOTE: If “Cancel” is clicked, you will be asked to confirm this. The Installer will thenend. The installation will be completed but the printer will not be connected. Thiswill happen when the printer is physically connected via the USB.12
ID Card Printer – User Manual After completion of the installation, you will be prompted with the following dialog tosignal the installation is complete:13
ID Card Printer – User ManualEthernet Installation Select “Ethernet” and model. Enter the IP address of the printer (this can be obtained using the printer’s frontpanel menu).14
ID Card Printer – User Manual Agree to the license agreement. Wait for the installation progress bar to finish.15
ID Card Printer – User Manual After completion of the installation, you will be prompted with the following dialogto signal the installation is complete: Congratulations the driver installation is now complete! You can now print from your chosen application.16
ID Card Printer – User ManualAdvancedThe “Advanced” dialog will allow you to perform the following: Set static IP addresses.Connect to hidden networks.Obtain the MAC address.17
ID Card Printer – User ManualACCESSING THE DRIVER SETTINGSAccessing the Driver “Printing Preferences” Settings (Windows 10 (64 bit) shown for information purposes).The printer’s Driver settings (Printing Preferences) can be accessed as follows: Right-click on the “Start” menu icon (bottom left of PC screen) and select the “Search” option.Search for “Control Panel and select the “Devices and Printers” option (you may need to set your “View by:”option to “Small icons” depending on your PC setup). In the “Devices and Printers” window, right-click on the printer thumbnail image and select “PrintingPreferences”.18
ID Card Printer – User ManualPrinting PreferencesDriver TabsPrinterThis is the default tab and offers theUser the option to change cardorientation, size and print resolution.Card Front/BackOptions to change the colour format,Image rotation and Security layer image.EncodingAvailable for MAG printers only.Options to change magnetic cardsettings and encoding formats. ISO andJIS formats supported.ImageImage manipulation options includingcolour correction, print head power(density) and colour adjustment.Colour Profiles also supported.AdvancedRe-writeable card support including theoption for User defined areas on card.SaveSpecific User settings can be saved andrestored at a later date. Factory Restoreoption available.Help with Driver SettingsThe Printer Driver contains a built-in help file (inHTML format) – this file gives an excellent, clearexplanation of each Driver setting.To view the Driver’s help file, go to the PrintingPreferences (as described above), and click on the“Help” Button.Alternatively contact Technical Support on 01305470 292.19
ID Card Printer – User ManualPRINTER FRONT DISPLAY MENU OPTIONSPress the “Menu” button The first menu option will be displayed. Press the “ ” button (where indicated) to step through each option in the menu.The front display panel consists of a text display and four push buttons. The function of each button will depend on the textdisplayed immediately above that button.NOTES: To accept a menu option or return to a previous menu, press the “OK” or “Back” options respectively.Hand Feed Mode enables you to select whether cards can be fed from the Hopper (at rear) or by hand (one-at-atime) from the front of the printer. Default OFF (automatic feed from rear hopper)Mag Test (if applicable) enables you to verify the magnetic encoding operation of the printer offline. Sample data iswritten onto the Magnetic Stripe.Using the /- Keys, Standby time can be selected for the following periods (minutes):15, 60, 600 or “OFF”** The Mag test option is only available on printers fitted with a Magnetic Encoder.20
ID Card Printer – User ManualNOTE:To accept a menu option orreturn to a previous menu,press the displayed “OK” or“Back” options respectively.“Off” at the Printer MainDisplay powers down to“Stand by” mode.Pressing any button willresume normal operationMagicard Front Panel LayoutPrinter Main DisplayMagicardOffMenuMenu Navigation Buttons21Menu Select Button
ID Card Printer – User ManualADDITIONAL USEFUL INFORMATIONCaring for your PrinterMAINTAINING YOUR PRINTER IS IMPORTANT! Maintenance is an important factor of your printer’s good operation and longevity. Maintaining a regular cleaning routine will give you optimum print quality and prevent downtime. We recommend that you clean the printer’s rollers and Print Head each time you changeDye Films. A clean printer will produce superior quality ID Cards and is less likely to require factorymaintenance and/or repair. In normal environments, regular maintenance should improve the longevity of the Print Headitself. (Remember foreign particles can lodge under the Head and cause permanent damage!) Increased reliability when magnetic encoding ensuring the encoded data can be readaccurately, reliably and continuously.Cleaning Supplies10 Cleaning Cards & 1 Cleaning Pen(Pt. 3633-0053)5 Cleaning Rollers & 1 Metal Bar(Pt. 3633-0054)Note: Cleaning supplies can be purchased from you printer supplier.22
ID Card Printer – User ManualHow to Clean your PrinterTo clean your printer, simply press the “Menu” buttonand follow the on-screen instructions (also shown below).Use the right-most button () to progress theoptions below.1.2.3/4.You can also view a short video on the recommended way to clean your printer using the link to ourwebsite ng-the-rio-pro-360/23
ID Card Printer – User ManualReplacing the Cleaning Roller Remove the blue Cleaning Roller from the printer and then remove the protective paper cover.Refit the blue Cleaning Roller (with the sticky coating now exposed) back into the printer.Do not touch the blue roller after the protective cover removed.NOTE:When replacing the blue Cleaning Roller, themetal bar above will need to be removed fromthe used Roller and refitted to thereplacement.DO NOT DISCARD THIS METAL ROLLER BAR!24
ID Card Printer – User ManualUsing the Cleaning PenThe Cleaning Pen (supplied with the Cleaning Kit (3633-0053 – see page 23) is used to clean the face ofthe print head. The pen contains Isopropyl Alcohol (IPA) and is very effective at removing light grease(such as finger grease etc.) which would otherwise spoil a printed card.To use, simply run the tip of the pen across the print face several times as shown in the diagram below.Once clean, do not touch the print face!The tip of the cleaning pen can itself be cleaned using an old “used” cleaning card until the Cleaning Kithas expired25
ID Card Printer – User ManualCHOOSING THE CORRECT DYE FILMBelow is a general guide to selecting the most suitable Film for any typical application.“Scratch” film lays down a soft film on the card’s surface which can be easily removed by light scraping.Dye Film Part NumberFilm PanelLayoutPrint Capacity(Cards)Typical ImagesMZ100YMCKO/4YMCKO100 (Printing colour)Single Sided - Colour Side 1 onlyDuplex - Colour Side 1 & 2MZ250YMCKOK/4YMCKOK250 (Printing colour oneside only)Single Sided - Colour Side 1 onlyDuplex - Monochrome Side 2MZ250YMCKOKO – HF/4YMCKOKO250 Half PanelSingle Sided - Colour Side 1 onlyDuplex - Colour Side 1 & 2MZ300YMCKO/4YMCKO300 (Printing colour oneside only)Single Sided - Colour Side 1 onlyDuplex - Colour Side 1 & 2MZ450YMCKO-HALF/4YMCKO450 Half PanelSingle Sided - Colour Side 1 onlyDuplex - Colour Side 1 & 2MZ600KO/4KO600Monochrome with Overcoat1000 (Printing on oneside only).Single Sided A1000K-n (n colour)Film PanelKey:Yellow (Y)KMagenta (M)Cyan (C)Resin (K)blackOvercoat (O)clearNOTE: 300YMCKO Dye Film is generally the appropriate choice for colour printing with both single and doublesided (duplex) printers.250YMCKOK Dye Film is generally preferred for duplex models only as this is more economic when printingcolour side 1 and monochrome side 2.1000K and 600KO Dye Film is often used where cost is an important factor.26
ID Card Printer – User ManualCHOOSING THE CORRECT CARDSNot all white PVC Cards are the same. For best image quality always use high grade PVC Cards.Pure PVC Card stock or laminated PVC/Polyester Cards are available. The latter are more durable andbetter suited to heavy use and heat lamination when required. For access control and Smart Cardapplications, your supplier should provide the appropriate type for “direct to card” printing.For consistent results, stick to a single variety of good quality Cards.Card sizesCR80 (Standard) 3.375” x 2.125” (85.6 mm x 54.0 mm). (w x h)CR79 (Small) 3.303” x 2.051” (83.9 mm x 51.0 mm). (w x h)Card thicknessStandard – 0.030” (0.76 mm).Minimum – 0.020” (0.51 mm).Maximum – 0.040” (1.02 mm).Card requirements necessary for good quality prints Glossy white.Free from contamination.Free from surface irregularities.Free from burrs at Card edges.1013 pixelsPrintable area of the CardThe printable area of a standard CR80 Card issize of 1013 x 642 pixels to obtain“edge to edge” print quality.642 pixelsAvailable Card 6M9006-797E9323Premium blank white cards – CR80Blank white cards with magnetic stripe – CR80Self-adhesive blank white cards – CR80Self-adhesive blank white cards – CR80 (USA)HoloPatch blank white cards with gold seal – CR80HoloPatch blank white cards with gold seal and magnetic stripe – CR80Magicard blank rewritable cards front & PVC back27
ID Card Printer – User ManualUsing Magnetic Stripe CardsIf you have a printer fitted with the optional Magnetic Encoding module, you can print and encode the data on therear of the Card in one operation. The magnetic encoding module can encode both HiCo and LoCo magnetic stripecard specifications.When loading magnetic stripe cards, make sure the stripe is facing down on the left side of the printer (as viewedfrom the front).To encode a magnetic stripe card, please refer to your card printing application although it’s also possible directly viathe Driver Interface.Using Self Adhesive CardsThere are many types of self-adhesive cards. Thorough investigation and testing has shown that poor quality orincorrect card types will cause: Poor image quality.Card feed failures.Cutting or snapping dye film.Cards jamming during printing.We recommend only using self-adhesive cards supplied by your ID card supplier.UPGRADING TO DUO OPERATIONPrinters can be supplied in two variants: UNO (single-sided) or DUO (double-sided).Single sided printers can be upgraded to DUO functionality via an electronic update. This is available from yourprinter supplier.28
PRINTER ERROR CODESERRORREF.1234ERROR TEXT DISPLAYED ONPRINTERLID OPENOUT OF CARDSHAND FEED ERRORCARD JAMERROR DESCRIPTION1:0The lid was opened while the print engine wasperforming an operation.1:1The lid was opened at the point the printer wasabout to begin a print job.2:5While feeding a card from the hopper, it took toolong for the rear sensor to block.2:6While trying to feed a card from the hopper, it tooktoo long for the front sensor to block.3:0While hand feeding a card, it took too long for thefront sensor to block.3:1While hand feeding a card, it took too long for thehopper sensor to detect a card.4:0While moving the card forwards to the front sensorin preparation for placing it in the contactlessencoding position, it took too long for the frontsensor to block.While moving the card backwards from the frontsensor to the contactless encoding position, it tooktoo long for the front sensor to unblock.4:14:2While feeding a card from the smart encoder to theflipper, it took too long for the smart extract sensorto indicate that the card was free of the encoder.4:3While moving a card from the flipper into the smartencoder, it took too long for the smart insert sensorto trigger.3029SOLUTION BY CATEGORYClose the Lid and try again.Load the printer’s rear feed hopper to continue.Check "Hand Feed" mode.Open the printer's Lid and remove the jammedcard to continue.
ID Card Printer – User Manual4:44:74:84:9While moving the card from the flipper to thestandby position, it took too long for the mid sensorto block.While feeding a card from the hopper, and havingseen the card reach the rear sensor, it took too longfor the mid sensor to block.While feeding a card from the hopper, and havingseen the card reach the mid sensor, it took too longto clear the rear sensor by rewinding the feedmotor.While moving the card forwards to feed into theflipper, it took too long for the card's leading edgeto block the front sensor.4:13While moving the card from the front sensor to thestandby position, it took too long for the frontsensor to unblock.4:14While moving the card from the rear sensor to thestandby position, it took too long for the rear sensorto unblock.4:15While moving a card from the flipper into the smartencoder, it took too long for the smart extractsensor to trigger. This may mean that there is noencoder actually fitted.4:16While feeding a card past a sensor, and having seenthe card reach that sensor, it took too long for thesensor to unblock.30
ID Card Printer – User Manual4:17While moving the card into position for a printing orencoding operation, it took too long for thereference edge of the card to move in front of thesensor used for positioning. In the case of extendedmono prints, this means the mid sensor took toolong to block. In other cases, this means it took toolong for the rear sensor to unblock.4:18While moving the card into position for a printing orencoding operation, it took too long for thereference edge of the card to move behind thesensor used for positioning. In the case of extendedmono prints, this means the mid sensor took toolong to unblock. In other cases, this means it tooktoo long for the rear sensor to block.4:19While trying to eject the card, it took too long forthe leading edge of the card to block the frontsensor.While trying to eject the card and having seen theleading edge of the card reach the front sensor, ittook too long for the front sensor to unblock.4:204:214:224:23While moving the card from the flipper to thestandby position, and having seen the card reachthe mid sensor, it took too long for the mid sensorto unblock.While trying to feed a card from the hopper, andhaving seen the card reach the front sensor, it tooktoo long for the front sensor to unblock.While moving the card backwards to feed into theflipper, it took too long for the card to block the midsensor.31
ID Card Printer – User Manual56OUT OF FILMWRONG FILM TYPE4:24While moving the card from the mid sensor to thestandby position, it took too long for the mid sensorto unblock.5:0While moving a dye panel edge from the dye sensorto the printhead, it took too long for the tachowheel to move the required amount. The film hasprobably either run out or snapped.5:1While advancing to the next dye panel, it too longfor the next panel boundary to be detected.5:2It took too many attempts for the printer to find aparticular panel of dye film (possibly because thedye sensor needs calibration).5:3A valid dye film RFID tag was found, but no physicalribbon could be detected while trying to take up thefilm slack.5:4A valid dye film RFID tag was found, but there wereno shots remaining.5:5After printing a card, the printer was unable todecrement the number of remaining prints on thedye film RFID tag.5:6While advancing the dye film, the printer detectedthe end-of-film marker.Check dye film.5:7While moving the dye film, too great a time elapsedbetween tacho sensor counts. The film has probablyeither run out or snapped.Check dye film.5:8While trying to take up the film slack, no tachopulses were observed within a reasonable amountof time.6:0The fitted dye film had an invalid RFID tag. Eitherthe tag was not programmed correctly or there is a32Check dye film is fitted and not expired. Also checkthe Film is not torn.Try a new dye film.
ID Card Printer – User Manualproblem with the RFID tag reader.78REMOVE FILMCAM ERROR6:1A dye film ribbon was detected, but a valid dye filmRFID tag could not be found. This printer is notconfigured to permit tagless film.6:2The fitted dye film does not have the right regioncode for this printer. Try another roll of film.6:3The fitted dye film does not have the right dealercode for this printer. Try another roll of film.6:4The fitted dye film does not have the right projectcode for this printer. Try another roll of film.6:5The fitted dye film does not have the right gradecode for this printer. Try another roll of film.7:0The printer detected film was loaded when trying tocalibrate dye LEDs and dye motor.7:1The printer detected film was loaded when trying tocarry out a soak test.7:2The printer detected film was loaded when trying tocarry out the cleaning routine.8:0While moving the printhead cam to the closedposition, it took too long to detect the trailing edgeof the cam pulley flag.8:1While initialising the cam, it took too long to detectthe leading edge of the cam pulley flag.33
ID Card Printer – User Manual910FLIP ERRORINVALID FILE8:2While initialising the cam and having detected theleading edge of the cam pulley flag, it took too longto detect the trailing edge of the flag.8:3While moving the printhead cam to the openposition, it took too long to detect the leading edgeof the cam pulley flag.9:0While initialising the flipper, it took too long todetect the start of the blocked region of the flange.9:1While initialising the flipper and having detected thestart of the blocked region of the flange, it took toolong to detect the start of the unblocked region (thestart of the slot).9:2While moving the card backwards to feed into theflipper and having seen the card arrive at the midsensor, it took too long for the mid sensor tounblock.10:0The printer received a print job. The side numberspecified for one of the sides of the image data wasinvalid. This probably means the print job file wascorrupt.10:1The printer received a print job. The formatspecified for the image payload was not supported.If updating the firmware does not fix this, it may bethat the print job file is corrupt.10:2The printer received a print job containing magne
1 Document: 5068 Issue 1.04 - 16/07/2020 User Manual Magicard D Printer Magicard K Printer