Transcription
Forms Printer 2500 SeriesUser's GuideNovember 2017www.lexmark.com
Contents2ContentsSafety information. 6Conventions. 6Learning about the printer. 7Printer overview.7Applying control panel overlays. 8Understanding the printer features and functions.9Printing a demonstration page. 11Printing a network setup page.12Printing from Windows or DOS.13Using IBM emulation mode.13Using Epson emulation mode. 14Using Okidata MICROLINE emulation mode. 15Using the control panel. 16Understanding the control panel buttons.16Understanding the control panel lights. 18Using the Start/Stop button. 18Setting the printer online or offline.19Advancing paper. 19Using the Load/Unload function.19Locking and unlocking the control panel. 20Selecting a Tractor mode. 20Selecting and locking a font.20Disabling Font Lock. 21Selecting and locking a pitch. 21Disabling Pitch Lock. 21Loading paper. 22Setting the forms thickness lever.22Paper paths. 23Using the Tear Off function.24Loading continuous paper. 25Loading continuous forms using the push tractor . 25Front loading continuous forms using the pull tractor . 27
Contents3Bottom loading continuous forms using the pull tractor. 31Loading cut forms.35Loading a cut form or envelope manually . 35Aligning the left margin. 38Setting Top-Of-Form. 39Setting Top‑Of‑Form for continuous forms in push mode. 39Setting Top‑Of‑Form for continuous forms in pull mode . 40Setting Top‑Of‑Form for a cut form or an envelope. 40Setting Top‑Of‑Form in a macro . 41Paper and specialty media guide. 42Paper types and sizes supported by the printer.42Changing tractor positions.43Push tractor position.43Pull tractor position. 43Converting the push tractor to pull tractor position. 44Converting the pull tractor to push tractor position. 45Understanding Setup mode and menu options. 47Using Setup mode.47Changing menu settings (an example). 48Setup Mode - Main menu.49Main menu options . 49Forms Macro options. 50Data options. 51Control options . 52Emulation options. 54Interface options. 54Maintaining the printer. 56Ordering supplies.56Removing the ribbon cartridge.56Cleaning the printer.56Recycling Lexmark products.57Administrative support. 58Restoring the factory default settings.58Supporting IPSec.59Supporting SNMPv3. 59
Contents4Using 802.1x authentication. 60Troubleshooting.61Checking an unresponsive printer. 61Testing the printer. 61Checking the printer status. 62Adjusting character (bidirectional) alignment. 64Solving printing problems. 66Printer test works, but the printer does not print when attached to the computer . 66Printer is noisy . 66Printer sounds like it is printing, but does not print. 66Printer alarm sounds. 66Printer goes to the Tear Off position before the print job finishes. 66Buttons do not work, except for Start/Stop, FormFeed, Tear Off, and Load/Unload. 67Left margin moves to the right during printing . 67Incorrect line length; lines do not start at the left margin. 67Printer speed slows . 68Incorrect characters print, left margin changes, or printing stops. 68Printing continues beyond the edges of the continuous forms. 68Selected font or pitch is not printing or is changing . 68Solving paper feed problems.68Paper is jammed in the printer. 68Paper is jammed in the Auto Sheet Feeder . 69Paper fed in the Auto Sheet Feeder jams at the printer entrance . 69Paper jam in the Tractor 2 Feeder . 69Printer does not feed paper . 70Printer does not feed from the optional Tractor 2 Feeder . 70Printer does not feed from the Auto Sheet Feeder . 70The optional Tractor 2 Feeder positions paper at incorrect Top‑Of‑Form position.71The Auto Sheet Feeder feeds paper at an incorrect rate .71The Auto Sheet Feeder places paper at the wrong Top‑Of‑Form position.71Paper fed from the Auto Sheet Feeder is skewed .71The Auto Sheet Feeder feeds multiple sheets.71Solving print quality problems.72Print is too light . 72Dots are missing or print quality is poor. 72Characters are wrong or missing . 72Forms are smudged or print is too dark.73Incorrect number of lines on a page .73Graphics do not print.73Incorrect line spacing or overprinting occurs .73Contacting Customer Support. 73
Contents5Notices. 74Edition notice. 74Power consumption. 78Index.86
Safety information6Safety informationConventionsNote: A note identifies information that could help you.Warning: A warning identifies something that could damage the product hardware or software.CAUTION: A caution indicates a potentially hazardous situation that could injure you.Different types of caution statements include:CAUTION—POTENTIAL INJURY: Indicates a risk of injury.CAUTION—SHOCK HAZARD: Indicates a risk of electrical shock.CAUTION—HOT SURFACE: Indicates a risk of burn if touched.CAUTION—TIPPING HAZARD: Indicates a crush hazard.CAUTION—PINCH HAZARD: Indicates a risk of being caught between moving parts.CAUTION—POTENTIAL INJURY: To avoid the risk of fire or electrical shock, connect the power cord toan appropriately rated and properly grounded electrical outlet that is near the product and easilyaccessible.CAUTION—SHOCK HAZARD: To avoid the risk of electrical shock, do not place or use this product nearwater or wet locations.CAUTION—POTENTIAL INJURY: To avoid the risk of fire or electrical shock, use only the power cordprovided with this product or the manufacturer's authorized replacement.CAUTION—POTENTIAL INJURY: Do not cut, twist, bind, crush, or place heavy objects on the powercord. Do not subject the power cord to abrasion or stress. Do not pinch the power cord between objectssuch as furniture and walls. If any of these things happen, a risk of fire or electrical shock results. Inspectthe power cord regularly for signs of such problems. Remove the power cord from the electrical outletbefore inspecting it.CAUTION—SHOCK HAZARD: Do not set up this product or make any electrical or cabling connections,such as the power supply cord or telephone, during a lightning storm.CAUTION—HOT SURFACE: The printhead may be hot. To reduce the risk of injury from a hotcomponent, allow the surface to cool before touching it.CAUTION—SHOCK HAZARD: Make sure that all external connections (such as Ethernet and telephonesystem connections) are properly installed in their marked plug-in ports.This equipment is not suitable for use in locations where children are likely to be present.Refer service or repairs, other than those described in the user documentation, to a service representative.This product is designed, tested, and approved to meet strict global safety standards with the use of specificmanufacturer's components. The safety features of some parts may not always be obvious. The manufactureris not responsible for the use of other replacement parts.SAVE THESE INSTRUCTIONS.
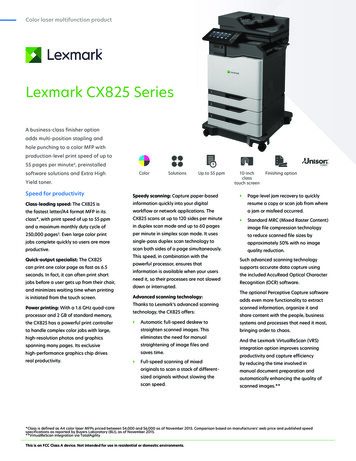
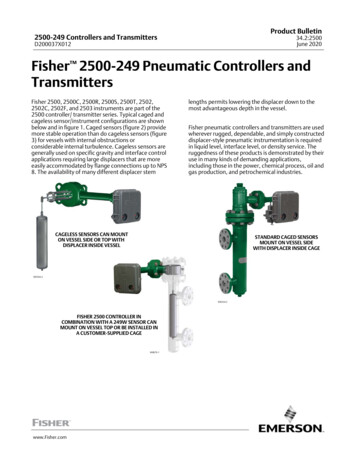
Learning about the printer7Learning about the printerPrinter overviewThe LexmarkTM Forms Printer 2500 Series printers are available in 9‑ and 24‑wire narrow‑ and wide‑carriagemodels. Depending on the model you have chosen, your printer may look slightly different from the printer inthe illustration.Printer front view12A76Part name1Forms thickness lever2Ribbon access cover3Paper select lever4Paper guides5Manual feeder6Front cover7Control panel543
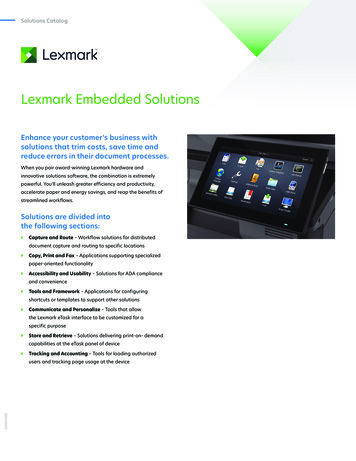
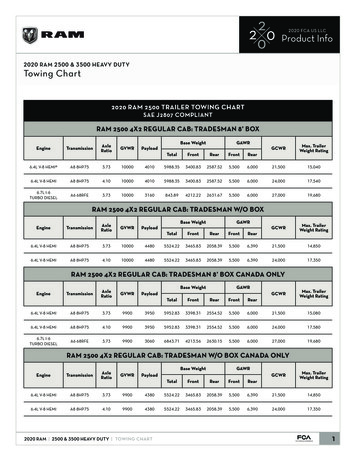
Learning about the printer8Printer back view5123461110987Part name1Ribbon access cover latch2Acoustic flap3Tear Off bar4Ribbon access cover latch5Recessed network button6Network connectorWarning—Potential Damage: Do not touch the network connector except when the printer is unpluggedfrom the electrical outlet.7Optional serial interface knockout8Parallel connector9USB connector10Optional Tractor 2 connector knockout11Power cord connectorApplying control panel overlaysThe Lexmark Forms Printer 2500 Series printers have control panel overlays available in different languages.Note: There is an overlay label for layer 1 of the control panel and a different overlay label for layer 2 of thecontrol panel.To apply an overlay in the language of your choice:1 Peel the backing off of the layer 1 label, and then place the overlay directly over layer 1 of the control panel.2 Open the control panel cover to access layer 2.3 Peel the backing off of the layer 2 label, and then place the overlay directly over layer 2 of the control panel.4 Close the control panel cover.
Learning about the printer9Understanding the printer features and functionsPrinter features by modelFeature or function2580 or 2581 2590 or 2591 Multi‑speed printingFastDft (Fast Draft) 10 characters per inch (cpi) 12 cpi 532 characters per second (cps) 618 cps 479 cps 556 cpsDraft400 cps400 cpsCourierGothic100 cps (Near‑Letter‑Quality mode)133 cps (Letter‑Quality mode)Character spacingPrints in 10, 12, 15, 17, and 20 cpi, as wellas proportional spacingPrints in 10, 12, 15, 17, 20, and 24 cpi, aswell as proportional spacingNote: Fast Draft supports only10, 12, and 15 pitch.Resident fontsPrint stylesNote: This feature is availablethrough printer commands.Graphics printingNote: This feature supportsexisting graphics programs.Multiple‑part forms Fast DraftDraftGothicCourierHighlighting capability: dItalicsOverscoreSubscriptSuperscriptUnderline Fast ptHighlighting capability: ingOutlineResolution of up to 144 x 240 dots persquare inch (dpi)Resolution of up to 360 x 360 dpiPrints original plus five copies (six‑partforms)Prints original plus five copies (six‑partforms)
Learning about the printer10Printer features of all modelsFeature or functionDescriptionControl panelThis is the button control for Load/Unload, Tear Off, Font, Setup, Pitch, Macro, and papermovement functions. Control panel lights indicate current status.Font lock This locks the font selection you make from the control panel so it is not changed byyour program. Font lock is deactivated when you unplug the printer power cord, unless it is set in theprinter default settings.Pitch lock This locks the pitch selections you make from the control panel so they are notchanged by your program. Pitch lock is deactivated when you unplug the printer power cord, unless it is set in theprinter default settings.Load/UnloadThis loads and unloads continuous form paper (tractor fed).Macro functionThis allows the printer to store four unique document formats to enhance flexibility whenusing different styles of preprinted forms.Manual front loading for This enables printing on cut sheets or envelopes.cut sheetsTear Off barAdjustable tractor This assists in removing printed continuous forms at the perforation. This assists in tearing non‑perforated forms. This reduces the amount of paper used, thus reducing costs.This lets you handle continuous form paper without purchasing additional options. Thiscan be repositioned to function as: Push tractor Pull tractorControl panel disableThis limits control panel functions to the Start/Stop, FormFeed, Tear Off, and Load/Unloadbuttons only, thus limiting the potential that untrained operators may accidentally changeforms settings.Ribbon cartridgeThis contains the inked fabric ribbon.Printer tests Power‑on Self Test Printer test page—This determines whether your machine has print problems. Demonstration PrintBox and line drawingsThis prints tables, charts, and other graphics as shown on your computer screen.Greek and mathsymbolsThis prints a variety of symbols used in mathematical equations, including subscript andsuperscript.Code pagesThis selects the characters and symbols corresponding to various languages.
Learning about the printer11Feature or functionDescriptionBar code functionThe following bar codes are resident in the printer: 3 of 9Codabar (NW‑7)Code 39Code 128Interleaved 2 of 5UPC‑AUPC‑EEAN 8EAN 13PostNetNote: For more information on the Bar code function, see the Technical Reference atwww.lexmark.com.Software compatibility The printer is compatible with all programs that support IBM emulation or Epsonemulation. The printer is compatible with Okidata MICROLINE emulation (with the M320 turbo),which is standard on the 9‑wire printer and 2580 or 2581 printer models.Interface connectionThis allows the printer to work with all computers with compatible interface connections.Warning—PotentialDamage: Do not touchthe network connectorexcept when theprinter is unpluggedfrom the electricaloutlet.Both parallel and USB interfaces are standard. The internal serial interface (RS‑232) isoptional for the 2580 or 2581 and 2590 or 2591 models.The Network option is standard on the 2580n or 2581n and 2590n or 2591n models.Printing a demonstration page1 Set the forms thickness lever to position 1.
Learning about the printer122 Plug the printer power cord to a properly grounded electrical outlet.Note: The Power light comes on and turns solid green, the Paper Out light is blinking, and the currentdefault font light is solid green. For more information on the control panel lights, see “Understanding thecontrol panel lights” on page 183 Open the manual feeder, and then move the paper select lever to theposition.4 Move the left paper guide to the right until it stops.5 Insert a single sheet of paper into the front of the printer.6 Adjust the right paper guide to fit the paper width.A7 Continue pushing the paper into the printer until the Paper Out light stops blinking. If Auto Cut Sheet Load is set to On, then the paper feeds automatically to the Top‑Of‑Form. If Auto Cut Sheet Load is set to Off, then press FormFeed.8 Press and hold Start/Stop for five seconds.9 Press Font and Start/Stop.Note: Hold down the Font button until all the control panel lights blink.10 Release the Font button.Note: The Power and Ready lights stay on, and the demonstration page prints.Printing a network setup pageIf the printer is attached to a network, then print a network setup page to verify the network connection andfind the printer address.
Learning about the printer13Note: This function is disabled if a USB cable is connected to the printer.1 Make sure the printer is ready and paper is loaded.2 With a paper clip or the tip of a pen, press the recessed button located just above the network connector.Note: The network setup page prints.Warning—Potential Damage: Do not touch the network connector except when the printer is unpluggedfrom the electrical outlet.3 Check the first section on the network setup page, and then confirm that the status is Connected.If the status is Not Connected, then the LAN drop may not be active, or the network cable may bemalfunctioning. Consult a system support person for a solution, and then print another network setup page.4 Check the network setup page to find the IP address and the fully qualified domain name.The fully qualified domain name is useful in situations where the IP address changes. For instance, the IPaddress changes if the printer is moved; however, the fully qualified domain name does not change.Note: The network setup page also provides important network configuration information.Printing from Windows or DOSWindowsWhen printing from a Windows application, use the Windows Forms Printer 2500 Series driver available fromthe Lexmark Web site at www.lexmark.com.DOSFollow the instructions that came with your DOS application to see what printer drivers are supported for yourlevel of DOS. Most applications let you specify the type of printer you are using so the application can take fulladvantage of the printer features.Using IBM emulation modeIf the printer is in IBM mode (the factory default setting), then select a printer from your program in the followingorder:
Learning about the printer14For Lexmark Forms Printer 2580 or 2581 users1 Forms Printer 2580 or 2581 2 Forms Printer 2480 or 2481 3 Forms Printer 2380 or 2381 4 2380 or 2381 5 2380/2381 IBM Personal Printer SeriesTM II6 4201/4202 IBM ProprinterTM III7 4201/4202 IBM Proprinter II8 IBM ExecJetTM Printer Model 4072For Lexmark Forms Printer 2590 or 2591 users1 Forms Printer 2590 or 2591 2 Forms Printer 2490 or 2491 3 Forms Printer 2390 or 2391 4 2390 or 2391 5 2390 or 2391 IBM Personal Printer Series II6 4212 IBM Proprinter 24P7 2390 IBM PS/1 Printer8 4207/4208 Proprinter X24/XL249 IBM ExecJet Printer Model 407210 2205 IBM PS/1 PrinterNotes: If your software does not let you select one of the printers in the list, then you may need to customizeyour printer for Epson emulation mode. The printer driver you select in your program must match the emulation model you select for your printer.Printer drivers other than the 2500 series support most, but not all, of the printer capabilities.Using Epson emulation modeIf the printer is in Epson mode, then select a printer from your application in the following order:For Forms Printer 2580 or 2581 users1 Epson FX8502 Epson FX 1050
Learning about the printer15For Forms Printer 2590 or 2591 users1 Epson LQ8502 LQ 1050Note: The printer driver you select in your application must match the emulation mode you select for yourprinter. Printer drivers other than the 2500 series support most, but not all, of the printer capabilities.Using Okidata MICROLINE emulation modeIf the printer has the Okidata MICROLINE emulation option installed, select a printer from your application inthe following preferred order.1 Oki 320/321 Turbo2 Oki 320/321
Using the control panel16Using the control panelUnderstanding the control panel buttonsThe control panel has two layers of functionality: Layer 1, with the control panel cover closed, contains basic functions li
The Lexmark TM Forms Printer 2500 Series printers are available in 9 ‑ and 24‑wire narrow‑ and wide‑carriage models. Depending on the model you have chosen, your printer may look slightly different from the printer in the illustration. Printer front view A 2 4 3 6 5 7 1 Part name 1 Forms thickness lever 2 Ribbon access cover 3 Paper .