Transcription
TOPAZ ReMask V3QUICK START GUIDE
IntroductionReMask 3Topaz ReMask is a masking solution that offers professional results while cutting down on masking and extraction time. It is designed totackle some of the most common photography and design tasks such as isolating specific image elements, background replacement, compositions, and adjusting selections with color and special effects. The advanced technology that backs ReMask makes the masking processquicker and easier than ever before - even for the trickiest masking tasks such as hair and fur.With Topaz ReMask you can: Easily extract objects with intricate image details Replace backgrounds Quickly isolate areas for selective adjustments Creatively emphasize the subject easily and naturally Make unique compositions Selectively blur only the background for a simulated bokeh effectNew Topaz ReMask 3.01. Color decontamination technology. Helps solve color bleed issues.2. Better hair detection and selection technology.3. Speed Boost. Increase in processing speeds.4. Auto Layer Creation. Option (enable / disable in preferences) to automatically create a new layer(in Photoshop CS3 and above only) when invoking the plug-in.5. New Refining Toolset. Mask adjustment (strength and hardness sliders) andforeground color (recovery and desaturation sliders).6. New Brush Tools. Single-Color Selection (with Color Range slider) and Dual-Color Selection.7. Split screen options. 2-screen view or 4-screen view.8. Layer Mask Option (in preferences). Let Topaz ReMask automatically create and alayer mask for non-destructive editing.For more ReMask 3 tutorials and resources please visit: http://www.topazlabs.com/tutorials
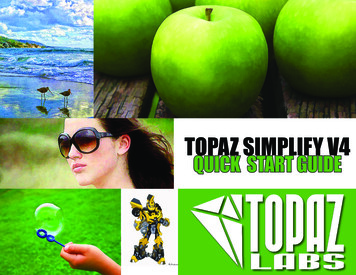
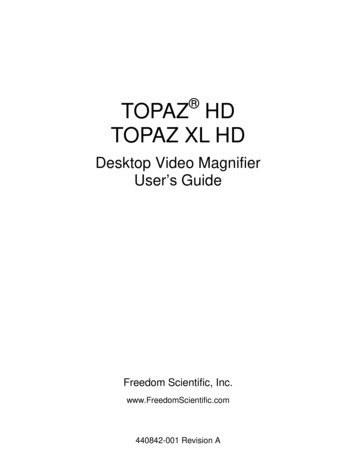
WorkspaceReMask 3315421. Preview Navigator2. Editing Parameters3. Editing Views4. Preview Window5. Split Screen ViewsDisplays the region of thepreview image you arecurrently focused on.Displays all of the tools thatyou will need to successfullycreate your mask.Displays editing views usedduring the masking process.Displays the preview ofeach editing view.2-screen and 4-screen optionsused to compare each editingview during the masking process.For more ReMask 3 tutorials and resources please visit: http://www.topazlabs.com/tutorials
Example WorkflowReMask 3In this project, we will walk you through an exampleworkflow to help you get acquainted with the basicReMask 3 workflow.For this example, we will be doing a simple background replacement. In the following steps, we willshow you how to achieve optimal results with yourown photos. So, let’s get started.1. Open an image file in Photoshop.2. Go to Filter - Topaz Labs and select ReMask 3.Before Topaz ReMaskThe new ReMask 3 features an auto-layer creationtool which allows users to skip the usual step of unlocking the background layer / creating a duplicatelayer.After Topaz ReMaskThis feature can be enabled / disabled in the ReMask3’s preferences. You can access it from within theprogram by going to Menu - Preferences.After Topaz DetailFor more ReMask 3 tutorials and resources please visit: http://www.topazlabs.com/tutorials
Example WorkflowReMask 3When your image loads it will automatically be filledwith green (keep) by default. So now we will justneed to add our red (remove) and blue (compute)selections to complete the tri-map.You will also notice that the additional refinementtoolset is not present. The refinement toolset will onlybecome available after you create and compute yourtri-map.For more ReMask 3 tutorials and resources please visit: http://www.topazlabs.com/tutorials
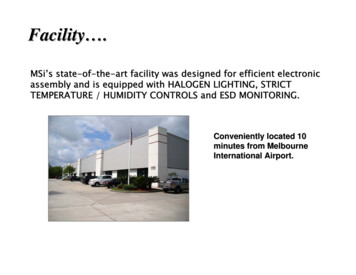
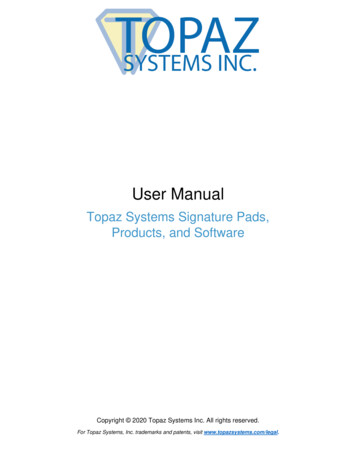
Example WorkflowReMask 33. Once your image loads, use the zoom tools tozoom in on a specific part of your image. Then youcan click on the preview and drag it around until youfind an area that you like to begin creating your trimap.4. Select the Blue (basic) brush tool and set yourbrush size. Brush around the edges of your subject.5. Select the Red fill tool and click outside of the blueoutline to fill the background area to be removed.For more ReMask 3 tutorials and resources please visit: http://www.topazlabs.com/tutorials
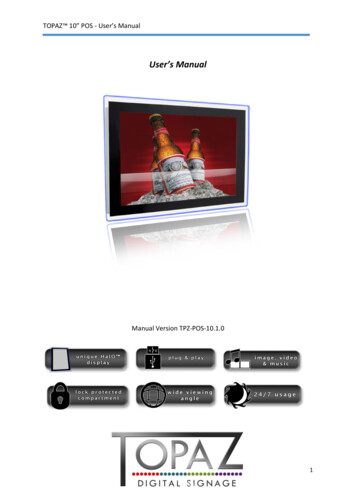
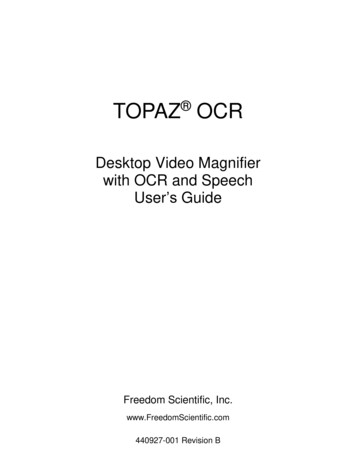
Example WorkflowReMask 36. Click “Compute” to compute your tri-map.Once your tri-map is computed you can use the viewtabs to see your mask, keep and cut selections.KeepIf desired, select a single or 2-screen view before beginning your refinements.You will notice that the refining tools are now available for use.MaskFor more ReMask 3 tutorials and resources please visit: http://www.topazlabs.com/tutorials
Example WorkflowReMask 3There are still some areas in between the hair strandswhere the removed yellow background can still bedetected. The new tools in ReMask 3 make the refining process easier and more precise, and will help usclean up the yellow remnants.7. Go to the Single Color Selection tool and select thered brush icon. Once you select this, it will activate thecolor picker. Select the background color by clickingon it in your image.8. Once you have your color selection, yellow in thiscase, you can then use the Color Range slider to determine the range of yellow that will be affected.9. Select your brush size and then brush over the hairto remove the leftover yellow areas. Repeat this process as necessary.Don’t forget that you can use the shortcut keys inTopaz ReMask to speed up your workflow.To bring foreground details back into your image, youcan select the green brush icon instead. Then choosethe main color of your foreground and adjust theColor Range slider. Then slowly brush those detailsback into your image.For more ReMask 3 tutorials and resources please visit: http://www.topazlabs.com/tutorials
Example WorkflowReMask 3Once the leftover color has been removed we canbegin refining the mask and foreground color.10. For this image we will not adjust the sliders in theMask Adjustment section. These sliders are best left at alow setting or completely disabled for images with hair.11. Go to the Foreground Color section and slowlyincrease the Recovery slider to bring back the haircolor.12. If desired, slowly increase the desaturation sliderto lower the saturation of the image edges.For more ReMask 3 tutorials and resources please visit: http://www.topazlabs.com/tutorials
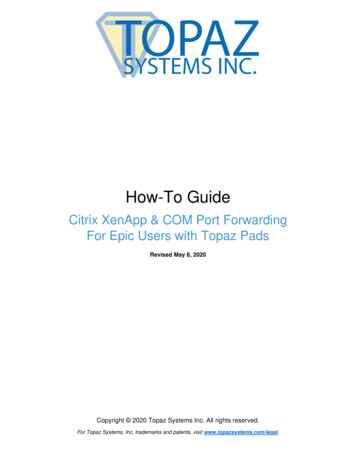
Example WorkflowReMask 313. Once you are happy with your selections, click OKto save your image back to Photoshop.Before Topaz ReMask14. Add a new background into your masked image, orany other desired creative enhancements and you areall set.After Topaz ReMaskFor more ReMask 3 tutorials and resources please visit: http://www.topazlabs.com/tutorials
Quick Start UseReMask 3This Topaz ReMask 3 Quick Start Guide is for users who are familiar with the masking and extraction process andwant to jump straight into using Topaz ReMask 3.For a more in-depth and comprehensive break down of using Topaz ReMask 3 please view the Topaz ReMask UserGuide.The User Guide was automatically installed on your computer when you installed Topaz ReMask 3.Here is how to access it:MAC: HD - Library - Application Support - Topaz Labs - ReMask 3 - DocsWINDOWS: Computer - C:/ - Program Files - Topaz Labs - ReMask 3 - DocsYou can also access additional written and video tutorials online at: http://www.topazlabs.com/tutorialsFor more ReMask 3 tutorials and resources please visit: http://www.topazlabs.com/tutorials
Connect with TopazReMask 3Check out our new Forum and our blog fortutorials, tips and updates from Topaz Labs!Follow us on Twitter for notifications ofrecent news and easily get in touch with uswhenever you feel like it!Find us on our Facebook page and networkwith other Topaz users!Participate in the entirely user-led TopazFlickr group for a helpful and highly activecommunity for Topaz Photoshop plug-ins!Subscribe to our YouTube channel to keepup with any newly released product videotutorials!For more ReMask 3 tutorials and resources please visit: http://www.topazlabs.com/tutorials
This Topaz ReMask 3 Quick Start Guide is for users who are familiar with the masking and extraction process and want to jump straight into using Topaz ReMask 3. For a more in-depth and comprehensive break down of using Topaz ReMask 3 please view the Topaz ReMask User Guide.