Transcription
TOPAZ 10” POS - User’s ManualUser’s ManualManual Version TPZ-POS-10.1.01
TOPAZ 10” POS - User’s ManualOur Full Product RangeFull details of all TOPAZ products available can be found by visiting our web sitewww.topazdigital.com2
TOPAZ 10” POS - User’s ManualSafety Instructions Please keep the display away from any heat sources. Place thedisplay in a stable and well‐ventilated place. Please handle with care as acrylic is fragile The holes or openings on the display are designed forventilation. Do not cover or block the ventilation holes oropenings with any objects. Remove protective covering from the screen before you usethe display. Shut off the power supply before cleaning. Use a soft lint‐freecloth instead of a tissue to wipe the screen. You may use a glass cleaner to clean the product as required.However, never spray the cleaner directly onto the displaysurface. Do not attempt to repair this product yourself! Anymodification to the product or repair carried out that is notdone with our authorization may invalidate the warranty andcould be potentially dangerous. If you have a problem that cannot be solved using the"Troubleshooting" guidelines, please contact your supplier.3
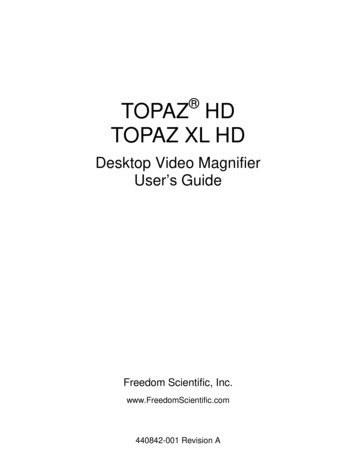
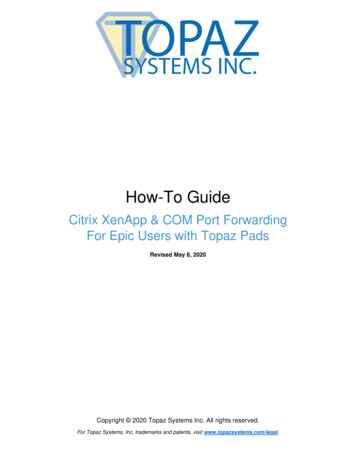
TOPAZ 10” POS - User’s ManualQuick Start GuideThis section of the guide is to allow rapid set up and use of the unit. Please refer to the mainpart of the User Guide for full information on use of the unit.Please follow the steps detailed below:1. Unpack unit and place in desired location2. Take the power lead from the accessories bag, insert the lead into the side of thescreen and connect to mains outlet. Switch the display on using the switch next tothe power socket. You will be greeted by the start‐up screen.3. Collect the files you wish to display and make sure they are supported by the unit(see Section 2.2)4. On a PC copy the files you want to play onto an empty USB drive. These should be inthe root directory (without putting them into a folder). Remove USB from PC.5. Insert USB drive into the USB port located on the side of the unit next to the on/offswitch (see Figure 1).6. The screen should indicate that it is copying the files onto the unit. Please note thatall files currently resident in the unit will be deleted. Once completed, the screen willdisplay a message to remove the USB drive.7. Remove the USB drive and the unit will play the stored files in a loop.USB Port4
TOPAZ 10” POS - User’s ManualContents:1.Introduction. 61.1Box Contents. 61.2Product Overview . 61.3Remote Control . 71.4Button Functions . 71.5Replacing the Remote Control Battery . 81.6Menu Operation .92. System Operation . 132.1System Functions. 132.2Supported Media Files. 142.3Steps to Load Media Files. 143. Installation. 153.1 Wall Mounting . 153.2 Counter Top . 164. F.A.Qs and Troubleshooting Guide . 174.1 How do I play PowerPoint presentations on my display?. 174.1.1 Option 1 (for plain slides with no animation): . 174.1.2 Options 2 (for presentations with animation): . 174.2 Video Conversion . 184.2.1 Format Factory. 184.3 My Remote Control does not appear to be working . 204.4 My media file does not fit properly on the screen. 204.5 My media file will not display or is missing from the playlist. 204.6 My media files will not update. 224.7 My media will not loop. 225. Panel Specifications . 225
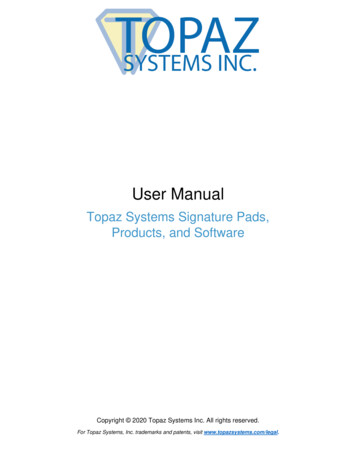
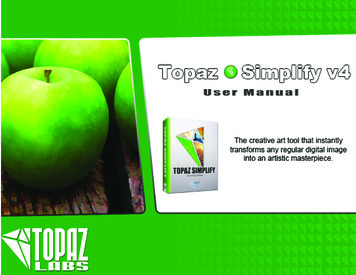
TOPAZ 10” POS - User’s Manual1. IntroductionThank you for choosing the TOPAZ POS range for your digital signage. Please read carefullyand follow all instructions in the manual before first use.The product should not be exposed to liquids, dripping or splashing and no objectsfilled with liquids, such as vases, should be placed on or next to the product.For user convenience, a number of operations can be performed through the remotecontrol.Attention:1.Do not change any default setting if it is unnecessary.2.Keep the product far away from water during installation and use.1.1 Box Contents1 x TOPAZ 10” POS Display1 x Mounting Bracket [connected to display]1 x Power Cable1 x CD (User Manual and Software)1 x Remote Control1.2 Product Overview1.12.23.34.45.52413Remote Control SensorInputsAir VentPower InLockable Card Compartment5Figure 2 Product Overview6
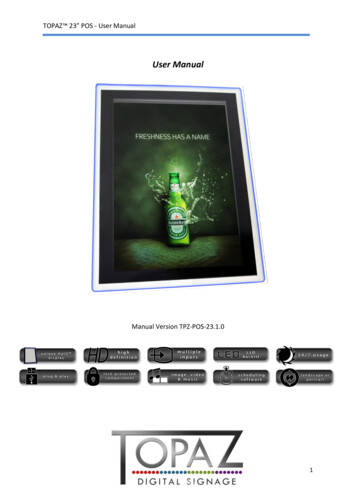
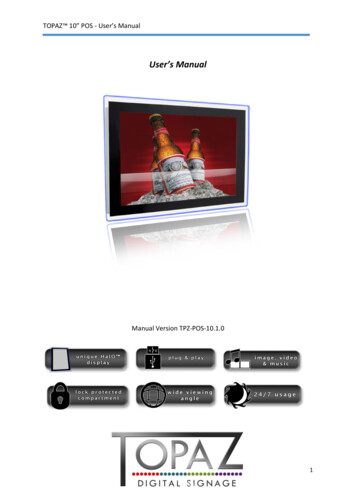
TOPAZ 10” POS - User’s Manual1.3 Remote Control1234576891101001201301401501601POWERSwitch between on and off2MUTETurn the sound on and off3GOTOAfter inserting different memory cards, you can check storage list.Selecting one card or pressing this button to enter sort media filechoice, can sort play or auto play all the media files4SETUPEnter basic function settings when it stops playing5TRANSITION(file edit mode) recover6INFOenter into file edit mode7VOL VOL-8SEL9Volume increase/decrease(file edit mode) set target media cardMove the direction of the cursor10ENTERConfirm the inputting content11MODEswitch to repeat mode (repeat one/repeat all/repeat off)12COPY(file edit mode) clear13Stop14Go to previous/next frame/picture/music/movie, etc15Play16Pause1.4 Button functions (on rear of unit)AV INCOPYTIMERON/OFF- SELMODEPOWERThe function and operation of the above buttons, please refer to the correspondingbuttons on the remote control.7
TOPAZ 10” POS - User’s Manual1.5Replacing the Remote Control Battery1. Open the battery cover2. Take out the battery box in the right direction as shown in the picture below3. Remove the used battery4. Insert the new battery with its terminals corresponding to the indicator5. Put the cover back in8
TOPAZ 10” POS - User’s Manual1.6 Menu OperationPress “SETUP” to enter Main Menu, press to select the right item, press “PLAY” toconfirm selection. Choose EXIT to exit the Main Menu.Main MenuGeneral SetupCalendar SetupTimer SetupLCD SetupSlideshow SetupGeneral Setup:Press ENTER on General Setup to enter menu.OSD LanguageGeneral PageOSD LanguageTimer ModeAuto StartScreen SaverEnglishChineseJapaneseTimer ModeTo set the Timer Mode to either DAY MODE or WEEK MODE, press the SETUP button toopen the MAIN MENU / GENERAL SETUP / TIMER MODE, then select either Day or WEEKmode:You can set up to five switch machine time.See specific settings please refer to (SEVEN.: Function of TIMER ON/OFF)General PageOSD LanguageTimer ModeAuto StartScreen SaverDay ModeWeek ModeAuto StartWhen setting the auto play option to ON, the player will automatically play any media filesstored immediately after powering on in a continuous loop.Open Main Menu/General Setup/Auto Start to setup the auto play function by pushing the‘setup’ button.General PageOSD LanguageTimer ModeAuto StartScreen SaverOFFON9
TOPAZ 10” POS - User’s ManualScreen SaverChange the screensaver to on or off by opening the Main Menu/General Setup/Auto Start tosetup the auto play function by pushing the ‘setup’ button.General PageOSD LanguageTimer ModeAuto StartScreen SaverONOFFCalendar Setup:Press ENTER on Calendar Setup to enter menu.CalendarTo change the date of the unit, go to the Main Menu/Calendar Setup/Calendar/Calendar andpress ENTER.Calendar PageCalendarTime DisplayTimeCalendarMain PageTime DisplayThe unit is able to display the current time in the top right corner of the screen over the top ofthe playing media files. To change this option to ON or OFF, go to the Main Menu/CalendarSetup/Time Display and press ENTER on ON or OFF.Calendar PageCalendarTime DisplayTimeONOFFMain PageTimeTo change the time of the unit, go to the Main Menu/Calendar Setup/Time and pressENTER.Calendar PageCalendarTime DisplayTimeCalendarONOFFMain Page10
TOPAZ 10” POS - User’s ManualTimer Setup (day mode):This menu allows the user to set 5 timers for when the unit will power on and off.To change between Day Mode and Week Mode, see Timer Mode on Page 10.Press ENTER on Timer Setup to enter menu.Timer PageEvery DayTimerMain PageTimer Setup (week mode):To change between Day Mode and Week Mode, see Timer Mode on Page 10.Timer rdayTimerSteps of using Timer Setup function:1. When the unit is in STOP mode, press SETUP and enter the SETUP,MENU/GENERAL SETUP. Choose TIMER Mode and choose DAY MODE or WEEKMODE. DAY Mode, the timer switch on will effect every day, each day has the sametimer on/off time. WEEKLY mode, the timer switch on the weekly, Sunday, Monday, Tuesaday.Saturday separately in different settings, set the timer switch specific timedifference effectively, namely: a group of Sunday, a group Monday.2. Press SETUP and choose CALENDAR SETUP/CALENDAR/CALENDAR enter thedate setting page. Set the current date and time, time is 24-hour format, set for a totalof four categories: time, month, year, date, use thebutton on the remote tomove the cursor between date, time and year.Such as: In the date section, use the arrow keys to move the cursor to the current date; Pressto go to the time section, use the left and right keys to move thehours, minutes, seconds to different places, use the up and down keys tochange value on the cursor position (hours, minutes, seconds); Pressto go to the month and year section, use the left and right keys tochange the value of the month/year.Press ENTER key to confirm the changes to values.11
TOPAZ 10” POS - User’s Manual3. In the SETUP MENU / TIMER SETUP, GO TO THE TIMER ON/OFF setting page,when you choose WEEK MODE, the timer page will list SUNDAY, MONDAY,TUESDAY, WEDNESDAY, THURSDAY, FRIDAY, SATURDAY. You can setindividuals times on different days of every week, the specific setting and TIMERSETUP set the same.4. SET EVERY DAY page, there are five items grouped timer switch settings can beset, each set ID includes an item that ON time and an OFF time. This is a timerswitch time.5. The timer on/off setting will be effective when the time is ON.If one group setup as ON time OFF time, means this group is invalid.If all five groups are set up ON time OFF time means the whole day setting is invalid. Theplayer will switch on the whole day (24 hours) this means TIMER OFF.The system reset default invalid timer switch, each time set up to 00, timer on/off is OFF.If the time setting of the timer switch is non-logical setting when you turn the machine ON,the machine will all loaded these groups into the machine, the judicious logic and timerswitch can run.1.In the SET TIMER page, use the left and right keys to move the cursor and set adifferent item. Use the cursor up and down keys to adjust the settings in the column.Move cursor up and down keys to adjust the settings in the column. Move cursor tothe YES position, press ENTER key to confirm the settings save and exit, move thecursor to the YES position, press ENTER key to cancel the settings save and exit.12
TOPAZ 10” POS - User’s Manual2. System Operation2.1 System Functions1. File Edit Mode (option)You can enter file edit menu by pushing info button in the stop playing mode.From here you can copy, move, cancel file.2. Media card instructionCF CardNormally used for storing media files, also you can play or transfer the files inthe SD card. And copy files on the USB to the SD card.SD CardNormally used for storing media files, also you can play or transfer the files inthe SD card. And copy files on the USB to the SD card.USB deviceNormally used for storing media files, also you can play or transfer the files onUSB.NAND FLASH (option)Usually used for storing the media files also can play directly from it.(When you insert the CF/SD card and USB at the same time, it will preferentially playCF media files; if you remove the CF card, it will automatically read and play files onthe SD card; if the SD card is removed, it will read the USB.The priority to read media cards is 1. CF, 2. SD, 3. USB.The player will read SD card first if a CF card without files is inserted. Will read USBfirst if inserted with a blank SD card. The USB reading speed is the slowest. It is notadvised to use USB to play media files; normally use CF card to play media filesUSB is used as a means to transfer the media files. It is the carrier of files to copy.)1) All of the media files should be the same format, for example it cansupport suffix .TS OR .MPG video file, not both.2) The resolution, codec, code rate, frame rate should be the same for allvideo files, and the audio coder, sample rate should be the same for allaudio files.13
TOPAZ 10” POS - User’s Manual2.2 Supported Media FilesSortAUDIOVIDEOPHOTOCodecMP3SortAUDIO filesupportMPG1 (VCD)MPG2 (DVD/SVCD)DivxVIDEO fileXvidsupportM-JPEGJPEGPHOTO filePROGRESSIVEsupportJPEGMax Resolution (video) – 720 x 576Max Resolution (jpg) – 800 x 480Suffixes*.mp3*.avi*.dat*.vob*.mpg*.jpgNOTE: To display videos on the unit, use the file formats listed in the table above. Ifyour video is not in one of these formats, it will need to be converted using a freevideo converter such as Format Factory (www.formatoz.com)2.3 Steps to Load Media Files1. Copy the files you want to play on to USB drive in the root directory (withoutputting them into a folder).2. Insert USB drive into the USB slot (see Figure 1 and Figure 3).3. This will automatically delete any files currently stored on the unit’s internalmemory.4. The files will then be copied to the internal memory and once completelyloaded it will ask you to remove USB drive.5. Remove the USB drive.6. The unit will now play the stored files.14
TOPAZ 10” POS - User’s Manual3. Installation3.1 Wall Mounting1. Empty contents of the box and test the screen’s power supply beforemounting.2. Clean the wall and mark out the position of the mounting plate.Figure 4 Mark out the mounting plate3. Mark out the plates hole positions on the wall for drilling (you can drill yourown holes in the mounting plate if required).Figure 5 Drill holes4. Once holes are drilled into the wall insert wall plugs and fix the plate to thewall using additional screws.15
TOPAZ 10” POS - User’s ManualFigure 6 Insert wall plugs5. Once secured to the wall, hang the display on the bracket and connect to themains.3.2 Counter TopTo place on counter top, rotate back of bracket to approximately 80 degree angleand unit will stand.16
TOPAZ 10” POS - User’s Manual4. F.A.Qs and Troubleshooting Guide4.1 How do I play PowerPoint presentations on my display?4.1.1 Option 1 (for plain slides with no animation):You can save the PowerPoint presentation as a JPEG File Interchange Format(.JPG). Microsoft PowerPoint software allows the user to do this1) Create or open a PowerPoint presentation.2) Click File Save As3) Enter a File name4) Click on “Save as type” scroll down and find the file extension “JPEG fileinterchange format”, as shown in the image below.5) Click Save.6) A message will appear asking if you would like to save all slides as JPEG’s7) Once you have selected your option, The JPEG images will be saved and areready to use within a playlist or to upload to a storage device.4.1.2 Options 2 (for presentations with animation):You can convert the PowerPoint presentation to a MPEG video clip. For the bestdisplay quality you should use the MPEG2 format which gives the best displayquality. We suggest that you use the following software:Software Name: Wondershare PPT2DVDWeb link: l :Select Video Format: PowerPoint to MPEG2 Video Settings: TV Standard: NTSC (29.97fbs); Standard: Standard DVD; Encode Size: Width 720, Height 576.17
TOPAZ 10” POS - User’s Manual4.2 Video ConversionThere are two possible tools for converting video4.2.1 Format FactoryThis is a free multipurpose convertor that can be used for normal definitionNormal Definition1. Download a free convertor (Windows) called Format Factory which can befound athttp://www.formatoz.com/2. Start the Software (picture 1).3. On the left hand window pane select the ‘Video’ conversion options.4. Select the ‘All to AVI’ conversion5. Click the ‘Add File’ button and locate the file to be converted.18
TOPAZ 10” POS - User’s Manual6. Click the ‘Output Setting’ button and modify it to look like the image shownbelow. A number of important settings have been highlighted.7. Select ‘OK’ to save these changes and then Press ‘OK’ button to goto main screen8. Press the ‘Start’ button along the top to start the conversion. Once completed,press the ‘Output Folder’ to see the converted video.19
TOPAZ 10” POS - User’s Manual4.3 My Remote Control does not appear to be workingThe remote controls have been design to have a limited range as some applicationsrequire several screens close together and individual control of each. If you areexperiencing difficulties in operating your remote please follow these steps beforecalling your supplier.1) Try pressing “SETUP” with the remote a few inches away from the unit justbelow the display (see section 1.2). If this does not bring up the menu screenthen go on to step 2.2) Replace the batteries in you Remote Control (see section 1.4). If this does notsolve the problem then please contact your supplier.4.4 My media file does not fit properly on the screenIf your media is being displayed with black edges please refer to section 2.2. Thishas happened because the file is not 16:9 aspect ratio (720x576). Please resize fileto 720x576 pixels and try loading the media onto the display once again.4.5 My media file will not display or is missing from the playlistIn this situation the first step to take to find the root of the problem is to start with ablank USB drive. Copy 1 file onto the blank USB drive and insert this into the unit,ensuring that the file name is 11 characters or less. If this works and the file displaysthen re‐name all the files that are 12 characters or more to have shorter file names.If this does not work please check first that the media file is the correct size to fit thescreen –720x576 pixels. If it is any bigger than this there is a danger the media filewill not display.For images, check that it is around 1‐2 MB in size and that it is a baseline JPEG nota progressive one – as these will be skipped. This can be checked by using freesoftware called IrfanView.1) Download Irfanview fromhttp://download.cnet.com/IrfanView/3000‐2192 4‐10021962.html?part dl‐IrfanView&subj dl&tag button2) Launch the software then open image file within the program.20
TOPAZ 10” POS - User’s Manual3) In the toolbar click on “Image” “Information”.4) This brings up the “Image property options”.5) Check the compression of the image, if it says “JPEG” the image is a baseline JPEG,however if it says “JPEG, progressive” then you must convert the image usingsoftware such as Adobe Photoshop.21
TOPAZ 10” POS - User’s Manual4.6 My media files will not updateIf you are have problems updating your display follow these steps to ensure it is nota technical issue.1) Ensure that there are no other files or folders stored on the USB drive.2) Check the USB drive for any additional self installation software, if it has thisformat the drive.3) Make sure the USB drive is firmly inserted into USB slot4) Before contacting your supplier try another USB drive to be certain this is notthe fault.4.7 My media will not loopIf you are having issues with your content not playing over from the start once it hascome to an end, then you will have to do a system reset.1)2)3)4)To do this press “SETUP” on your remote control.Go to “SYSTEM” and press “PLAY”.Go to “Restore Default” and press “PLAY”.This will clear the unit’s memory but not the time and date details, try yourmedia again before contacting your supplier.For further information or technical advice please contact your supplier quoting yourmodel number & serial number.510.1 inch Panel SpecificationTypeTFT LCDMonitor size / profile ratio10.1 INCH (Digital LCD, LED Backlight)/ 16:9Display resolution800 x 3 (RGB) x 480Dot pitch0.2745 (W) x 0.2745 (H)Active area219.6 (W) x 131.76 (H)Brightness320cd/m2Contrast ratio500:1Module size235 (W) x 145.9 (H) x 5.4 (D)View Angle65 (Right)/65 (Left)/ 45 (Top)/65(Bottom)Power SupplyDC:12VPower Consumption 24WOSD menu languageEnglish/Chinese/JapaneseMediumCF Card/ SD Card/ USBSpeaker output2Wx222
TOPAZ 10 _ POS - Users Manual 1 User's Manual Manual Version TPZ-POS-10.1. TOPAZ 10 _ POS - Users Manual 2 Full details of all TOPAZ products available can be found by visiting our web site Our Full Product Range www.topazdigital.com . TOPAZ 10 _ POS - Users Manual 3