Transcription
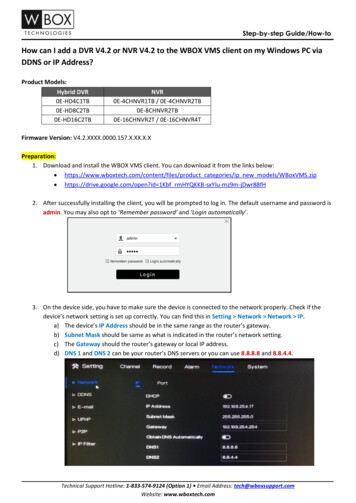
Step-by-step Guide/How-toHow can I add a DVR V4.2 or NVR V4.2 to the WBOX VMS client on my Windows PC viaDDNS or IP Address?Product Models:Hybrid DVR0E-HD4C1TB0E-HD8C2TB0E-HD16C2TBNVR0E-4CHNVR1TB / 0E-4CHNVR2TB0E-8CHNVR2TB0E-16CHNVR2T / 0E-16CHNVR4TFirmware Version: V4.2.XXXX.0000.157.X.XX.X.XPreparation:1. Download and install the WBOX VMS client. You can download it from the links below: https://www.wboxtech.com/content/files/product categories/ip new models/WBoxVMS.zip https://drive.google.com/open?id 1Kbf rmHYQKKB-sxYIu-mz9m-jDwr88fH2. After successfully installing the client, you will be prompted to log in. The default username and password isadmin. You may also opt to ‘Remember password’ and ‘Login automatically’.3. On the device side, you have to make sure the device is connected to the network properly. Check if thedevice’s network setting is set up correctly. You can find this in Setting Network Network IP.a) The device’s IP Address should be in the same range as the router’s gateway.b) Subnet Mask should be same as what is indicated in the router’s network setting.c) The Gateway should the router’s gateway or local IP address.d) DNS 1 and DNS 2 can be your router’s DNS servers or you can use 8.8.8.8 and 8.8.4.4.Technical Support Hotline: 1-833-574-9124 (Option 1) Email Address: tech@wboxsupport.comWebsite: www.wboxtech.com
Step-by-step Guide/How-to4. If you would like to use a DDNS address in adding the device to the client, please enable the DDNS first.[1] Go to Setting Network DDNS.[2] Click the toggle switch to Enable DDNS.[3] Under Protocol choose ‘wboxddns’. (This is a free DDNS service).[4] Input a Domain Name inside the box. Example: mydvr.wboxddns.com.5. If you would like to access the device remotely via WAN (external/public) IP or DDNS address using theclient, you have to open/forward the Client Port of your device. The Client Port can be found in Setting Network Network Port. The default value is 30001. If you changed this to a different number, please open/forward the newport number.[1] Log in to the router where the device is connected to.[2] Set up port forwarding using the device IP address and Client Port. You may go to this website tofind some general guidelines on how to perform port forwarding depending on your router’sbrand/manufacturer – www.portforward.com.[3] Verify if the Client Port is open or not. You can go www.yougetsignal.com/tools/open-ports/.[4] Once the port is open, you can now proceed in adding the device to the WBOX VMS client onyour phone.Technical Support Hotline: 1-833-574-9124 (Option 1) Email Address: tech@wboxsupport.comWebsite: www.wboxtech.com
Step-by-step Guide/How-toProcedure:1. The page below will show up when you logged in to the client successfully.2. Click the System Management tab. At the bottom right corner of the page, click Local Device.Technical Support Hotline: 1-833-574-9124 (Option 1) Email Address: tech@wboxsupport.comWebsite: www.wboxtech.com
Step-by-step Guide/How-to3. You will be prompted with a pop-up screen as shown below.4. Input the needed information on the pop-up screen.a. Select the correct Device Type (IPC, NVR or DVR).b. In the IP Address field, enter the local IP address, WAN (external/public) IP address or the DDNSaddress of the device.c. In the Port field, input the Client Port indicated in the device setting. This information can be foundin Setting Network Network Port.Please note: The default value of the Client Port is 30001. If you changed it to a different number,please make sure to input the new port number in the client. If you will only access the device using the client on local/home network only, thereis no need to port forward the Client Port. If you will be accessing the device remotely via WAN (external/public) IP or DDNSaddress using the client, you need to port forward the Client Port.d. Enter the Username and Password of the device.e. Click OK to the save the information.Technical Support Hotline: 1-833-574-9124 (Option 1) Email Address: tech@wboxsupport.comWebsite: www.wboxtech.com
Step-by-step Guide/How-to5. Once the device is successfully added, it will be listed under the device list in System Management.6. To view the cameras, follow the steps below.[1] Go to the Live Video tab.[2] Select a Layout.[3] Click the device that you have added.[4] Drag and drop each camera to the No-Link boxes.Technical Support Hotline: 1-833-574-9124 (Option 1) Email Address: tech@wboxsupport.comWebsite: www.wboxtech.com
Step-by-step Guide/How-to7. If you would like to save the current layout on the screen, follow the steps below.[1] Click the Save (floppy disk) icon at the bottom of the screen.[2] Input a Layout Name and choose if you would like to save it under Shared Layout or My Layout.[3] Click Save.Technical Support Hotline: 1-833-574-9124 (Option 1) Email Address: tech@wboxsupport.comWebsite: www.wboxtech.com
Step-by-step Guide/How-to8. After successfully saving the layout, it will now be listed under Layout on the left pane. You can just click thelayout you have created to automatically view the cameras.Technical Support Hotline: 1-833-574-9124 (Option 1) Email Address: tech@wboxsupport.comWebsite: www.wboxtech.com
b. In the IP Address field, enter the local IP address, WAN (external/public) IP address or the DDNS address of the device. c. In the Port field, input the Client Port indicated in the device setting. This information can be found in Setting Network Network Port. Please note: The default value of the Client Port is 30001. If you changed .