Transcription
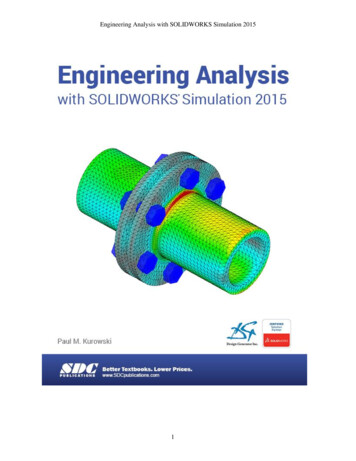
Engineering Analysiswith SolidWorksSimulation 2012 Paul M. KurowskiSDCP U B L I C AT I O N SSchroff Development CorporationBetter Textbooks. Lower Prices.www.SDCpublications.com
Visit the following websites to learn more about this book:
Engineering Analysis with SolidWorks Simulation 20122: Static analysis of a plateTopics covered Using the SolidWorks Simulation interfaceLinear static analysis with solid elementsControlling discretization error with the convergence processFinding reaction forcesPresenting FEA results in a desired formatProject descriptionA steel plate is supported and loaded, as shown in Figure 2-1. We assume thatthe support is rigid (this is also called built-in support, fixed support or fixedrestraint) and that a 100000N tensile load is uniformly distributed along theend face, opposite to the supported face.Fixed restraint100000N tensile loaduniformly distributedFigure 2-1: SolidWorks model of a rectangular plate with a hole.We will perform a displacement and stress analysis using meshes withdifferent element sizes. Notice that repetitive analysis with different meshesdoes not represent standard practice in FEA. However, repetitive analysiswith different meshes produces results which are useful in gaining moreinsight into how FEA works.31
Engineering Analysis with SolidWorks Simulation 2012ProcedureIn SolidWorks, open the model file called HOLLOW PLATE. Verify thatSolidWorks Simulation is selected in the Add-Ins list (Figure 2-2).Select Simulation asan active Add-in andas a Start-up Add-inFigure 2-2: Add-ins list in SolidWorks.Verify that SolidWorks Simulation is selected in the list of Add-Ins.32
Engineering Analysis with SolidWorks Simulation 2012Once Simulation has been added, it shows in the main SolidWorks menuand in CommandManager.SimulationPin downStudy creation iconSimulation tabFigure 2-3: Simulation tab is a part of the SolidWorks CommandManager.Selecting Simulation tab in the CommandManager displays Simulation menuitems (icons). Since no study has been yet created, only the Study creationicon is available; all others are grayed-out. For convenience, pin down thetop tool bar as shown.33
Engineering Analysis with SolidWorks Simulation 2012Before we create a study, let’s review the Simulation main menu (Figure 2-4)along with its Options window (Figure 2-5).New Study iconSimulationOptionsFigure 2-4: Simulation main menu.Similar to the Simulation CommandManager shown in Figure 2-3, only theNew Study icon is available. Notice that some commands are available bothin the CommandManager and in the Simulation menu.Simulation studies can be executed entirely from the Simulation drop downmenu shown in Figure 2-4. In this book we will use the Simulation mainmenu and/or CommandManager to create a new Study. Everything else willbe done in the Study PropertyManager window.Now click on Simulation options shown in Figure 2-4 to open the SimulationSystem Options window shown in Figure 2-5.34
Engineering Analysis with SolidWorks Simulation 2012Default OptionsUnitsSet Pressure/Stressunit to N/mm 2( MPa)Figure 2-5: Simulation Options window.The Options window has two tabs. In this example, Default Options andUnits are selected and shown.Please spend time reviewing all of the options in both System Options andDefault Options shown in Figure 2-5 before proceeding with the exercise. Inthe Units options, make the choices shown in Figure 2-5. In this book we willmostly use the SI system of units using MPa rather than Pa as unit of stressand pressure. Occasionally we will switch to the IPS system.Notice that Default Plots can be added, modified, deleted or grouped intosub-folders which are created by right-clicking on the results folders; forexample, Static Study Results folder, Thermal Study Results folder, etc.35
Engineering Analysis with SolidWorks Simulation 2012Creation of an FEA model starts with the definition of a study. To define anew study, select New Study in either the Simulation tab in the CommandManager (Figure 2.3) or Simulation main menu (Figure 2-4). This will openStudy PropertyManager. Notice that New Study icon in the SimulationCommandManager can be also used to open the Study Advisor. We won’t beusing Study Advisor in this book. Name the study tensile load 01 (Figure 26).New Study icon in theSimulation tab can bealso used to openthe Study AdvisorThis help messagecan be hiddenEnter study nameSelect StaticStudy PropertyManager windowWe will use this optiononly in chapter 18Figure 2-6: Creating a new study.The study definition window offers choices for the type of study, here weselect Static.36
Engineering Analysis with SolidWorks Simulation 2012Once a new study has been created, Simulation commands can be invoked inthree ways: From the Simulation CommandManager (Figure 2-3) From the Simulation main menu (Figure 2-4) By right-clicking appropriate items in the Study PropertyManagerwindow. In this book, we will most often use this method.When a study is defined, Simulation creates a study window located belowthe FeatureManager Design Tree and places several folders in it. It alsoadds a study tab located next to the Model and Motion Study tabs. The tabprovides access to the study (Figure lationstudyFigure 2-7: The Simulation window and Simulation tab.You can switch between the SolidWorks Model, Motion Studies andSimulation Studies by selecting the appropriate tab.37
Engineering Analysis with SolidWorks Simulation 2012We are now ready to define the analysis model. This process generallyconsists of the following steps: CAD geometry idealization and/or simplification in preparation foranalysis. This is usually done in SolidWorks by creating an analysisspecific configuration and making your changes thereMaterial properties assignmentRestraints applicationLoad applicationIn this case, the geometry does not need any preparation because it is alreadyvery simple, therefore we can start by assigning material properties.Notice that if a material is defined for a SolidWorks part model, the materialdefinition is automatically transferred to the Simulation model. Assigning amaterial to the SolidWorks model is actually a preferred modeling technique,especially when working with an assembly consisting of parts with differentmaterials. We will do this in later exercises.To apply material to the Simulation model, right-click the HOLLOW PLATEfolder in the tensile load 01 simulation study and select Apply/Edit Materialfrom the pop-up menu (Figure 2-8).Select Apply/Edit Materialto assign a materialFigure 2-8: Assigning material properties.38
Engineering Analysis with SolidWorks Simulation 2012The action in Figure 2-8 opens the Material window shown in Figure 2-9.Alloy SteelFigure 2-9: Material window.Select Alloy Steel to be assigned to the model. Click Apply, and then click Close.In the Material window, the properties are highlighted to indicate themandatory and optional properties. A red description (Elastic modulus,Poisson’s ratio) indicates a property that is mandatory based on the active studytype and the material model. A blue description (Mass density, Tensile strength,Compressive strength, Yield strength, Thermal expansion coefficient) indicatesoptional properties. A black description (Thermal conductivity, Specific heat,Material damping ratio) indicates properties not applicable to the current study.In the Material window, open the SolidWorks Materials menu, followed bythe Steel menu. Select Alloy Steel. Select SI units under the Properties tab(other units could be used as well). Notice that the HOLLOW PLATE folder inthe tensile load 01 study now shows a check mark and the name of the selectedmaterial to indicate that a material has been assigned. If needed, you can defineyour own material by selecting Custom Defined material.Defining a material consists of two steps:Material selection (or material definition if a custom material is used) Material assignment (either to all solids in the model, selected bodies ofa multi-body part, or to selected components of an assembly)Having assigned the material, we now move to defining the restraints. Todisplay the pop-up menu that lists the options available for defining restraints,right-click the Fixtures folder in the tensile load 01 study (Figure 2-10). 39
Engineering Analysis with SolidWorks Simulation 2012Type tabSplit tabRight-click Fixtures,select Fixed geometryto open the FixturePropertyManagerFixedGeometryThis window showsgeometric entities whererestraints are appliedEnlargedrestraint symbolFigure 2-10: Pop-up menu for the Fixtures folder and Fixture definitionwindow (Fixture PropertyManager).All restraints definitions are done in the Type tab. The Split tab is used todefine a split face where a restraint is to be defined. The same can be done inSolidWorks by defining a Split Face.40
Engineering Analysis with SolidWorks Simulation 2012Once the Fixtures definition window is open, select the Fixed Geometryrestraint type. Select the end-face entity where the restraint is to be applied.Click the green check mark in Fixture PropertyManager window to completethe restraint definition.Notice that in SolidWorks Simulation, the term “Fixture” implies that themodel is firmly “fixed” to the ground. However, aside from Fixed Geometry,which we have just used, all other types of fixtures restrain the model incertain directions while allowing movements in other directions. Therefore,the term “restraint” may better describe what happens when choices in theFixture window are made. In this book we will switch between the terms“fixture” and “restraint” freely.The existence of restraints is indicated by the symbols shown in Figure 2-10.The size of a symbol can be changed in Symbol Settings in the Fixturewindow. Notice that symbols shown in Figure 2-10 are distributed over thehighlighted face, meaning the entire face has been restrained. Each symbolconsists of three orthogonal arrows symbolizing directions where translationshave been restrained. Each arrow has a disk symbolizing that rotations havealso been restrained. The symbol implies that all six degrees of freedom (threetranslations and three rotations) have been restrained. However, the elementtype we will use to mesh this model (second order solid tetrahedral element)has only translational degrees of freedom. Rotational degrees of freedom can’tbe restrained because they don’t exist in this type of element. Therefore, diskssymbolizing restrained rotations are irrelevant in our model. Please see thefollowing table for more explanations.Before proceeding, explore other types of restraints accessible through theFixture window. Restraints can be divided into two groups: Standard andAdvanced. Review animated examples available in the Fixture window andreview the following table. Some less frequently used types of restraints arenot listed here.41
Engineering Analysis with SolidWorks Simulation 2012Standard FixturesFixedAlso called built-in or rigid support. All translational and allrotational degrees of freedom are restrained.Immovable(No translations)Only translational degrees of freedom are restrained, whilerotational degrees of freedom remain unrestrained.If solid elements are used (like in this exercise), Fixed andImmovable restraints would have the same effect becausesolid elements do not have rotational degrees of freedom.Therefore, the Immovable restraint is not available if solidelements are used alone.HingeApplies only to cylindrical faces and specifies that thecylindrical face can only rotate about its own axis. Thiscondition is identical to selecting the On cylindrical facerestraint type and setting the radial and axial components tozero.Advanced FixturesSymmetryApplies symmetry boundary conditions to a flat face.Translation in the direction normal to the face is restrainedand rotations about the axes aligned with the face arerestrained.Roller/SlidingSpecifies that a planar face can move freely on its plane butnot in the direction normal to its plane. The face can shrink orexpand under loading.Use referencegeometryRestrains a face, edge, or vertex only in certain directions,while leaving the other directions free to move. You canspecify the desired directions of restraint in relation to theselected reference plane or reference axis.On flat faceProvides restraints in selected directions, which are definedby the three directions of the flat face where restraints arebeing applied.On cylindrical faceThis option is similar to On flat face, except that the threedirections of a cylindrical face define the directionsof restraints.On spherical faceSimilar to On flat face and On cylindrical face. The threedirections of a spherical face define the directionsof the applied restraints.Cyclic symmetryAllows analysis of a model with circular patterns around anaxis by modeling a representative segment. The geometry,restraints, and loading conditions must be identical for allother segments making up the model. Turbine, fans,flywheels, and motor rotors can usually be analyzed usingcyclic symmetry.42
Engineering Analysis with SolidWorks Simulation 2012When a model is fully supported (as it is in our case), we say that the modeldoes not have any rigid body motions (the term “rigid body modes” is alsoused), meaning it cannot move without experiencing deformation.Notice that the presence of restraints in the model is manifested by both therestraint symbols (showing on the restrained face) and by the automaticallycreated icon, Fixture-1, in the Fixtures folder. The display of the restraintsymbols can be turned on and off by either: Right-clicking the Fixtures folder and selecting Hide All or Show All inthe pop-up menu shown in Figure 2-10, orRight-clicking the fixture icon and selecting Hide or Show from the popup menu.Use the same method to control display of other Simulation symbols.43
Engineering Analysis with SolidWorks Si
SolidWorks Simulation is selected in the Add-Ins list (Figure 2-2). Figure 2-2: Add-ins list in SolidWorks. Verify that SolidWorks Simulation is selected in the list of Add-Ins. Select Simulation as an active Add-in and as a Start-up Add-in . Engineering Analysis with SolidWorks Simulation 2012 33 Once Simulation has been added, it shows in the main SolidWorks menu and in CommandManager .