Transcription
AVEVA Viewing Application Graphics in a WebBrowser
AVEVA Viewing Application Graphics in a Web Browser 2020 AVEVA Group plc and its subsidiaries. All rights reserved.No part of this documentation shall be reproduced, stored in a ret rieval system, or transmitted by anymeans, electronic, mechanical, photocopying, rec ording, or otherwise, without the prior writtenpermission of AVEVA. No liability is assumed with respect to the use of the information contained herein.Although precaution has been taken in the preparation of this documentation, A VEVA assumes noresponsibility for errors or omissions. The information in this documentation is subject to change withoutnotice and does not represent a commitment on the part of AVEVA. The soft ware described in thisdocumentation is furnished under a license agreement. This soft ware may be used or copied only inaccordance with the terms of such license agreement.ArchestrA, Aquis, Avantis, Citect, DYNSIM, eDNA, EYESIM, InBatch, InduSoft, InStep, Int elaTrac,InTouch, OASyS, PIPEPHASE, PRiSM, PRO/II, PROV ISION, ROMeo, SIM4ME, SimCentral, SimSci,Skelta, SmartGlance, Spiral Software, Termis, WindowMaker, WindowViewer, and Wonderware aretrademarks of AVEVA and/or its subsidiaries. An extensive listing of AVEVA trademarks can be found at:https://sw.aveva.com/legal. All other brands may be trademarks of their respective owners.Publication date: Wednesday, November 11, 2020Contact InformationAVEVA Group plcHigh CrossMadingley RoadCambridgeCB3 0HB. UKhttps://sw.aveva.com/For information on how to cont act sales and customer training, see https://sw.aveva.com/contact.For information on how to cont act technical support, see https://sw.aveva.com/support.2
AVEVA Viewing Application Graphics in a Web BrowserContentsChapter 1 Using the Web Client . 5Using the Web Client About the InTouch Web Client . 5Designing an InTouch Web Client Application . 5Securing Web Client Access . 7Accessing Web Client from Outside the OT Network . 8Registering with the AVEVA Identity Manager . 8Accessing the Web Client Using Single Sign On . 9Using Local Tags with A IM . 10Configuring User Access in Web Client . 10Enabling the Web Client Feature. 10Customizing the Web Client . 11Configuring Graphics for Viewi ng in a Web Brows er . 11Setting the Web Client Home Symbol . 12Understanding the behavior of the Web Client Home Icon . 12Viewing Application Graphics in a Web Browser . 12Web Client Fast Switch . 13Understanding the Web Client Page . 14Application Graphics and Browser Resizing . 16Pan and Zoom Support . 17Hosting InTouch Application Graphics on External Websites . 18Generating the iFrame Code Block. 19Chapter 2 Supported Graphical Elements and Known Limitations . 21Supported Graphical Elements and Known LimitationsKnown Limitations . 21Properties Supported by All Graphical Elements . 21Properties Supported by All Graphic Elements With Some Limitations . 22Supported Graphic Elements and Additional Properties . 23Supported Animations . 28Chapter 3 Web Client Mobile App . 31Operating System Requirements . 31Logging in to Mobile App . 31Using the Web Client Mobile App . 31Chapter 4 Managing the InTouch Web Client . 33Managing the InTouch Web Client InTouch Web Client Error Handling . 333
AVEVA Viewing Application Graphics in a Web BrowserContentsBrowser and Mobile Support . 33Troubleshooting Viewing Graphics in a Web Browser . 33Invalid Certificate Error . 34Chapter 5 Licensing the Web Client . 35Licensing the Web Client Licensing for InTouch Application Graphics in a Web Browser . 35Acquiring a License . 35Read-Only and ReadWrite Modes . 35Single Session Mode. 36Grace Period . 36Periodic Renewal . 36License Release . 364
AVEVA Viewing Application Graphics in a Web BrowserC HAPTER 1Using the Web ClientAbout the InTouch Web ClientThe InTouch Web Client feature allows you to view selected Industrial graphics used within an InTouc hHMI application on any HTML5 supported web browser. A built -in Web Server provides web browsersaccess to application graphics, from any Microsoft Windows client or s erver operating system without the use of Remote Desktop Protocol (RDP ) or Internet Information Services (IIS ) for Microsoft WindowsServer. You can view application Industrial graphics in a web browser for both Standalone and Managedapplications.Designing an InTouch Web Client ApplicationDesigning InTouch Web Client applications involves the following stages:Configure (Optional)1.Configure the security protocol.a.Connect to a System Management Server using the System Platform Configurator - choosebetween a remote or loc al server.2.Configure AVEVA Identity Manager3.Configure the reverse proxy server.Design1.Create and/or edit an application.2.Identify the root folder that will cont ain all the graphics you want displayed on the web client.3.Identify and set the Web Client Root folder.5
AVEVA Viewing Application Graphics in a Web Browser4.Identify and set the Web Client Home symbol.5.Fast switch to InTouch WindowViewer.o6.Using the Web ClientWindowViewer is required to run to access InTouch tags, but not ArchestrA object attribut ereferences.Use the Web Client fast switch button or launch a browser and navigate tohttp://localhost/InTouchWeb.Iterative Development1.The home symbol will be displayed on the web page.2.Use the Navigation overlay to navigate to a symbol/ window.3.Make any graphic related changes in WindowMaker, the changes are automatically refreshed on thebrowser.Changes in Quality and Status Style, Element Style, and Formatting Styles will be propagated onlyafter making the following graphics changes or re-launching WindowViewer.4.oCont ent of symbol is updated and savedoSymbol is created, imported, or deletedoSymbol is moved to different toolset folderoRoot folder or home symbol assignment is updatedYou can continue to build the application and test the output in the browser.Deploy1.Assign users to one of the Web Client related user groups (local or domain) or opt for anonymousaccess.2.Publish or deploy the application.3.Run the application in InTouch WindowViewer. WindowViewer must be running, to receive live datafrom InTouc h tags.After the application is published or deployed, it will be available from any computer on the intranet.You can point to http:// IPAddress /InTouc hWeb or http:// NodeName /InTouc hWeb, where IPAddress or NodeName corresponds to the machine where the application is published ordeployed.6
Using the Web ClientAVEVA Viewing Application Graphics in a Web BrowserSecuring Web Client AccessConfiguring t he System Management Server (SMS) allows Web Client to be used securely wit h the httpsprotocol. Additionally, after configuring the SMS, Web Client can be used wit h the AVEVA IdentityManager (A IM), to support non-windows based sec urity and single sign on. As an administrator there aremultiple configuration options available for user authentication and security. Security and usermanagement should work toget her, see Configuring User Access in Web Client on page 10 for moreinformation.Option 1: By default, Web Client can be accessed using the http protocol and windows -basedauthentication.Option 2: Use the Configurator to connect to a local or remote System Management Server. Here theWeb client will us e the https protoc ol with windows-based security (by default). If you connect to a remoteserver, you must provide credentials for a domain user when accessing the Web Client.Option 3: After you configure the System Management Server, you can optionally enable the AVEVAIdentity Manager (AIM). AIM is a standalone authentication server that exposes an OpenID Connectendpoint. To use AIM, you must register the client to the identity server. Y ou can configure AIM using theSystem Management Server Configurator or InTouch HMI Application Manager. For more information,see Registering with the AVEVA Identity Manager on page 8.In runtime when the Web Client page loads, if there is no valid security token, then: Web Client will re-direct to AIM’s login page AIM will check user credential from the Active Directory. If the credentials are valid, then Active Directory will provide a security token and return it to WebClient Web Client will then grant access to user with the token.7
AVEVA Viewing Application Graphics in a Web BrowserUsing the Web ClientIf a security token already exists, then the user will be granted access. AIM will only support users thatcan be validated from Active Directory.Option 4: The Reverse Proxy option allows the web client to be accessed by users outside the OTnetwork. Provide the FQDN of the reverse proxy server in the secure gateway field in the Configurator orthe Web Client tab in InTouch HMI Application Manager.Option 5: When A IM is used for user authentication, it will prevent graphics from being displayed in aniFrame. Selecting the Allow web client to be embedded in any website checkbox will allow users todisplay graphics within an iFrame in runtime. In runtime, use the Share icon and select the code snippetto insert in the iFrame.Accessing Web Client from Outside the OT NetworkA reverse proxy is a server that sits in front of one or more web servers, intercepting requests fromclients. With a reverse proxy, when clients send requests to the origin server of a website, those requestsare intercepted at the network edge by the reverse proxy server. The reverse proxy server will then sendrequests to and receive responses from the origin server.A forward proxy sits in front of a client and ensures that no origin server ever communicates directly withthat specific client. On the other hand, a reverse proxy sits in front of an origin server and ens ures that noclient ever communicates directly with that origin server.Before devic es outside the OT network can access the Web Client, a revers e proxy must be configuredon the DMZ server. AVEVA Identity Manager must be enabled for the reverse proxy to function. Thereare many providers of reverse proxy solutions. Refer to the relevant reverse proxy solutiondocumentation, for instructions on setting up the reverse proxy solution in your infrastructure. For moreinformation, see the InTouch HMI Application Management and Extension Guide.Registering with the AVEVA Identity ManagerUsing the AVEVA Identity Manager you can configure the Web Client to use Single Sign On, instead ofthe default Windows OS based authentication.The steps to configure the Identity Server are:1.In the System Platform Configurat or, configure the Common Platform System ManagementServer.2.In AVEVA Application Manager, register the AIM server with user credentials.The AIM Registration dialog box can also be used to configure the reverse proxy server:1.8Setup the reverse proxy server.
Using the Web ClientAVEVA Viewing Application Graphics in a Web Browser2.In the System Platform Configurat or, configure the Common Platform System ManagementServer.3.Provide the S ecure Gateway address in the AIM registration dialog box.You can select a remote or local System Management Server. For more information on configuring theSystem Management Server, see the System Platform Installation Guide.To register with the Identity Server:1.In Application Manager, click the Web Client tab.2.Click Tools and then AIM Regi stration.The AIM Regi stration dialog box appears.3.Click the Use AIM Server as the authentication server checkbox to enable the use of the AVEVAIdentity Manager.The Identity Server field displays the Identity Server, configured in the Configurator.4.5.Update the following settings:a.User Name: Provide the us er name to connect to the Identity Server. The user must be part ofthe Administrators user group.b.Password: Provide the password for the corresponding user name.To complete the reverse proxy setup, provide the URL of reverse proxy or DMZ server in the SecureGateway field.This is an optional setting, and needs to be set only if the We Client is hosted behind a revers e proxyserver.6.Optionally you can also click the Allow Industrial Graphics to be embedded in any websitecheckbox to view the web client within an HTML iframe in runtime.7.Click OK.8.Click Apply.Accessing the Web Client Using Single Sign OnIf the System Management Server option has been enabled in the Configurator, you can use Single SignOn to access the web client. This will be different from the default Windows based authentication. Thismethod will use the HTTPS prot ocol and only support domain us ers (when using a remote SMS ) that canbe validat ed from Microsoft Active Directory. If the us er selects to use the HTTP protocol, then WebClient will fall back to using Windows Based authentication only.For information to configuring the System Management Server, see the AVEVA System PlatformInstallation Guide and the InTouch HMI Application Management and Extension Guide.1.Launch Web Client.The login page appears.2.Enter your username and password.3.Click Login.Optionally, you could click on Windows Integrated to use the credentials of the user currentlylogged in.You will be logged with the Identity Manager credentials.4.Use Sign Out to logout of the session.9
AVEVA Viewing Application Graphics in a Web BrowserUsing the Web ClientUsing Local Tags with AIMThe behavior of Local tags in Web Client is independent of WindowViewer. The behaviour of local tagswill differ if A IM is enabled. If AIM is enabled a unique token is used for every session for every user. Asession is a new instance of the browser on the same node. For more information on Memory LocalTags, see the InTouch HMI Data Management Guide.User 1 – Sessi on 1User 1 – Sessi on 2User 2 – Sessi on 1AIM Di sabledSame tag valueSame tag valueDifferent tag valueAIM EnabledDifferent tag valueDifferent tag valueDifferent tag valueConfiguring User Access in Web ClientAccessing the Web Client AnonymouslyWeb Client provides both anonymous and authenticated user access. By default, anonymous access isdisabled. To enable this option, select the Allow Anonymous Acce ss checkbox in the Web Client tab inInTouch HMI Application Manager. In runtime, the us er does not have to provide any user credentialsand will be logged in as a ‘Guest’ user. The Guest user will have read only access to Web Client.Configuring Authenticated Users for Web ClientBoth authentication and licensing workflows use user groups to determine which users get access andthe type of licens e acquired for the web session. The user groups can be configured on the local orremot e node depending on the SMS configuration. All users needing access must be included in one ofthe groups depending on their access level.If Web Client is configured to use a remote System Management Server, create the following domainuser groups;aaInTouchUsers and aaInTouchRW Users on the remote server. Add all relevant users tothese groups before deploying the application.Enabling the Web Client FeatureBy default, on installation the InTouch Web Client feature will be disabled. You must enable the WebClient feature before you can use it. The Web Client feature will be automatically enabled if you con figureone of the following options in the Configurator: Common Plat form System Management Server Application Manager Web ClientFor more information on the Configurator, refer to System Platform Installation Guide. To enable ordisable the Web Client feature manually, you must have administrative privileges. You can enable theWeb Client feat ure from Application Manager or InTouch WindowMaker.Enabling the Web Client Feature from Application ManagerTo enable the Web Client feature, launch A pplication Manager and select one of the following options: Under the Web Client Tab, click the Enable Web Client toolbar icon. Under the Web Client Tab, from the Tool s menu, click Enable Web Client.Enabling the Web Client Feature from WindowMakerA user with administrative privileges can enable the web client feature from WindowMaker.1.10Launch an application in WindowMaker.
AVEVA Viewing Application Graphics in a Web BrowserUsing the Web Client2.Click the Web Client fast switch button.The following dialog box appears 'InTouch Web Client feature is currently disabled on this system.Do you want to enable it?'.3.Click Yes.The InTouch Web client page will appear.If y ou try to launch the Web Client when it is disabled, you will receive t he following error message: HTTPError 404.0 – Not Found.If a non-administrative user attempts to enable the Web Client feature from WindowMaker, they will bedirected to enable the feature from Application Manager.Customizing the Web ClientUsers can customize the Web Client interface using the AVEVA Application Manager.1.In Application Manager, navigate to the Web Client tab.2.In the Graphic Refre sh Rate (m s) specify the refresh rate in milliseconds.3.In the Alarm Refresh Rate (ms) provide the refresh rate in milliseconds.4.In the Web Client Site Name field provide the new URL string.The string provided here will be appended after http://localhost/.5.Select the Show Header checkbox to display the Title Bar.6.Select the Enable NavBar checkbox to display the Navigation Overlay.If the Title bar is hidden, the navigation overlay will not be display ed by default.7.Select the Allow Anonymous Access checkbox to enable anonymous user access to Web Client.By default the option is disabled.8.Click Apply.Configuring Graphics for Viewing in a Web BrowserUsing the Graphic Toolbox, you can configure the folder containing the application graphics that will bedisplayed on the web browser. Only graphics stored within the folder set as the Web Client Root folderare displayed on the web browser.Note: The operating system user groups aaInTouchUsers and aaInTouchRWUsers will be creat ed onthe InTouch runtime node during installation. Only users in the aaInTouchUs ers or aaInTouchRWUsersuser groups will have access to view graphics from an application in the web browser. Add relevant usersto the group before configuring the application. By default, the installation user will be added to thegroups.1.Start InTouch WindowMaker.2.Open an application.In the Industrial Graphic Toolbox, create or identify the folder that will contain the hierarchy offolders and graphics you want displayed on the web browser.3.Right -click the folder and select Set the Web Client Root Folder.The icon thumbnail will change to reflect the setting.IconDescriptionWhen the root folder is set as the Web Client Root folder11
AVEVA Viewing Application Graphics in a Web BrowserUsing the Web ClientWhen a folder is set as the Web Client Root folderBy default, the root of the Graphic Toolbox is set as the Web Client Root folder.Setting the Web Client Home SymbolYou can set the default symbol displayed on the Web Client page when it is launched by setting the WebClient Home Symbol.1.Set the Web Client Root Folder, see Configuring Graphics for Viewing in a Web Brows er on page 11.The Home Symbol must be a child of the Web Client Root folder.2.Under the Web Client Root folder, identify the home symbol.3.Right -click the symbol and click Set Web Client Home Symbol.The icon thumbnail ( ) will change to reflect the setting. If no home symbol is set, the Web Client webpage will display a blank page when launc hed. While viewing the Web Client in a browser, click the Homeicon on the Title bar to navigate to the home symbol.Understanding the behavior of the Web Client Home IconStandalone applications can be viewed on the web client. Standalone application windows must beconverted to Industrial Graphics before they can be viewed on the Web Client. Only Frame windows andIndustrial Graphics can be viewed on the web client.For InTouch applications, in WindowMaker you can use the Home Windows tab to set up windows thatwill appear by default in WindowViewer, see Setting Windows to Appear at RunTime in the InTouch HMIVisualization guide. Similarly, you can set a graphic to be the default symbol that appears on the webclient when it is launched, see Setting the Web Client Home Symbol on page 12.If you have used the InTouch ShowHome script function, when the windows is converted to a graphic,the script is converted to the ShowHom e() function and will display the corresponding graphic as a Homesymbol in WindowViewer.These settings will impact, which window or graphic appear on the web client by default when it islaunched. For an InTouch HMI application; there are t wo possibilities:1.If Home Windows are configuredE ven if the user has configured Home Symbols, on all occasions, only the Home Windows aredisplayed by default. Clicking the Home icon will display the Home Windows.2.If Home Windows are not configuredAnd the Home Symbol is configured, by default the home symbol will be displayed.If no home symbol is configured then, by default, no symbol or home windows are displayed. Clickingon the Home symbol will not display any graphic or window.Viewing Application Graphics in a Web BrowserAfter you configure the Web Client application you can view the graphics in the web browser. For a list oftested and supported browsers, refer to the Browser and Mobile Support section of this guide.1.Launch an HTML5 supported browser, enter the URL: http:// hostname /InTouchWeb orhttp:// IPAddress /InTouchWeb.If your credentials are authenticated and a valid InTouch Web Server licens e is acquired, theInTouch Web page is displayed. The Home Symbol will be displayed by default.12
AVEVA Viewing Application Graphics in a Web BrowserUsing the Web ClientYou can access the web client using the URL: https:// hostname /InTouchWeb orhttps:// IPAddress /InTouchWeb. The InTouch Web Client will automatically use the HTTPSprotocol, when the Common Platform System Management Server is configured with a certific ate(local or remote server) for encrypted communication bet ween the server and client. If the WebClient page is not displayed, refer to Troubleshooting Viewing Graphics in a Web Browser on page33.For information on customizing the Web Client URL, see Customizing the Web Client on page 11.2.Click theicon.The overlay on the left displays the hierarchical structure of the graphics, under the selected WebClient Root folder within the running application.3.Click a folder name.The graphics within the folder are displayed.4.Click a graphic.The selected graphic is displayed on the InTouch Web Client.Only graphics stored within the folder set as the Web Client Root folder are display ed on the webbrowser. If anonymous access disabled, then the user account accessing the graphics must beAuthenticated and Authorized, for more information see Acquiring a License on page 35.InTouch WindowViewer must be running on the host machine for symbols displayed in the Web Client toreceive live data from InTouch tags. You can also run WindowViewer as a service. Application Servermust be running to receive live dat a from application objects.Web Client Fast SwitchDuring the development of the application you can use the Web Client Fast Switch feature to togglebetween WindowMaker and the InTouch Web Client. To use the Web Client Fast Switch feature, click the Web Client button in InTouch WindowMaker.Any changes in WindowMaker will reflect automatically on the Web Client, if the same application isbeing edited in WindowMak er and viewed in the Web Client. For aut omatic refresh to work, only oneapplication can be edited and viewed at a time. The InTouch Web page refreshes to the symbolpreviously displayed. If WindowViewer is run for anot her application, then the Web Client page willautomatically switch to that application. You can specify the Graphic Refre sh Rate from the Configurator. By default the polling rat e will1000 milliseconds. You can also specify the Alarm Refresh Rate from the Configurator. By default the polling rat e will1000 milliseconds.Alarm Refresh Rate should be greater than the Graphic Refresh Rate, and the value of the GraphicRefresh Rat e should be less than 180 seconds.Note: To enable the Web Client to run in Fast Switch mode while editing a Managed InTouch applicationfrom a remote IDE, first configure the InTouch Web Windows service to run as a user account that is amember of the aaConfigTool s us er group, in both the GR and Remote IDE machines. For moreinformation, refer to the Application Server User Guide.For a given InTouch application, the Web Client fast switch button in WindowMaker is disabled bydefault. The button is automatically enabled when the application is run in WindowViewer.13
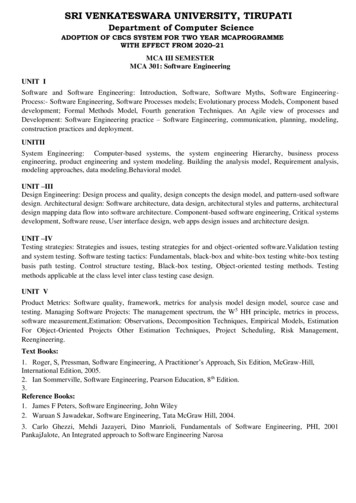
AVEVA Viewing Application Graphics in a Web BrowserUsing the Web ClientNote: The web client fast switch feature is available- only during development,- only on the computer with InTouch WindowMaker and InTouch WindowViewer installed,- only on a web browser accessing the Web Client pointing to http://localhost/InTouchWeb in the URL.Understanding the Web Client PageThe InTouch Web Client page provides various options to inform and organize the user experience usingicons on the page. The following table describes these options.ElementDescription1The Title bar displays the InTouch Application name, symbol name, home icon,notifications icon, full screen icon and profile icon.ApplicationName: SymbolNameThe Title bar will display the application and symbol name.For example – PlantA: Section16- where PlantA is the application name and Section16 is the symbol name.Click to view the symbol set as the web client home symbol.Click to view the iFrame code snippet for the selected graphic.Click the Notifications icon messages related to License status change andWindowViewer status change messages. The number of notifications will beoverlayed on the icon.14
AVEVA Viewing Application Graphics in a Web BrowserUsing the Web ClientClick to maximize the canvas area and dis play the web page in full screenmode. You can also use the F11 key. The title bar and navigation overlay willnot be visible.To view the title bar: Move your cursor to the top of the page, the title bar will slide down. Clickto pin the title bar on the page. Clickto hide the title bar.Click to minimize the canvas area and exit the full screen mode.The profile icon displays the user logged in.Click the profile icon and then select the Sign Out icon. The Sign Out will onlybe available if System Management Server option is configured. For moreinformation, see Accessing the Web Client Using Single Sign On on page
Using the Web Client AVEVA Viewing Application Graphics in a Web Browser 9 2. In the System Platform Configurator, configure the Common Platform System Management Server. 3. Provide the Secure Gateway address in the AIM registration dialog box. You can select a remote or local System Management Server. For more information on configuring the