Transcription
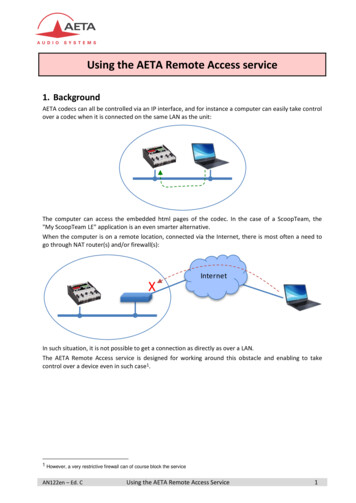
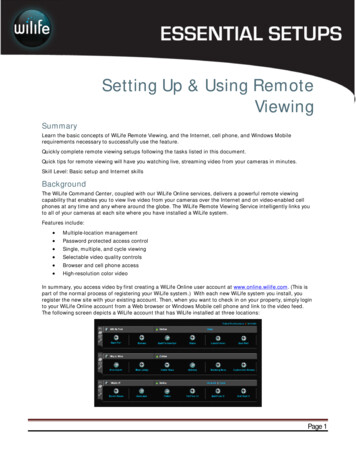
Setting Up and Using Remote ViewingSummarySetting Up & Using RemoteViewingLearn the basic concepts of WiLife Remote Viewing, and the Internet, cell phone, and Windows Mobilerequirements necessary to successfully use the feature.Quickly complete remote viewing setups following the tasks listed in this document.Quick tips for remote viewing will have you watching live, streaming video from your cameras in minutes.Skill Level: Basic setup and Internet skillsBackgroundThe WiLife Command Center, coupled with our WiLife Online services, delivers a powerful remote viewingcapability that enables you to view live video from your cameras over the Internet and on video-enabled cellphones at any time and any where around the globe. The WiLife Remote Viewing Service intelligently links youto all of your cameras at each site where you have installed a WiLife system.Features include: Multiple-location managementPassword protected access controlSingle, multiple, and cycle viewingSelectable video quality controlsBrowser and cell phone accessHigh-resolution color videoIn summary, you access video by first creating a WiLife Online user account at www.online.wilife.com. (This ispart of the normal process of registering your WiLife system.) With each new WiLife system you install, youregister the new site with your existing account. Then, when you want to check in on your property, simply loginto your WiLife Online account from a Web browser or Windows Mobile cell phone and link to the video feed.The following screen depicts a WiLife account that has WiLife installed at three locations:Page 1
Setting Up and Using Remote ViewingWith WiLife Online it is easy to monitor your home, office, cabin, or even grandma's house – anytime, anywhere– all from your WiLife Online account.Browser RequirementsRequirementDescriptionCommon RequirementsWindows Media Player 9 or laterBrowsersMicrosoft Internet Explorer Version 6.0 and later (7.0recommended). Firefox 2.0 and later.Network RequirementsRequirementDescriptionNetwork SpeedUplink and downlink speeds of 150kpbs or faster, per installation.For best results, a full-time broadband connection of 144K or greater.Lower speeds will work as long as they are broadband.Connection TypeAlways-on broadband connectionCell Phones & Handhelds RequirementsWiLife provides remote viewing using Windows Mobile cell phones, handhelds, and web browsers. Thecommon requirement for a compatible web browser is support for Windows Media Player 9. The commonrequirement for the cell phone is also support for Windows Media 9. Usually you can find these phoneslabeled as Windows Mobile or Windows Smartphones.WiLife is compatible with a wide range of Microsoft Windows Mobile cell phones and wireless handhelds. Ofcourse, these devices require Internet access either through a cell service provider or wireless Internet hub,depending on your device.Note: Cell phone users should subscribe to an unlimited data plan to ensure cost effective access.Examples of Compatible Cell PhonesAnextek SP230Microsoft/Flextronics "Peabody"Audiovox PPC 6601; PPC 5050, PPC 4100; SMT5600Neonode N1Asus P535, P525, P505Cingular 8525; 8125; 3125;Dopod StrTrk S300E-ten M600; P300BGigabyte GSmartGotive H41GSMK CryptophoneHitachi Pocket PC phoneHP iPAQ hw6500 series; h6300 seriesHTC MteoR; TyTN; Universal; Wizard; Blue Angel;Typhoon; Amadeus; MagicianiMate SmartFlip; SP5; SP5m; K-JAM; JASJARMotorola Q; i930; CN620; MPx, MPx100 & MPx22002 XDA; XPhoneOrange SPV C600; C550Palm Treo 700wPantech PH-S8000TQool Labs ADASamsung BlackJack; SCH-i730; SCH-i600; SGH-i300Sharp W-Zero3Siemens SX66Sierra Wireless Voq PhoneSprint PCS Vision; Power Vision;T-Mobile Dash; MDA; SDAPage 2
Setting Up and Using Remote ViewingVerizon XV6700Examples of Wireless Handheld Devices:Above-Net Top100PJuniper Systems Archer Field PCAsus MyPal A730WMitac Mio A201Acer n20 seriesDell Axim X51v; X51; X50v; X50; X30HP iPAQ hx2400 series; hx2700 series; hx3700series; hx4700 seriesi-mate PDA2Lenovo ET960MP2 Solutions MRT300Olympus "Tough Digital Assistants"Toshiba e805; e400/e405; e750/e755; e800/e805Intrinsyc Carbonado;SETUPSCreating a WiLife Online AccountNote: Skip this step if you set up your Online account during the Setup Wizard!Note: To create your online account, you will need Internet access.1) Click on the Setup button.Note: To create your online account, you will need Internet access.2) Click on the Online tab screen.3) In the WiLife Online Account section, click on the link (Create a WiLife Online account).4) When the WiLIfe Setup Wizard screen displays, validate that the option "Create new remote viewingaccount" is selected. Click Next .5) Fill out the fields with basic account and site information -- first/last name and location name. ClickNext to continue.Page 3
Setting Up and Using Remote ViewingThe next screen in the Wizard requests the details that will help you securely login in and manage yourWiLife Online account. The following table explains each field:Field NameDescriptionE-mailYour e-mail address doubles as your account name.PasswordWe recommend you create a password using at least 7 characters,one of them being a number. Punctuation characters are allowed.Confirm PasswordRe-enter the password that you entered in the Password field.Security QuestionCreate a security question that you can use to unlock your accountshould you ever forget your password. For example: “my first dog’sname.”Security AnswerEnter the answer to your security question. For example: “Rocky.”I want to be notified of WiLife softwareand product updatesLeave this checkbox marked to receive e-mail about software orcamera updates. Remove the checkbox if you don’t wish to receiveany notifications.I have read and agree to the Terms ofUse and Privacy PolicyClick this checkbox after you have read the Terms of Use page andPrivacy Page. This checkbox must be marked to complete yourregistration.6) When you have completed filling out the form, click Next .7) You have completed creating your online account from Command Center. Click Finish.Page 4
Setting Up and Using Remote ViewingNotice that the WiLife Online Account section of the Online tab screen is populated with your account'susername and password:Registering with Online.WiLife.com1) Open an Internet browser and go to online.wilfe.com. The Login screen displays.2) Click on the link “Register Now!” link.3) Complete the Free Registration form.4) Follow any additional instructions from the registration process.5) You may now view live video from your sites and cameras.REMOTE VIEWING TIPSHow Do I Access My WiLife Online Account?You can access your WiLife Online Account using any one of these methods:Using the WiLife Button In Command Center, click Setup Online tab.In the Online Connection section, click on thelink http://my.online.wilife.comIn Command Center, click the WiLife buttonlocated on both the Live and Playbackscreens. The WiLife website displays.Click the menu options My WiLife and selectMy Cameras.Using WiLife.Com Open an Internet browser. Click on the menu option My WiLife andselect My Cameras. Online Setup Tab LinkGo to http://www.wilife.com.NOTE: Go to http://online.wilife.com to godirectly to your account.How Do I Remotely View From a PC?Note: This process assumes that you have completed the setup steps for Online Viewing.Online Viewing is a process that consists primarily of two easy steps – logging into your WiLife Online Accountand selecting which camera or cameras you want to view. This section shows you how to accomplish thosetasks.Page 5
Setting Up and Using Remote Viewing Log in to your WiLife Online Account View the video feed for one camera View the video feed for your cameras using the cycle feature Viewing video in Direct or Relayed Mode Use the My Cameras Page View the video feed for all cameras Using the Video Viewing WindowLOGGING INTO YOUR WILIFE ONLINE ACCOUNT1) Go to online.wilife.com. If you have not previously loggedin, the Please Log In page displays.2) Enter your e-mail and password. Then click Log In. Youwill then be redirected to your WiLife Online page.Hint: If you mark the “Remember me next time” check box,the system will automatically open your WiLife Online page.If you ever forget your password, you can come to the Log Inpage and click on the link “Have you forgotten yourpassword?”USING THE MY CAMERAS PAGEonline.wilife.com Login (if you have not yet logged in)The My WiLife page allows you to see all your WiLife sites and cameras on one page.Your account page is accessed by going to online.wilife.com.The layout of the page is designed so you can easily distinguish between sites and the cameras used for eachsite. In the example below, you can see the information and options available for each site.Here are some hints to help you better understand the links on the page:Page 6
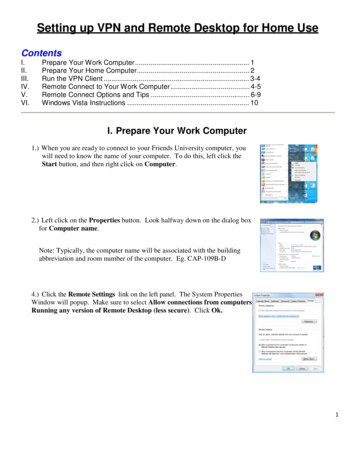
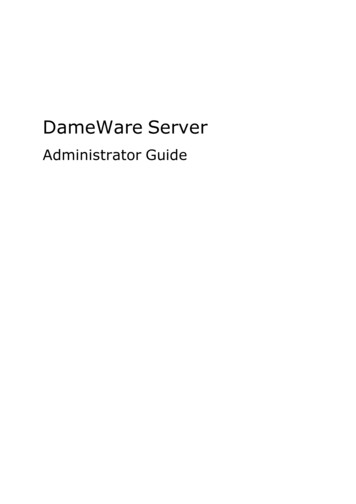
Setting Up and Using Remote ViewingStatus LEDActive Locationsdisplay with a greenicon.Inactive Locationsdisplay with a redicon.Active locationswithout activecameras displaywith a yellow icon.Site NameClick on the site’s nameto open the ManageWiLife Online page.[On] Connection MonitoringIs “On.” Click to turn “Off.”[St] Go to Storage page[RP] Go to RemotePlayback.Manageconnections withthe CommandCenter Site andcamerasLocation StatusDisplays Availableor OfflineView AllAllows you to see the live videofrom all of your cameras, all inone view.CycleWiLifecyclesthrougheachcamera’sCamera Namelive videoClick the link to open the viewing page feed.and view this camera’s live feed.Click to open the viewing page andview this camera’s live feed.VIEW THE VIDEO FOR ONE CAMERAonline.wilife.com Camera icon or Camera's nameTo view live video for just one camera, follow these steps:1) Go to www.online.wilife.com.If you previously marked the “Remember me next time” check box when you last logged in, the systemwill automatically open your My Cameras page. If not, you will need to enter your login name andpassword. (See Logging into Your WiLife Online Account for instructions.)2) On the My Cameras page, click on the camera icon or the camera's name, which displays beneath thecamera icon.The Video Viewing Window opens and the video plays in the viewing panel, as shown in this example:Page 7
Setting Up and Using Remote ViewingNote: Complete information regarding the features you see on the Live Remote Viewing screen, aswell as descriptions of Direct Mode and Relay Mode can be found in the Additional Remote ViewingDescriptions section at the end of this document. See the topics: “Using the Video ViewingWindow” and “Viewing Video in Direct vs. Relayed Mode.”VIEW THE VIDEO FOR ALL CAMERAS IN ONE IMAGEonline.wilife.com Camera name or iconTo view live video for all cameras at a specific site, follow these instructions:1) Go to online.wilife.com.If you previously marked the “Remember me next time” check box when you logged in, the system willautomatically open your My Cameras page. If not, you will need to enter your login name andpassword. (See Logging into Your WiLife Online Account for instructions.)2) On the My Cameras page, click on cameras name or icon. The Video Viewing Window displays.3) Click View All.Because you are viewing the video feed from all of your cameras, the viewing panel will be divided upinto squares, each square displaying the video for one of the cameras. The illustration below showswhat the viewing panel displays if you have 2, 3, 4, 5, or 6 cameras: 2-Camera View 3-Camera View 4-Camera View 5-Camera View 6-Camera ViewVIEW THE VIDEO FOR YOUR CAMERAS USING THE CYCLE FEATUREonline.wilife.com Camera name or iconThe “Cycle” option allows you to view the live, secure video for all of the cameras at the selected location oneat a time. The Viewing page will rotate through each camera and will continue to do so until you turn the optionoff.To use this feature, follow these steps:1) Go to online.wilife.com.If you previously marked the “Remember me next time” check box when logging in, the system willautomatically open your My Cameras page. If not, you will need to enter your login name andpassword. (See Logging into Your WiLife Online Account for instructions.)2) On the My Cameras page, click on the cameras name or icon. The Video Viewing Window will display.Please wait while WiLife connects.3) Click Cycle.VIEWING YOUR CAMERAS USING A CELL PHONE OR HANDHELDThe following requirements must be met prior to viewing remotely using a cell phone or handheld:1) Registered for a WiLife Online account? If not, please see the topic “Create Your WiLife OnlineAccount” for complete details.2) Have enabled Remote Viewing in Command Center? If not, please see the topic “Enable CommandCenter for Remote Viewing.”Page 8
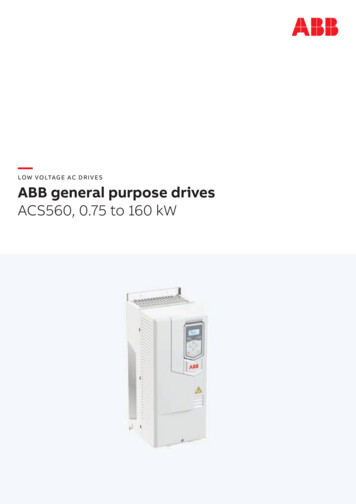
Setting Up and Using Remote Viewing3) Does your PDA or Cell Phone meet the system and browser requirements? To verify, please visithttp://www.wilife.com/About/Requirements.aspx and view the section titled “Cell Phones andHandhelds.”First Time PDA ViewingIf you are logging into WiLife Online for the first time, you will see thelanding page. The landing page has three options: Login link Live Demo button WiLife Online buttonHint: Click the LIVE DEMO button to connect to thedemo site to view live video from a WiLife testlocation. This option can be used to test yourhandheld to make sure that it is compatible forremote viewing.Because this is the first time opening WiLife Online, you need to login.1. Click the Login link or the WILIFE ONLINE button.2. Enter the e-mail address and your password.3. Mark the checkbox “Remember me next time.”4. Click the LOG IN button.Note: Now that you have logged in, the websiteremembers you and will automatically direct you tothe landing page. Simply click the button WILIFEONLINE.Using the WiLife Online Page (for Handhelds)Your WiLife Online page allows you to see your WiLife network all on onepage.In the example on the right, you will notice the names of your locations andcameras. You will see if a Location is Offline or Available.Each camera name is a link that opens the Video Viewing Window anddisplays live video for the camera you selected.Active cameras appear in green and underlined text.When you click on one of the camera links, you will see messages similar to these:Page 9
Setting Up and Using Remote ViewingThis window will display aslong as WiLife isconnecting to theCommand Center system.With handheld devices,there is a time limit of 3viewing minutes. Whenthe time expires, you arewelcome to reconnect andview video again.For some handheld devices,you will see a securitymessage similar to this:“Running a systemcommand on the item mightbe unsafe? Do you wish tocontinue?Click “Yes.”Viewing a Camera’s Live Video on a HandheldThe Video Viewing Window is used to show video from the camera youselected.The window consists of the following sections: Name of the Location. Video Viewing Panel. Status of the video feed (buffering, playing, stopped, etc.). Player control panel that includes the time counter, time progressionbar, percent of size of video panel, and basic player control buttons(full screen, stop, play, and decrease/increase video size).Page 10
Setting Up and Using Remote ViewingMonitoring & Troubleshooting Remote ViewingIf you experience a problem with your account please check the following items: I have completed the Setup Remote tab screen setups. I have registered a WiLife Online account at online.wilife.com. My account name (email address) and password is entered correctly. You can verify this in CommandCenter. Go to Setup Remote tab. Both the user name and password must match those you usedwhen you created your WiLife Online account.Note: The password is case sensitive in both locations. If you have forgotten your WiLife onlinepassword, reset it by clicking on the “Forgotten your Password?” link on the Login page atonline.wilife.com.Note: After you receive a new password from WiLife Online, you must also make the change in yourhost Command Center. Go to Setup Remote tab screen to validate or edit the password. Is remote viewing enabled in WiLife Command Center? Go to Setup Remote and check “EnableRemote Viewing” box and press "Apply Change." If you are still having an issue, try un-checking“Enable Remote Viewing,” pressing "Apply Change," followed by re-checking “Enable Remote Viewing”and pressing "Apply Change." Test your connection configurations. In Command Center, go to Setup Remote tab screen and clickthe “Test” button. Test your Internet connection. Open an Internet browser. If successful, go to www.wilife.com. My Internet Browser or Cell Phone is compatible with WiLife requirements. Read system requirements.Page 11
Setting Up and Using Remote ViewingAdditional Remote Viewing DescriptionsONLINE CONNECTION SECTION DESCRIPTIONSSetup Online tab Online Connection SectionThe Online Connection section of the Online tab screen allowsyou to check the status of your online connection andstreaming video. The following screen shot is an example ofthis feature.ONLINE STATUS INDICATORSThe Online Status field specifies whether or not you’re currently connected to our WiLife servers. For Onlinestatus, there are four primary indicators: Disconnected, Attempting Connection, Connected, and mmand Center is currently disconnected from remote viewing.ConnectedCommand Center is connected and available for remote viewing.Attempted ConnectionDisconnectingCommand Center is attempting to enable remote viewing.Command Center is disconnecting from remote viewing.There are also indicators that will display in the event of an error. The following table lists these indicators anddescribes the meaning of each.IndicatorsUnknown SiteAccount Already ExistsAccount Not VerifiedAccount UnknownData ErrorCommunication ErrorInvalid SerialConnection Test FailedDescriptionsCommand Center has attempted to register cameras without first registering thesite.The specified remote viewing account already exists. Please select anotheraccount.This WiLife remote viewing account has not been verified. Please check your emailto verify this account.Unknown remote viewing account. Please verify that your email address andpassword are correct, and remember that the password is case sensitive.See Knowledge Base topic WiLife Online Setup for more information.Command Center cannot connect to WiLife at this time. Please try again later. If thiserror persists, contact your network administrator. Possible causes include firewallsoftware, antivirus software, or a virus. Make sure you have installed all updatesand patches and that your firewalls are configured to allow Werks to access theInternet.See the Knowledge Base topic WiLife Online Data ErrorCommand Center cannot connect to WiLife at this time. Please try again later. If thiserror persists, contact your network administrator. Possible causes include firewallsoftware, antivirus software, or a virus. Make sure you have installed all updatesand patches and that your firewalls are configured to allow Werks to access theInternet.See the Knowledge Base topic WiLife Online Communication Error.The supplied serial number is invalid.Command Center has failed to establish a direct connection with the backend.Page 12
Setting Up and Using Remote ViewingService Response Camera NotRegisteredUnknown ErrorOne or more of the cameras being updated has not yet been registeredAn unknown error has occurred. Please check your event log and/or contact WiLife.Service-oriented indicators include Service Response Not Authorized, Service Response Expired, ServiceResponse No Registered Product, Service Response Disk Full, Service Response Limit Reached, ServiceResponse Not Implemented, etc.STREAMING STATUS INDICATORSThe Streaming Status field specifies whether or not someone is actively viewing your cameras.IndicatorsActive - Direct ModeActive - Relay ModeInactive - No ClientDescriptionsSomeone is actively/currently viewing your live cameras in Direct mode - thestreaming video feed is channeled directly to you because your system’s firewallsettings aren't blocking the stream and the Internet capability is powerful.Someone is actively/currently viewing your live cameras in Relay mode - thestreaming video feed is channeled through WiLife’s network to you.Nobody is actively viewing your live cameras.USING THE VIDEO VIEWING WINDOWonline.wilife.com Camera name or iconThe Video Viewing Window automatically opens when you click on a camera's name or icon from the MyCameras page.As the following example shows, the Video Viewing Window consists of a viewing panel, additional cameraicons, options to View All or Cycle through all cameras, options to change the size of the viewing panel, and astreaming video status bar.Here are some additional notes about the features and options on the screen:Components of the Viewing WindowPage 13
Setting Up and Using Remote Viewing Name of the location of cameras.List of cameras set up at this location. Click on a camera to view the live, secure video.View All : Allows you to see the video from all of your cameras in one view.Cycle : Viewing panel rotates through each camera’s video.The video viewing panel displays the video.The status bar shows the following information: Status of the video-- connecting, buffering, or playing.The amount of viewing time left in the current session. Only displays if you are using RelayedMode.The Normal and Large options allow you to alter the size of the video. The default setting isNormal.VIEWING VIDEO IN DIRECT VS. RELAYED MODEDirect ModeIf you are viewing video Direct Mode, you are in the best possible mode. However, the Internet may still blockvideo for a number of reasons. If you do not see video after a few minutes, consider switching to RelayedMode, which uses our WiLife network and requires less browser ability. To switch to this mode, you simply clickon the button SWITCH TO RELAYED MODE. You can switch back to Direct Mode at any time.There is no viewing time limit in this mode.Relayed ModeIf you are viewing video in Relayed Mode, it is because your firewall or other Internet influences are preventingdirect access to your video. Relayed Mode directs the video feed through WiLife’s network to you. Because ofthis, there is a time limit of 3 minutes for each viewing session. Of course, you can re-connect and receiveanother 3 minutes viewing time, as many times as you want.If you would like to use Direct Mode and not be restricted to a time limit, you can enable UPnP on your router.If you cannot enable UPnP, you can manually set ports in the router for Command Center to use. The portaddresses Command Center uses are 20570 to 20575. (Contact the manufacturer of the router or see yourfirewall or router documentation for complete instructions about manually configuring ports.)If you are using Relayed Mode, you do not have the option to switch to Direct Mode.Mobile devices will always use Relayed mode.Send feedback regarding this Technical Note to support@wilife.com and reference the technicalnote number WL1001 R1 in the subject.Page 14
Learn the basic concepts of WiLife Remote Viewing, and the Internet, cell phone, and Windows Mobile requirements necessary to successfully use the feature. Quickly complete remote viewing setups following the tasks listed in this document. Quick tips for remote viewing will have you watching live, streaming video from your cameras in minutes.