Transcription
ADOBE PHOTOSHOP CS TUTORIAL
ADOBE PHOTOSHOP CSAdobe Photoshop CS is a popular image editing software that provides a workenvironment consistent with Adobe Illustrator, Adobe InDesign, Adobe ImageReady, andother products in the Adobe Creative Suite. This tutorial is an introduction to usingAdobe Photoshop. Here you will learn how to get started, how to use the interface, andhow to modify images with basic Photoshop tools.Adobe Photoshop CS2
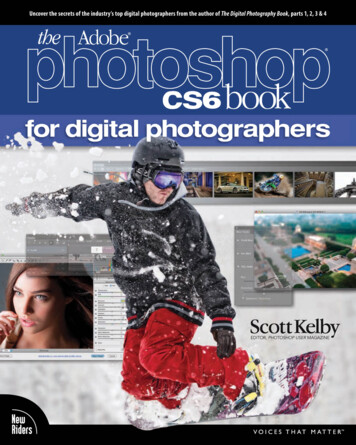
GETTING STARTEDOPENINGBegin by opening Adobe Photoshop CS.On a PC, click Start Programs Adobe Photoshop CS, or click on the shortcut onthe desktop.On a Mac, click Macintosh HD Application Adobe Photoshop CS AdobePhotoshop CS shown in Figure 1, or click the icon in the Dock.Figure 1. Navigation to Photoshop CS on a MacSETTING UP THE DOCUMENTSetting up your document correctly from the start will make your job much easier as youwork through your project. This will require some advanced planning. For example, ifyour final output will be a brochure, you may need to set up your document to behorizontal and double-sided.To create a new document, click File New. This will open the Document Setup dialogbox (Figure 2).Figure 2. Document Setup dialog boxAdobe Photoshop CS3
Here you will be able to name your file, set up the correct page size, and orientation foryour document. Options include, but are not limited to:Page Size and OrientationChange the page size by typing in new values for width and height. Page sizerepresents the final size you want after bleeds or trimming other marks outside the page.In the Preset dropdown menu you can find such common sizes as letter, legal, tabloid,etc. Typing in exact values for Height and Width gives you more control over the sizeand orientation of your page.ResolutionResolution is a number of pixels on a printed area of an image. The higher theresolution, the more pixels there are on the page, the better is the quality of the image.However, high resolution increases the size of the file. The standard recommendedresolution for printed images is 150 - 300, for web images - 72.Color ModeChoose a color mode that will best fit your project. For example, when making a graphicfor a web site, choose RGB. When making an image for print, choose CMYK.Background ContentsChoose the background: white, color, or transparent.When you have entered all of your document settings, click OK.OPENING AN IMAGE FROM A DISKIf the image you have is saved on a disk, select File Open, and then navigate to thedisk drive where your image is saved. Choose the image file and click Open. At thispoint, you may want to save your image under a different name so that you can alwayshave the original to fall back on in case of a mistake. To save you r file, select File Save As and type in the new name of the file in the dialogue box. Now you should beready to go.Adobe Photoshop CS4
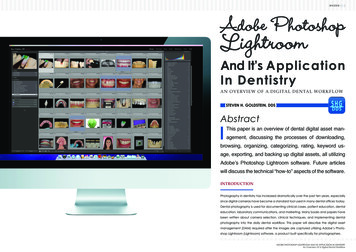
INTERFACE LAYOUTThis is the layout of Adobe Photoshop interface.Menu BarIf you look at the top of the screen you will see the Menu bar which contains all the mainfunctions of Photoshop, such as File, Edit, Image, Layer, Select, Filter, View,Window, and Help.Tool BarMost of the major tools are located in the Tool bar for easy access.Options BarThe Options bar contains extra options for most tools. The options change as differenttools are selected. Some tools share the same settings in the options bar, for example,painting modes and opacity, the others have specific options, for example, the AutoErase setting for the Pencil tool.The ImageThe image will appear in its own window once you open a file.Adobe Photoshop CS5
Image NameThe name of any image that you open will be at the top of the image window as shownabove.PalettesPalettes contain functions that help you monitor and modify images. By default, palettesare stacked together in groups. These are the palettes that are usually visible:Navigator, Color, Histogram, Layer. If none of the palettes are visible, go to Windowin the Menu bar and choose palettes you need to work with.Adobe Photoshop CS6
PALETTESBelow is the description of the most commonly used palettes in Adobe Photoshop CS.Palettes used for more advanced image editing will be covered in the Adobe PhotoshopCS Tutorial - Intermediate.NAVIGATORThe Navigator palette (Figure 1) allows you to resize and move around within theimage. Drag the slider, click on the Zoom In and Zoom Out icons, or specify thepercentage to navigate in the image.Figure 1. Navigator paletteCOLOR, SWATCHES, STYLEThe Color palette (Figure 2) displays the current foreground and background colors andRGB values for these colors. You can use the sliders to change the foreground andbackground colors in different color modes. You can also choose a color from thespectrum of colors displayed in the color ramp at the bottom of the palette.Figure 2. Color paletteAdobe Photoshop CS7
In the Swatches palette (Figure 3) you can choose a foreground or background color oradd a customized color to the library.Figure 3. Swatches paletteThe Styles palette (Figure 4) allows you to view, select, and apply preset layer styles.By default, a preset style replaces the current layer style. You can use the styles in thepalette or add your own using the Create New Style icon.Figure 4. Styles paletteAdobe Photoshop CS8
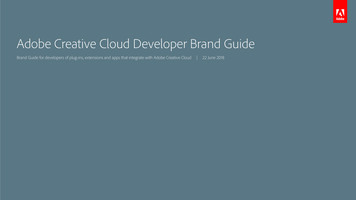
HISTORYThe History palette (Figure 5) stores and displays each action performed allowing youjump to any recent stage of the image alteration. The alterations should be createdduring the current working session; after saving or closing the document the Historypalette clears all the contents. Each time you apply a change to an image, the new stateof that image is added to the palette. The History palette can store up to 20 stages.However, you can always go back to the first stage, for example opening the document.It is important to know that once you click on any of the previous stages, all the changesthat were made after it will be lost.Figure 5. History paletteLAYERSLayers let you organize your work into distinct levels that can be edited and viewed asindividual units. Every Photoshop CS document contains at least one layer. Creatingmultiple layers lets you easily control how your artwork is printed, displayed, and edited.You will use the Layers palette (Figure 6) often while creating a document, so it iscrucial to understand what it does and how to use it.Adobe Photoshop CS9
A) Layer Visibility - the eye shows that theselected layer is visible. Click on or off to see orto hide a layer.B) Layer Locking Options - click the checkeredsquare icon to lock Transparency; click thebrush icon to lock the Image; click the arrowicon to lock the Position; click the lock icon tolock all options.C) Layer Blending Mode - defines how thelayer's pixels blend with underlying pixels in theimage. By choosing a particular blending modefrom the dropdown menu you can create avariety of special effects.D) Fill - by typing in a value or dragging theslider you can specify the transparency of thecolor of the image or object.E) Opacity - by typing in a value or dragging aslider you can specify the transparency of theentire layer.F) Layer Lock - the icon shows when the layeris locked and disappears when it is unlocked.Double-click the icon to unlock the layer.G) Layer Options Menu - click the blacktriangle to see the following options: New Layer,Duplicate Layer, Delete Layer, LayerProperties, etc. Some of the options arepresented as icons at the bottom of the Layerspalette.H) Layer Styles - if a layer has a style, an "F"icon shows at the bottom of the Layers palette.Click the little black triangle to see style options.I) Layer Mask - a grayscale image, with partspainted in black hidden, parts painted in whiteshowing, and parts painted in gray shadesshowing in various levels of transparency.J) Layer Set - this option helps to organizeimages with multiple layers. Click the icon tocreate a folder for several layers.Adobe Photoshop CS 10
K) Create New Fill or Adjustment Layer - havethe same opacity and blending mode options asimage layers and can be rearranged, deleted,hidden, and duplicated in the same manner asimage layers. Click the icon and select an optionto create a new fill or adjustment layer.L) Create New Layer - click this icon to create anew layer.M) Delete Layer - to delete a layer, select alayer in the Layers palette and drag it to thetrash can icon; or, select a layer and click theicon.Adobe Photoshop CS 11
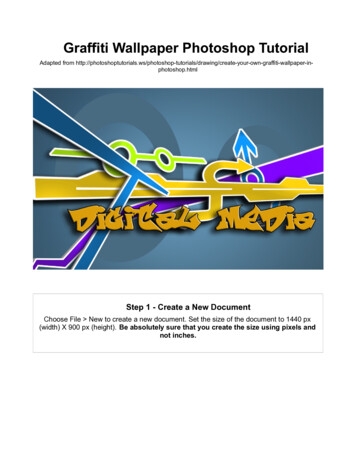
TOOLBOXIf you used other Adobe products, such as Illustrator or InDesign, you should be familiarwith the toolbox in Photoshop CS as it shares some of the tools from these applications.If you are a novice user of Adobe products you should keep in mind that you might notneed to use all the tools. In this tutorial, only the basic tools will be discussed in depth.To view detailed descriptions of the tools in the toolbox click on section of tools you wishto learn about.Link to : www.adobe.comSelection toolsAlteration toolsDrawing and Selection toolsAssisting toolsColor boxes and ModesAdobe Photoshop CS 12
Some tools in the toolbar have additional "hidden" tools. These tools have small blacktriangles in the right-hand corner. To view the "hidden" tools, click and hold down on anytool that has a black triangle in the corner (Figure 1).Figure 1. "Hidden" toolsAdobe Photoshop CS 13
SELECTION TOOLSBUTTONTOOLDESCRIPTIONMarqueeSelects an object by drawing a rectangle or an ellipse aroundit.Click the tool button, choose a rectangular or an ellipticalmarquee. Drag the marquee over the area of the image youwish to select.Used to select and move objects on the page.Click the tool button, then click on any object on the page youwish to move.Selects an object by drawing a freehand border around it.Click the tool button, drag to draw a freehand border aroundthe are of the image you wish to select.Selects an object by drawing a straight-edge border around it.Click the tool button, click on the starting point on the image,drag to draw a straight-edge border, click and drag again toselect the are of the image you wish to select. Double-click tofinish.Selects an object by drawing a border that snaps to the edgesof the defined area of the object.Click on the starting point on the image, drag around the are ofthe image. The tool will make fastening points at the edges. Tofinish selecting, drag the border to the starting point and clickprecisely in the point.Selects all objects in a document with the same or similar fillcolor, stroke weight, stroke color, opacity, or blending mode.By specifying the color range, or tolerance, you can controlwhat the Magic Wand tool selects.Click the tool button, then click on the area of the image youwish to select.Selects and cuts parts of an image.Click the tool button, then click and drag the tool over the partof the image that you want to keep. Resize the selected areadragging the squares at the sides and corners. Click theRETURN key when your crop box is sized correctly.Used to cut images into slices, which can be exported to a andCrop ToolSlice ToolAdobe Photoshop CS 14
ALTERATION TOOLSBUTTONTOOLDESCRIPTIONHealingBrushCorrects small blemishes in scanned photos.Select the tool, hold down the ALT key and left-click on thebase color you need to heal. Then left-click over theblemish.Brush ToolClone StampDraws lines of different thicknesses and colors.Select the tool. Then click on the selected area, drag todraw lines. Use the Options bar to change the Brush,Mode, Opacity, and Flow.Takes a sample of an image and applies over anotherimage, or a part of the same image.Select the tool. Hold down the ALT key and left-click on acertain point of the document where you want to start yourcopy point. Then, put your mouse over whatever part of thenew document you want the picture to go to. Hold downthe left mouse button and drag the mouse across the pageto copy the picture.Art HistoryBrushPaints over an image using the source data from aspecified history state or snapshot.Select the tool, specify the Brush, Blending Mode,Opacity, Style, Area, and Tolerance.Erase ToolRemoves part of an existing path or stroke. You can usethe Erase tool on paths, but not on text.Select the tool, click on the part of the image you wish toerase. Drag to erase pixels.Paint BucketToolFills and entire area with a specific color of your choice.Select the tool. Choose a foreground color in the ColorBox. Select an area you wish to apply the color to. Clickthe tool button, then click on the selected area.Gradient ToolApplies a gradient fill to a selected part of the image or toan entire layer.Select an area you wish to apply gradient to, click the toolbutton, choose a fill in the Options bar, click on the startingpoint, hold the mouse down and drag to the end point.Blur ToolBlurs the sharp edges of an image.Select an area where you wish to apply the tool. Click thetool button, choose the Brush, Mode, and Strength. Dragthe brush along the edges.Adobe Photoshop CS 15Dodge ToolLightens areas in an image.
Dodge ToolLightens areas in an image.Select the area where you wish to apply the tool. Choosethe Brush, Range, and Exposure. Click on the spots youwish to highlight.Adobe Photoshop CS 16
Adobe Photoshop CS 17
DRAWING AND SELECTION ts paths and path segments.Type ToolTypes text on a page. Every time you click the Type Toolon a new portion of the page a new layer will be created.Select the tool, click anywhere on the path.Select the tool, click on the page and begin to type. Youcan specify the font and size in the Options bar. You canalso resize and transform the text box by dragging thesquares at the sides and corners. Use the Move Tool tomove the text on the page.Pen ToolDraws smooth-edged paths.Select the tool, click on the page, drag to draw a path.Click and drag the anchor points to modify the path.RectangleToolD
Adobe Photoshop CS 9 HISTORY The History palette (Figure 5) stores and displays each action performed allowing you jump to any recent stage of the image alteration. The alterations should be created during the current working session; after saving or closing the document the History palette clears all the contents. Each time you apply a change to an image, the new state