Transcription
C30, C70 & XC90VOLVO NAVIGATION SYSTEM (VNS)L:7 :9 I DC
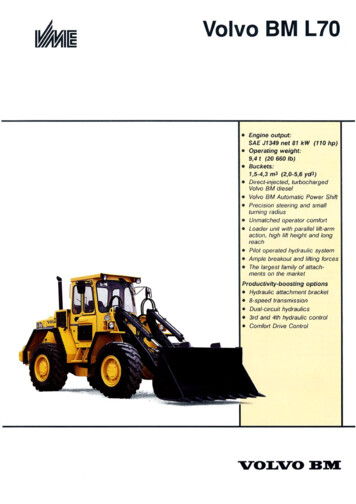
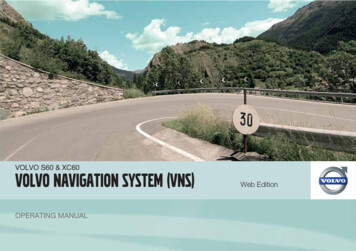
Direction to take at next guidance pointType of junctionIntermediate destinationName of next street or roadNext guidance pointStored locationSymbol for a Point of Interest – POI (Gas station)Remaining time to destinationRemaining distance to destinationMap scaleG033441RouteCurrent roadFinal destinationFamous landmarksTypes of roadsColorThe vehicle’s current locationFreewaysGreenCompleted section of the routeMain roadsRedStarting pointSecondary main roadsBrownTraffic informationNormal roadsDark grayOuter ring of compass – direction to destinationLocal roadsDark greenCompassText and symbols on the screenArea to be avoidedDistance to the next guidance point
VOLVO NAVIGATION SYSTEM (VNS) WITH RTTVNS is a navigation system developed by Volvo, which is designedto help guide you to the destination of your choice and provide information along the way.RTT1 (Real Time Traffic) is an information system developed by Volvo,which can detect roads/streets with traffic disruptions and make itpossible to select an alternative route past the problem area.The system includes features that enable you to set itineraries, searchfor certain types of points of interest along your route, store specialdestinations, obtain traffic informaton en route, etc.The system indicates the vehicle’s current location, and shows partor all of the route to your destination, depending on the settings youhave made. If at any time you should decide to deviate from the routeoriginally set by the system, a new route to the destination will automatically be calculated.By enabling you to reach your destination quickly and by the mostdirect route, Volvo's navigation system also helps contribute toimproving the environment.NAVTEQ DATABASE End-User License AgreementSee the information on page see page 78.1Option. Not available in all markets.
Contents01 02 0301 Getting to know thenavigation systemThis manual. 8Before you start. 9Navigation system, updating and care. 11C30 system overview. 12C70 system overview. 14XC90 system overview. 16Navigation system controls. 18On-screen keypad. 19Display and voice guidance. 20Unverified roads and Compass. 22Menu selections. 23202 Easy user modeMain menu, Shortcut menu, Scroll menu.Menu selections.Setting a destination.Show/Remove destination.Settings.03 Advanced user mode2829303334Main menu, Shortcut menu.Map scroll menu.Menu selections.Setting a destination.Itinerary.Next destination.Current position.Traffic information (option).Settings.System simulation.38414244495152535458
Contents04 05 0604 Traffic informationIntroduction.Avoiding traffic problems .Selecting information.Reading information.6263656605 Symbols on the map06 Questions & answersRoad numbers and Points of interest. 70Frequently asked questions. 76EULA – End User License Agreement. 783
Contents0707 IndexIndex. 824
Contents5
6G028780This manual. 8Before you start. 9Navigation system, updating and care. 11C30 system overview. 12C70 system overview. 14XC90 system overview. 16Navigation system controls. 18On-screen keypad. 19Display and voice guidance. 20Unverified roads and Compass. 22Menu selections. 23
GETTING TO KNOW THE NAVIGATION SYSTEM
01 Getting to know the navigation systemThis manual01Using this manualThe manual is divided into chapters describingthe various features and functions of the navigation system.A section dealing with common questions andanswers, and an index, can be found at the endof the manual.Menu selections/PathsMenu selections are shown in gray text in thismanual, for example:Set destinationAddressCityChanges in the manualThe specifications, design features, and illustrations in this manual are not binding. Wereserve the right to make modifications withoutprior notice. 2009 Volvo Car Corporation8
01 Getting to know the navigation systemBefore you startIntroductionMap modeOffThe VNS system can be used even if a destination has not been selected.When the system has started, the screen willdisplay the main menu briefly before enteringMap mode. A map of the vehicle's current location will then be displayed.1. Use the navigation control to go to Shutdown.The vehicle’s current route will be shown on thescreen and the vehicle’s position will be indicated by a blue arrow on the map.The system’s contents may vary from state tostate, and not all menu selections may be available for technical reasons. Press BACK to display the main menu. Press ENTER to activate the shortcut012. Press ENTER (press BACK to go to themain menu before shutting down).The screen will retract automatically into thedashboard.menu. Start upPress the navigation control to activateMap scroll mode, for example to see partsof the map that are outside of the screenarea.NOTEThe system can be used even if the engineis not running. It should be turned off whennot in use to help avoid battery drain.Pressing ENTER in this mode activates theMap scroll menu, see page 28.SettingsONThe system is provided with default settings,but it will start with the settings that were mostrecently used.The ignition must be in position I or II in orderto operate the system (refer to the vehicle’sowner’s manual).If a setting is changed and you wish to returnto the default setting, only the currentlyselected function will be affected.On/OffThe system starts up by displaying text on thescreen that must be confirmed by pressingENTER after you have selected to use eitherEasy mode or Advanced mode. Press ENTER or BACK.The screen will slide up from the dashboardautomatically. It may take several seconds forthe system to determine the vehicle’s locationand direction.There is no global reset function to return allsettings to default.9
01 Getting to know the navigation system01Before you startEasy/Advanced modesDemo (simulated guidance)When the navigation system is started, thedesired user mode can be selected.The navigation system contains a function thatdemonstrates guidance to a destination. However, please be aware that the demo can onlybe run when the vehicle is at a standstill. EasyOnly the primary menus are available in thismode, and can be used to simply get directionsfrom point A to B. AdvancedThis mode makes all settings and functionsavailable.Switching between modesSwitching between modes can be done inSettings.NOTESettings made in Easy mode are not used ifthe system is switched to Advanced mode,and vice versa. Settings are stored in themode in which they were made.10This function is only available when VNS is inAdvanced mode, see Demo on page 58.
01 Getting to know the navigation systemNavigation system, updating and careContents of the main unitAll map information is stored on the main unit’shard drive. There is no DVD in the unit when itis delivered. The DVDs are used for anyupdates to system or map information, see theinstructions of the DVD’s cover.If a DVD contains new system software in addition to map information, the system will beginby running the software installation.To perform an update:Volvo cannot be responsible for the accuracyor completeness of data, maps, or routingguidance presented by your navigation system. Please contact the map developer, NavTeq at www.navteq.com.2. Remove a DVD if one is already inserted inthe system’s DVD player.NOTEThe main unit’s DVD player is intended forVolvo DVDs only.Updating with a DVDNOTEPlease note that an update may take up to90 minutes. Be sure the vehicle’s battery isadequately charged before beginning.The VNS start screen will be displayed whenupdating is completed.NOTEThe vehicle can be driven while the navigationsystem is being updated, but VNS cannot beused while the update is in progress.New DVDs are issued on a regular basis withupdated and new information. The latest DVDscan be purchased from a Volvo retailer.01The type of information that may be displayed on the map is regulated by nationallegislation. For the latest information, go towww.volvocars.com/navi.1. Switch on the navigation system.3. Insert the DVD containing the updatedinformation. If there is more than one disc,insert them in the numbered order.DVD care When changing discs, make sure that theyare kept free of oil, grease and other impurities. The discs must not be exposed to moisture.4. The system will now be automaticallyupdated. Information will be displayed toshow update progress. 5. After the update, the DVD containing themost recent update must remain in thesystem’s DVD player. If more than one dischas been used, insert disc 1. If the disc isremoved from the player, the navigationsystem will stop functioning.Screen careIf the system is switched off while an update isin progress, the update will be resumed thenext time the system is switched on.The discs must be kept in their packagingwhen not in use. Avoid storing discs inexcessive heat, direct sunlight or in a dustyenvironment.Clean the display screen with a soft, non-staticcloth or a moist paper towel and a mild windowcleaning agent.Never use petroleum based solvents or abrasive substances when cleaning the screen.In certain cases, updating map information willadd new system functions.11
01 Getting to know the navigation systemC30 system overviewG0196310112
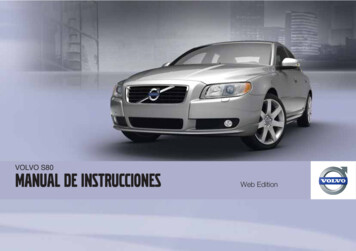
01 Getting to know the navigation systemC30 system overviewMain unitThe main unit contains a hard drive, a DVDplayer (for navigation system map discs only)and an integrated GPS (Global PositioningSystem) receiver and a TMC (Traffic MessageChannel) receiver.The main unit has the following functions: Calculates the vehicle’s current position Calculates the route to the selected destination Processes traffic informationProvides voice guidanceStores map dataUses the DVD player to update map dataand system softwareThe area covered by the system is being steadily expanded, which makes occasionalupdates necessary, see page 11.01IR port for the remote controlSee page 18.Regardless of whether the navigation systemis in Easy or Advanced mode, broadcast traffic information is always received and presented. see page 62 for additional information.SpeakersSound from the navigation system comesthrough the audio system’s front speakers.Navigation controlSee page 18.ScreenGPS receiverThe navigation system uses GPS signals, thevehicle’s speedometer and a gyroscope todetermine the vehicle’s current location anddirection.The screen displays the maps and providesdetailed information on intersections, distances, etc. See page 11 for information oncaring for the screen.Traffic information – TMC (option)1TMC is a standardized code system for transmitting traffic information. The receiver automatically tunes to the correct frequency andreception is handled by the audio system’s FMantenna.1Not available in all markets.13
01 Getting to know the navigation system01C70 system overview23415* 14
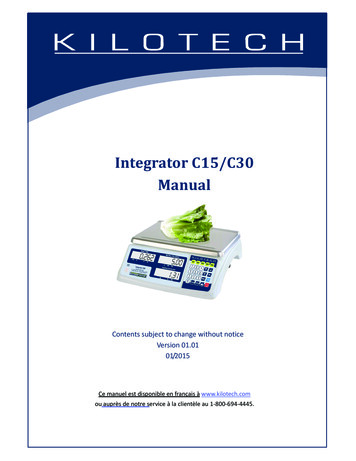
01 Getting to know the navigation systemC70 system overviewMain unitThe main unit contains a hard drive, a DVDplayer (for navigation system map discs only)and an integrated GPS (Global PositioningSystem) receiver and a TMC (Traffic MessageChannel) receiver.The main unit has the following functions: Calculates the vehicle’s current position Calculates the route to the selected destination Processes traffic informationProvides voice guidanceStores map dataUses the DVD player to update map dataand system softwareThe area covered by the system is being steadily expanded, which makes occasionalupdates necessary, see page 11.01IR port for the remote controlSee page 18.Regardless of whether the navigation systemis in Easy or Advanced mode, broadcast traffic information is always received and presented. see page 62 for additional information.SpeakersSound from the navigation system comesthrough the audio system’s front speakers.Navigation controlSee page 18.ScreenGPS receiverThe navigation system uses GPS signals, thevehicle’s speedometer and a gyroscope todetermine the vehicle’s current location anddirection.The screen displays the maps and providesdetailed information on intersections, distances, etc. See page 11 for information oncaring for the screen.Traffic information – TMC (option)1TMC is a standardized code system for transmitting traffic information. The receiver automatically tunes to the correct frequency andreception is handled by the audio system’s FMantenna.1Not available in all markets.15
01 Getting to know the navigation system01XC90 system overview* 16
01 Getting to know the navigation systemXC90 system overviewMain unitThe main unit contains a hard drive, a DVDplayer (for navigation system map discs only)and an integrated GPS (Global PositioningSystem) receiver and a TMC (Traffic MessageChannel) receiver.The main unit has the following functions: Calculates the vehicle’s current position Calculates the route to the selected destination Processes traffic informationProvides voice guidanceStores map dataUses the DVD player to update map dataand system softwareThe area covered by the system is being steadily expanded, which makes occasionalupdates necessary, see page 11.01IR port for the remote controlSee page 18.Regardless of whether the navigation systemis in Easy or Advanced mode, broadcast traffic information is always received and presented. see page 62 for additional information.SpeakersSound from the navigation system comesthrough the audio system’s front speakers.Navigation controlSee page 18.ScreenGPS receiverThe navigation system uses GPS signals, thevehicle’s speedometer and a gyroscope todetermine the vehicle’s current location anddirection.The screen displays the maps and providesdetailed information on intersections, distances, etc. See page 11 for information oncaring for the screen.Traffic information – TMC (option)1TMC is a standardized code system for transmitting traffic information. The receiver automatically tunes to the correct frequency andreception is handled by the audio system’s FMantenna.1Not available in all markets.17
01 Getting to know the navigation system01Navigation system controlsNavigation control/remote controlG019916Location of the navigation control andIR portThe navigation system can be operated withthe steering wheel-mounted navigation controlor with the remote control.The navigation control is located on the right,rear side of the steering wheel.Point the remote toward the IR port located atthe screen (only the XC90 has the IR port onthe audio system as shown above).The navigation control and remote control havethe same functions. Each enables you to navigate through the menus and make settings/selections.Use the navigation control to moveamong various menu alternatives or tomove the cross hairs on the map. The buttons,,andon the remotecontrol can be used for the same purpose.ENTER – Confirms or activates selections.NOTEThe remote control runs on AAA or R03 batteries. Check the batteries if the remotedoes not function properly.BACK – Press this key to go to the previousmenu or to undo a selection.NOTEThe exact design of the navigation controlmay vary from model to model.18"Do not disturb"In certain situations, the system may need afew extra seconds to calculate a route. A symbol will be displayed while this is taking place.NOTEWhile the route calculation symbol is displayed, the navigation system cannotaccept any commands from the navigationcontrol, or the ENTER or BACK buttons.
01 Getting to know the navigation systemOn-screen keypadEntering letters and selectingalternatives01The scroll bar at the right of the screen indicates that there are more alternatives than canbe displayed at one time.The figure shown indicates the number ofnames on the list. Press BACK to exit the list of names. You can also press BACK to delete lettersG033459one at a timeThe on-screen keyboard is used in many situations in the menus to select specific information such as points of interest, a state/city/street address/zip code, etc. Select letters with the navigation controland press ENTER.When there are no further alternatives, theentire name will be displayed automatically.The list at the bottom of the screen shows thefirst three possible alternatives made availableby the letters that have been entered.1. You can also go directly to the list of names.by pressing2. Select a name and press ENTER.General searchesSearches can be made at any time and alwaysfunction in the same way, regardless of whereyou may be in the menu system when a destination is selected.Pressing ENTER while keying in charactersdisplays all result combinations for the respective selections: City, Street, Points of interest,etc.For example, when searching for NewarkAirport, all combinations of Newark will bedisplayed when NE is entered. As the searchbecomes more specific, fewer alternatives willbe displayed, making selection easier.A search beginning with NE will also display,for example, NEwmaket restaurant since allalternatives containing a number of words separated by spaces are included in the search.19
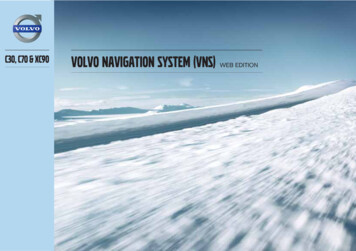
01 Getting to know the navigation system0120Display and voice guidance
01 Getting to know the navigation systemDisplay and voice guidanceDisplay appearanceVoice guidanceThe screen display is determined by factorssuch as geographic location and settings thathave been made, such as map scale, the symbols selected to be displayed, etc.After a destination and guidance has started, avoice message indicating the action to betaken and distance will be provided as youapproach an intersection, exit, etc. A detailedmap of the intersection will also be displayed.The message will be repeated as you comecloser to the intersection.An explanation of the text, signs, and symbolsthat may be displayed on the screen can befound on the inside of the front cover of thismanual.On a highway. The screen will display thepoints of interest along the highway. Thisfunction is available even if a destinationhas not been selected. A scroll list at theright indicates that there are additionalalternatives.The upper row on the screen shows the distance to the next exit or turn, and the name ofthe exit.The next row provides road sign information. Ifthe number of the road or exit, or the name ofthe exit are available, this information will alsobe displayed.Detailed map showing intersections. Thescreen will display lanes on the road to helpyou select the correct one at the next intersection. This function is only available onmajor roads. Voice guidance is also alwaysprovided.The vehicle’s current location is shown at thebottom of the screen.Two maps have been selected inSettings. Both sections of the screen display the same map, but with differentscales, see p. 38 for more information.This message will only be provided if a destination has been selected.Map scroll mode.01Toll boothsWhen driving on toll roads, you will receivevoice notification as you approach toll booths.NOTEToll booths are shown on the map but cannot be searched for as points of interest.21
01 Getting to know the navigation system01Unverified roads and CompassUnverified roadsCompassA small number of roads in the system may beunverified. This means that information onsigns, one-way streets, left turns, etc., may notbe accurate. An itinerary containing unverifiedroads will be displayed with gray arrowsinstead of the usual yellow ones.The system provides information when anunverified road is added to an itinerary andwhen the vehicle begins to travel on one ofthese roads.WARNINGAlways use good judgment when followingnavigation system guidance, and do not follow guidance that seems contrary to yourown best judgment.Never use the navigation system or anyother feature in your vehicle in a way thatdistracts you from the task of driving safely.Distraction can lead to a serious accident.Set and make changes in your navigationsystem only with the vehicle parked.Be aware of the current traffic situation.Always comply with relevant traffic regulations.22The compass can be displayed in two ways:– With north always at the topof the screen.– With the vehicle's currentdirection at the top of thescreen.The red point of the compass needle pointsnorth on the map.The gray destination arrow in the outer ring ofthe compass points toward the destination.Go to Map Options under Settings to changethe way in which the compass is displayed orto hide it.
01 Getting to know the navigation systemMenu selectionsMenus on two levels – Easy modeSet destinationGuiding voiceGuiding volumeMenus on two levels – Advanced modeSet destinationAddressLanguageAddressPoints Of Interest (POI)ColorPoints Of Interest (POI)Last 20Map viewStored locationsPoint on mapDistance unitLast 20User modeReturn tripShow destination01Point on mapRemove destinationSettingsShut downLatitude/longitudeFor information on all of the menu alternativesin Easy mode, see page 29.ItineraryStart guidanceAdd to itineraryRoute optionsClear itineraryNext destinationCurrent position 23
01 Getting to know the navigation system01Menu selectionsSettingsTraffic informationRoute optionsMap optionsGuiding optionsSystem optionsStart demoShut downFor information on all of the menu alternativesin Advanced mode, see page 42.24
01 Getting to know the navigation system0125
262829303334G029194Main menu, Shortcut menu, Scroll menu.Menu selections.Setting a destination.Show/Remove destination.Settings.
EASY USER MODE
02 Easy user modeMain menu, Shortcut menu, Scroll menuIntroduction02Shortcut menufic information is always received and presented. see page 62 for additional information.The navigation system starts in Easy usermode.G029190The most important menus are available in thismode, which makes things easier if changes inSettings are not often made.This menu offers icons for making quick settingchanges.Scroll menu Press ENTER in map mode and select asub-menu withor.Main menuG028755– Map scale/Current routeG033469At the top of the menu, you can choose to seeeither the remainder of the route1to the destination from your current location, or the entireroute.The main menu is at the top of the menu structure and can be accessed by pressing theBACK key several times.The map scale can be changed from 1/32 of amile to 60 miles. Hold the button down until themap scale of your choice is displayed, andrelease the button.G028755Press ENTER to repeat voice guidance.To switch between Easy and advanced modes,go to Settings System options Usermode.Traffic information (option)21228– GuidanceSwitching between settingsA destination must be selected.Not available in all areas.Regardless of whether the navigation systemis in Easy or Advanced mode, broadcast traf-G033467Change the map scale for a larger perspectiveor to display greater detail. Activate map scrolling by pressing thenavigation control. Press ENTER in scroll mode to activate theScroll menu.ScaleThis function changes the scale of the area inwhich you are currently driving. The scale canbe changed from 150 ft to 60 miles.Set as destinationSelect a position on the map. Guidance willbegin immediately.
02 Easy user modeMenu selectionsThree levels of the menu structure are shownhere. A number of the third level menus alsohave sub-menus, which are described in detailin their respective sections in this manual.Guiding volumeAddressp. 30Points Of Interest (POI)p. 31Last 20p. 31Point on mapp. 32p. 34Black/Chrome/Blue/DarkMap viewp. 342D/3DDistance unitShow destinationp. 33Remove destinationp. 33p. 34Km/MilesUser modep. 34Easy/AdvancedSettingsGuiding voicep. 34US English/Espanol/Francais /3/4/5LanguageSet destinationp. 34p. 34Shut downp. 9Female/Male29
02 Easy user modeSetting a destinationSelecting an address021. To change the state or city, use thenavigation control to move to State and/or City.1. After selecting a street, go to theNumber row and press ENTERor2. Press ENTER, or choose among the mostrecently chosen alternatives with.NOTEGo directly to Set. Alternative street numbers will be displayed.2. Go to Set after you have entered a streetnumber.The definition of a city or area may vary. Itwill sometimes be an entire city, or a particular section of a city.Set destinationAddressThe system does not contain streetaddresses for very small towns or villages.In these cases, the center of the town isused as the destination.Alternative 1 Select Street without choosing a city.The system will provide guidance to the midpoint of the selected street. If the street existsin more than one city, a list of alternatives willbe displayed.Alternative 21. Begin by selecting a City.Selecting a street addressThe system will place the cursor on Street. Themost recently selected State and City will bepre-selected.302. Select a Street.Selecting a street numberIf the address selected has a street number,this can be used as a specific destination.If a street number has not been entered,the system will guide you to the mid-pointof the selected street.SetConfirms the entered number.UndoReturns to the previous screen.Selecting an intersection Go to Interse. and choose a street thatintersects the selected street.Start guidance Go to Start guidance to begin receivingdirections to the destination.
02 Easy user modeSetting a destinationSearch using a Zip codeNOTEThis also applies to searches using Pointsof interest.02Point of Interest (POI)3. Go to Type, press ENTER.Set destinationAddress4. Select a POI from the list provided, pressENTER.CityInstead of searching in a city, you can opt tosearch for an area’s Zip code.5. In the list All names, select a name fromthe list.1. Go to ZIP code and press ENTER.2. Select the digits in the Zip code and pressENTERorSelect a Zip code from the list.3. Go to Street to select a street with the Zipcode entered and press ENTER.4. Go to Start guidance to begin receivingdirections to the destination.Set destinationPoints of interestPoints of interest include gas stations, hotels,restaurants, Volvo retailers, hospitals, parkinglots, etc.1. Highlight menu alternative POI.2. Press ENTER to access a sub-menu withdifferent search options in order to select apoint of interest.6. Press ENTER to display all informationabout the selected POI.7. Press ENTER to start guidance.Last 20Set destinationLast 20This is a list of the twenty most recentlyselected destinations. The scroll bar at the rightof the screen indicates that there are morealternatives than can be displayed at one time. Go to the desired destination and pressor ENTER to access the sub-menu.31
02 Easy user modeSetting a destinationSet as destination02Adds the destination to the itinerary.Delete locationRemove the destination from the Last 20 list.Point of the mapSet destinationPoint on map1. Use the Arrow keys to move the cursor tothe desired destination, press ENTER toaccess the map scroll menu.2. Select Set as destination and pressENTER.NOTEA position on the map can be selecteddirectly with the cursor by using the Arrowkeys in map mode.32
02 Easy user modeShow/Remove destinationShow the destination on the mapShow destination02 Press ENTER for an overview on the mapof the area that you have selected as yourfinal destination.Remove the destinationRemove destination1. Press ENTER and go to the destination tobe deleted.2. Press ENTER again.33
02 Easy user modeSettingsGuiding voice02SettingsGuiding voiceTwo-dimensional (2D) or threedimensional (3D)SettingsMap viewSelect a male or female voice for directions.Guiding volumeSettingsGuiding volumeSet the volume level for voice guidance or turnoff this function.LanguageSelect the language for menus, text and voicemessages.ColorThere are 4 screen settings that can be made– choose the one that you prefer.34SettingsD
Regardless of whether the navigation system is in Easy or Advanced mode, broadcast traf-fic information is always received and presen-ted. see page 62 for additional information. Speakers Sound from the navigation system comes through the audio system's front speakers. Navigation control See page 18. Screen The screen displays the maps and .