Transcription
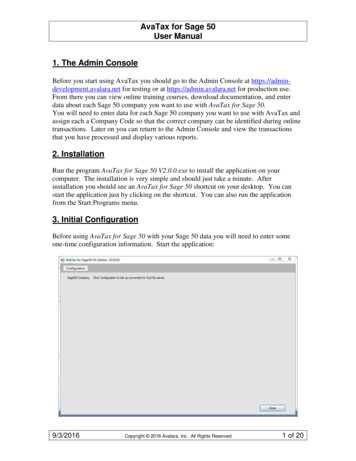
AvaTax for Sage 50User Manual1. The Admin ConsoleBefore you start using AvaTax you should go to the Admin Console at https://admindevelopment.avalara.net for testing or at https://admin.avalara.net for production use.From there you can view online training courses, download documentation, and enterdata about each Sage 50 company you want to use with AvaTax for Sage 50.You will need to enter data for each Sage 50 company you want to use with AvaTax andassign each a Company Code so that the correct company can be identified during onlinetransactions. Later on you can return to the Admin Console and view the transactionsthat you have processed and display various reports.2. InstallationRun the program AvaTax for Sage 50 V2.0.0.exe to install the application on yourcomputer. The installation is very simple and should just take a minute. Afterinstallation you should see an AvaTax for Sage 50 shortcut on your desktop. You canstart the application just by clicking on the shortcut. You can also run the applicationfrom the Start:Programs menu.3. Initial ConfigurationBefore using AvaTax for Sage 50 with your Sage 50 data you will need to enter someone-time configuration information. Start the application:9/3/2016Copyright 2016 Avalara, Inc. All Rights Reserved1 of 20
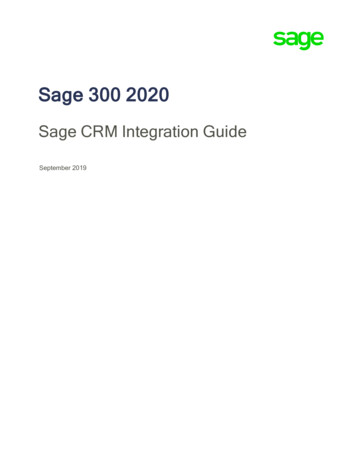
AvaTax for Sage 50User Manual3.1 Enter Connection DataClick the Configuration tag in the menu bar to open the Configuration form:During initial setup you will enter data on the Sage 50 and Connection tab. Afterdescribing how to do this the use of the other tabs will be explained.First select whether you want to connect to the AvaTax server for Production work or forSandbox testing. Note that the URL for the server, which is filled in automatically, isdifferent for these two modes. Depending on whether you want to work in Production orSandbox mode the security information, which you should specify next, is different foreach mode.The security credentials you need to connect to the AvaTax server can be specified eitheras an Account and Key, which you may have been provided by Avalara, or as theUsername/Password you use to log onto the Avalara administration site. Select thepreferred way you want to log on and then click Edit to enable you to enter thecorresponding values. (You may want to enter both kinds of credentials so that you havea fallback way of connecting if the primary way fails.)After you have entered your security credentials, click Test Connection to see if yourcredentials work. If they do, you will see the form filled in with connection data asshown in the next figure.9/3/2016Copyright 2016 Avalara, Inc. All Rights Reserved2 of 20
AvaTax for Sage 50User ManualIf your credentials fail, the information at the bottom half of the screen will not be filledin and you will see an error message.Before you have entered your credentials you can view only the Connection tab, Optionstab, and About tab but not the other tabs because they require a valid Sage 50 company tobe specified, which we will do in the next step.3.2 Select Sage 50 CompanySelect the Sage 50 tab and click the Select Sage 50 Database button on the Sage 50 tab:9/3/2016Copyright 2016 Avalara, Inc. All Rights Reserved3 of 20
AvaTax for Sage 50User ManualThe Open Company form lets you browse to the location of your Sage 50 data. You canfind the location of your company data by examining the Sage 50 Company Informationform. Select the drive where your company is located, then traverse the directories list tothe directory where your data is located. Note that the directory you want to located isone above the directory path shown in Sage 50, so if the path in Sage 50 rsu, then you would drop the\belgarsu and brows to the path shown in the figure above. If several companies areshown, select the one you want.If you are having trouble finding your company path or want to select a different databasethan the one currently open in Sage 50, click the Find button to see a form that quicklydisplays all companies that have been opened in Sage 50 at any time in the past.If you still don’t see your company, click the Search for Additional Companies buttonand your entire system will be scanned for additional companies to add to the list. Notethat this operation can take a very long time because an exhaustive search of your entiresystem is performed.After you select your company the Sage 50 tab should display the company name, thelocation of the data, and the Sage 50 version data.The first time you select this company the Company Code field will be blank. (If youlater switch back and forth between several Sage 50 company databases, the applicationwill remember code for all companies you have previously selected and will fill this fieldin for you.)9/3/2016Copyright 2016 Avalara, Inc. All Rights Reserved4 of 20
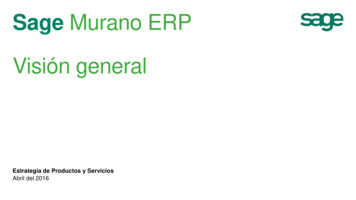
AvaTax for Sage 50User ManualEnter the code you created for the company on the online Admin Console in theCompany Code field, or if you don’t remember the code you used, click the SelectAvailable AvaTax Company Code and all the codes you created on the Avalara site willbe displayed and you can click the one you want. This code will be passed to the AvaTaxwebsite when getting tax so that the website will know the correct company to associatesaved data with.After you have set up a valid Sage 50 company the Sage 50 Tab should look somethinglike this:Note that the Sage 50 version shown is based on an internal Sage 50 code and may notcorrespond to the version of the Sage 50 application.3.3 Tax Codes TabAvaTax can associate codes with ship methods and inventory items for special handling.You can specify the codes to use on the Tax Codes tab.After you have selected a Sage 50 company the current tax code data will be filled in onthe Tax Codes tab from the database for that company. The default ship methods arelisted in the left panel and all inventory items are listed in the right panel, as shown in thefigure on the next page. For the ship methods you may want to assign them the code“FR”, which indicates to the AvaTax server that the shipment is for freight and the freightcharges are non-taxable. The tax codes for the inventory items are initially blank,indicating no special tax processing of the items.9/3/2016Copyright 2016 Avalara, Inc. All Rights Reserved5 of 20
AvaTax for Sage 50User ManualNote in the figure above that the tax code for one of the items shown has already beenspecified.If you have entered some new items in Sage 50 that are not showing up on the inventoryitem list, click the Synchronize with Sage 50 button to update the list.Click on any ship method or item ID to select the desired code from a pull-down list:Note that the very first entry is blank. Select that entry if you want to remove a tax codefrom the item. Also note that clicking on a shipping method only shows freight codes.9/3/2016Copyright 2016 Avalara, Inc. All Rights Reserved6 of 20
AvaTax for Sage 50User Manual3.4 Customer Entity/Use CodesOn the Entity/Use Codes tab you can assign Entity/Use Codes to individual customers:Each Entity/Use Code is associated with exemption tax rules for each state indicatingapplicable exemption scenarios.If you have entered some new customers in Sage 50 that are not showing up on thecustomer list, click the Synchronize with Sage 50 button to update the list.Click on any customer ID to change the code as in the form on the next pageThe first item in the list is blank. You can use this item to clear a previously set code.The default codes displayed are standard across all companies. However, AvaTax letsyou specify additional custom codes that are specific to the company. In the form abovethe customer CHAPPLE has been assigned the custom code XYZ.9/3/2016Copyright 2016 Avalara, Inc. All Rights Reserved7 of 20
AvaTax for Sage 50User Manual3.5 Address Validation9/3/2016Copyright 2016 Avalara, Inc. All Rights Reserved8 of 20
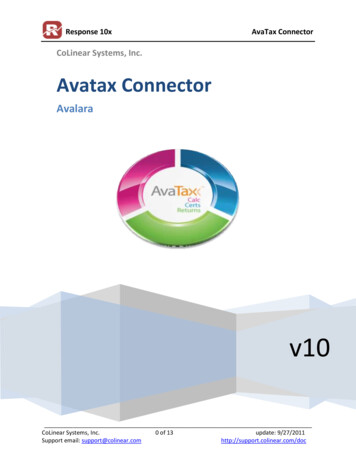
AvaTax for Sage 50User ManualOn the Address Validation tab you can invoke the AvaTax Address Validation service tovalidate your company address, the address of any customer, or the address of anyvendor.For example, to validate a customer address click the Customer Address Validationbutton to display the customer validation form:Select the customer from the customer list, whose address you want to validate. Some ofyour customers may have multiple addresses (Bill To, Ship To 1, etc.) If this is the caseyou can select the address you want to validate from the Address Type list.After you select a customer the address data on the left will be filled in from theassociated Sage 50 customer data. To validate this address, click the Validate button.The validated address from the AvaTax service will appear on the right. You can also9/3/2016Copyright 2016 Avalara, Inc. All Rights Reserved9 of 20
AvaTax for Sage 50User Manualcheck the Auto-validate box and the customer address will be immediately validated assoon as you select a customer. In either case after validation the form will look like this:Note that in this example address validation has combined address lines 1 and 2 into asingle line, modified the zip code to be correct, and added US as the country.The validated address information also includes the longitude and latitude of the address,although this information is not available in the Sage 50 database.After the address has been validated, you can optionally update the customer record inthe Sage 50 database with the validated address by clicking the Save to Sage 50 button inthe right panel.If the address is not valid, a RED status line will appear near the bottom of the formdescribing what the problem is.9/3/2016Copyright 2016 Avalara, Inc. All Rights Reserved10 of 20
AvaTax for Sage 50User ManualIf the customer address is not valid, you can edit the address in the left panel and click theValidate button to try again. If you were able to create a valid address, then you can savethat to the customer record to the Sage 50 database.If you prefer to keep the original address in the Sage 50 company database, then don’tclick on the Save to Sage50 button.Validating the company address or vendor addresses works exactly the same as illustratedhere for a customer.3.6 OptionsThe Options Tab looks like this:Normally you would not care about the handshaking between this application and theAvaTax server. However, if you are experiencing some sort of problem it is useful tosee what commands are sent to the server. Selecting the check box Enable Logging ofAvalara Server Transactions allows you to do that. When logging is enabled a recordof every transaction that this application sends to the AvaTax service is logged.You can view the log of transactions by clicking the Show Event Log button. The resultis a report that looks something like this:9/3/2016Copyright 2016 Avalara, Inc. All Rights Reserved11 of 20
AvaTax for Sage 50User ManualTransactions that were successful and transactions that generated an error are reported.For successful transactions the round-trip time to get a reply to the transaction is alsoreported.The Options Tab also has a check box Disable Sage50 warning messages. Normallythis application has no problem reading from and writing to a Sage 50 database.However, if some corruption has occurred in the Sage 50 database, which is somethingthat can happen, although rarely, during normal operations of Sage 50, then errors canoccur when this application tries to access the database. And when these errors occur anerror message is displayed. For certain kinds of corruption the number of error messagesare excessive, so you might want to suppress them by checking this box.The Options Tab also has a pull-down list that allows you to select the default date rangethat appears on the forms for selecting transactions. Click on the arrow to display thefollowing options:AllAll transactions regardless of dateSage50 Open PeriodStart/end dates of period current Sage 50 periodThis yearLast six monthsLast three monthsLast two monthsThis monthLast 30 daysLast two weeksLast weekLast 4 daysLast 3 daysLast 2 daysTodaySelect the default date range that you find most convenient for your operations.9/3/2016Copyright 2016 Avalara, Inc. All Rights Reserved12 of 20
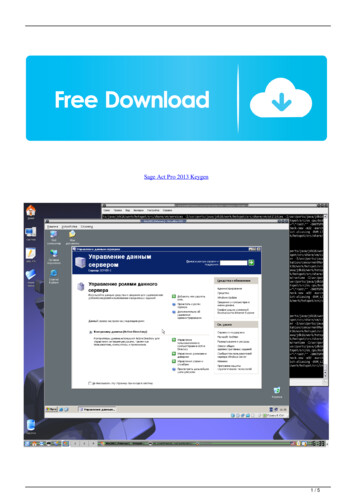
AvaTax for Sage 50User Manual3.7 About AvaTaxThe AvaTax tab displays some useful information about the application:Clicking the Publisher link will take you to the Avalara home page.Clicking the For technical support link will open up a new email message with thecorrect email address for contacting Avalara technical support.Clicking the Support Information link will take you to the Avalara support webpage.3.8 Setting Customer Tax CodesAfter you have successfully connected to the AvaTax server and have connected to aSage 50 database, the menu bar on the main form will contain a button Set CustomerTax Codes. As part of the procedure for setting up a Sage 50 database to work with thisapplication, as described in the next section, you will need to modify the default taxauthority that Sage 50 should use for your customers. If you want to enable just a fewcustomers to have their tax computed by AvaTax, you can do that manually. However,it is more likely that you will want to change the default tax authority for all of yourcustomers. That is easily done on the form that appears when you click the SetCustomer Tax Codes button:9/3/2016Copyright 2016 Avalara, Inc. All Rights Reserved13 of 20
AvaTax for Sage 50User ManualNotice that for this example only three customers have been assigned an AvaTax taxcode.You can select the customers whose tax codes you want to change in several ways. Youcan simply check the desired customers, or you can select the desired customers in thenormal Windows way and then click the Check Selected button. You can also select allcustomers by clicking the Check All button. Similarly you can unselect checkedcustomers by clicking again on checked boxes or unselect them using the Uncheck All orUncheck Selected button. If you want to select most, but not all customers you can firstclick Check All and then uncheck the unwanted customers.You can click on any column header to sort the entries by that column. You can alsoresize the form to show more records.The pulldown list for the new tax code you want to use for the selected customers will letyou specify the tax code you want to change the selected customers to. Note that notonly can you change the tax code for customers to an AvaTax code, you can also changethem back to any tax code defined in your Sage 50 database.When you are ready to change the tax codes for the selected customers, click ChangeTax Codes and the operation will be performed.9/3/2016Copyright 2016 Avalara, Inc. All Rights Reserved14 of 20
AvaTax for Sage 50User Manual4. Setting up Sage 50Before using AvaTax with Sage 50 you need to do the following in Sage 50:1. (Optional) Create a sales tax payable account for AvaTax. You should already have aSales Tax Payable account defined. If you want to separate the tax payable to Avalarafrom the tax payable to other tax codes, you should add an account to the chart ofaccounts for this. The account type should be Other Current Liabilities.2. Add a vendor record for Avalara. This is so Sage 50 will know what vendor will bepaid the taxes computed by AvaTax.3. Add a new tax code to indicate that when tax should be computed by AvaTax onjournal transactions. The name of the tax code must be “AvaTax”. The Sage 50 form forcreating a new tax code will also need to create a tax authority to use with the AvaTaxcode. Name the authority “AvaTax” also and set its tax rate to 0. Note: you can createseveral tax codes if you want to keep track of subsets of taxable activity in differentcategories; the only restriction is the codes must all begin with AvaTax. For example,you might want to create a separate account in Sage 50 for tracking tax in California, inwhich case you could create two tax codes: AvaTaxCA and AvaTaxOther.4. For any customer that you intend to use AvaTax with, set the default tax code toAvaTax on the customer record in Sage 50. This will cause the AvaTax tax code to bedisplayed on any journal transactions you create for the customer. Or you can use the SetCustomer Tax Codes form described in the previous section to make bulk changes toyour customer’s default tax codes. And you may want to create a test customer with thetax code AvaTax during the learning process so you can easily play around with theapplication without affecting your working data. Alternatively you might want to make acopy of your live company data to work with during the learning stage.5. How It WorksIdeally as you enter new transactions into Sage 50 you would like the sales taxautomatically be computed on the fly as you are entering data. Unfortunately Sage 50does not have any hooks into their application that would allow an external process to betriggered to perform the tax computation. So we have had to implement AvaTaxcomputations in the next best way: AvaTax for Sage 50 detects which transactions havebeen marked with a tax code of AvaTax, performs the tax computation using the AvaTaxweb service, then updates the Sage 50 record with the correct tax amount.So the procedure for using AvaTax for Sage 50 is to enter a transaction in Sage 50, tellAvaTax for Sage 50 to perform the tax computations, then open the transaction again inSage 50 and the correct tax will now show.9/3/2016Copyright 2016 Avalara, Inc. All Rights Reserved15 of 20
AvaTax for Sage 50User Manual6. Selecting Transactions to ProcessTo select Sage 50 transactions for processing click the Select Journal Transaction buttonon the main form:Selecting what is displayedWhen this form opens the From and To dates will be set to the beginning and ending dateof the range that is specified by the setting on the Options Tab of the Configuration form.You can change the dates to any values you desire to display the transactions to narrowdown or widen the transactions displayed. You can also click on any column to sort therecords by that column and you can resize the form to show more records.The Type is initially set to All. This causes the nine different types of transactions (All,Proposal, Quote, Receipt, Return, Sales Credit Memo, Sales from Proposal, SalesInvoice, and Sales Order) all to be displayed on the list. You can change the setting ofType to display just one of these types of transactions.Status ValuesThe Status values shown at the end of each line have the following meaning:Calculate OnlyNew9/3/2016You can only compute the tax for this transaction. No data isstored on the AvaTax service web site.This transaction has not been processed by the AvaTax service.Copyright 2016 Avalara, Inc. All Rights Reserved16 of 20
AvaTax for Sage 50User dTax has already been computed by the AvaTax service andinformation about the transaction has been stored.Payment of the tax by Avalara for this transaction has beenauthorized.The transaction has been modified in Sage 50 and the tax needs tobe recomputed.The transaction has been voided on the AvaTax server.The transaction has not been posted in Sage 50, so the AvaTaxservice will not save any information about the transaction whenthe tax is computed.The transaction has been deleted from Sage 50 but there is stillinformation about the transaction being held by the AvaTaxservice. Deleted transactions always are displayed in Red.Selecting Transactions to ProcessThe form has several features that make it easy to select the transactions you want: Click on an entry to select only that transaction.Click on the column headings to sort the entries by that column. Click again tosort in the reverse direction.Select a group of items using the Select pull-down list in the lower left corner ofthe form. You can select None, All, Calculate only, Cancelled, Changed,Invoices, New, Saved, or Unposted.While holding the Shift key down, click on an entry to add all entries between thelast selected entry and the one you just selected.While holding the Ctrl key down, click on an entry to switch its state betweenselected and not selected.After you have selected the transactions you want, click the OK button and the selectedtransactions will be transferred to the main form.7. Processing TransactionsAfter you have selected the transactions you want to process and are back on the mainform, the main form will look something like what is shown on the next page:9/3/2016Copyright 2016 Avalara, Inc. All Rights Reserved17 of 20
AvaTax for Sage 50User ManualIf there are any transactions of type Proposal, Quote, Sales from Proposal, Sales Order, orUnposted, then the Compute Taxes button will be enabled and clicking on it willcompute the taxes for these transactions. However, details of these transactions are notstored on the AvaTax server because they are not transactions on which taxes are due, sothe Commit button will not be enabled.If there are any transactions of type Receipt, Return, Sales Credit Memo, Sales fromProposal, or Sales Invoice, then both the Compute Taxes and Commit button will beenabled.Note: For transactions with a status of Cancelled or Saved the tax has already beencomputed and agrees with the Sage 50 database, so these transactions do not trigger theenabling of the buttons. So if you have selected only transactions with status Cancelledand/or Saved, neither button will be enabled.When you click the Compute Taxes button this application will inform the AvaTaxServer to compute the tax for the appropriate transactions and return the results. Afterthis occurs, which should be very quick if you don’t have to many transactions selected,the display will change: the total amount and tax columns will be updated, and the entriesin the status column will change accordingly: If the status was Unposted and Calculateonly, it will change to Tax Computed, and if the status is New or Changed, it will changeto Saved.9/3/2016Copyright 2016 Avalara, Inc. All Rights Reserved18 of 20
AvaTax for Sage 50User ManualFor all the transactions for which you computed taxes and the tax amount has changed,the associated transaction in your Sage 50 company database will be updated to reflectthe new tax amount. You can then open the transaction in Sage 50 and you will see thecorrect tax as computed by AvaTax appears.After you have computed taxes on the selected transactions you can view the details ofany transaction by double-clicking on it. When you do that you will see something likethis:The top part of the form shows the same sort of information that appears when youexamine the transaction in Sage 50.The middle part of the form shows the line detail that you see on a Sage 50 transaction,but the individual tax for each line is additionally shown. Also the freight amount isshown as a separate detail line, whereas in Sage 50 the freight amount is shown in aseparate box at the bottom of the form.The bottom part of the form is something you don’t see on the Sage 50 forms: it is thebreakdown of the tax amount by tax authority for a particular detail line. By default thebreakdown is shown for the first line but you can click on any other line to see its detail.The form can be resized to show more lines.9/3/2016Copyright 2016 Avalara, Inc. All Rights Reserved19 of 20
AvaTax for Sage 50User Manual8. AvaTax Service HistoryOn the main form there is a button AvaTax Service History that is always enabled andyou can click on it at any time to see details of the transaction data that is stored on theAvaTax server:You can resize this form as desired and click on any column to sort the records by thatcolumn. And like the in the previous section you can double-click on any transaction topop up a form showing the details that are stored on the AvaTax Server for thattransaction.You can specify the date range for which you want to return data. By default this rangeis set to the range specified on the Configuration form Options Tab.If you want to void any transactions, select the desired transactions and click the VoidSelected Transactions button. This will cause the AvaTax Server to void all theselected transactions and will change the status on this form for the selected transactionsto Cancelled.If you want to delete any transactions completely from the AvaTax Server, select thedesired transactions and click the Delete Selected transactions button. This will removethe selected transactions from the AvaTax Server and will remove them from this form.The ability to delete transactions from the AvaTax Server is handy when you are inSandbox mode because it allows you to change the status of the transaction back to Newso you can retry an operation. However this functionality may not be permitted whenyou are in Production mode.9/3/2016Copyright 2016 Avalara, Inc. All Rights Reserved20 of 20
AvaTax can associate codes with ship methods and inventory items for special handling. You can specify the codes to use on the Tax Codes tab. After you have selected a Sage 50 company the current tax code data will be filled in on the Tax Codes tab from the database for that company. The default ship methods are