Transcription
USER MANUAL
Special ThanksDIRECTIONFrederic BrunPierre-Lin LaneyrieENGINEERINGSamuel LimierMichel DavitValentin LepetitMathieu NocentiBenjamin RenardGermain MarzinMatthieu CouroubleDESIGNMorgan PerrierSébastien RochardMANUALMorgan PerrierRandy Lee ARTURIA SA – 2017 – All rights reserved.11 Chemin de la Dhuy38240 MeylanFRANCEhttps://www.arturia.comInformation contained in this manual is subject to change without notice and does notrepresent a commitment on the part of Arturia. The software described in this manual isprovided under the terms of a license agreement or non-disclosure agreement. The softwarelicense agreement specifies the terms and conditions for its lawful use. No part of thismanual may be reproduced or transmitted in any form or by any purpose other thanpurchaser’s personal use, without the express written permission of ARTURIA S.A.All other products, logos or company names quoted in this manual are trademarks orregistered trademarks of their respective owners.Product version: 1.0Revision date: 21 June 2017
Thank you for choosing Arturia!This manual covers the features and operation of Arturia’s MIDI Control Center, thecompanion software for many Arturia hardware devices. For additional information aboutthe hardware itself, please read the appropriate owner's manual.
IntroductionDear musician,The fact that you're reading this manual means that you have done your research andhave purchased one of our products. Thank you! We like to think that you did so havingrecognized the power, flexibility, and sheer fun of the Arturia device you now own. We arecertain you are about to begin a journey that will lead to the production of some amazingmusic.This manual will help you make the most of your Arturia product by using the MIDI ControlCenter, the powerful companion software we designed to work with our hardware.The MIDI Control Center does much more than simply give you another way to tweakthe front panel controls of the device; it also provides access to parameters that are notavailable from the front panel.If you are reading this manual and have not already downloaded the MIDI Control Center,you can find it here: Arturia Downloads. : A pop-up window will let you know when a new version of the MIDI Control Center is available.You'll have the option to update at that time or wait until later.Be sure to visit the www.arturia.com website for information about all of our great hardwareand software instruments. They have proven time and again to be the go-to solutions formusicians around the world.Musically yours,The Arturia team
Table Of Contents1. Welcome to the MIDI Control Center! . 21.1. Features of the MIDI Control Center . 22. Overview. 42.1. The Main window . 42.1.1. Device selection. 42.1.2. Sync. 52.1.3. Firmware Revision. 52.1.4. Device Memories / Device Projects. 62.1.5. Template utility buttons . 72.1.6. Resizing the window. 72.1.7. MIDI Console. 72.2. The basics of editing . 82.2.1. Selecting a control . 82.2.2. Setting values . 82.2.3. Selecting the tabs. 93. Working with templates . 103.1. The Sync button. 103.1.1. Sync operations. 103.1.2. Non-sync operations . 113.2. Definitions: Memories, Projects, and Templates . 113.2.1. The Project tab . 113.3. Project / Template Browser. 123.3.1. Device Templates . 123.3.2. Building a library. 123.3.3. The Working Memory / Working Project . 133.3.4. Revise a Template. 153.4. Store To / Recall From. 163.4.1. The ‘Store To’ button. 163.4.2. Recall edited data from the device . 163.4.3. Template utilities. 174. Device Settings. 184.1. The Device Settings tab . 184.2. Import/Export Device Settings. 194.2.1. Export Device Settings. 194.2.2. Import Device Settings . 195. Controller Maps . 205.1. Creating a Controller Map . 205.1.1. Assignable vs. non-assignable controls . 215.1.2. Rear and side panel controls. 216. Updates. 226.1. Device Firmware Upgrades. 226.2. MIDI Control Center updates . 227. TROUBLESHOOTING. 237.1. Error messages . 237.2. Device not recognized . 237.3. Device failed to open (Windows only). 248. Software License Agreement. 25
1. WELCOME TO THE MIDI CONTROL CENTER!Arturia has a long history of developing highly sought-after hardware products, while alsocrafting supplementary software that enhances the capabilities of the hardware manytimes over.The MIDI Control Center (MCC) is software with many faces, but one purpose: to unlock thefull potential of the device with which it is being used. The MCC is constantly evolving andgrowing; as each new hardware device is released, its virtual partner is added to the list ofsupported devices inside the MCC window.The MCC supplies an additional way to configure the front panel features of a device, andalso provides access to features that are not available directly on the physical unit. Thesoftware and hardware are a powerful combination, and in your hands a creative trinity willbe unleashed!1.1. Features of the MIDI Control Center : The following list is not exhaustive. Not all features are available on all devices. Please refer to theappropriate documentation for specific information. 2Device settings Memory backup Response curves Sequence/pattern behavior MCU/HUI control Transposition CV/Gate characteristics Sync settings Drum map User scale Import/export settings to/from another unitPerformance control assignments Faders, knobs, modulation wheel MIDI Channel number CC/RPN/NRPN number and range Aftertouch and range Bank/Program number and range Pitch Bend MIDI channel Pads, buttons, switches MIDI Machine Control Preset selection/MIDI Program change MIDI note number MIDI CC toggle LED color Sustain Pedal operationArturia - User Manual MIDI Control Center - Welcome to the MIDI Control Center!
Sequences/patterns Pattern length Step size Notes Duration/Gate time Tie/Hold Legato Swing amount Scale selectionKeyboard Zone MIDI Channel Split pointArturia - User Manual MIDI Control Center - Welcome to the MIDI Control Center!3
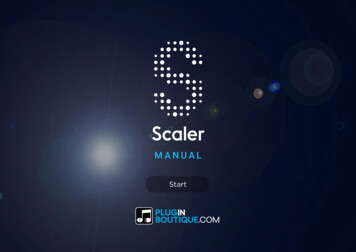
2. OVERVIEW2.1. The Main windowThe Main window of the MIDI Control Center shows information related to the device(s) youhave connected. For example, you may see one or more of these items on the right side: an image of the device: this enables you to assign MIDI messages to many ofthe controls. a grid or a musical staff for creating and editing a sequence or pattern. two or more tabs within the window for access to different features. a button that leads to the global settings of the device.In other words, the right side of the window contains most of the device-specific functions.We'll give general information about these things elsewhere in this manual, but for fulldescriptions of these features you will need to refer to the appropriate documentation.However, the left side of the main window is fairly uniform from one product to the next. Itis these shared functions which will be described in this chapter of the manual.2.1.1. Device selectionConnect one or more Arturia devices to your computer and then launch the MIDI ControlCenter. Next, locate the Device menu in the upper left corner of the MCC. Click anywhere inthe Device Name field to open the selection menu.Your device(s) will be in the list of connected devices:Device selection menuThe device which is currently selected has a blue check mark by its name. To use the MCCwith a different device, select its name within the Connected Device list.4Arturia - User Manual MIDI Control Center - Overview
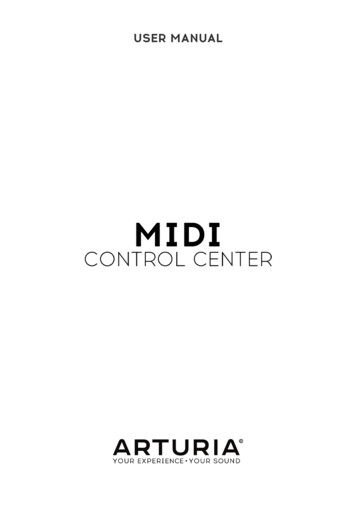
2.1.2. SyncThe Sync button is located immediately to the right of the Device selection window, asshown below.For those devices that support Sync mode, clicking this button will pull the contents of theirmemory into the MCC for editing.For more information about Sync and non-Sync operations, see the chapter Working withTemplates [p.10].2.1.3. Firmware RevisionThe MCC will notify you of firmware updates for the connected device if your computer isconnected to the internet. Firmware update notifications will look something like this:Firmware updatenotificationThere is more information about device firmware updates in the chapter Updates [p.22].Arturia - User Manual MIDI Control Center - Overview5
2.1.4. Device Memories / Device ProjectsThe left side of the MCC window shows a list containing Memories, Projects, and Templates,depending on the connected device. When one of these items is selected from the list theMCC can transmit that item to, or request that item from, the internal memory of the device.The Store To / Recall From buttons are used for this purpose. See Working with Templates[p.10] for information about this. : Some products such as the MatrixBrute have their project management features on the right sideof the MCC window, not the left side. Please refer to the product documentation for more information.Here are some examples of what you may see, depending on the selected device:The Device MemoriesDevice Projects -syncabledevices-The items within these windows may be dragged and placed into new locations to re-orderor overwrite existing data.Some Arturia products, such as the BeatStep Pro, do not utilize a Working Memory or aWorking Project. In that case the Device Projects list and Project Browser window may looklike this:The Device Memories /Device Projects windows-non-sync devicesThe memory management techniques for both sync- and non-sync devices are detailed inWorking with Templates [p.10].6Arturia - User Manual MIDI Control Center - Overview
2.1.5. Template utility buttonsBeneath the Project Browser window are a series of buttons that are used to save, create,and share your original Templates.The functions of the Template utility buttons are discussed in greater length in Working withTemplates [p.10].2.1.6. Resizing the windowTo see a larger number of the Projects in the Device Projects list, click and drag the windowresizing button:Resizing the DeviceProjects window2.1.7. MIDI ConsoleWhen the MCC and your device are connected it is possible to monitor the MIDI messagessent by and to your device. To do so, select MIDI Console in the View menu (or use Ctrl/Cmd M).A panel will open at the bottom of the MCC to display the MIDI data in both hexadecimaland "friendly" formats. This window also allows text selection and copy.The MIDI Console windowArturia - User Manual MIDI Control Center - Overview7
2.2. The basics of editing2.2.1. Selecting a controlMany devices have a page inside the MCC that shows a graphic representation of their frontpanels. This enables you to construct a Controller Map for that device.A Controller Map contains a set of MIDI assignments for the available knobs, pads, buttonsand controls. Hover over the desired control, or click it; if it is assignable it will turn red anda list of its editable parameters will appear at the bottom of the MCC window.MiniLab Controller Map: Pad 1 selectedMore information can be found in the chapter Controller Maps [p.20].2.2.2. Setting valuesThere are two main ways to enter new parameter values in the MIDI Control Center: clicksomething and move it, or type a number into a field.In many cases both options are available. For example, if you want to change the Swing %value for a pattern, there are two methods: Click and drag the knob graphic, or Double-click in the value field and enter a new value.Editing a knob valueTo edit a parameter that has multiple options in a list, click its pull-down menu and make aselection:Selecting a pull-downmenu option8Arturia - User Manual MIDI Control Center - Overview
2.2.3. Selecting the tabsThe middle window of the MIDI Control Center often has tabs. For example, when usedwith a BeatStep Pro there are six tabs: Project, Seq1, Seq2, Drum, ControllerMap, and DeviceSettings.The device tabs: BeatStep Pro shownIn the picture above, ControllerMap is the active tab. Simply click on a tab to select itswindow.Please refer to the appropriate manual if more information is needed about editing theparameters of a particular device.Arturia - User Manual MIDI Control Center - Overview9
3. WORKING WITH TEMPLATES3.1. The Sync button : Some Arturia devices do not support the Sync feature. Here is a partial list of devices that do ordon't:- Sync supported: BeatStep, KeyStep, KeyLab series- Sync not supported: BeatStepPro, DrumBrute, Spark, MiniLab seriesClicking the Sync button is a quick way to back up the data from your device. It also allowsyou to do other things we’ll cover later in this chapter.However, there are some things you can do even if you don’t click the Sync button. Here’s aquick overview of the different states:3.1.1. Sync operationsThe MIDI Control Center (MCC) does the following when you click the Sync button. Not allfeatures are available on all devices: It automatically makes a backup copy of the internal memory of your device.This is known as a Template. It allows live editing of parameters from within the MCC window. See theappropriate manual to learn more about how to use this feature with your device.!: When the MCC and a device are synced, every time you click on a Template in the Project Browserwindow it will be sent to the internal memory of the device. Any changes you have made from the frontpanel of the device will be lost.10Arturia - User Manual MIDI Control Center - Working with templates
3.1.2. Non-sync operationsWhen the MCC and the device are not synced there are plenty of features available.Depending on the device you are using, the MCC will allow you to: drag and drop a pattern or sequence from the Project Browser to one of the Banktabs send a single pattern to the internal memory of the device use the Store To and Recall From buttons to transmit an entire memory bank ineither direction edit the Device Settings perform other MCC functions such as pattern editing, file management andTemplate creation, etc. : The MCC will also perform all of the functions listed above when the MCC and the device aresynced.3.2. Definitions: Memories, Projects, and TemplatesThe MCC window will show "Memories" for some devices and "Projects" for others. So beforewe dive into the rest of this chapter let's define those terms: Memories contain the MIDI assignments for each control and each pad, andmay also contain pattern data for sequences, arpeggios or drum patterns,depending on the device. Many of our keyboard products offer multipleMemories, so it may be helpful to think of Memories as "presets." Projects are similar to Memories but contain more different types of data. Forexample, a Project in the BeatStep Pro contains the data for 2 step sequencersand 1 drum sequencer, in addition to the MIDI assignments for each control. Itmay be helpful to think of Projects as "songs." A Template contains the same data as a Memory or a Project, so whichever typeyou will be working with, that's what a Template is. All devices save their Userdata as Templates in the Project Browser.3.2.1. The Project tabWith some devices you will see a "Project" tab on the right side of the MCC window. Thiscontains settings that do the following within a Template:1.They affect the entire set of patterns or sequences2.They define basic parameters such as keyboard split point, MIDI Channel, andresponse curves, etc.The settings contained by the Project tab are stored with the Template, so they are sent tothe device when the Store To function is used, and transmitted by the device when the RecallFrom function is used. : The Device Settings tab contains parameters that are not stored with the Template. They are savedand recalled independently using the Import/Export buttons found on the Device Settings tab. For moreinformation about this process, see Device Settings [p.18].Arturia - User Manual MIDI Control Center - Working with templates11
3.3. Project / Template BrowserThe Project / Template Browser shows a list of all the Templates that have been archivedonto your computer using the MIDI Control Center. These are divided into two main groups:Factory and User.A Template often contains the same number of items as the internal memory of the device,and it also has them arranged in the same way: for example, four banks of 16 patterns, orwhatever is appropriate for your device.However, some devices can hold multiple Templates at one time. Examples include theKeyLab series keyboards (10 Templates, or Memories) and the BeatStep Pro (16 Templates,or Projects). : A Template does not contain the Device Settings. We’ll show you how to save those separately inDevice Settings [p.18].3.3.1. Device TemplatesA Template may contain one or more layers and types of data, depending on the device.If additional levels are available, they may be revealed and hidden using the " " and "-"symbols in the browser window.Examples of types of Templates: click /- to expand or collapse Template view3.3.2. Building a libraryYou can build a limitless library of data from your device in the User Templates area.Make as many presets, patterns, or sequences as you like, wherever you are. Then the nexttime you use the MIDI Control Center, simply press the Recall From button. This will transferthe device memory into the MCC.The MCC will create a new Template in the User Templates area. The Template will be namedautomatically with a date/time stamp, but you can give it a more descriptive name if youlike.12Arturia - User Manual MIDI Control Center - Working with templates
3.3.3. The Working Memory / Working Project : Some Arturia products do not have the Sync feature, and others do not have a Working Memoryor Working Project. Please refer to the documentation for specific information about your device.When the MCC and a device are in sync, the Working Memory is also the active memory ofthe device. Edits made to most parameters and performance data inside the MCC are madesimultaneously to the device.When they are not in sync the Working Memory functions as a sort of ‘target’ onto whichTemplates, sequences, or patterns can be dragged and then transmitted to the devicememory. But edits made inside the MCC when not in sync do not edit the data inside thedevice.Here are some examples of the Working Memory / Working Project from various products:Examples of the Working Memory / Working Project3.3.3.1. Live editingIf your device is sync-capable, then after you click the Sync button the internal memoryfrom the device will be displayed inside the MCC. Any edits you make to this data will alsobe made in the device. This is called “live editing.” !: Live editing works in one direction: from the MCC to the device. Changes made from the frontpanel of the device are not detected by the MCC. Use the Recall From button to back them up to yourcomputer before selecting another Template.When you make a change in the Editor window an asterisk (*) will appear next to the nameof the selected Template. These changes are not automatically saved, so you will need touse the Save or Save As. buttons to preserve your new data.Arturia - User Manual MIDI Control Center - Working with templates13
3.3.3.2. Drag and dropIt’s possible to drag a single item or an entire Template from the Project Browser onto theWorking Memory. When you do, the data will be sent to the device internal memory.Drag and drop one itemfrom within a TemplateHere's another example of how a sub-component of a Project, in this case the ControllerMap, can be dragged from within the Project Browser and dropped onto any one of theProjects:Drag and drop aController Map onto aProject within a device14Arturia - User Manual MIDI Control Center - Working with templates
3.3.4. Revise a Template3.3.4.1. While syncedIf the MIDI Control Center and the device are already in sync, it’s easy to modify anarchived Template. Simply select one and its data will appear in the Editor window. This datawill also be transmitted to the device internal memory.As long as the device and the MCC are in sync, any changes made to the data inside theMCC will also be made in the device. If the device is pattern-based you can actually havethe pattern running inside the device while you make edits with the MCC, and then hear theedited pattern the next time the pattern loops. : When an edit is made an asterisk will appear next to the name of the source Template. This meansyou need to use the Save or Save As. buttons to preserve your new data.See the documentation for your device to learn about editing patterns or sequences in theMCC.3.3.4.2. Not syncedIf the MIDI Control Center and the device are not in sync you can still edit the data of anarchived Template. Simply select that Template and its data will appear in the MCC Editorwindow, ready to be edited.If you would like to confirm the results by having the data played on the device, there aretwo ways. !: The following process will overwrite the Working Memory and the pattern memory of the device.Be sure to save what you were doing before you transfer the file!First use the Save or Save As. buttons to save your changes, then: drag the revised Template from the Local Templates window and drop it on theWorking Memory, or press the Store To button (see the next section).Arturia - User Manual MIDI Control Center - Working with templates15
3.4. Store To / Recall From3.4.1. The ‘Store To’ buttonThe upper left-hand section of the MIDI Control Center has a button called “Store To”. Itis used to transmit a Template from the Local Templates / Project Browser window to thedevice. !: The following process will overwrite the internal memory of the device. If you are not sure the datahas been backed up, be sure to archive it to your computer using the Recall From button.If there is a particular Template you would like to transmit to your device, select it in theLocal Templates / Project Browser window.If the device and the MCC have been synced, all data from the Template will be transmittedto your device as soon as you select the Template.But if the device and the MCC have not been synced, or if your device does not use the syncfeature, you will need to use the Store To button to transmit the Template.The process is similar to the one described previously: Select the desired Template as shown below Click the Store To bu
software and hardware are a powerful combination, and in your hands a creative trinity will be unleashed! 1.1. Features of the MIDI Control Center : The following list is not exhaustive. Not all features are available on all devices. Please refer to the appropriate documentation for specific information. Device settings Memory backup