Transcription
OS 4.1 AND AUTOMAP UNIVERSAL 2.0 Rev-02
ReMOTE SL COMPACT USER GUIDEOS 4.1 AND AUTOMAP UNIVERSAL 2.0CONTENTS1 INTRO2 REGISTRATION3 HARDWARE OVERVIEW3.1 FRONT PANEL OVERVIEW3.2 REAR PANEL CONNECTIONS4 GETTING STARTED WITH THE SL COMPACT4.1 POWERING THE SL COMPACT4.2 INSTALLATION - PC4.3 INSTALLATION - MAC4.4 CONNECTING THE SL COMPACT4.5 USING THE SL COMPACT AS A MIDI INTERFACE4.6 MODES AND MENUS OVERVIEW4.7 TEMPLATES5 AUTOMAP OVERVIEW5.1 AUTOMAP UNIVERSAL5.2 SEQUENCER AUTOMAP5.3 AUTOMAP AND THE SL COMPACT’S MIDI PORTS5.4 AUTOMAP TEMPLATES AND STANDARD TEMPLATES – WHAT IS THE DIFFERENCE?5.5 RECORDING PARAMETER AUTOMATION WHEN USING AUTOMAP5.6 SPEED DIAL FUNCTION WHEN USING AUTOMAP6 AUTOMAP UNIVERSAL6.1 AUTOMAP UNIVERSAL TERMINOLOGY6.2 THE AUTOMAP SERVER6.3 THE AUTOMAP SETTINGS6.4 THE PLUG-IN MANAGER7 CONTROLLING PLUG-INS WITH AUTOMAP UNIVERSAL7.1 AUTOMAP-WRAPPED PLUG-INS7.2 THE AUTOMAP UNIVERSAL TEMPLATE7.3 THE AUTOMAP UNIVERSAL WINDOW7.4 CONTROL MAP OPTIONS7.5 PLUG-IN PARAMETER LAYOUT7.6 DEFAULT AND INSTANCE CONTROL MAPS7.7 EDITING A CONTROL MAP7.8 CONTROL SETTINGS – NAME RANGE AND STEP SIZE7.9 SAVING A CONTROL MAP8 CONTROLLING A SEQUENCER MIXER WITH AUTOMAP UNIVERSAL8.1 CUBASE/NUENDO SETUP8.2 SONAR SETUP8.3 TRACKTION SETUP
9 THE AUTOMAP MIDI CLIENT9.1 MIDI PORTS9.2 MIDI CONTROL MAPS9.3 ASSIGNING MIDI MESSAGES9.4 USING LEARN MODE TO ASSIGN MIDI MESSAGES9.5 SAVING A MIDI CONTROL MAP10 SEQUENCER AUTOMAP10.1 LOGIC10.2 ABLETON LIVE10.3 PRO TOOLS10.4 DIGITAL PERFORMER10.5 REASON11 THE GLOBAL MENU11.1 SAVING GLOBAL SETTINGS12 STANDARD TEMPLATES13 PLAY MODE13.1 THE QUICK MENU13.2 THE SPEED DIAL FUNCTION IN STANDARD TEMPLATES14 EDIT MODE14.1 CONTROL CHANGE (CC)14.2 NON-REGISTERED PARAMETER NUMBER (NRPN)14.3 REGISTERED PARAMETER NUMBER (RPN)14.4 SYSTEM EXCLUSIVE (SYSEX)14.5 MIDI MACHINE CONTROL (MMC)14.6 NOTE ON/OFF (NOTE)14.7 PROGRAM CHANGE (PROG CHG)14.8 BANK CHANGE (BANK CHG)14.9 DRUM PAD NOTE (DRUMNOTE)14.10 TEMPLATE14.11 SYSTEM REAL TIME (REALTIME)14.12 PITCH BEND (PITCHBND)15 THE TEMPLATE MENU16 KEYBOARD ZONES17 SAVING AND NAMING TEMPLATES17.1 RESTORING TEMPLATESAPPENDIXI SPECIFICATIONSII LIST OF FACTORY TEMPLATESIII GUIDE TO FACTORY STANDARD TEMPLATES
1 INTROWelcome to the Novation ReMOTE SL Compact User Guide! This guide is designed to help you get started with thecontroller, as well as to provide comprehensive information about its operational features and Automap software. Thecontent is structured in a way that should allow you to read only as far as you need to. Basic and essential information iscovered early on whilst the latter sections deal with more advanced features.We are constantly developing the SL Compact and Automap Universal and software updates will be made available as freedownloads on the Novation website. We suggest checking the SL Compact product page regularly to ensure you have thelatest update and documentation.No troubleshooting section has been included in this guide. If you require further guidance or technical support afterreading this guide please visit the Novation Answerbase, which can be found in the support area at www.novationmusic.com. The Novation Answerbase contains troubleshooting articles for all Novation products and a technical support contactform that you can use to get in touch with us if you cannot find the information you are after.2 REGISTRATIONTo register your SL Compact, visit www.novationmusic.com and click the ‘Register’ link in the main menu at the top of thehome page, then fill in the required details. Once you have registered, your one-year product warranty will become active,providing a ‘no compromise’ service solution. In addition to this you can sign up to receive Novation e-zines, which are email newsletters (sent once every two or three months) containing product update news, competitions, freebies and tipsfrom signed artists. Registering your SL Compact is the best way to ensure you stay up to date with updates, as well ashelp with any technical enquires you may make.
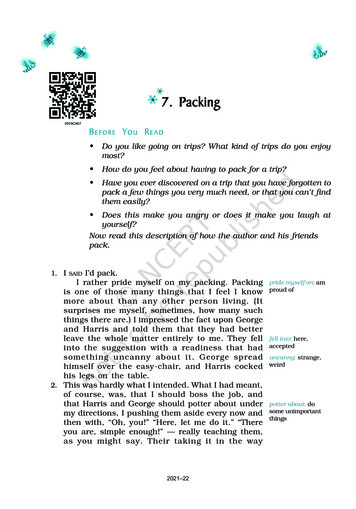
3 HARDWARE OVERVIEW3.1 FRONT PANEL OVERVIEW1. Speed dial – provides quick control of whatever the mouse rests over in Automap mode or one of 16 parametersin non-Automap mode. Also selects mixer sends and plug-in presets in Automap Universal2. Template up/down buttons – select templates 1-40 by ascending/descending in single steps. Pressing togetheractivates Quick Jump mode, where buttons above and below the display can be used to quickly jump to another template3. Mode/menu buttons – switch between Play mode or one of the three edit modes (Edit, Template or Global).Write button saves settings4. 8 encoders – assignable controls that can be used to control up to 32 parameters, in conjunction with the fourencoder group switches (A-D) below5. 8 buttons – assignable controls that can be used to control up to 32 parameters, in conjunction with the four buttongroup switches (B1-4) below6. LCD display – displays up to 8 parameter names and values simultaneously, as well as various menu options7. Encoder/f1 and button/f2 row select buttons – display the parameter names and values of either the encoders orbuttons on the LCD display. Used for other functions in Automap mode8. Page up and down/next and prev buttons – scroll between any available pages of display or menu options in eachmode. Select different plug-ins for control (with shift held down) and bank mixer tracks in Automap mode9. 8 drum pads – assignable pads that can be used to eg: trigger 8 clips or play 8 drum samples10. Drumpad row select/shift button – displays the parameters assigned to the drumpads on the LCD screen.Holding down in Automap Universal mode allows active plug-ins to be viewed and selected (with the next/prev buttons)11. Button group select switches – activate one of four button groups (B1-4)12. Encoder group select switches – activate one of four encoder groups (A-D)
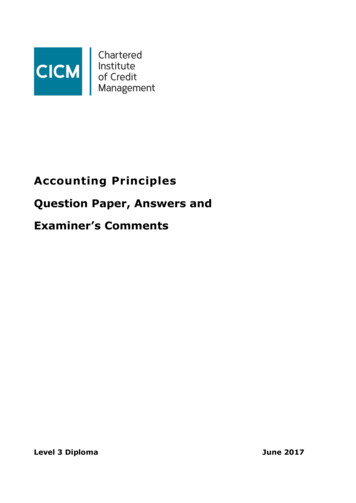
13. Keyboard – semi-weighted velocity-sensitive keyboard with aftertouch14. Octave up/down buttons – transpose the keyboard in whole octaves across the entire MIDI note range15. Mod wheel – assignable modulation control16. Pitch bend wheel – assignable pitch control, springs back to the centre17. Menu button – activates the Quick Menu in Play mode, where general Template settings, such as keyboard transpose,can be quickly edited. Also, press and hold in an edit mode to temporarily display the name of the current edit screenand show instructions where possible18. Transport buttons – 6 assignable buttons ideal for controlling sequencer transport3.2 REAR PANEL CONNECTIONS1. PSU connector – allows a power supply unit (PSU - not supplied) to be connected for providing 9V DC from the mains2. Power select switch – sets the power supply between DC, off and USB3. USB connector – allows the supplied USB cable to be connected for linking to a computer. This connection providespower as well as data flow4. Sustain pedal – allows a sustain pedal (not supplied) to be connected5. Expression pedal – allows an expression pedal (not supplied) to be connected6. MIDI In/Out – two standard MIDI ports allow connection to additional MIDI equipment such as hardware synthesizers
4 GETTING STARTED WITH THE SL COMPACT4.1 POWERING THE SL COMPACTThe SL Compact can be powered in one of two ways. One option is to connect the keyboard to your computer usingthe supplied USB cable, which will supply power to the device, then set the power select switch to USB (extreme rightposition). The other option is to connect a PSU (not supplied) and set the power switch to DC (extreme left position) topower the keyboard from the mains. The required PSU output specs are 9V, dc, 600-1000mA, center pin positive.4.2 INSTALLATION - PCThe latest ReMOTE SL installer is compatible with Windows XP SP2, XP X64 and Vista (32 and 64 bit editions).1. Connect the ReMOTE SL Compact to your computer via USB and ensure it is switched on. If the WindowsFound New Hardware Wizard opens click ‘Cancel’ to close it. If you already have an older version ofAutomap Universal installed, make sure the Automap Server is NOT running.2. Double-click on ‘ReMOTESLSetup.exe’ to run the installer.3. Whilst the driver is installing, the following message may appear:Win XPWin VistaClick ‘Continue Anyway’ (Win XP) or ‘Install’ (Win Vista) to continue installation.
4. Once the driver is installed, the installer will run the ReMOTE SL Compact Hardware Upgrade:Select to update the operating system and Automap templates. If you use Pro Tools then select the HUI update too.Once the operating system has been uploaded to the SL Compact you will be prompted to turn the unit off andback on again before the rest of the updates are sent to it.5. Towards the end of the installation the Automap Plug-in Manager will open automatically.Select the plug-ins you want to use with Automap by dragging them from the left-hand list to the right-handlist, then click ‘OK’ to close the Plug-in Manager window and complete the installation.
4.3 INSTALLATION - MACThe latest ReMOTE SL installer is compatible with OS X 10.3.9 or later.1. Connect the ReMOTE SL Compact to your computer via USB and ensure it is switched on. If you alreadyhave an older version of Automap Universal installed, make sure the Automap Server is NOT running.2. Mount ‘ReMOTESLInstaller.dmg’ and double click on ‘ Setup ReMOTE SL’ to run the installer.3. During installation the Automap Plug-in Manager will open automatically. Select the plug-ins you want touse with Automap by dragging them from the left-hand list to the right-hand list, then click ‘OK’ to close thePlug-in Manager window.4. The ReMOTE SL Compact Hardware Upgrade application will also run automatically (watch out - this window mayopen behind the Plug-in Manager and Installer windows!):Select to update the operating system and Automap templates. If you use Pro Tools or Digital performer then selectthe appropriate HUI update too. Once the operating system has been uploaded to the SL Compact you will beprompted to turn the unit off and back on again before the rest of the updates are sent to it.
4.4 CONNECTING THE SL COMPACTIf you want to control software using the SL Compact, connect it to your computer using the supplied USB cable:If you want to control hardware MIDI devices using the SL Compact, connect them to the MIDI OUT port on the backof the unit:It is possible to use the SL Compact to control hardware MIDI devices without it being connected to a computer, however ifthere is no USB connection the SL Compact must be powered using a PSU.4.5 USING THE SL COMPACT AS A MIDI INTERFACEAs well as being able to control software and hardware, the SL Compact can be used as a MIDI interface i.e. it can routeMIDI data between your computer and hardware MIDI devices. For this, the SL Compact must be connected to yourcomputer via USB and to your hardware MIDI devices via the MIDI connectors on the back of the unit:10
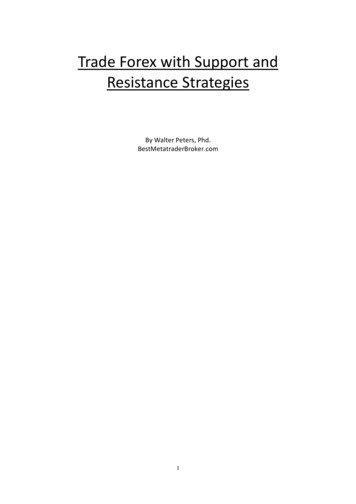
The SL Compact has one physical MIDI port (with IN and OUT connectors) and a further three virtual ports over the USBconnection. These ports are labelled as M1, U1, U2 and U3 in the menus on the SL Compact where you set how MIDI datais routed in, out or through the unit. Because there are three virtual USB ports, the SL Compact will appear three times inthe MIDI input and output device lists in your software as follows:ReMOTE SL Compact Port 1ReMOTE SL Compact Port 2ReMOTE SL Compact Port 3If you use Windows Vista the SL Compact will appear as:Input:ReMOTE SL CompactMIDIIN2 (ReMOTE SL Compact)MIDIIN3 (ReMOTE SL Compact)Output:ReMOTE SL CompactMIDIOUT2 (ReMOTE SL Compact)MIDIOUT3 (ReMOTE SL Compact)Any MIDI data sent from your computer on USB port 1 will automatically be routed to the MIDI OUT connector. MIDI datasent from an external MIDI device to the MIDI IN connector can be routed to USB port 1, USB port 2 or back out of theMIDI OUT connector (see section 11 for further information on setting where data from the MIDI IN connector is routedto). The following diagram shows how data can be routed through the SL Compact between the physical MIDI and virtualUSB ports:11
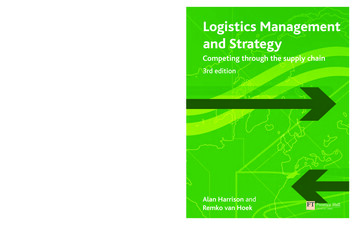
4.6 MODES AND MENUS OVERVIEWThe vertical column of five buttons to the left of the display are the mode and menu buttons. These allow access tosettings that affect individual controls within a template (Edit), general template settings (Template) and also the overallkeyboard settings (Global). Whilst in any of the ‘edit’ menus, the screen displays available settings and the encoders andbuttons aligned with a setting can be used to edit it, as follows:Use the PAGE UP/DOWN buttons to scroll through all pages of available settings in an edit menu. If only using the SLCompact for Automap Universal, the only edit mode you may need to access is the Global menu. See the Global Modesection for details.Here is a breakdown of each mode:Play modeThis is the default mode for the SL Compact and the one that will be active when the keyboard powers up. This modeshould be active most of the time, as it’s the one to use when using Automap or standard templates to control softwareor hardware. After making changes to any settings in one of the three edit menus, press the PLAY button to return to playmode so that the LED next to the button illuminates.Template menuThis menu allows access to settings that affect the currently selected template. Press the TEMPLATE button to accessthis menu and then use the PAGE UP/DOWN buttons to scroll between the two pages of options. Pressing the TEMPLATEbutton a second time will access the Keyboard Zones Menu, where the keyboard can be split into zones for playingdifferent instruments within the same template (see the Keyboard Zones Menu section for details). Repeatedly press theTEMPLATE button to switch between the Template Menu and Keyboard Zones Menu.Edit modeThis mode allows access to the individual settings of any assignable control within the currently selected template.Controls that can be edited in this mode are: encoders, buttons, drum pads, transport controls, pedals, pitch and modwheels. Press the EDIT button to activate Edit mode and the PAGE UP/DOWN buttons to scroll between the pages ofsettings for the currently selected control (where available). To activate a different control for editing in this mode, pressand hold down the EDIT button and operate the control.Global MenuThis menu allows access to the general device settings on the SL Compact eg: memory protect, and wheel/drum padcalibration. Press the GLOBAL button to access the menu and then use the PAGE UP/DOWN buttons to scroll betweenthe seven pages of settings.12
Write buttonThe WRITE button allows you to save settings and confirm actions on the SL Compact. Whilst in Play, Edit or Templatemodes, pressing WRITE will save all changes to the currently selected template by first taking you to a screen where youcan set the template name and choose which of the 40 memory locations you want to save the template to. Once you haveset these, press WRITE again to confirm. Pressing WRITE whilst in the Global menu saves all Global settings.4.7 TEMPLATES - What are they and how do I switch between them?All the settings for every individual control accessed in Edit Mode and the settings accessed in the Template Menu can besaved to the SL Compact’s internal memory, and then recalled. A group of saved settings is called a template.As an example of the use of templates, you may have two synthesizers (software or hardware) that you want to controlwith the SL Compact. To do this, you would have to program each control (set it to send the correct MIDI data and nameit appropriately) for one synth and save all settings to a memory location, then program every control for the other synthand save all settings to a different memory location. This provides you with two templates, one for each synth. Now, tocontrol each synth, you can simply switch between the two templates.There is space for 40 templates on the SL Compact. Templates 1-33 are pre-programmed standard templates (designedby Novation to work with popular software instruments), templates 35- 36 are blank user templates and templates 34,37-40 are Automap templates. You cannot delete any templates so that there are less on the SL Compact but you canoverwrite any template by editing and then saving it, or by uploading one from your computer.There are four ways to switch between the 40 onboard Templates:TEMPLATE UP/DOWN buttons – these are located next to the Speed dial in the top left corner of the SL Compact’s frontpanel. Pressing them steps up/down through the templates one at a time.Quick Jump – pressing the TEMPLATE UP/DOWN buttons together calls up 16 templates on the SL Compact’s display.Templates 1-8 appear on the top row and 33-40 on the bottom row. Use the buttons directly above and below the screento select the corresponding template. For example, press button 3 on the row above the screen to call up template 3, orpress button 6 on the row below to select template 38. The PAGE UP/DOWN buttons can be used to scroll the top rowthrough Templates 1-8, 9-16, 17-24 and 25-32.Menu/Function button – pressing the MENU button in Play mode accesses the Quick Menu that allows the core templatesettings such as Transpose and Common port routing to be changed. The first option on this screen is template number,which shows the currently selected template. Change this value, using the encoder above or buttons above and below, tochange the currently selected Template. When you press MENU again, the newly selected template will be active.Use any assignable button or drumpad – any assignable button or drumpad within any template can be used to selectone of the onboard templates. This can be useful for quickly switching to a different template. To set this up, the buttonmust be selected for editing in Edit Mode and then the Control set to ‘template’ and the desired template number set.See the Edit Mode section for details.When you switch to a different template, the number and name will appear briefly on the display, before it switches toshowing the parameter names and values of the currently selected row of controls. To see the number and name of thecurrently selected template, you can press and hold the PLAY button at any time.The SL Compact will load template 1 by default when the keyboard powers up. To change the ‘load up’ template to adifferent number, you must select the template you want to be active on start up, then press the GLOBAL button toaccess the Global Menu, then press the WRITE button to save the Global settings. That template will now be active everytime the SL Compact is powered up.If you have set the SL Compact up to work in Automap mode then the relevant Automap template will be selected when youlaunch your music software, although you can switch away from and back to this template as you please using any of theprocesses described in this section.13
5 AUTOMAP OVERVIEWAutomap is a revolutionary system for controlling software plug-ins and sequencers using the SL Compact. Certaintemplates on the SL Compact are reserved for use with Automap. These are templates 34 and 37-40. To avoid problemswhen using Automap we suggest that, unless instructed, you do not edit these templates.Automap works in two different ways, ‘Automap Universal’ and ‘Sequencer Automap’.5.1 AUTOMAP UNIVERSALAutomap Universal is a pioneering system that allows automatic mapping of software parameters to the SL Compact.It also provides a quick and simple learn system which you can use to create your own custom control maps. AutomapUniversal can be used to control any VST, AU or Pro Tools (RTAS or TDM) format plug-in in any sequencer (note Pro Toolsplug-in format support is only currently available on Mac). It can also be used to control the mixer in Cubase, Nuendo,Sonar and Tracktion. It is also possible to control hardware MIDI devices with Automap Universal using the AutomapMIDI client.To use Automap Universal you must select the Automap Universal template (template 38) on the SL Compact and run theAutomap Server software on your computer. The Automap Server handles communication between the SL Compact andthe software you are controlling. When you run the Server the Automap Universal window will appear. This is a resizable,semi-transparent, heads-up display from which you can view and edit control assignments, select a different client tocontrol and view the interactive help.To control a plug-in you must first enable it for Automap control in the Plug-in Manager. Once enabled it will be “wrapped”,meaning that a new version of the plug-in will be created which is contained within the Automap software. The newAutomap-wrapped plug-in will appear in your sequencer with “(Automap)” after its original name. Load the Automapwrapped plug-in in your sequencer to allow Automap control over it. The plug-in will look exactly the same as before butwith the addition of an Automap border at the bottom of the window, from which you can access Automap functions.When you load an Automap-wrapped plug-in, the plug-in parameters will be automatically mapped to the SL Compactcontrols. You can open as many Automap-wrapped plug-ins as you like (up to a limit of 253) but you can only control oneat a time from the SL Compact. To select a plug-in for control, click on the Automap logo in the bottom-left hand corner ofthe plug-in window so that it turns red.To control the mixer in Cubase, Nuendo, Sonar or Tracktion, first follow the relevant set up instructions in section 8.5.2 SEQUENCER AUTOMAPThere are separate Automap templates on the SL Compact to allow control over sequencers that do not use AutomapUniversal for mixer control. These are Pro Tools (template 34), Reason (template 37), Logic (template 39), Ableton Live(template 40) and Digital Performer (installed as template 34 instead of Pro Tools if selected during installation). Thesework differently to Automap Universal in that the SL Compact communicates directly with the sequencer when using thesetemplates, rather than through the Automap Server software.Each sequencer has its own set up procedure, detailed in the section 10 of this guide. Once the set up procedure iscomplete the SL Compact will automatically switch to the relevant template each time you open your sequencer. Youare free to switch from this template to any other on the unit (to control other software or hardware) and back again.This includes the Automap Universal template for when you want to control Automap-wrapped plug-ins. If you select aSequencer Automap template for a program which is not running on your computer, you will see an OFFLINE messageappear on the SL Compact display.The Pro Tools, Logic and Ableton Live Sequencer Automap templates include some means for controlling plug-ins. This canbe used where it is not possible to use Automap Universal for plug-in control i.e. for those that use a proprietary plug-informat, or where you find it easier than using Automap Universal.14
5.3 AUTOMAP AND THE SL COMPACT’S MIDI PORTSThe SL Compact has three virtual MIDI ports over the USB connection. USB ports 2 and 3 are used for transfer ofAutomap data between the SL Compact and the computer. Port 2 is used for transferring Automap data between asequencer program and the SL Compact (i.e. Sequencer Automap). Port 3 is used for transferring Automap data betweenthe Automap Server software and the SL Compact. If you are using Automap, it is important to only select port 2 or 3 inyour software where instructed in this guide.USB Port 1 is used for transfer of all non-Automap data between the SL Compact and your computer. This includeskeyboard note and aftertouch, pitch bend, modulation, expression and sustain pedals, program and bank change data. Allfactory standard (non-Automap) templates send data on USB Port 1. Additionally USB port 1 must be used when routingMIDI data between your computer and an external MIDI device connected to the SL Compact’s MIDI IN and OUT connectors(see section 4.5). Ensure only SL Compact Port 1 is selected as the input to MIDI tracks in your sequencer.When controlling plug-ins using Automap Universal, it is important to remember that the keyboard, pitch/mod wheelsand pedal inputs on the SL Compact will NOT follow the currently selected Automap-wrapped plug-in. They will alwayssend data to whichever MIDI track is record enabled in your sequencer, meaning you can simultaneously play a soft-synthfrom the keyboard and use the controls to tweak the parameters of a different plug-in. If you select an Automap-wrappedinstrument plug-in for control then you must also record enable the corresponding MIDI or instrument track in yoursequencer before the keyboard, pitch/mod wheels and pedals will control it.5.4 AUTOMAP TEMPLATES AND STANDARD TEMPLATES –WHAT IS THE DIFFERENCE?Templates 1-33, 35 & 36 on the SL Compact are ‘standard’ templates, so called because when they are selected the SLCompact functions as a standard MIDI controller. A standard MIDI controller allows you to set what MIDI message eachof its controls sends. If you want to control software or hardware that responds to MIDI then you need to know whatmessages it responds to. This information can usually be found in the documentation for the software or hardware. Onceyou know this, you can set up the controls on a standard MIDI controller to send those messages.We have used this method to program the standard templates on the SL Compact to work with popular softwareinstruments (except templates 35 and 36, which are blank user standard templates). These templates can be used whereit is not possible or desirable to use Automap Universal for controlling software instruments, for example when using asoftware instrument as a stand-alone program rather than a plug-in within a sequencer.With standard templates there is only one-way communication from the SL Compact to the software or hardware you arecontrolling and the SL Compact has no way of knowing when a parameter is changed from the software or hardware itself.For example, if you change a parameter on a software instrument with the mouse, the parameter value displayed on theSL Compact will not update to reflect that change.The Automap templates have been set up such that the controls send MIDI messages that are recognised by the Automapsoftware i.e. the Automap Server or Sequencer Automap implementation. The Automap software then “automaticallymaps” those MIDI messages to different plug-in or sequencer parameters, depending on what you select to control.Because Automap incorporates two-way communication between your computer and the SL Compact, the Automapsoftware can send display data back to the SL Compact to automatically name the controls and let you know whichparameter each control is currently assigned to. Additionally you can see the current value of each parameter, even if it isbeing changed using the mouse.5.5 RECORDING PARAMETER AUTOMATION WHEN USING AUTOMAPTo record control movements from the SL Compact in a sequencer when using a standard template, you must recordenable a MIDI track and then put the sequencer into record. MIDI control data will then be recorded onto the MIDI trackwhen you operate a control on the SL Compact.15
When using an Automap template, MIDI control data is converted into Automation data by the Automap software i.e.the Automap Universal Server or Sequencer Automap implementation, to allow control over software parameters. Thismeans that control movements will not be recorded as MIDI data. To record control movements from the SL Compact ina sequencer when using an Automap template, you must set the Automation mode on the relevant instrument or audiotrack to ‘write’ (some sequencers have a number of different write modes) and then put the sequencer into playback(not record). Automation data will then be written when you operate a control on the SL Compact. Remember to setthe Automation mode for the track back to ‘read’ when you have finished recording control movements. Note that somesequencers use different methods for writing Automation data compared with this so check the documentation for yoursequencer.5.6 SPEED DIAL FUNCTION WHEN USING AUTOMAPWhen using the SL Compact in Automap mode the SPEED DIAL can be used to control any on-screen parameter thatyou can control using the mouse (in any program). Simply move the mouse pointer over what you want to control, thenpress and rotate the SPEED DIAL. This process can be used for e.g. altering parameters on a soft-synth, controlling mixerparameters in your sequencer, selecting an option from a drop-down menu or resizing a window. The Automap UniversalServer software must be running and one of the Automap templates (template 34 or 37-40) must be selected for thisfunction to work.16
6 AUTOMAP UNIVERSAL6.1 AUTOMAP UNIVERSAL TERMINOLOGYBefore you start to use Automap Universal we recommend getting to know the terminology associated with it:Clients“Client” is the term used for anything you can control using Automap Universal. This could be one of the following:Automap-wrapped plug-in (VST, AU or Pro Tools format)Sequencer mixerAutomap MIDI ClientClients connect to the Automap Server and tell it what parameters they have available to control. The Server assignsthese parameters to controls on the SL Compact. A maximum number of 253 clients can be connected to the Server atone time.At present only Cubase, Nuendo, Sonar and Tracktion support Automap Universal mixer control. For other sequencersmixer control may be possible using Sequencer Automap. Automap Universal mixer control for other sequencers will beincluded in future updates so keep an eye out on www.novationmusic.com for update news.The Automap MIDI client can be used to control software or hardware that responds to MIDI control change (CC)messages. More information on the Automap MIDI client can be found in section 9.Control Maps“Control Map” is
9.3 assigning midi messages 9.4 using learn mode to assign midi messages 9.5 saving a midi control map 10 sequencer automap 10.1 logic 10.2 ableton live 10.3 pro tools 10.4 digital performer 10.5 reason 11 the global menu 11.1 saving global settings 12 standard templates 13 play mode 13.1 th