Transcription
user guideXCell4 SureLock Midi-CellFor leak-free electrophoresis of 1–4 midi gelsCatalog number WR0100Publication Number MAN0000534Revision A.0For Research Use Only. Not for use in diagnostic procedures.
Important Licensing Information:These products may be covered by one or more Limited Use Label Licenses. By use of these products, you accept theterms and conditions of all applicable Limited Use Label Licenses.DISCLAIMER: LIFE TECHNOLOGIES CORPORATION AND/OR ITS AFFILIATE(S) DISCLAIM ALL WARRANTIES WITHRESPECT TO THIS DOCUMENT, EXPRESSED OR IMPLIED, INCLUDING BUT NOT LIMITED TO THOSE OFMERCHANTABILITY, FITNESS FOR A PARTICULAR PURPOSE, OR NON-INFRINGEMENT. TO THE EXTENT ALLOWEDBY LAW, IN NO EVENT SHALL LIFE TECHNOLOGIES AND/OR ITS AFFILIATE(S) BE LIABLE, WHETHER IN CONTRACT,TORT, WARRANTY, OR UNDER ANY STATUTE OR ON ANY OTHER BASIS FOR SPECIAL, INCIDENTAL, INDIRECT,PUNITIVE, MULTIPLE OR CONSEQUENTIAL DAMAGES IN CONNECTION WITH OR ARISING FROM THIS DOCUMENT,INCLUDING BUT NOT LIMITED TO THE USE THEREOF. 2014 Thermo Fisher Scientific Inc. All rights reserved. All trademarks are the property of Thermo Fisher Scientificand its subsidiaries unless otherwise specified.iiXCell4 SureLock Midi-Cell User Guide
ContentsExperienced users procedure. ivKit contents . viIntroduction . 1Product description .1Description of parts .2Experimental overview.4Methods . 5General guidelines for preparing samples and buffers .5Assemble the XCell4 SureLock Midi-Cell .7Perform electrophoresis . 13Disassemble the XCell4 SureLock Midi-Cell . 14Troubleshooting. 16Appendix . 17Safety information . 17Sicherheits-Anweisungen . 19Instructions de sécurité . 20Product specifications . 21Accessory products . 22Technical support . 23XCell4 SureLock Midi-Cell User Guideiii
Experienced users procedureIntroductionA brief experienced users procedure for performing electrophoresis with theXCell4 SureLock Midi-Cell is described below. If you are a first time user ofthe XCell4 SureLock Midi-Cell, refer to the detailed protocols in this manual.ActionPrepare sampleand bufferProcedurePrepare protein sample at the appropriate concentration using the NuPAGE LDSSample Buffer or Tris-Glycine SDS Sample Buffer for denaturing SDS-PAGE andusing the Tris-Glycine Native Sample Buffer for native PAGE (for use withNuPAGE Midi Tris-Acetate Midi and Tris-Glycine Midi Gels only).Prepare the following 1X Running Buffer (see page 5 for the amount of bufferneeded based on the number of gels used).NuPAGE Bis-Tris Midi Gels1X NuPAGE MES SDS Running Buffer toresolve small proteins1X NuPAGE MOPS SDS Running Buffer toresolve mid-size proteinsNuPAGE Tris-Acetate Midi Gels1X NuPAGE Tris-Acetate SDS RunningBuffer to resolve large proteins1X Tris-Glycine Native Running Buffer toperform native gel electrophoresisTris-Glycine Midi Gels1X Tris-Glycine SDS Running Buffer fordenaturing SDS-PAGE1X Tris-Glycine Native Running Buffer fornative gel electrophoresisPrepare gelcassette1. Remove the gel cassette from the pouch and rinse with deionized water.Assemble with4 gelsInstructions for assembling four gels are described below. For assembling less thanfour gels, see page 9.2. Peel off the tape covering the slot on the back of the gel cassette and pull thecomb out of the cassette. Rinse the wells with 1X running buffer and fill thesample wells with running buffer.1.Insert the XCell4 SureLock Assembly in its unlocked position into the center ofthe Midi-Cell base. The XCell4 SureLock Assembly slides down over theprotrusion in the Midi-Cell base.2.Place one cassette on each side of both Buffer Cores.3.While holding the assembly together with your hands, insert the Buffer Coreswith the gel cassettes into the Lower Buffer Chamber such that the negativeelectrode fits into the opening in the gold plate on the Lower Buffer Chamber.Always hold the cassette assembly by its edges.4.Lock the XCell4 SureLock Assembly by moving the tension lever to the lockedposition (indicated on the XCell4 SureLock Assembly). This will squeeze thegels and Buffer Cores together, creating leak free seals.Continued on next pageivXCell4 SureLock Midi-Cell User Guide
Experienced users procedure, continuedActionAdd buffer andload samplesProcedure1.2.3.4.5.Fill each of the Upper Buffer Chambers with 175 mL of the appropriate 1X runningbuffer. For running NuPAGE Midi Gels under reducing conditions, use 1XRunning Buffer with 435 µL NuPAGE Antioxidant in each of the Upper BufferChambers. Ensure that the Upper Buffer Chambers are not leaking.Load the appropriate volume of the protein sample and molecular weight markersin the wells.Add 700 mL 1X running buffer (for 4 gels) to the Lower Buffer Chamber (anode) bypouring into the center of the Midi-Cell (over the XCell4 SureLock Assembly). Fillto the fill line marked on the Midi-Cell.Place the lid on the assembled XCell4 SureLock Midi-Cell. The lid firmly seats ifthe (-) and ( ) electrodes are properly aligned.With the power off, connect the electrode cords to power supply. Turn on thepower and perform electrophoresis as follows.Gel typeDisassemble1.2.3.4.5.6.7.VoltageRun time200 VConstant40 minNuPAGE Bis-Tris SDS-PAGE with MESRunning Buffer1.NuPAGE Bis-Tris SDS-PAGE withMOPS Running Buffer200 V ConstantNuPAGE Tris-Acetate SDS-PAGE(denaturing, reducing)150 V ConstantNuPAGE Tris-Acetate SDS-PAGE(native)150 V ConstantTris-Glycine with SDS Running Buffer(denaturing, reducing)125 V ConstantTris-Glycine with Tris-Glycine NativeRunning Buffer (native electrophoresis)125 V Constant 55 min70 min2 hr–3 hr105 min1 hr–12 hrRemove the lid. Discard the buffer.Unlock the XCell SureLock Assembly by moving the tension lever to the unlockedposition (indicated on the XCell SureLock Assembly).Remove the Buffer Cores with gel cassettes from the Lower Buffer Chamber whileholding the cassettes against the cores.Remove the gel cassettes from Buffer Cores and carefully insert the gel knife(included with the Midi-Cell) beveled edge into the narrow gap between the twoplates of the cassette. Caution: Use caution while inserting the gel knife betweenthe two plates to avoid excessive pressure towards the gel.Push up and down gently on the knife’s handle to separate the plates. Repeat oneach side of the cassette until the plates are completely separated.Upon opening the cassette, remove and discard the plate without the gel, allowingthe gel to remain on the other plate.If blotting, proceed to the western transfer protocol (refer to XCell II Blot Modulemanual for more details). For staining, remove the bottom foot of the gel with aGel Knife, if desired. Hold the cassette plate and gel over a container with the gelfacing downward. Use the gel knife to carefully loosen one lower corner of the geland allow the gel to peel away from the plate.XCell4 SureLock Midi-Cell User Guidev
Kit contentsContentsThe components included with the XCell4 SureLock Midi-Cell are listedbelow. For more details on each component, see page 2.Components1 eachXCell4 Lid with Cables1 eachXCell4 Buffer Cores2 eachXCell4 Buffer Dam1 eachXCell4 Displacement Dam1 eachXCell4 SureLock Assembly1 eachGel Knife1 each viQuantityXCell4 Lower Buffer Chamber XCell4 SureLock Midi-Cell User Guide
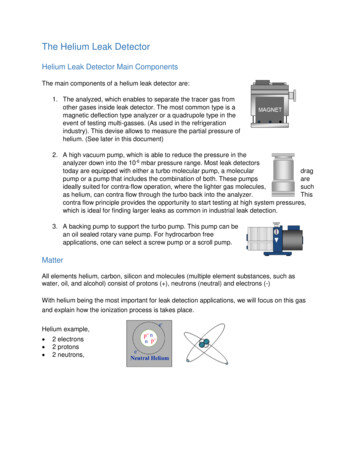
IntroductionProduct descriptionXCell4 SureLock Midi-CellThe XCell4 SureLock Midi-Cell’s unique design allows you to quickly andeasily perform simultaneous vertical electrophoresis of 1–4 midi-gels withoutleaking, resulting in consistent performance. The XCell4 SureLock Midi-Cell isbuilt with tough plastic material to boost durability and features a speciallydesigned lid to enhance user safety.XCell4 SureLock Midi-CellBuffer CoreBanana PlugLower BufferChamberSystem overviewThe XCell4 SureLock Midi-Cell consists of a Lower Buffer Chamber, two BufferCores, Buffer Dam, Displacement Dam, and a lid with cables (see page 2 fordetailed description of parts). Electrophoresis of proteins on midi-gels in the XCell4SureLock Midi-Cell is performed after assembling each Buffer Core with 2 midigels or a Buffer Core with a midi-gel and a Buffer Dam. The Buffer Core/gelassembly is inserted into the Lower Buffer Chamber and is sealed using a positivelocking mechanism that seals the Buffer Core/gel assembly firmly into position andensures leak-free electrophoresis. The Buffer Core/gel assembly creates separateupper buffer chambers for each gel and a common lower buffer chamber shared byall gels. The lid is placed onto the Midi-Cell and fits on the Midi-Cell in only oneorientation to prevent incorrect connection to the electrodes.The unique design of the XCell4 SureLock Midi-Cell evenly dissipates heatresulting in consistent performance of all gels without the need for any externalcooling device. The Buffer Core electrical poles are color-coded for easy, intuitiveassembly.Features User-friendly design without any clamps or grease for leak-freeelectrophoresis Flexibility to perform electrophoresis of 1–4 midi-gels Unique, heat-dissipating design of the XCell4 SureLock Midi-Cellproduces consistent results without the need for any cooling device Built-in safety features to enhance user safetyXCell4 SureLock Midi-Cell User Guide1
Description of partsXCell4 LowerBuffer ChamberThe XCell4 Lower Buffer Chamber,when assembled with the XCell4SureLock Assembly and Buffer Cores,creates two individual chambers forelectrophoresis. The Lower BufferChamber volume is 700 mL and is usedas a heat sink and ion reservoir duringelectrophoresis. The Lower BufferChamber when combined with theXCell4 Lid produces an enclosed unitfor electrophoresis.XCell4 Buffer CoreThe unique design of the XCell4 BufferCore with the XCell4 SureLock Assemblyprovides a consistent seal without the use ofany clamps or grease. The Buffer Core isspecifically designed to evenly dissipate heatresulting in consistent performance across allgels. The Buffer Core contains the anode andcathode electrode assembly and has colorcoded electrical poles for easy, intuitiveassembly.The XCell4 SureLock Midi-Cell includes2 Buffer Cores.XCell4 Lid withcablesThe XCell4 Lid will fit onto the MidiCell in only one orientation to preventincorrect connection to the electrodes.Gel KnifeThe Gel Knife is used to open the gel cassette to remove the gel.Continued on next page2
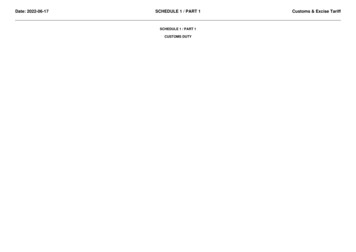
Description of parts, continuedXCell4 Buffer DamUse the XCell4 Buffer Dam when you wishto run less than 4 gels in the XCell4SureLock Midi-Cell. The Buffer Dam isplaced in the Buffer Core instead of a secondgel. Instructions for using the Buffer Dam torun 1 or 3 Midi Gels are provided on page 9.XCell4 Displacement DamUse the XCell4 Displacement Dam when you wishto run less than 3 gels in the XCell4 SureLock Midi-Cell. The Displacement Dam is placed in theLower Buffer Chamber instead of a second BufferCore. Instructions for using the Displacement Damto run 1 or 2 midi-gels are provided on page 9. Donot add any buffer or water to the DisplacementDam.XCell SureLock AssemblyThe positive locking action of the XCell SureLock Assembly ensures troublefree, leak-free electrophoresis of protein gels. Move the lever on the XCellSureLock Assembly to a locked position to generate an even horizontal forcewhich seals the gel cassette/Buffer Core assembly firmly into position in theLower Buffer Chamber. The locked and unlocked positions are marked (shownwith an arrow in figure A) on the XCell SureLock Assembly for easy, intuitiveassembly. Figure B shows the markings in detail.Note: Do not use the Gel Tension Wedge supplied with the XCell SureLock Mini-Cell with the Midi-Cell as the wedge is specifically designed for the MiniCell and will not fit correctly in the Midi-Cell.Figure ALeverXCell4 SureLock Midi-Cell User GuideFigure BThe locked and unlocked positionsmarked on the assembly are shown indetail below.3
Experimental overviewExperimentaloutlineThe table below outlines the experimental steps necessary to performelectrophoresis using the XCell4 SureLock Midi-Cell. For more details oneach step, see indicated pages.StepMaterials neededPower supplyrequirementsActionPage1Prepare protein samples.52Prepare running buffer.53Assemble the XCell4 SureLock Midi-Cell with the desirednumber of gel cassettes.74Load the 1X Running Buffer into the upper buffer chamber.105Load protein samples into the wells of the gel. Load runningbuffer into the Lower Buffer Chamber.116Perform electrophoresis using the recommended runconditions.137Disassemble the XCell4 SureLock Midi-Cell.14Ordering information is on page 22. Power supply (see the following section) Novex Midi Gels Gel loading tips Protein samples Protein Standard Sample buffer (see page 5) Running buffer (see page 5)The XCell4 SureLock Midi-Cell is used with an external DC power supplydesigned for electrophoresis. This power supply must: Be isolated from the ground so that the DC output is floating and must beequipped with No Load or Open Circuit protection Be able to operate at 200 VThe ZOOM Dual Power Supply and PowerEase 90W Power Supply andPowerEase 300W Power Supply are compatible for use with Novex MidiGels. See page 22 for ordering information.Note: The XCell4 SureLock Midi-Cell has covered power leads to be incompliance with the latest IEC (International Electrotechnical Commission)and EN (European) standards, and reduce the risk of electrical shock due toexposure to bare metal. To allow connection of the XCell4 SureLock Midi-Cellcovered power leads with certain power supplies, use Novex Power SupplyAdapters available separately (page 22).4
MethodsGeneral guidelines for preparing samples and buffersIntroductionGeneral guidelines for preparing samples and buffers for Novex Midi precastgels are discussed below.Detailed instructions for preparing the sample buffer and running buffer foreach gel type is provided in the instruction manual included with each geltype. This manual is available for downloading from our web site atwww.lifetechnologies.com or by contacting Technical Support (page 23).RecommendedbuffersGel typeNuPAGE Novex Bis-Tris Midi GelsNuPAGE Novex Tris-Acetate MidiGelsNovex Tris-GlycineMidi GelsAmount of bufferThe recommended running buffer and sample buffer for each Novex MidiGel is listed below. You will prepare your sample in the appropriate samplebuffer such that the final concentration of the sample buffer is 1X. You need todilute the running buffer to 1X final concentration before use. See page 22 forordering information on pre-mixed buffers.Running bufferSample bufferNuPAGE MES SDS Running Buffer (20X)to resolve small proteinsNuPAGE LDS Sample Buffer (4X)NuPAGE MOPS SDS Running Buffer(20X) to resolve mid-size proteinsNuPAGE LDS Sample Buffer (4X)NuPAGE Tris-Acetate SDS RunningBuffer (20X) to resolve large proteinsNuPAGE LDS Sample Buffer (4X)Tris-Glycine Native Running Buffer (10X)to perform native gel electrophoresisTris-Glycine Native Sample Buffer (2X)Tris-Glycine SDS Running Buffer (10X) toperform denaturing gel electrophoresisTris-Glycine SDS Sample Buffer (2X)Tris-Glycine Native Running Buffer (10X)to perform native gel electrophoresisTris-Glycine Native Sample Buffer (2X)The amount of 1X Running Buffer required depends on the number of gelsused for electrophoresis as described below:Number of gelsAmount of buffer41400 mL31250 mL2950 mL1750 mLContinued on next pageXCell4 SureLock Midi-Cell User Guide5
General guidelines for preparing samples and buffers, continuedReducing agentThe NuPAGE Sample Reducing Agent contains 500 mM dithiothreitol (DTT)at a 10X concentration in a ready-to-use, stabilized liquid form (page 22 forordering information) and is used to reduce samples for electrophoresis.β-mercaptoethanol can be used with the Novex Midi gels at a finalconcentration of 2.5% (v/v). Choice of the reducing agent is a matter ofpreference and either DTT or β-mercaptoethanol can be used. We recommendadding the reducing agent to the sample within an hour of loading the gel.Avoid storing reduced samples for long periods of time even if they are frozen.This will result in the reoxidation of samples during storage and produceinconsistent results.ImportantDo not use the NuPAGE Antioxidant (see below) as a sample reducing agent.The antioxidant is not efficient in reducing the disulfide bonds. This will resultin partially reduced bands with substantial background smearing in the lane.NuPAGE AntioxidantThe NuPAGE Antioxidant (a proprietary reagent) is added to the runningbuffer in the upper (cathode) buffer chamber only when performingelectrophoresis of NuPAGE Novex Midi Gels under reducing conditions. TheNuPAGE Antioxidant migrates with the proteins during electrophoresispreventing the proteins from reoxidizing and maintaining the proteins in areduced state. The NuPAGE Antioxidant also protects sensitive amino acidssuch as methionine and tryptophan from oxidizing.The NuPAGE Antioxidant is not compatible with gel systems other than theNuPAGE system as the antioxidant is not efficient at higher pH of other gelsystems including Novex Tris-Glycine Midi Gels.If you are performing electrophoresis of NuPAGE Novex Midi Gels underreducing conditions using the XCell4 SureLock Midi-Cell, use 175 mL1X Running Buffer with 435 µL NuPAGE Antioxidant in each of the UpperBuffer Chambers.6
Assemble the XCell4 SureLock Midi-CellMaterials neededFirst time use Appropriate precast gels (page 21) Running buffer (1X) Protein sample and protein standard Gel loading tipsThe Buffer Cores and lid of the XCell4 SureLock Midi-Cell are suppliedassembled.If you are using the XCell4 SureLock Midi-Cell for the first time, you need todisassemble the XCell4 SureLock Midi-Cell and wash various parts beforeuse as described below:1.Remove the lid.2.Remove the Buffer Dam, Displacement Dam, and 2 Buffer Cores from theLower Buffer Chamber.3.Wash various parts of the XCell4 SureLock Midi-Cell with a milddetergent and rinse with deionized water before use. Do not damage thewires on the core during the washing.To avoid contamination from possible residual acrylamide, wear gloves andlaboratory coat when loading and unloading gels into the XCell4 SureLock Midi-Cell, and when staining, destaining, or drying gels.Prepare gelcassettes1.Cut open the gel cassette pouch and drain away the gel packaging buffer.2.Remove the gel cassette from the pouch and rinse with deionized water.3.Peel off the tape covering the slot on the back of the gel cassette.4.In one fluid motion, pull the comb out of the cassette.5.Use a pipette to gently wash the cassette wells with 1X running buffer.Invert the gel and shake to remove buffer. Repeat twice. Fill the samplewells with running buffer. Be sure to displace all air bubbles from thecassette wells, as they will affect sample running.Note: Always handle the cassette by its edges only.NoteTo obtain the best results, use gels of the same type and same percentage ofacrylamide in the XCell4 SureLock Midi-Cell. Avoid mixing different geltypes and percentage of gels.Continued on next pageXCell4 SureLock Midi-Cell User Guide7
Assemble the XCell4 SureLock Midi-Cell, continuedAssemble with4 gelsInstructions are provided below to assemble the XCell4 SureLock Midi-Cellwith 4 precast midi-gels. See page 9 to assemble with less than 4 gels.1.Insert the XCell4 SureLock Assembly in its unlocked position into thecenter of the Midi-Cell base. The XCell4 SureLock Assembly slides downover the protrusion in the Midi-Cell base.2.Place one cassette on each side of the Buffer Core for each of the two cores.For each cassette, the shorter “well” side of the cassette faces in towards thebuffer core. The slot on the back of the cassette must face out towards thelower buffer chamber (see the following figure).3.While holding the assembly together with your hands (Figure A), insert theBuffer Cores with the gel cassettes into the Lower Buffer Chamber such thatthe negative electrode fits into the opening in the gold plate on the LowerBuffer Chamber (Figure B). Always hold the cassette assembly by its edgesas shown in the following figure.ABNote: If you are having difficulty inserting the assembly into the lowerbuffer chamber, make sure the cathode (black polarity indicator) of theBuffer Core is aligned with the cathode (black polarity indicator) of theLower Buffer Chamber.Continued on next page8
Assemble the XCell4 SureLock Midi-Cell, continuedAssemble with4 gels, continuedAssemble with lessthan 4 gelsProcedure continued from previous page.4.The Upper Buffer Chamber (cathode) is the void formed between a gel andthe Buffer Core at the center of each core.5.Lock the XCell4 SureLock Assembly by moving the tension lever to thelocked position (indicated on the XCell4 SureLock Assembly). This willsqueeze the gels and Buffer Cores together, creating leak free seals.6.Proceed to loading samples and buffers, pages 10–12.Instructions are provided below to assemble the XCell4 SureLock Midi-Cell withless than 4 gels using the Buffer Dam and Displacement Dam included with theMidi-Cell.Note: Do not use the XCell SureLock Buffer Dam with the XCell4 SureLock MidiCell.Gel Number2. Instructions Assemblewith 3 gels1.Insert the XCell4 SureLock Assembly in its unlocked positioninto the Midi-Cell. The XCell4 SureLock Assembly should reston the bottom of the Lower Buffer Chamber.2. Assemble 1 Buffer Core with 2 gel cassettes and insert the BufferCore/gel cassette assembly into chamber 1 of the Lower BufferChamber as described on page 8.3. Assemble the second Buffer Core with a gel cassette and BufferDam (see adjacent figure) and insert into chamber 2 of the LowerBuffer Chamber.4. Lock the XCell4 SureLock Assembly by moving the tension lever to the locked position(indicated on the XCell4 SureLock Assembly) to create a leak free seal.Assemblewith 2 gelsInsert the XCell4 SureLock Assembly in its unlocked positioninto the Midi-Cell between the two Buffer Cores. The XCell4SureLock Assembly should rest on the bottom of the LowerBuffer Chamber.2. Assemble 1 Buffer Core with 2 gel cassettes and insert the BufferCore/gel cassette assembly into chamber 1 of the Lower BufferChamber as described on page 8.3. Insert the Displacement Dam into chamber 2 of the Lower BufferChamber (figure A).4. Lock the XCell4 SureLock Assembly by moving the tensionlever to the locked position (indicated on the XCell4 SureLock Assembly) to create a leak free seal (figure B).1.ABContinued on next pageXCell4 SureLock Midi-Cell User Guide9
Assemble the XCell4 SureLock Midi-Cell, continuedAssemble with less than 4 gels, continuedGel numberAssemblewith 1 gelInstructions1.2.3.4.Add buffer into theUpper BufferChamber Insert the XCell4 SureLock Assembly in its unlocked position into the Midi-Cellbetween the two Buffer Cores. The XCell4 SureLock Assembly should rest on thebottom of the Lower Buffer Chamber.Assemble 1 Buffer Core with 1 gel cassette and 1 Buffer Dam and insert theassembly into chamber 1 of the Lower Buffer Chamber as described on page 8.Insert the Displacement Dam into chamber 2 of the Lower Buffer Chamber asdescribed on the previous page.Lock the XCell4 SureLock Assembly by moving the tension lever to the lockedposition (indicated on the XCell4 SureLock Assembly) to create a leak free seal.After assembling the XCell4 SureLock Midi-Cell, load buffer in the UpperBuffer Chamber as described below. The Upper Buffer Chamber (cathode) isthe void formed between a gel and Buffer Core at the center of each core.1.Fill each of the Upper Buffer Chambers assembled with gels with 175 mL ofthe appropriate 1X running buffer (page 5). Use enough running buffer tocompletely cover the sample wells. If using only the Displacement Dam,there is no need to add any buffer to the Dam.2.If you are running NuPAGE Novex Midi Gels under reducing conditions,use 1X Running Buffer with 435 µL NuPAGE Antioxidant in each of theUpper Buffer Chambers.Tip: Slowly load the buffer into the Upper Buffer Chamber to avoid a lot ofbubble formation. Bubbles make sample loading more difficult.3.Ensure that the Upper Buffer Chambers are not leaking. If the level ofrunning buffer drops, the electrophoresis core and cassettes are notproperly seated. Disassemble the Buffer Core/cassette assembly and repeatthe assembly.Continued on next page10
Assemble the XCell4 SureLock Midi-Cell, continuedLoad samplesThe recommended sample volume for each Novex Midi gel type is listed onpage 21.1.Prepare your samples using the appropriate sample buffer at the desiredprotein concentration.2.Use a pipette equipped with a sample loading tip (page 22) to underlay thesamples into the gel wells. Lower the tip to the bottom of the sample welland slowly pipet sample into well without contaminating another well withthe sample (see figures A and B below). The sample wells are marked onthe cassette allowing you to easily identify the sample wells and load thesamples properly into each well.Note: To obtain the best results and promote a uniform running of thestacking front, load sample buffer in all the wells, whether or not theycontain samples.AImportantBDo not add any buffer or water to the D
NuPAGE Midi Tris-Acetate Midi and Tris-Glycine Midi Gels only). . Antioxidant in each of the Upper Buffer Chambers. Ensure that the Upper Buffer Chambers are not leaking. 2. Load the appropriate volume of the protein sample and molecular weight markers in the wells. 3. Add 700 mL 1X running buffer (for 4 gels) to the Lower Buffer Chamber .