Transcription
S-Gear v3.0User Manual 2022 Scuffham Amps.S-GEAR V3.0 – USER MANUAL (DRAFT A)All Rights Reserved.PAGE 1
The information in this document is subject to change without notice and does not represent anycommitments or obligations from Scuffham Amps OÜ.The software featured in this guide is protected by an End User License Agreement and therebysubject to all those terms.No part of this guide may be copied, reproduced, or otherwise transmitted or recorded, for anypurpose, without prior written permission from Scuffham Amps OÜ (Scuffham Amps). All trademarksand brand identities are used for descriptive purposes only and remain the property of theirrespective owners.S-GEAR V3.0 – USER MANUAL (DRAFT A)PAGE 2
Contents1. WELCOME TO S-GEAR6About S-Gear6Installing S-Gear on your computer6Licensing S-Gear62. GETTING STARTED7Configuring S-Gear Standalone Application7Audio Routing Configuration9Setting Input and Output Levels10Audio Buffer Size and Sample Rate Considerations11The S-Gear interface123. USING S-GEAR AS A PLUG-IN13Supported plug-in formats13Using the VST2 plug-in on Windows13DAW Presets vs S-Gear Presets134. PRESETS AND BANKS14Overview14The Presets View14Presets Button Bar15Presets Action Menu15Renaming, Duplicating or Deleting items15Drag and Drop operations for Presets and Banks15Preset Migration from an earlier version of S-Gear165. HOW TO STORE A PRESET17Store Button17The ‘Store As’ View176. THE S-GEAR AMPS18Selecting an Amp18Amp A/B and VU meter18Common power amp controls19Custom ‘5720The Wayfarer21The Duke24The Stealer25The Jackal267. TUNER27The S-Gear Tuner27Tuning-Up28Reference Frequency28S-GEAR V3.0 – USER MANUAL (DRAFT A)PAGE 3
Tuner Mute28Using the S-Gear Tuner in a DAW28Enabling the S-Gear Tuner via Midi28Checking the intonation of your guitar288. NOISE GATE299. THE S-GEAR PEDALBOARD30Show or Hide the Pedalboard30Add or Remove Pedals30Pedal Control Tab31Pedal Presets31Drive thru3210. THE S-GEAR RACK33The Rack33Moving a rack unit33Adding or removing rack units33The rack unit Button Panel34Controlling the rack height35Factory Presets for rack devices3511. DELAY THING36Delay Thing effects36Knobs and switches36Sync to Tempo37Delay Time range38Delay Thing Factory Presets3812. MOD THING39Overview39Knobs and switches39Mod Thing Factory Presets4013. ROOM THING41Overview41The RoomThing display41Factory Presets41The Front Panel controls41The Edit Screen parameters4114. PRO-CONVOLVER46About the Convolver46Selecting a Cabinet and Microphone46ProConvolver channel strip47DI and Fast IIR filters48S-GEAR V3.0 – USER MANUAL (DRAFT A)PAGE 4
15. MIDI CONTROL49Overview49Configuring the Standalone App for Midi49Midi Program Change50Midi Controllers50Assigning Controllers to rack devices51Controller types52Dealing with S-Gear three-way switches53Bank Up, Bank Down, Preset Up and Preset Down Controllers53Troubleshooting Midi5316. DEVICE PRESETS54About Device Presets54Storing a Device Preset54Loading a Device Preset54Deleting a Device Preset54Importing and Exporting Device Presets5417. LOADING IMPULSE RESPONSES55The Impulses view55Importing impulse response files55Loading an impulse into the convolver56Renaming or Removing impulses56User impulse specification5618. THE CONFIG VIEW5719. DEACTIVATE S-GEAR5820. APPENDIX59Cabinet, Speaker and Microphone options in ProConvolver59Factory Presets61Midi Controller assignable parameters63Two-stage bypass65S-Gear system requirements66S-GEAR V3.0 – USER MANUAL (DRAFT A)PAGE 5
1 WELCOME TO S-GEARThanks for using S-Gear!About S-GearS-Gear is a collection of guitar amplifiers and effects implemented in software. You can use S-Gearas a standalone application or as a plug-in with most popular music production software, oftenreferred to as DAW (Digital Audio Workstation) software.To use S-Gear with your guitar, you will need an Audio Interface to provide a high impedanceinstrument input, along with audio outputs for headphones or powered speakers. Please also seethe system requirements section in the Appendix to check that your computer system is compatible.Installing S-Gear on your computerDownload the latest S-Gear installers from the www.scuffhamamps.com download page. Thenfollow instructions found on the installation support tion-guide/installationAfter running the installer, launch the S-Gear standalone application to activate your license or tostart a free trial period. You will need an internet connection for activation.On a Mac, launch the S-Gear standalone App from the Applications folder.On a Windows machine, launch the S-Gear Standalone App from the desktop icon.Licensing S-GearA free 10-day trial period is available so that you can evaluate the software on your system. The trialwill start automatically when you first launch S-Gear. When the trial period ends you must purchasea full license for S-Gear to continue using the software.An S-Gear license allows up to three computer activations for your own use. You can deactivate acomputer if you wish to move an activation to another machine. See the following website supportpage for detailed activation product-activation/s-gear-activationUse of S-Gear is subject to an End User License Agreement and you can read the full details /eula jan20.pdfS-GEAR V3.0 – USER MANUAL (DRAFT A)PAGE 6
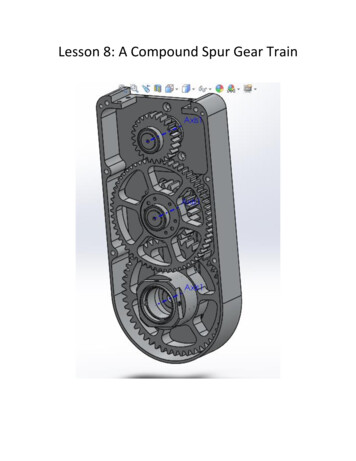
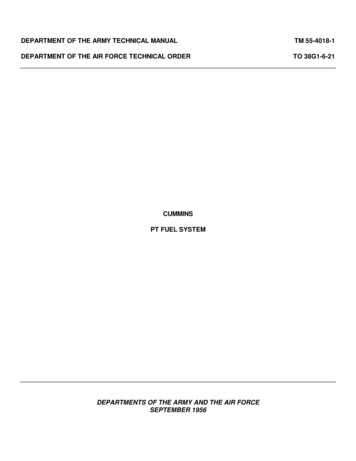
2 GETTING STARTEDConfiguring S-Gear Standalone ApplicationTo use the S-Gear standalone app on a Windows machine, you will need a dedicated audiointerface with ASIO capability. We assume you have followed the instructions provided withyour audio interface for correct installation.From the File menu, select Audio Driver Configuration to access the Audio and MIDI configurationdialog box. The first tab ‘Audio Device’ provides controls to configure your ASIO audio interface.1) From the ‘Driver’ dropdown list, select the correct driver for the ASIO device you wish touse.2) From the ‘Sample Rate’ dropdown list, select 44100 unless you specifically wish to run at ahigher sampling rate.3) If the device is connected and running, then the ‘Device Status’ should indicate ‘Running’. Ifthe device status is ‘Stopped’, check that the device is connected properly, switched on, andthen click the Restart button.The S-Gear ‘ASIO Config’ button provides access the audio interface configuration dialog. Thisinterface is provided by the publisher of your ASIO driver software, so consult your audio interfacedocumentation for specific configuration advice.S-GEAR V3.0 – USER MANUAL (DRAFT A)PAGE 7
To use the S-Gear Standalone App on an Apple Mac system, you will need a dedicated audiointerface with Core Audio capability. We assume you have followed the instructions providedwith your audio interface for correct installation.From the ‘S-Gear’ menu select preferences. The first tab ‘Audio Device’ provides controls toconfigure your audio interface.1) From the ‘Driver’ dropdown list, select the driver you wish to use.2) From the ‘Sample Rate’ dropdown list, select 44100 unless you specifically wish to run at ahigher sampling rate.3) Select an appropriate audio buffer size using the ‘Buffer Size’ dropdown list (follow ouradvice below on setting audio buffer size).4) If the device is connected and running, then the ‘Device Status’ should indicate ‘Running’. Ifthe device status is ‘Stopped’, check that the device is connected properly, switched on,then reselect the driver.If your audio device is not detected by S-Gear on an Apple Mac:S-Gear Standalone App expects to see a ‘full duplex’ audio device, i.e. one that provides bothinput and output channels simultaneously. If your device is not detected, it could be because itonly provides an input channel, or it reports input and output channels separately. If this is thecase, the solution is to create an Aggregate Device using the Apple Audio MIDI Setup utility. Seethe following Apple Support note: https://support.apple.com/en-us/HT202000S-GEAR V3.0 – USER MANUAL (DRAFT A)PAGE 8
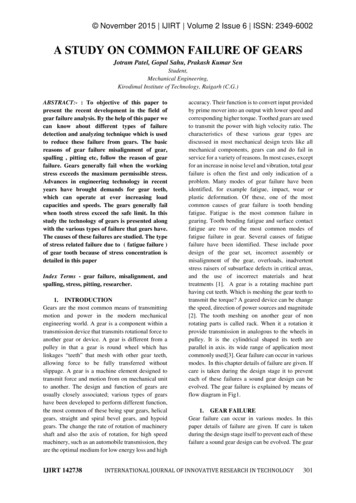
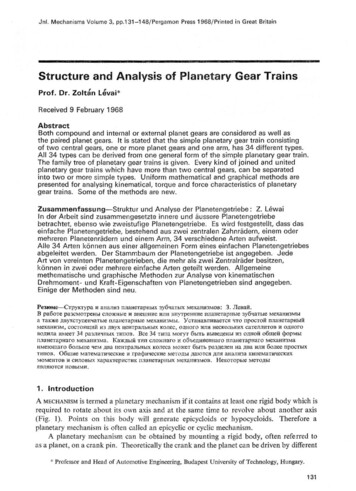
Audio Routing ConfigurationThe second tab of the Audio and MIDI configuration (Windows) / Preferences (MAC), is for settingup audio input and output routing. S-Gear accepts stereo-in and stereo-out routing, however it isonly necessary to provide a single mono input. The screen shot below shows a typical setup.If the audio interface is correctly connected and configured, you should see some level on the S-Gearinput meters at the bottom of the rack.Input LevelMetersChannel Select ButtonsOutput LevelMetersGlobal MONO switchThere are two channel select buttons below the input trim control, ‘L’ and ‘R’ that correspond to thestereo left and right input channels of the audio interface. If your guitar is connected to the leftinput (as per our routing example above), then make sure that the L button is selected and the Rbutton in not selected. Note: You could sum two guitar inputs into S-Gear by routing and selectingboth left and right channel inputs. The ‘MONO’ button sums the two output channels to mono.S-GEAR V3.0 – USER MANUAL (DRAFT A)PAGE 9
Setting Input and Output LevelsInput and output level meters (shown above) indicate the audio level right at the start of S-Gearprocessing and right at the end of S-Gear processing. S-Gear provides trim controls for input andoutput level and these trim settings are stored and recalled with S-Gear Presets.Audio Interface input levelKeep in mind that there are two places where you can adjust your input gain, on your audiointerface device and within the S-Gear software (using the trim control).It is important to avoid clipping the input of your audio interface, this will most likely hard clip andsound unpleasant. We recommend running with a softer input level allowing plenty of headroomfor the dynamics of your instrument.To check your input, bypass the S-Gear AMP, EFFECTS and CAB (using the buttons on the RackController), then listen to clean guitar through your interface. If you hear clipping, lower the inputlevel on your audio device.Setting the S-Gear Input levelNow in the digital domain, you can use the S-Gear input trim control to adjust the level moresubjectively. You can drive the S-Gear amp models harder or softer according to what gives pleasingresults. See the tone tips below for more advice!Setting the S-Gear Output levelWhen setting output level, it is important to avoid clipping. If the meter hits the red, then back offthe output trim control. Output clipping will cause hard clipping which can sound unpleasant. Theoutput from S-Gear will be converted back into a fixed-point number and be susceptible to digitalclipping if levels are not managed.Correct input and output levels are critical to achieving a natural guitar amp tone with S-Gear. Whenyou plug a guitar into a physical amp, you know how much impact the pickup output level has on thetones produced. Setting the input level into S-Gear is just as critical, and you will find that thedynamic behaviour of the amps differ considerably when they are driven harder or softer.It is possible to use the S-Gear Input Trim control to deliberately drive the S-Gear Amp harder. It isOK to do this because your guitar signal is already in the floating-point digital domain, and the resultwill be that the first stage of the S-Gear amp is overdriven sooner. Don’t attempt the same trick withyour audio interface, as you are likely to get some nasty audio clipping – unless your audio interfacehas been designed to clip in a nice way – as most are not designed to be overdriven and the resultswill most likely sound bad.S-GEAR V3.0 – USER MANUAL (DRAFT A)PAGE 10
Audio Buffer Size and Sample Rate ConsiderationsThe audio buffer size determines how many audio samples your interface will store up beforepassing a packet of audio data to S-Gear. Sometimes it is configured in samples, and sometimes inmilliseconds. The bigger the value, the more latency you will suffer through your computer;however, if the value is too small, then you are likely to suffer clicks and pops since the computercannot process one packet of audio data before the next arrives.If you are running MAC OS X, then S-Gear standalone will present a dropdown list ofavailable buffer sizes.If you are using an ASIO interface with Windows, then the buffer size is configured using thedevice’s dedicated interface.As a quick guide to the relationship between buffer size and number of samples, use the followingtable:MillisecondsSamples at 44100Hz sample rate2 ms88 samples3 ms132 samples4 ms176 samples5 ms220 samples6 ms264 samplesWhat latency is acceptable?It is quite difficult to hear less than 6 ms latency. Consider also that sound travels at roughly 343meters per second in air, so even with a physical amp it takes nearly 10 ms for the sound to travel3.5 meters from the speaker to your ear.The audio buffer size mentioned above is NOT the end of the story; your audio interface will also addconsiderable latency for input and output buffering (on top of the audio buffer latency). Dependingon the performance of your audio interface, you will likely end up with between 4-15 ms latencythrough your setup. Once you become accustomed to playing your instrument with this latency, youwill probably find that it does not bother you too much.Which sample rate to use and does S-Gear sound better at higher sample rates?S-Gear sounds just as good at 44100Hz, but your audio interface might not. For reasons ofprocessing power, we recommend that you run at 44100Hz sample rate. If your audio interface hasgood quality filters, then you should achieve great results. It is often apparent that with moreexpensive audio interfaces, there is less perceptible difference between 44100Hz and highersampling rates, and this is most likely because the input and output filters are of a better quality(anti-aliasing filter requirements are more demanding at lower sample rates). If you wish to run at ahigher sampling rate, make sure you have enough computer processing power on tap to cope withthe extra samples.S-GEAR V3.0 – USER MANUAL (DRAFT A)PAGE 11
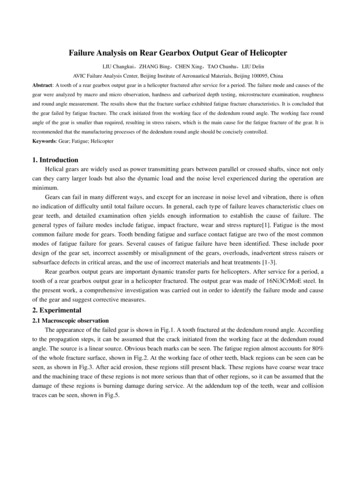
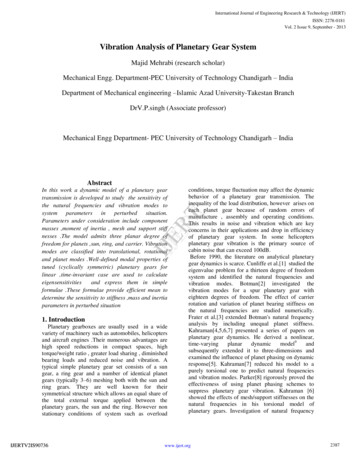
The S-Gear InterfaceTop Control BarShow/HidePedalboardCurrent PresetBankSamplerate andBlocksize indicatorZoomAboutPresetsControl BarCurrent BankPedalboardAmpRack buttonpanel withminimise,parallel mThingRackControllerTuner SelectBypassswitchesNoiseGateI/O Trims andVU MetersAmp A/B SelectorAmp VU meterThe Zoom button can be used to resize the S-Gear GUI to 100%, 125%, 150% or 200%. The largerzoom settings will only be available if the screen is big enough to accommodate the larger GUI size.S-GEAR V3.0 – USER MANUAL (DRAFT A)PAGE 12
3 USING S-GEAR AS A PLUG-INSupported Plug-in FormatsS-Gear supports:Audio Unit, VST3 and AAX plug-in formats on MAC.VST2, VST3 and AAX on WindowsAll plug-ins are 64-bit.VST is a registered trademark of Steinberg Media Technologies GmbH.Using the VST2 Plug-in on WindowsTo use the S-Gear VST2 plug-in on Windows, add the S-Gear default VST folder to the list offolders scanned by your DAW. This path can usually be entered in the options settings ofyour DAW. The default S-Gear VST2 folder is as follows:C:\Program Files\Scuffham Amps\S-Gear VST\On a Windows machine, typically you can place your VST plug-in DLL anywhere you like, and thenconfigure your VST host to look in that location. However, we strongly recommend using the defaultS-Gear VST install location. This way your DAW will always find the most recently installed version ofS-Gear.DAW Presets vs S-Gear PresetsThe DAW software will store the settings for all plug-in instances used in a project. These settingsare stored independently to the native S-Gear Presets which you can store and organise. The DAWmight also allow you to store and name plug-in Presets separately to the S-Gear Preset system.When you save a DAW project, S-Gear will tell the DAW which S-Gear Preset and Bank were usedalong with any edits that have been made. When a project is re-opened, S-Gear will attempt todisplay the correct Preset and Bank information originally used. However, if that Preset or Bank nolonger exists in the S-Gear Preset library, then the name will be displayed greyed-out.S-GEAR V3.0 – USER MANUAL (DRAFT A)PAGE 13
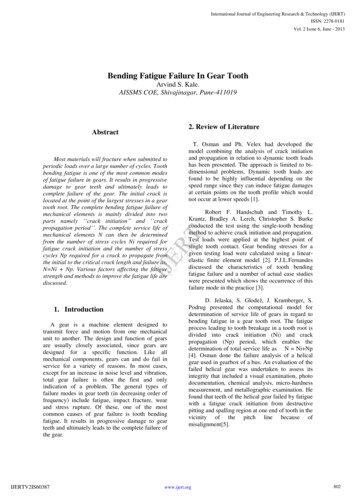
4 PRESETS AND BANKSOverviewS-Gear allows you to create Presets so you can save and recall your guitar sounds and organise themas you wish. S-Gear organises Presets into Banks, each Bank holding 128 Presets.A default Bank called ‘Factory’ is created containing the S-Gear Factory Presets. You can create asmany additional Banks as required. The currently loaded Preset and Bank are displayed on the Preset Control Bar:Step through Presets inthe current Bank using theup/down rocker switch.Load a Preset from thepop-up menu by clickingthe Preset Name Display.Change Bank by clickingthe Bank Display toaccess the pop-up menu.The Presets ViewClick ‘PRESETS’ on the Top Control Bar to display the Presets View. The Presets View can be used toorganise your Presets and Banks using drag and drop functionality. For convenience on smallerscreens, the view can be undocked and positioned anywhere over the main S-Gear GUI.Click & Drag the header to undock the viewButton BarBank ListPreset ListA light grey bar indicates thecurrently loaded Preset.S-GEAR V3.0 – USER MANUAL (DRAFT A)PAGE 14
Presets Button BarBanks button to show/hide the Bank List.Notes button to show/hide the Preset Notes Panel‘ ’ button to access the Presets Action MenuThe Preset Notes Panel can be used to make notes about the currently selected Preset.Presets Action MenuThe Presets Action Menu can be used to createnew Presets and Banks, import a Bank or Restorethe Factory Bank.The Single Click Load option changes the way thatPresets are selected or loaded into S-Gear. Whenchecked, Presets will load on a single click. Whenunchecked, Presets are selected on a single clickand loaded on a double click.Don’t worry about editing the Factory Presets!You can restore the originals at any time. TheRestore Factory Bank option will create a newcopy of the Factory Bank. You can also restore an individual Factory Preset by right-clicking on thePreset List and selecting Restore Factory Preset.Renaming, Duplicating or Deleting itemsThe Bank and Preset lists provide a right-click menu for operations including renaming, duplicating,or deleting an item.Drag and Drop operations for Presets and BanksWhilst both Preset and Bank items provide right-click menus for common functions, Drag & Drop isalso an essential part of the workflow for managing Presets and Banks in S-Gear v2.9:Drag & Drop Operations for Presets Reorder the Preset List (by dragging and dropping Presets)Copy a Preset to a Bank (by dragging a Preset to the Bank List)Export a Preset to a file (by dragging a Preset to the desktop)Import a Preset from a file (by dragging the Preset .sfx file to the S-Gear Preset List)Drag & Drop Operations for Banks Reorder the Bank List (by dragging and dropping Banks) Export a Bank to a file (by dragging a Bank to the desktop) Import a Bank from a file (by dragging the Bank .sfx file to S-Gear)S-GEAR V3.0 – USER MANUAL (DRAFT A)PAGE 15
Workflow example 1: Create a new Bank, then copy some Presets to the new Bank1.2.3.4.From the ‘ ’ menu, click ‘New Bank’Rename the new Bank to something meaningful.Select a different Bank from which you wish to copy a PresetThen eithera. Drag and drop a Preset to the new Bankorb. Right-click on a Preset and use ‘Copy To Bank’Preset Migration from an earlier version of S-GearS-Gear v2.9 will automatically migrate Presets from an earlier version of S-Gear. Two User Banks arecreated to accommodate migrated Presets (User 1 and User 2):User 1 User 2 Contains old User Presets 000-099Contains old User Presets 100-199If required, Preset Migration can be re-triggered using the Presets Action Menu. A hidden menufunction to Migrate v2.7 Presets can be accessed by clicking Ctrl-A prior to opening the PresetsAction Menu. This function may be useful if for some reason migration needs to be re-run.S-GEAR V3.0 – USER MANUAL (DRAFT A)PAGE 16
5 HOW TO STORE A PRESETStore buttonThe S-Gear Store Button provides a two-click system for storingcurrent Preset edits. When a Preset has been edited, the StoreButton is enabled, and the Store LED is lit. Press Store once to initiate the store operation. The LED will flash for 10 seconds, duringthis time you can commit the store operation. Press Store again to commit the store operation. The LED will turn off and the Preset saved.The ‘Store As’ ViewThe Store As View provides a way to save the current Preset to a particular position or Bank. It isalso possible to store the Preset to a new Bank. Click Store As to save the current Preset. The Store As view will be displayed and thedestination will be set to the next available Preset slot in the current Bank. The target Presetname can be edited. Click the STORE button to commit the store operation. Click CANCEL to quit. Store the Preset to a differentBank by selecting the target Bankfrom the Bank drop down menu. Select ‘New Bank’ to create a newBank as the target.S-GEAR V3.0 – USER MANUAL (DRAFT A)PAGE 17
6 THE S-GEAR AMPSS-Gear includes five original amp designs,The Duke, The Stealer, The Jackal, The Wayfarer and the Custom ‘57.Selecting an AmpRight-click the mouse anywhere on the Amp to pop up the menu. Use the Select Amp option tochange the Amp.Amp A/B and VU MeterEach S-Gear Preset accommodates two amp configurations A and B, and you can switch betweenthese configurations using the Amp Selector buttons on the S-Gear I/O Rack Unit.The Amp VU meter displays the audio level going into the rack.In many situations, you may only require AMP A. However, whenusing S-Gear in a live environment it can be very useful to have twodifferent amp setups that can be switched into the same rack ofeffects.S-GEAR V3.0 – USER MANUAL (DRAFT A)PAGE 18
Common power amp controlsWhilst each S-Gear amp incorporates a unique power amp design, all amps provide the followingcommon controls to adjust the behavior of the power amp.PresenceUsing the same negative feedback circuit found in typical push-pull guitar tube power amplifiers, theS-Gear presence circuit uses a tuned feedback loop to boost the upper mid and high frequencies.Presence adjusts the amount of feedback and hence the amount of high frequency boost in thepower amplifier.Presence FrequencyPresence frequency adjusts the tuning of the presence feedback circuit. Higher settings will raise theoperating point to give more of a sizzle. Lower settings will produce a harder presence boost.A low presence frequency setting will boost considerably more upper mids when turningup the presence in the amp. A high setting will leave the mids alone and focus the presence controlmore on the ‘sparkle’ or ‘sizzle’.Hi-CutHi-Cut adjusts the dynamic high frequency reduction applied when the power amp is pushed harder.SagIncreasing the Sag will increase the effect of dynamic non-linearity in the power amp.Sag is an important control when looking for a totally natural power amp feel. As hardware tubeamps start to work hard, demands on the power supply cause the amp to increasingly compress thesignal. This happens even when the amp is running ‘clean’, and is one reason why tube amps feelmore responsive than solid-state counterparts. This occurs to varying degrees depending on design,type of tubes etc., so this control is variable and not pre-set.Carefully balancing the sag with the amount of drive can be important if you are lookingfor a realistic spongy vintage feel. High gain players may find tighter more uncompromising toneswith this control set lower but there are no rules here!S-GEAR V3.0 – USER MANUAL (DRAFT A)PAGE 19
Custom ‘57The Custom ’57 is the newest amp in the S-GEAR line-up. This is our interpretation of the favourite‘Tweed’ amp from the late 50’s.This is a simple amp with minimal controls. The pre-amp of the ’57 is essentially clean, but with thepossibility to push the power amp into overdrive as the volume is cranked higher.The control line-up is as follows:VolumeLike a Tweed Deluxe, this amp starts to break up when the volume is around 4-5, and develops a richpower-amp overdrive when pushed further towards 12.BrightRather than stick to a vintage correct tone section, we’ve added a bright-contour control similar tothat found on The Stealer. This produces the bright lift of a capacitor bypassed bright volume pot,whilst maintaining a constant volume. Push the Bright control higher for glassy Fender tones, dialback for warm, rich tones.BassThe Bass control is a typical passive bass control. Lower the bass to tidy-up an unruly distortion or tocompensate for the speaker cabinet selection.LevelLevel controls the output level of the amplifier. This control does not affect the tone of the amp inany way. It does change the level sent to the S-GEAR rack, so a hotter output may affect the tone ofthe rack devices (such as Delay Thing tube emulation).Notes:The ’57 is very sensitive to the settings of the Power Amp controls (Presence, Hi-cut and Sag).Experiment with these controls to fine tune your sounds. You will also find that working withdifferent speaker cabinets opens up lots of possibilities with this amp.S-GEAR V3.0 – USER MANUAL (DRAFT A)PAGE 20
The WayfarerThe Wayfarer brings together elements from the classic American amp designs. Three channels,several tone shaping switches and additionally a graphic EQ between the preamp and power amp,make this a very versatile amp.The three Wayfarer Channels:Wayfarer Clean:The Wayfarer clean channel is true to the classic Fender Brown and Blackface favourites. Thepreamp structure is a traditional Tube-Tone-Tube, with a further preamp Tube before the poweramp.TUBETONESTACKBRIGHTVOLUMETUBETUBEThe third tube stage was typically added to traditional amps to provide correct buffering to a springreverb drive and return circuit, but it also helps add an extra slinky top end to the amp.Gain, Bright Frequency and Amp Drive:The Wayfarer gain control incorporates a bright bypass capacitor providing a treble lift as the gaincontrol is lowered from full gain. This control strongly determines the overall character of the amp.The lower the gain, the brighter the tone, as illustrated in the following diagram:The classic tube amps employing thiscircuit would typically have just asingle volume (gain) control, and youwould probably set this somewhere inthe range between 2-5, giving apronounced bright boost andcharacterising the sound of the amp.Pushing the volume control higher would then create a degree of edge, then overdrive as the poweramp is driven harder - the lower powered amps were often capable of producing some sweetoverdriven tones.S-GEAR V3.0 – USER MANUAL (DRAFT A)PAGE 21
The Wayfarer provides a continuously variable Amp Drive control, allowing you to dial-in the degreeof power-amp drive required. This is a great tool for balancing the brightness vs overdrive in theclean channel, and with careful balancing you can achieve some beautiful vintage overdrive toneswith tons of dynamic responsiveness from the power amp.The other feather in the Wayfarers cap is the Bright Frequency switch located in the amps tweaksection. This alters the value of the bright bypass capacitor on the gain control and hence thefrequency of the bright boost achievable. The two settings, high and low are based on values foundin Fender Deluxe and Fender Twin amps respectively. At the lower setting, bright boost occurs at alower frequency producing more presence and bite, whereas the high setting operates at a higherfrequency and produces a softer bright boost.Remember that the Wayfarer clean preamp section is common to all three channels of the amp, sothe Gain/Amp Drive/Bright balance discussed above applies to all channels.Lead IThe classic hot-rodded Fender - Lead I channel adds an additional ECC83 drive stage after the cleanpreamp with a tailored voicing to achieve rich overdrive sounds.Lead IIAdding two additional ECC83 drive stages after the clean preamp, Lead II is capable of producingvery high gain sounds - much higher gain in fact, than any previous S-Gear amp. This channel offersanother degree of intensity over Lead I, and with a slightly more aggressive voicing for heavily drivensounds. The Wayfarer graphic EQ is particularly effective for tailoring high gain Lead II sounds.Lead DriveThe Lead Drive control comes into play to adjust the gain of the additional drive stages in the LeadChannels. Careful balancing of the Gain and Lead Drive is the key to achieving great tight overdrivesounds. Don't forget that the Gain control also alters the bright boost into the overdrive stages.If you are looking to achieve a Boogie MKV style tone: note that the gain control has asweet spot at about 7.5 with the overall drive then being tailored by the Lead Drive control.Take care when setting up the Amp Drive for lead sounds. A moderate amount of AmpDrive provides a more lively dynamic overdrive tone, too much Amp Drive and you will losesensitivity in the dynamic response.Bass, Middle and Treble Tone controls:The Wayfarer tone stack is based on the classic Fender/Boogie tone stack with some smallmodification to suit this particular amp. Like most guitar passive tone stacks, these controls areinteractive, for example adjusting the Bass and Treble will also shift the centre frequency of themiddle cut.The Wayfarer tone stack is positioned in front of the drive stages, so these controls willeffect how the overdrive responds at different frequencies. Be careful with the Bass control – dial ina lower setting to achieve a tighter rhythm sound.S-GEAR V3.0 – USER MANUAL (DRAFT A)PAGE 22
Tone switches: Bass Shift, Mid Shift, Lead BrightBass Shift, when engaged provides a pronounced reduction in frequencies below 250Hz, righ
S-GEAR V3.0 - USER MANUAL (DRAFT A) PAGE 5 15. MIDI CONTROL 49 Overview 49 Configuring the Standalone App for Midi 49 Midi Program Change 50 Midi Controllers 50 Assigning Controllers to rack devices 51 Controller types 52 Dealing with S-Gear three-way switches 53 Bank Up, Bank Down, Preset Up and Preset Down Controllers 53 Troubleshooting Midi 53