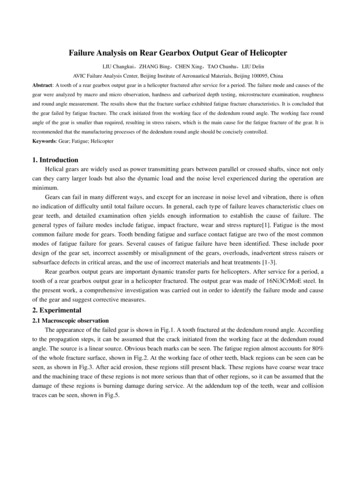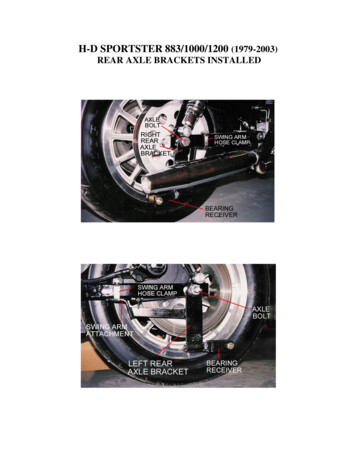
Transcription
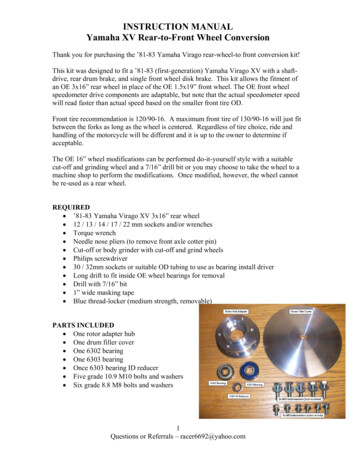
INSTRUCTION MANUALYamaha XV Rear-to-Front Wheel ConversionThank you for purchasing the ’81-83 Yamaha Virago rear-wheel-to front conversion kit!This kit was designed to fit a ’81-83 (first-generation) Yamaha Virago XV with a shaftdrive, rear drum brake, and single front wheel disk brake. This kit allows the fitment ofan OE 3x16” rear wheel in place of the OE 1.5x19” front wheel. The OE front wheelspeedometer drive components are adaptable, but note that the actual speedometer speedwill read faster than actual speed based on the smaller front tire OD.Front tire recommendation is 120/90-16. A maximum front tire of 130/90-16 will just fitbetween the forks as long as the wheel is centered. Regardless of tire choice, ride andhandling of the motorcycle will be different and it is up to the owner to determine ifacceptable.The OE 16” wheel modifications can be performed do-it-yourself style with a suitablecut-off and grinding wheel and a 7/16” drill bit or you may choose to take the wheel to amachine shop to perform the modifications. Once modified, however, the wheel cannotbe re-used as a rear wheel.REQUIRED ’81-83 Yamaha Virago XV 3x16” rear wheel 12 / 13 / 14 / 17 / 22 mm sockets and/or wrenches Torque wrench Needle nose pliers (to remove front axle cotter pin) Cut-off or body grinder with cut-off and grind wheels Philips screwdriver 30 / 32mm sockets or suitable OD tubing to use as bearing install driver Long drift to fit inside OE wheel bearings for removal Drill with 7/16” bit 1” wide masking tape Blue thread-locker (medium strength, removable)PARTS INCLUDED One rotor adapter hub One drum filler cover One 6302 bearing One 6303 bearing Once 6303 bearing ID reducer Five grade 10.9 M10 bolts and washers Six grade 8.8 M8 bolts and washers1Questions or Referrals – racer6692@yahoo.com
INSTRUCTION MANUALYamaha XV Rear-to-Front Wheel ConversionStep #1Remove tire from donor rear wheel and suitablydegrease. Remove the original wheel bearings a suggestion is tapping the drum side bearing ina bit to use the inner spacer sleeve to push the2x drive side bearings a out bit. Once there is alittle clearance, a long drift can be used thru theID of the bearings/spacer sleeve to drive theopposite side bearings out. Because thebearings are being driven out via the ID races,they will be ruined and cannot be reused.Step #2Drive side: remove the 4 Philips screws thathold on the drive side outer trim ring andremove the ring (keep if you plan to reuse - yourchoice).Step #3Drive side: remove the 5x M10 bolts holding onthe spline-drive hub and remove the hub(discard or save as a spare).2Questions or Referrals – racer6692@yahoo.com
INSTRUCTION MANUALYamaha XV Rear-to-Front Wheel ConversionDrive Side Modification PlanDrum Side Modification Plan3Questions or Referrals – racer6692@yahoo.com
INSTRUCTION MANUALYamaha XV Rear-to-Front Wheel ConversionStep #4Remove drive side material. A body grinderwith a 4.5" cutoff and grind wheels is suitable.This is a clearance cut and critical part matingsurfaces aren't affected - hence lathe-typeaccuracy isn't required – but you may choose tohave machined4Questions or Referrals – racer6692@yahoo.com
INSTRUCTION MANUALYamaha XV Rear-to-Front Wheel ConversionStep #5Remove brake side material. Again a bodygrinder setup is sufficient. This is a clearancecut to the drum filler cover, but some fine tuningmay need to be made once the wheel is installed(the drum filler cover doesn't turn with thewheel so it needs 1-2mm clearance to the finalsurface).5Questions or Referrals – racer6692@yahoo.com
INSTRUCTION MANUALYamaha XV Rear-to-Front Wheel ConversionStep #6Clearance drill the original spline-drive hubmounting holds with a 7/16" drill bit.6Questions or Referrals – racer6692@yahoo.com
INSTRUCTION MANUALYamaha XV Rear-to-Front Wheel ConversionStep #7Brake side hole cleanup: chamfers and washerclearance grind a flat surface around the drilledhole webs. A body grinder fits if careful. Cleanthe wheel of all chips and grind dust.Step #8Install rotor hub adapter over drive side pilotand insert 5x M10 bolts/washers from drum sidelightly torqued. Suggest a trial fit of the wheelassembly to the bike before final assembly.Final assembly of these bolts should includeblue thread-locker and a final torque.7Questions or Referrals – racer6692@yahoo.com
INSTRUCTION MANUALYamaha XV Rear-to-Front Wheel ConversionStep #9Suitably support bike on centerstand andposition front wheel off the ground with suitableblocks under the front of the engine case.Remove the front axle by: Removing cotter pin and LH axle nut Loosen axle pinch bolt on RH fork Slide axle out from the RH side Roll wheel forward to remove frombrake caliper (may be easier to re-installif brake caliper is removed from LH fork– not necessary to break hydraulic lineconnection) Take care to remove and set-aside thespeedo drive unitStep #10Remove brake rotor from OE 19” front wheeland clean for re-assembly. Lock tabs underoriginal rotor bolts can be re-used instead of theM8 washers supplied in the kit. Notingassembly, carefully remove LH speedo seal anddrive parts from the OE 19” front wheel andclean / re-grease for re-installation into the rotorhub adapter.If you intend to reuse the inner bearing spacersleeve, remove one of the front wheel bearings(similar to how removed from the donor rearwheel) and then extract inner spacer sleeve.Or a new inner spacer sleeve can be made perStep #16.8Questions or Referrals – racer6692@yahoo.com
INSTRUCTION MANUALYamaha XV Rear-to-Front Wheel ConversionStep #11Install rotor onto hub adapter with 6x M8bolts/washers and lightly torque. Suggest a trialfit of the wheel assembly to the bike. Finalassembly will include blue thread-locker and afinal torque.Step #12Install flanged ID reducer into 6303 bearing andthen install bearing into drum side of wheel withthe flange of the ID reducer towards the centerof the wheel. A press is ideal, but a 32mmsocket and hammer works well.9Questions or Referrals – racer6692@yahoo.com
INSTRUCTION MANUALYamaha XV Rear-to-Front Wheel ConversionStep #13Install 6302 bearing into rotor hub adapter. Apress is ideal, but a 30mm socket and hammerworks well.It is not necessary to fit the speedo drive partsand seals for trial fitment unless desired.TRIAL FITMENTStep #14Loosely install drum filler cover over drum sideof wheel and install wheel in reverse order ofremoval of Step #9. Take care to include theRH side axle spacer and align the speedo driveunit. Apply light torque to axle nut to establishand note final position of axle. Brake rotorshould be centered in the LH fork groove.DO NOT apply axle nut final torque without abearing inner spacer sleeve installed (ref. Step#16)10Questions or Referrals – racer6692@yahoo.com
INSTRUCTION MANUALYamaha XV Rear-to-Front Wheel ConversionThe RH end of the axle and/or the RH axlespacer may need to be modified as shown totune-in the wheel/rotor centering position andallow the axle nut to be final torqued and cotterpinned. Carefully modify the axle as required.Rotate the wheel and address any drum fillercover contact issues with more drum side flangeclearance grinding – the drum filler covershould remain stationary relative to the wheeland maintain a 1-2mm clearance to the drumside flange on the wheel.11Questions or Referrals – racer6692@yahoo.com
INSTRUCTION MANUALYamaha XV Rear-to-Front Wheel ConversionStep #15When satisfied with fitment, remove rotor hubadapter by removing the five M10bolts/washers. Additionally remove the six M8bolts/washers to remove the brake rotor.Refinish wheel, rotor adapter hub, and drumfiller cover to personal preference. Suggest aminimum of a clear coat paint as the bare CNCaluminum finish will oxidize over time - youcan choose to anodize, paint, or powdercoat toyour color choice.Mount the tire of choice to the wheel.Recommend loosely installing the rotor hubadapter (with rotor) to the wheel for final wheelbalancing.FINAL ASSEMBLYStep #16Apply a coating of grease and install a 65 mmlong bearing inner sleeve spacer (modifyoriginal front inner spacer or use a ¾” OD x1/16” wall tube) into center of wheel against the6303 ID reducer flange.Re-assemble the rotor hub adapter over theshortened drive side pilot.Re-assemble five M10 bolts with blue threadlocker and torque in a criss-cross pattern to 40Nm.Re-assemble the brake rotor over the adapterhub pilot and secure with six M8 bolts/washers(or lock tabs) with blue thread-locker and torquein a criss-cross pattern to 20 Nm.12Questions or Referrals – racer6692@yahoo.com
INSTRUCTION MANUALYamaha XV Rear-to-Front Wheel ConversionSTEP #17Re-assemble the wheel/tire assembly to the bikeAs in Step #14.Lightly torque the axle nut to seat axle.Torque RH fork axle pinch bolt to 20 NmTorque axle nut to 107 Nm and insert cotter pinRe-assemble brake caliper to fork (if removed).Caliper to LH fork bolt torque is 25 Nm.Caliper bolt nut torque is 20 Nm.Lower bike to ground and test ride – use caution as the ride and handling dynamics ofthe bike will be changed. Perform a few medium brake stops and allow rotor tosufficiently cool. Check for any play of the hub adapter to the wheel and check sixM8 rotor bolts to make sure they have retained the 15 ft-lb torque. If loose, wheelshould be disassembled and all bolt and tap threads cleaned and degreased, threadlocker re-applied and bolts re-torqued to respective values.No Warranty of any kind,express or implied, is maderespecting this product. Becausemodifying an OE motorcycle canbe dangerous, the buyerassumes all risk and liabilitywhatsoever resulting from use.13Questions or Referrals – racer6692@yahoo.com
Yamaha XV Rear-to-Front Wheel Conversion 13 Questions or Referrals – racer6692@yahoo.com STEP #17 Re-assemble the wheel/tire assembly to the bike As in Step #14. Lightly torque the axle nut to seat axle. Torque RH fork axle pinch bolt to 20 Nm Torque axle nut to 107 Nm and insert cotter pin Re-assemble brake caliper to fork (if removed).