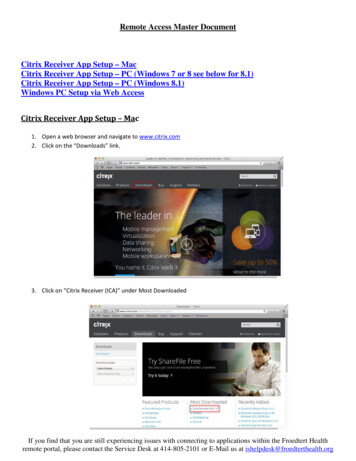
Transcription
Setup and User GuideAccount SetupOnce registered and logged in, you will see the Dashboard and a series of panels guiding youthrough what you need to do to set up your account. Please complete these sections in order.Tip: You can always go back and make changes to all sections of your account in the future so noneed to worry if you don’t have all the information at hand.On any page in the software, look out for theicon – hover over this icon (or tap on mobile)to see more information about the particular field or section it relates to.In order to make this process as quick and simple as possible, you should follow the steps in thefollowing order.1. Configure your Venue2. Create your Hire Charge Rates3. Create your Rooms and Facilities4. Create a list of Activity Groups5. Add your list of Additional Line Items6. Configure your Email Templates and Options7. Create your Administrators and assign their Roles8. Add your list of Customers9. Add your current bookingsSteps 1 – 7 refer to the menus inside the Admin dropdown list on the left of the screen.Step 1 - Configure your Venue – Venue SettingsTo edit your venue, make sure it is selected in the dropdown menu at the top, then go to theVenue Settings page.Here you can edit the venue name if needed, as well as set other global settings for your venue.If you require addresses from your customers to include on invoices and receipts etc, then tickthe box for ‘Enable Customer Addresses’.Your venue may have restrictions or requirements for the number of attendees a booking mighthave – in this case, tick the box for ‘Require Number of Attendees’ to make this a required fieldon your booking forms, and move the field to a more prominent position on the page.
Use the Currency dropdown menu to choose the currency symbol you want to display on any ofyour monetary values. Please note that this is not a currency conversion tool. If you cannot seeyour currency code listed, please let us know so we can add this in for you.Calendar Buffers – use this section to setup automatic buffers at the start/end of your bookings.These can be displayed either as extensions of the booking itself, or as separate items on thecalendar for which you can also select the display colour using the provided colour picker. Youcan see an example of how this would look in the ‘Event Preview’ section. If you do not wantthese buffers to be added, then just leave this section as it is with the ‘Duration’ field set to 0.T's & Cs – Here you can put a link to the Terms & Conditions page or document on your ownwebsite. When you enter the address here, it will automatically place this link on the bookingform with a tick box that your customers need to tick before they can proceed and make abooking request. You can use the Title field to set how the document will display on the bookingform.Secondary T’s & C’s – If you have a secondary set of terms that customer must agree to, thenyou can put this here. Similar to the main document above, you can set the Title and URL usingthe provided fields – eg: ‘https://www.ourhall.org/CovidTandCs.pdf’ – ‘COVID19 RestrictionsPolicy’PayPal Integration - If you have the PayPal Integration Module enabled, enter your PayPal emailaddress here. This will automatically allow your customer to be able to pay their invoices directlyinto your PayPal account. They will be able to make part or full payment of multiple invoiceswhich you can verify before setting their Invoices to Paid etc. For more information go to theUser Resources tab on your Dashboard, where you will find a document regarding ‘PayPalintegration’.Step 2 – Hire Charge RatesHere you can create the names and types of different price rates for your Rooms and Facilities.An Hourly rate will calculate the cost, times the duration of the booking, where a Fixed rate willbe a static cost regardless of booking duration.Note: There is no need to set a rate name for each Room or Facility, as theamount for these rates is set in the Rooms/Facilities page and can be easily seenin the Charges Matrix.
These Charges can then be linked in turn to your customers and more specifically to the activitythey do (for example Jenny Smith runs a Yoga Class and has the Regular User Rate ). You can alsosetup conditional rates which will automatically select the appropriate Hire Charge based on thebooking details. For information on setting these up, please see the ‘Conditional Price Rates’document once you have finished setting up your venue.
Step 3 –Rooms / FacilitiesDetailsFirstly under the Admin Rooms/Facilities section click ‘Create New Room’.Give it a name (eg Main Hall, Small Room, Playing Field 1 etc), and complete the rest of theinformation including a description of what the room could be used for and facilities available . Ifyou don’t want to allow the public to be able to make booking requests, tick the box for ‘DisableBookings’. If you want this room to be hidden from your public calendars altogethe r, then tickthe relevant box. Any ‘hidden’ rooms will also be considered disabled for public bookingsPLEASE NOTE – You do not need to create a room for ‘whole hall’ or ‘use of all rooms’. Bookingsare created for the Whole Hall or All Facilities by selecting all of the rooms together in thebooking form. If you create a single room that encompasses multiple areas then the software willnot be able to check for booking clashes and you may end up with double bookings.ImagesYou can upload some images to help promote the room or facility - these will appear in the MainDisplay Panel – see the Admin Website Integration page for detailsPrice RatesYou will see the names of the Hire Charges you set up previously. Enter the cost for each rate forthis room.If a price rate changes throughout the day, for example if you have morning, afternoon andevening prices, then you can enter these using the ‘TO’ and ‘THEN’ buttons, setting the timeswhere the price changes.These prices will then be used to calculate the costs for your invoices.Opening and Closing TimesThe times you set here will be available to your customers when they make a booking req uestfrom the public view of the online calendar. These times are not enforced on the booking form,so if a customer requests a booking outside of these times, you will be notified via the emailsent. Please note that the times are in 24-hour format where 00:00 is the START of the day andMidnight is set as 23:59.
Next, tick the days of the week that this room is open. A list will automatically appear below withthe opening times. You can change these to have different opening times for each day of theweek.Click on Save to complete the Room Setup.You can repeat the above steps for any other rooms your venue may have.Once completed, you can re-order the rooms how you wish using the up and down arrows onthe far right of the Rooms / Facilities list. This order is then reflected in the Website Integrationpanels and booking forms.Step 4 – Activity GroupsThese are general headings for the type of activity you have at your venue. Eg Classes, Meetings,Party, Wedding etc.We recommend you keep these as a generic heading as you will link these to your customerslater, along with more specific activities such as ‘Yoga Classes’, ‘Pilates Classes’ etc.You can enable the Activity Groups you want to appear in the Customer's Public Booking Form.This gives you the flexibility to just offer just the Activities you want. All Activities are availableto the Administrators however.Step 5 – Additional Line ItemsYou can prompt your customers to select additional items such as Table and Chair Hire, Catering,Projector Hire, Alcohol and PRS Licences etc. These ‘Additional Line Items’ can be groupedtogether and individually enabled or disabled for the Customer Booking Form if necessary.You can apply a cost for these along with an individual tax rate if applicable.If selected by the Customer, these get added to their Booking request and in turn, if you areusing the Invoicing module will get included in their Invoice.You can also mark any line items as ‘Required’, meaning the customer will need to select them inorder to continue with their booking request.
Some of your items may be tax exempt or require different tax rates to be applied. You can setthis using the ‘Tax Rate’ dropdown. If your venue is not VAT rated then you can just leave thisdropdown at the default ‘No Tax 0%’ value.All Line Items are available to Administrators to be able to add to Bookings or Invoices.
Step 6 – Email ConfigurationThe Email Configuration menu contains a set of tabs with all of the email templates that will besent out from Hallmaster. We have entered default content to each email, but all of thesetemplates are fully customisable so you can tailor them to suit your venue’s design style, andchange the text to your own personal messages.Each template has a set of Macros, which are effectively placeholder tags that will be replacedwith relevant data when the email is sent – for example [User First Name] will be replaced withthe first name of the email recipient – similar to how a Mail Merge function would work.You can use the ‘Send an example copy’ button to receive a preview email of the template youhave created, and then press Save when you are happy. If you want to reset the template backto the default content, use the red ‘Reset to Default’ button – this will prompt you to confirmbefore changes are saved, so don’t worry if you press this accidentally!More detailed instructions on how to use this section are available in the Instructions tab.By default, all booking and invoicing emails are sent to the relevant customer and anyadministrators with the matching role assigned, provided their email is verified*. IE Bookingrequest and confirmation emails are sent to administrators with the Booking role assigned, andInvoice emails are sent to administrators with the Invoicing role assigned.Archived administrators will not receive any booking or invoicing emails.Alternatively, you can setup primary Booking and Invoicing email addresses which will receivethese messages instead of the administrators. These are added in the ‘Primary Emails’ tab of thispage. This can also be used for managing automatic email forwarding from your own emailservice.*For more information on Email Verification – see Email Verification section of User Management Guide.
Step 7 - Create your AdministratorsHallmaster allows for multiple administrators to access your venue at once, each with their ownset of permissions and roles. Enter their first name, last name and email address. If thisadministrator is also a customer of your venue, you can add their activities and rates here onceyou have set those up.In the Roles section, tick the boxes for the permissions this user should have. Each role isexplained in more detail in the tooltips.You can then press Save to create this administrator profile. The Save and Email Passwordbutton will create this administrator and email them a link they can use to setup a password andlogin for the first time.For more detailed instructions on managing your users, please see the User Managementdocumentation.Step 8 – CustomersThis process is the same as setting up an Administrator but without the User Roles andPermissions. Once set up, and the customer has set their own password, they can view theirown bookings, invoices and payment history.If your venue has enabled Public Bookings, they can also make additional booking requests fromtheir account. Customers are not able to edit any existing bookings, so they would need tocontact your venue directly for this.
Step 9 - Bookings – Adding, editing and receiving requestsBefore adding any bookings, you need to make sure that you have completely set up yourHallmaster account including lists of Activities, Hire Charges, Line items and Customers.Add a new bookingSelect the rooms you require and enter the name, start date and end date of the booking orevent. If this is a single or one-off booking, you can move on to the Customer section of thebooking form. If this is a series of multiple bookings, continue reading the Recurring Bookingssection.Recurring BookingsTo create a recurring series of bookings, tick the box for ‘recurring booking’, this will open a newpanel for entering the series details.Set the recurring frequency to match the pattern you want these bookings to follow. Thefrequency selected here will be used to automatically calculate the dates in this se ries. If youselect ‘Weekly’, you will be prompted to select which days of the week this booking occurs on.Specify how many dates you want to add to this series (this box is limited to 100 datesmaximum). Once this is done the booking form will automatically fill in the dates for thisbooking. You can then manually change each date and time if you need to.Once finished, press the green ‘Check Availability’ button to make sure there are no otherbookings that may clash with these new dates.You can add or remove dates later if you need to by editing the booking series.Customer SectionIn the Customer section, start typing the first 3 or more characters of the customer’s first name,email address, surname or Group Name to search for them. If the customer has more than oneactivity linked to their account, you can select the one you want from the dropdown menu,otherwise this box will be automatically filled in with their one activity.If this customer does not yet have the activity you want to use assigned, you can use the ‘AddActivity’ button to set it up for them.If the customer for this booking has not yet been setup in Hallmaster, you can use the ‘AddCustomer’ button to add them from here.Number of People Attending:This field can contain a whole number indicating how many attendees are expected at thisevent. If you have set this to be a required field, it will appear towards the top of thebooking form, and you/your customers won’t be able to continue with the booking until it isfilled in.
Booking PrivacyEvents are displayed in the calendar and the system according to their privacy settings asfollows:Public – bookings and contact details are displayed on the calendar. Ideal for classesand public eventsPrivate – show as Private Event on the calendar with no access by the public apartfrom the timings of the eventPublic with Contact Details Hidden – Shows all booking details on the publiccalendar, but hides contact details of the customer.As an administrator for your venue you will see the booking details regardless of privacyoption.Special RequirementsThese are not visible by the public and appear against the booking in the printable list – idealfor assisting the caretaker when setting up the Hall or VenueAdmin NotesSimilar to Special Requirements but are for Administrator use only, these are hidden fromthe customer and members of the public.Booking StatusBookings can have a different status as follows:Requested – This is a booking normally made by the public from the online calendarand waiting to be confirmed. Once made, the calendar displays this as a requestedBooking until it is confirmed or cancelled.Confirmed – A confirmed booking will show on the calendar as confirmed – thebooking details will show depending on the Privacy option selected.Cancelled – A booking that has been cancelled. This will not show in the calendarsand will not flag as clashing with any potential bookings, but will still show up in theadministrators Bookings list.Terms & ConditionsIf you have entered a link to your T&Cs when setting up your account, you (or the customer)will need to tick this box before being able to proceed with the booking.Save & Send Booking EmailsOnce you have completed the booking, you can use the Save button to save the booking, or‘Save and Send’ to send an email to the customer. The email content will be loaded from theEmail Template you have set for the booking Status selected, with the booking detailsautomatically filled in. The calendar is then updated automatically.
How to Manage your Booking RequestsPeople visiting your online calendar will be able to view availability for particular dates for theevent they may want to hold there. They can make a booking request directly from the calendarand you will be automatically notified by email, and the calendar will update to show thatsomeone has made a booking request in that slot.You can then log in to view the booking request and decide if you want to confirm it. To do this,click on Bookings menu and then Edit the booking. This will now display the booking details. Youcan make any changes to the booking as necessary including the dates and times, then changethe Status from Requested to Confirmed.Click on Save and Send Booking Emails and the event holder will be automatically emailed to saythat their event has been confirmed. If you don’t want to send a message, select Save. Both ofthese will update the calendar automatically.If you are using the Invoicing module, any bookings that have an invoice assigned to them havethe ‘Invoiced’ amount highlighted in blue. This includes any ‘child’ bookings which you can viewif you click on the black arrow on the left of the bookings grid.Print out a list of your bookingsYou can view a list of bookings for a given date range using the Start Date From/To filters on theBookings menu. Your results will be listed in the grid. To include past dates, make sure thedropdown menu for ‘Show Bookings From’ is set to include the dates you want to view. You cansort the columns of the results or search for specific items using the column headings andmagnifying glass icons. Click on the Print Grid button and you will be given a printable list of yoursearch and filter results. Just click on the 'Print for your records' link at the top. You can alsochoose to show/hide admin notes from this grid using the tick box at the top of the page.SUPPORT – here to help!On your dashboard you will see a button for ‘Contact Us’ Click on thisbutton to log a support ticket for any questions you may have.
Invoice emails are sent to administrators with the Invoicing role assigned. Archived administrators will not receive any booking or invoicing emails. Alternatively, you can setup primary Booking and Invoicing email addresses which will receive these messages instead of the administrators. These are added in the ZPrimary Emails [ tab of this page.