Transcription
USDA User Profile Step-by-step(To be used together with the User Profile user guide found onhttps://wbt.access.usbank.com)1) t "Setup a new user" to create anew user IDSearch for an existing user ID by user ID orname to maintain an ID User Profile gives USDA APC/LAPC/LFPCs the ability to setupnew user IDs for APCs/LAPCs/LFPCs/AOs that sit below them intheir hierarchy real time in Access Online Simply log in to Access Online, select System Administration,select User Profile, and begin1
Creating a new user ID Fill out the required fields on the first screen to set up log-ininformation Required fields are indicated with a red asterisk (*)2
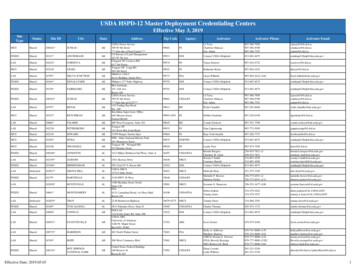
Please refer to the FEG matrix onthe User Profile Setup andMaintenance Overview or see belowto assign the correct FEG to the userthat you wish to createONLY use AccountingCode View 1 for USDAuser IDsWhen finished,hit “save”FEG matrixUSDA FEGs to be utilized in User ProfileUser TypeDescriptionPAGC APC-LAPCUSDA specific APC FEGAccount Setup and Maintenance, Transaction Managementand Allocation, Fleet reportingPAGC AO4USDA specific AO FEGNo Account Setup and Maintenance, no allocation andlimited reportingPAGC RPTReporting only FEGStandard reportingPAGC AO2View only APC FEGSET UP AND MAINT FLEET VEHICLE AND DRIVERFleet FEG1View only: Account Administration, TransactionManagement and Standard reportingRequired for fleet usersSET UP AND MAINT CH ACCT FLEET INFOFleet FEG2Required for fleet usersFleet reportingFleet FEG3Fleet reporting Purchase program can use PAGC APC-LAPC,PAGC AO4, PAGC RPT,PAGC AO2Travel program can use PAGC APC-LAPC, PAGC RPT, PAGC AO2Fleet program requires three FEGs for each AFPC or LFPC:o PAGC APC-LAPCo SET UP AND MAINT FLEET VEHICLE AND DRIVERo SET UP AND MAINT CH ACCT FLEET INFOo Optional for fleet reporting only: Fleet reporting3
Select View/Add processing hierarchynext. You will want to add theequivalent reporting hierarchy as well Click on “Save” and you are brought to this screen You should see the user ID log-in information that you set up atthe top of the screen Next step, add processing hierarchy to the user ID4
Search for the hierarchy that you wish to link to this user IDo APCs usually require one or multiple agent levels (level 4s)o LAPCs/LFPCs usually require one or multiple companylevels (level 5s)o AOs usually require one or multiple division or departmentlevels (level 6 or 7s)5
Select position to addhierarchyWhen finished,hit “AcceptHierarchy” Place a check mark in the box to the left of the hierarchy you wishto link to the user Click on the button, “Select position” It should then appear on the right side of the screen under“Selected Hierarchy position” Click on the button, “Accept Hierarchy”6
Use the same process for reporting hierarchySearch for the levels that you wish to link to the user7
Select position to addhierarchyWhen finished,hit “AcceptHierarchy” Select them with a check markAccept the hierarchyYou may also remove hierarchy from a usero Place a check mark in the hierarchy you wish to removeo Click on the button, “Remove position”o Accept Hierarchy Note: Remember to add new hierarchy to a user before removingold hierarchy. If a user ID has all hierarchy removed you willlose the ability to maintain that user because he/she is no longertied to your own hierarchy. See page 15 to remove a user ID altogether8
Click on this edit link to enable auser as an approval manager To enable a user as an approval manager (purchase APCs,LAPCs, AOs), click the login information edit link after linkinghierarchy to the user ID By selecting the Approval Manager box, cardholders will be ableto select and send approved transactions to this user for FinalApproval9
Place a check mark here if you wish toenable your user as an approval managerClick “save”when finished After placing the check mark in the Approval Manager box, click“save”10
Click here to add address, email, and emailnotification information Select the Contact Information edit link to add the address, email,and email notification detail11
Fill in the required fields indicated with a red asterisk (*)Select Data Exchange to allow users to schedule reports and whento be notified by email if a report is populated for the user12
Click “save”when finished Select “Pending Transaction Approval” to enable emailnotification when an approved transaction awaits the user’s finalapproval in their Approval Manager Queue Select when the user should be notified of approved transactionsin their queueo The default selection for USDA is weekly on Wednesdays Ignore statement notification for all product lines Hit “save”13
You will now see the User Profile Summary screen with yourupdates to the contact information Unless you need to maintain something, your request is completeand the user ID is created and ready to be used Note: Approval Manager updates load overnight14
Removing a user IDClick on this link to remove auser ID To remove a user ID, search for the user by user ID or name Click on the login information edit link15
Click “save”when finished Select “Removed” from the drop-down box under User AccessStatus to remove a user You may also choose to make a user “inactive” if you do not wishto permanently remove the user IDo A user cannot log-in to Access Online if their status is“inactive” Click on “save” and your request is completedFor further questions contact customer service, the technicalhelpdesk, or your account coordinator16
https://wbt.access.usbank.com) 2) Select User Profile 1) Select System Administration Select "Setup a new user" to create a new user ID Search for an existing user ID by user ID or name to maintain an ID User Profile gives USDA APC/LAPC/LFPCs the ability to setup new user IDs for APCs/LAPCs/LFPCs/AOs that sit below them in