Transcription
Getting StartedAutotask Integration 2008-2011, INNERAPPS, LLC. ALL RIGHTS RESERVED
Identity Syncronizer Autotask MMC Getting Started Guide InnerApps, LLC28366 Kensington Lane Suite 1Perrysburg, OH43551Phone 888.908.7962 Fax 419.931.0061
Table of ContentsIdentity Syncronizer – Getting Started Guide. 1Launching the Autotask Active Directory tab. 1Autotask User Properties . 2Enabling Client Portal . 3Enabling Taskfire . 4Creating a New User . 5Configuring New User Settings . 8Unprocessed Transactions . 9Resetting Passwords. 9User Changes – Enable, Disable, Delete . 9User Data Syncronization . 10
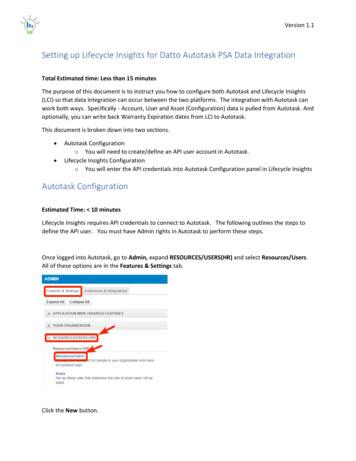
USERS GUIDEIdentity Syncronizer – Getting Started GuideLaunching the Autotask Active Directory tabTo launch the Identity Sycnronizer Autotask tab you should start the “Active Directory Usersand Computers” (ADUC) tool as you would normally. This can be found in on any domaincontroller under Administrative Tools on the start menu or by typing “dsa.msc” into Start Run.Once ADUC has opened, navigate to the user you wish to administer or right click on thedomain and select “Find” to search for the user. Access the properties for the user by eitherdouble clicking the user or you my right click the user and select properties from the contextmenu as shown in the image above.After selecting the properties option, the Properties window for that use will be displayed.You will notice many tabs displayed along the top of this property window. Each tabrepresents a different configuration item for that user. Look for the tab titled “Autotask” andselect that tab by left clicking it.1
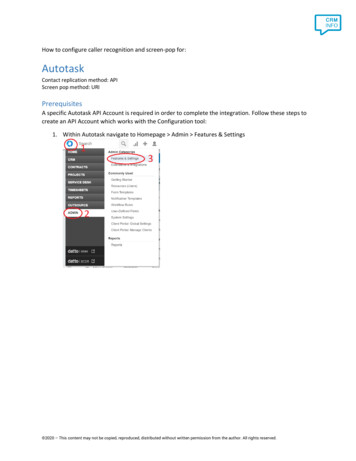
USERS GUIDEAutotask User PropertiesOnce the Autotask tab is selected you will a window similar to the onebelow:1.User Name: This displays the User Name for the currently selected user. This is alsoknown as the SAMAccountName.2.Password: If enabled, this field specifies the current password for the user. Thispassword field is only enabled if the “Syncronization” check box is unchecked.Passwords entered here will not be displayed but will show asterisk (*) characters.3.Disable Account: When checked, this user will be disabled for Autotask . Ifunchecked then this user is currently enabled for Autotask. Please note: The userwill not be disabled within Active Directory by checking this box, only for Autotask functionality.4.Syncronization: When checked, the value entered in the password field will belocked to the value stored in the Identity Syncronizer database. When uncheckedthe password field will be unlocked and can be edited. This password will be sent toAutotask when the transaction is submitted. This will not change the password forWindows and Active Directory.2
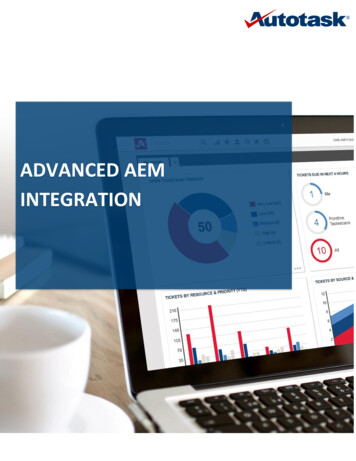
USERS GUIDEEnabling Client PortalOnce a user has been enabled for Autotask , that user will automatically be added to yourAutotask account as a contact record. Once enabled, you may also select to enable ClientPortal access, or Task fire access by selecting from the Security Level options displayed.5.Standard Client Access Security Levels – These options enable the Client Accessportal feature for this user.a.Basic – This use can only see their tickets and has basic accessto create new requests and add notes and attachments.b.Advanced – This user can see all tickets (including on ChildAccounts) for their organization, and can fully create newrequests, notes, attachments, and can also e-mail theirsupport team.c.Manager – Has all of the access of the Advanced level but canalso see costs, hours, and invoice and contract reports.3
USERS GUIDEEnabling Taskfire 6.Taskfire Security Levels – By selecting one of these options, the user will be enabled forTaskfire.a.Resource – Can access all tickets and projects for the Account, Create newReqeusts, and View/Add notes, attachments, issues, costs, and schedule.b.Administrator – Has all the access of the Resource level but can also manageQueues, Request Types, Vendors, Configuration Items, Invoices, and other costreports.c.Custom Security Level - If the none of the standard security levels meet yourrequirements, you can create a custom security level for the Client Access Portalwithin Autotask. See the appropriate Autotask user guide for more information.4
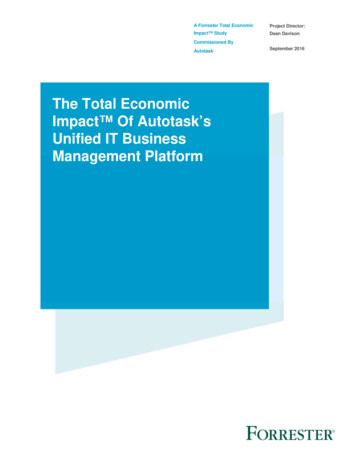
USERS GUIDECreating a New UserWhen creating a new user in Active Directory, you can create a new Autotask portal user as part of thisprocess using Microsoft’s standard ADUC tools. To begin, create a new Active Directory user as you wouldnormally. The steps have been outlined below:Within Active Directory User and Computers, right-click in the appropriate Organizational Unit (OU) andselect the option for New User from the context menu:The New User dialog will be displayed and should be filled out as you normally would for any user. Thefirst page is general user information including Name, Logon, etc. Click Next to continue.5
USERS GUIDEThe next page of the dialog will allow you to specify the user’s password and other standard options.These should be filled out as normal. Click Next to continue.The last page of the dialog will provide you with a summary of the user being created. normal. Click Finishto create the user.6
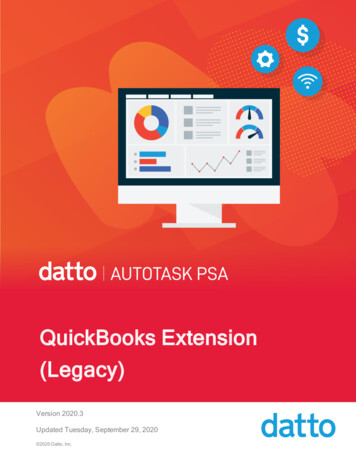
USERS GUIDEOnce the user has been created, right click on the new user and select “Properties” from the context menuto display the property sheet for that user. Select the Autotask property sheet. The user should notcontain any data and should be disabled as shown in the image below:7
USERS GUIDEConfiguring New User SettingsTo create a user in Autotask , check the box that says “Account Enabled”. By selecting this box only and clicking OKthe user will be created in Autotask as a contact record. If no other options are selected, the user will not have anyClient Portal or Taskfire rights.A user configured in this way will be setup in Autotask as a contact for Tickets, Projects, and other items but will notthemselves have access to the system.8
USERS GUIDEUnprocessed TransactionsWhen displaying a User’s property page you may occasionally notice that the property sheet may appear locked with astatus message at the bottom of the screen indicating that there are unprocessed transactions for this user.This is indicating that there are uncommitted changes that have not yet been completed. This message will not bedisplayed once the pending change has been completed.The property sheet will automatically attempt to refresh the screen every 30 seconds. Once the transaction processesyou will be able to manage the user’s settings.Resetting PasswordsPassword changes made by the user at their workstation using standard Windows procedures will automatically besynchronized to Autotask immediately upon the user’s request. Should it become necessary to reset the User’spassword, you may do so by using the “Reset Password” function within Active Directory.Right click on the user and select “Reset Password” from the context menu that is displayed. You will be promped forthe new password and this will be automatically synchronized to Autotask .User Changes – Enable, Disable, DeleteIdentity Syncronizer will automatically keep Autotask updated when changes are made to users that are configuredfor access. When a user is enabled or disabled within Active Directory (even if they are disabled for entering apassword incorrectly) – this change in status will be automatically replicated to Autotask .These changes arereplicated whether they are system generated, user generator, or are automatically generated by Windows.If a user is deleted from Active Directory, that user will be automatically removed (if possible) from Autotask . IfIdentity Syncronizer attempts to remove a user from Autotask but is unable to do so (due to tickets, or projectsattached to that user), it will simply disable the user instead.9
USERS GUIDEUser Data SyncronizationIdentity Syncronizer automatically keeps Autotask updated with changes in user information stored inActive Directory. This includes all of their address, telephone, and organizational information stored onthe tabs within the Users’ Property sheet.The General, Address, Telephones, and Organization tabs are all synchronized to Autotask When a change to this information is made within Active Directory, Identity Syncronizer willautomatically send these change to Autotask to keep that information fully up-to-date with changes thatare occurring.The information that is synchronized can be restricted by configuring the Autotaskintegration (see the Installation Guide) to remove certain data elements that you do not wish to havemaintained.10
See the appropriate Autotask user guide for more information. USERS GUIDE 5 reating a New User When creating a new user in Active Directory, you can create a new Autotask portal user as part of this process using Microsoft's standard ADUC tools. To begin, create a new Active Directory user as you would