Transcription
QuickBooks Extension(Legacy)Version 2020.3Updated Tuesday, September 29, 2020 2020 Datto, Inc.
Table of ContentsThe Autotask QuickBooks Extension (Legacy) for desktop4Initial setup7Enabling Autotask access to QuickBooks11Mapping lines of business to QuickBooks classes15Importing QuickBooks customer records into Autotask PSA17Importing or updating data21System settings that impact QuickBooks users33Multi-currency and QuickBooks39Transferring invoices40Mapping Autotask billing items to QuickBooks43The Item Mapping page: Selecting naming convention for transferred billingitems45Populating Autotask PSA lists with QuickBooks items54Using the tilde for mapping sub-items59Mapping to a QuickBooks inventory item61Assigning a QuickBooks financial account63Invoice template setup for transfer to QuickBooks65Invoice field map68Setting invoice preferences for QuickBooks76Calculating taxes in Autotask PSA instead of QuickBooks? (US versions of QuickBooks only)78Transfer process87 2020 Datto, Inc. Page 2 of 128
Parent-subsidiary and job-level invoicing90Inventory synchronization and purchase order transfer93Importing an inventory file into Autotask95Synchronizing inventory98Transferring and updating purchase orders100Purchase order data mapping104Transferring expense reports110Mapping resources111Mapping expense categories to QuickBooks classes and accounts113Transferring expense reports to QuickBooks (legacy method)118Transferring the payroll summary report122Mapping resources123Mapping payroll time categories125Transferring payroll to QuickBooks126Transfer logs128 2020 Datto, Inc. Page 3 of 128
The Autotask QuickBooks Extension (Legacy) for desktopOverviewAutotask customers who use the QuickBooks Extension run their business in Autotask,but do their financial accounting in QuickBooks Desktop.In Autotask, theylManage their customers, vendors and prospectslManage their sales and forecastinglSet up the Autotask contracts that govern the billing of products and serviceslSchedule and manage services deliverylTrack both billable and non-billable timelProcure products and track inventorylReport on travel expenseslApprove, post and invoice all billable itemsQuickBooks Desktop picks up where Autotask leaves off. It manages Inventory andPurchasing, Accounts Receivable, Accounts Payable and Payroll:lYou transfer and synchronize Purchase Orders and Inventory from Autotask toQuickBooks, and pay your vendors from there. Refer to "Inventory synchronizationand purchase order transfer" on page 93lYou transfer the invoices generated in Autotask, and manage your receivables inQuickBooks. Refer to"Transferring invoices" on page 40lYou transfer expense reports generated in Autotask, and reimburse resources fortravel expenses from QuickBooks. Refer to "Transferring expense reports" onpage 110. 2020 Datto, Inc. Page 4 of 128
You track resource time in Autotask, generate a Payroll Summary report and trans-lfer the hours into the QuickBooks Timesheet to manage payroll. Refer to "Transferring the payroll summary report" on page 122.All transfer options work independently. Information is always sent from Autotask toQuickBooks, not the reverse.NOTE If you are considering the QuickBooks Online Integration, click to view a comparison of the QuickBooks Extension vs QuickBooks Online Integration.Supported QuickBooks versionsThe QuickBooks Extension supports English Internet Explorer in 32-bit mode inWindows only.NOTE The Contracts module supports other browsers, but Internet Explorer isrequired to transfer invoices, purchase orders, expense reports and payrollsummary reports to QuickBooks.The Autotask QuickBooks extension works with the following versions of QuickBooks Desktop:lUS: Pro and Premier 2019 and 2020; Enterprise 19.0 and 20.0lUK: Premier and Pro Edition 2017 and 2020; Enterprise 14.0lCanadian: Pro and Premier 2019 and 2020; Enterprise 19.0 and 20.0lAustralian: Reckon 2016 and 2017The Autotask Intuit QuickBooks Online Integration works with the following:lQuickBooks Online (English Autotask and English QuickBooks Online only)NOTE Datto Partner Support does not provide support for virtualized and remotelyhosted QuickBooks desktop platforms. You must be transferring to a localized version on your machine. 2020 Datto, Inc. Page 5 of 128
QuickBooks OnlineAutotask offers a separate integration with English language versions of QuickBooks Online. This integration uses the Autotask to QuickBooks Online Integration developed by Autotask on the AppConnect platform hosted by Intuit.Autotask provides support for the new integration.The Autotask QuickBooks Online Integration currently does not support all the features of the standard Autotask QuickBooks Integration. It consists of three separateapps, Autotask Invoices to QuickBooks Online, Autotask Expenses to QuickBooksOnline and Autotask Purchase Orders to QuickBooks Online.lThe Invoices integration app will automatically send Autotask invoices, customer information, and billing codes to QuickBooks Online. It can automatically create customers from shared invoice information. If a billing codethat you send to QuickBooks Online does not match to a QuickBooks Onlinebilling item, a notification is sent.lThe Expenses integration app will transfer Autotask Expense Reports toQuickBooks Online where they will be turned in to bills. The AutotaskResources associated with the Expense Reports will be transferred to QuickBooks Online as vendors.lThe Purchase Order Transfer application automatically sends submittedAutotask purchase orders that fall within the selected date range and have ablank purchase order field to QuickBooks Online as bills. QuickBooks Onlinewill treat Autotask resources as vendors in QuickBooks Online.For additional information about the QuickBooks Online Integration, refer to download the Autotask to QuickBooks Online Integration PDF from Autotask OnlineHelp, User Guides.If you are interested in accessing the Autotask QuickBooks Online Integration,please contact your Autotask Account Manager. 2020 Datto, Inc. Page 6 of 128
Initial setupSECURITY Access to your QuickBooks Company fileIMPORTANT The QuickBooks Web Connector version is now available to all usersof the legacy version of QuickBooks. We urge you to transition to the new version assoon as possible. We will sunset support for the legacy version and InternetExplorer with the release 2020.4.For information about QuickBooks Web Connector, refer to QuickBooks Extension(New).Once the QuickBooks Extension has been activated for your database, and before yourfirst transfer, we recommend you complete the following initial setup steps.IMPORTANT These instructions apply to the Autotask QuickBooks Extension integration for the desktop version of QuickBooks. If you are working with QuickBooksOnline, refer to The Autotask QuickBooks Online Integration.If you are integrating with a new QuickBooks installation, be sureyour QuickBooks includes the minimum requirementsYour QuickBooks installation must include at least one Vendor account and two taxcodes:lIn the US: Tax and NonlIn Canada and the UK: S and ElIn Australia: GST and FREAn existing, operational QuickBooks installation will most likely already have theserequirements in place.Set up required folders for QuickBooks DesktopThe following folders must exist on the customer's computer for the integration to work: 2020 Datto, Inc. Page 7 of 128
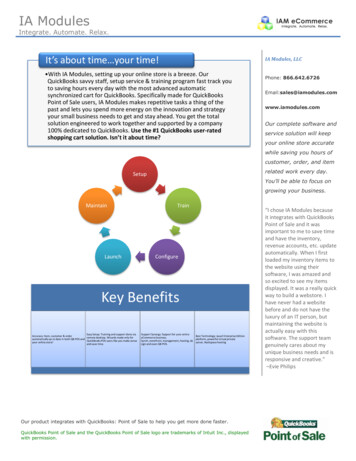
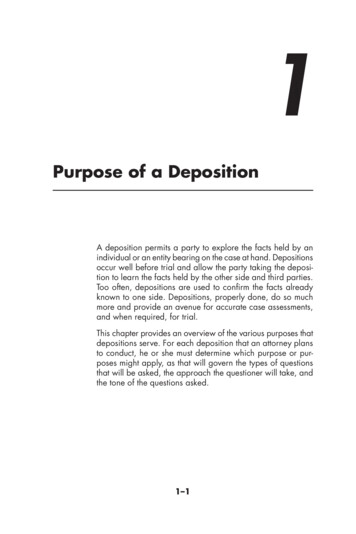
lC:\Program Users\*your Autotask\AutotaskConnect\QuickBooks\LogsIf the folder is not there:1. Ensure the user has admin permissions on their computer. If not, they will need tobe updated.2. If they are an admin, when creating the folder structure ensure they have correctpermissions for the folder structure. To set the permissions on the folder structure,right-click the Autotask Folder click Properties Security Tab set the permissions for the currently logged in user to Full Control (see below).To update the permissions on the folder, select the name of the user and thenselect the correct permission.3. Sometimes permissions cannot be correctly set for the folder or the user becauseof group policies implemented by the customer's company. If this is the case, theywill need to work with their internal IT department to ensure their user has full control, and is an admin on their machine. 2020 Datto, Inc. Page 8 of 128
Check the ActiveX browser setting "Initialize and script ActiveX controls not marked as safe for scripting"To prevent possible issues with data display and transfer, confirm that this setting isEnabled: Internet Explorer Tools Internet Options Security tab Trusted sites Custom Level. ActiveX controls and plug-ins.Allow Autotask to access your QuickBooks company fileIf you do not manually enable the required permissions, you will be prompted the firsttime Autotask attempts to access your QuickBooks file. Refer to "Enabling Autotaskaccess to QuickBooks" on page 11.Import QuickBooks customer records to AutotaskYou will create duplicate customer records in QuickBooks if the Autotask "CompanyName" field does not exactly match the QuickBooks "Customer Name" field. The bestway to avoid duplication is to import your customers from QuickBooks to Autotask. Referto "Importing QuickBooks customer records into Autotask PSA" on page 17.Review the system setting settings that impact data transfer toQuickBooksRefer to "System settings that impact QuickBooks users" on page 33.NOTE Be sure that all users who will be using the QuickBooks Extension areaware that the extension is fully supported on Internet Explorer only. Refer to "TheAutotask QuickBooks Extension (Legacy) for desktop" on page 4.Review your browser settingsMake sure that your browser is configured properly. Refer to System Requirements andConfigure Your Browser Settings.Map lines of business to QuickBooks classesIf Organizational Structure is enabled, map each division line of business pairing to aQuickBooks class. Refer to "Mapping lines of business to QuickBooks classes" onpage 15. 2020 Datto, Inc. Page 9 of 128
For expense mapping, you can choose to use either the line of business mapping orcontinue to use the department name. Refer to "Mapping expense categories to QuickBooks classes and accounts" on page 113. 2020 Datto, Inc. Page 10 of 128
Enabling Autotask access to QuickBooksSECURITY Security level with permission to configure QuickBooksRequired security levelsAutotask must have access to your QuickBooks company file to transfer purchaseorders, invoices, expense reports or the payroll summary report. To enable this access,you must be logged into both QuickBooks and Autotask with Administrator securitylevel.NOTE Once the QuickBooks Extension is configured, you will need access to theAutotask Contracts module to transfer a purchase order, invoice or expense report,and access to the Reports module to transfer the Payroll Summary Report.If you experience data display or transferissues.Occasionally, QuickBooks Extension users run into data display or transfer issues during setup and when data transfer begins; for example, the Item Mapping page does notdisplay data, or an invoice transfer appears to be processing, but no invoices are transferred. In most cases, one of the following two solutions will resolve the issue:lCheck the ActiveX browser setting "Initialize and script ActiveX controls notmarked as safe for scripting", as described in "Initial setup" on page 7. This settingmust be enabled to ensure correct data display and processing.lGrant “Full” permission on the following folder to all resources who will be performing the transfer of invoices, expense reports, purchase orders, or payroll datafrom Autotask to QuickBooks: C:\Program Files\Autotask\AutotaskConnect\QuickBooks 2020 Datto, Inc. Page 11 of 128
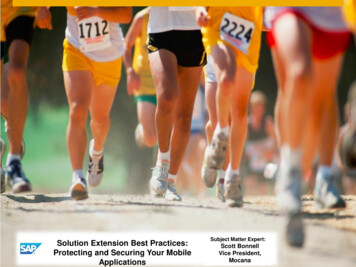
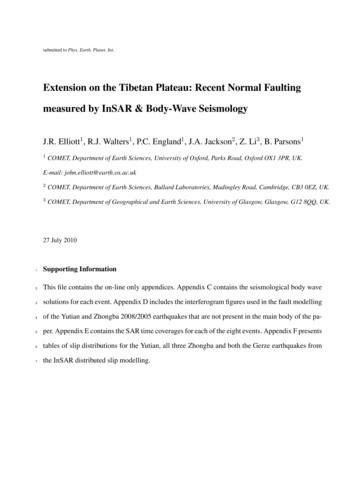
NOTE These solutions also apply to Terminal Server users.If neither of these solutions work for you, the topic Troubleshooting Guide: What to dowhen Invoice Process Window "Hangs" or I can't access the Item Mapping / ExpenseMapping Page? provides a more detailed, step by step analysis. Or, contact AutotaskCustomer Support.To enable access1. The first time Autotask tries to access your company file (for example when youopen the Item Mappings page or attempt to transfer an invoice) QuickBooks willdisplay the following authorization window.2. Select Yes, whenever this QuickBooks company file is open. Access to personaldata is not required.3. Click Continue and Done on the Access Confirmation pop-up window.You can now proceed with the action that initiated the file access. 2020 Datto, Inc. Page 12 of 128
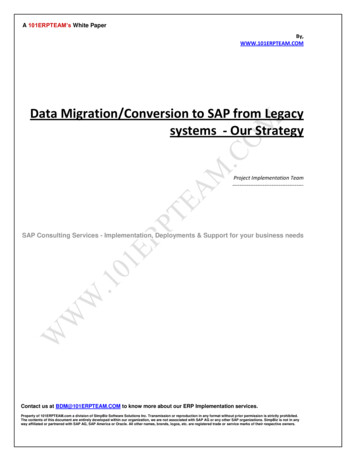
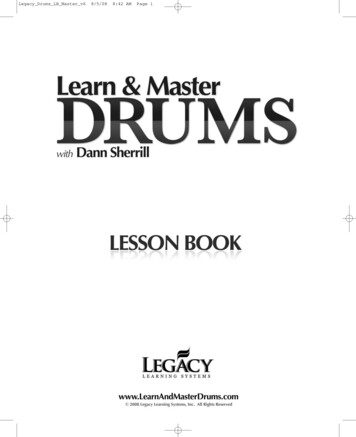
Autotask Electronic Transfer item in QuickBooksOnce you have configured access permissions, an Autotask Electronic Transfer itemwill be listed on the Preferences Integrated Applications window that can beaccessed from the QuickBooks Edit menu.IMPORTANT Make sure the Don't allow any applications to access this companyfile check box is cleared! If it is selected, you will receive an application error whenyou transfer an invoice.Click Properties to view the access rights settings: 2020 Datto, Inc. Page 13 of 128
2020 Datto, Inc. Page 14 of 128
Mapping lines of business to QuickBooks classesSecurity and navigationSECURITY Security level with permission to configure QuickBooksNAVIGATION Admin Extensions & Integrations QuickBooks Exten-sion Line of Business MappingIMPORTANT This page is only displayed in Internet Explorer!BEFORE YOU BEGIN For Autotask to support classes, Organizational Structuremust be enabled, and division line of business pairings must be set up. Refer toSet Up Organizational Structure.On the Line of Business Mappings page, map your Autotask division line of businesspairings to QuickBooks classes. When billing items are transferred to QuickBooks, theclass that gets assigned is based on their A
l UK: Premier and Pro Edition 2017 and 2020; Enterprise 14.0 l Canadian: Pro and Premier 2019 and 2020; Enterprise 19.0 and 20.0 l Australian: Reckon 2016 and 2017 The Autotask Intuit QuickBooks Online Integration works with the following: l QuickBooks Online (English Autotask and English QuickBooks Online only)